Wednesday, September 01, 2021

Cherry Crumble


This recipe by Jessica Seinfeld is not low-carb. I could try to justify this by saying that cherries are anti-inflammatory and full of antioxidants, but honestly, that just sounds like I’m taking all the fun out of cherries! The truth is simply that I didn’t want to let cherry season go by without making something with fresh cherries, and this dessert looked really good! I loved it, but my kids didn’t (I think that the only kind of cherries they like at this point are maraschino cherries, which I don’t even keep on hand). 

For the cherries 
4 cups pitted cherries (halved if large) 
⅓ cup granulated sugar 
2 Tbsp. all-purpose flour 
1 tsp. grated lemon zest 
1 pinch kosher salt
2 Tbsp. lactose-free butter, cut into small pieces 

For the crumble 
1½ cups all-purpose flour (I used white whole wheat flour) 
⅓ cup granulated sugar 
⅓ cup dark brown sugar 
¼ tsp. grated nutmeg 
1 pinch kosher salt 
½ cup cold lactose-free butter, cut into small pieces 

Preheat the oven (with the oven rack in the middle) to 350°F. 

For the cherries, in a large bowl, toss together the cherries, sugar, flour, lemon zest, and salt. Pour into a shallow 2-quart baking dish. Dot the cherries with the butter pieces. 

For the crumble, stir together the flour, granulated sugar, brown sugar, nutmeg, and salt. Add the butter and use your fingertips to work it into the mixture until crumbly. Sprinkle over the cherries. Bake 40 to 45 minutes, until the cherries bubble and the crumble topping is golden brown.


Porc et vermicelles de chou rôtis à la coréenne

Quand je lui ai dit que je voulais manger moins de glucides, tout en déplorant les recettes de “nouilles” de courgettes et de “riz” de chou-fleur, mon amie la Mère des Zygotos m’a donné cette recette de Ricardo où le chou remplace les nouilles. J’étais partante pour essayer! Et bon, en conclusion, on a *adoré* le porc, et les légumes marinés étaient corrects, mais le chou n’était pas à notre goût. C’était un bel essai, mais j’aurais vraiment préféré du riz à la place du chou (du riz brun serait mieux que du riz blanc, quand même, côté glucides). 

À noter que j’avais doublé les quantités de porc, et j’ai eu l’impression que les assaisonnements auraient suffit pour davantage de viande, peut-être 3 livres. Donc avec les quantités ci-dessous, vous pourriez sans doute augmenter la quantité de porc à 1 ½ livre. 


Pour les légumes marinés 
1 courgette, coupée en rondelles d’environ 5 mm (¼ po) 
1 poivron, épépiné et coupé en lanières d’environ 5 mm (¼ po) 
1 c. à soupe de cassonade 
1 c. à soupe d’huile de sésame grillé 
1 c. à soupe de mirin 
1 c. à soupe de vinaigre de riz 

Pour le chou 
1 ¾ lb. de chou vert, émincé (1 petit chou) 
1 c. à soupe d’huile de sésame grillé 
1 c. à soupe d’huile végétale 

Pour le porc 
1 lb. de porc haché maigre
¼ tasse de sauce soya 
2 c. à soupe de cassonade 
2 c. à soupe de vinaigre de riz 
2 c. à soupe de sauce hoisin 
2 c. à soupe d’huile de sésame grillé 
2 c. à thé de pâte de piment fermenté ou de sriracha (je recommande ½ c. à thé) 


Pour les légumes marinés 
Dans une casserole d’eau bouillante salée, blanchir les légumes 1 minute. Égoutter. Refroidir sous l’eau froide. 

Dans un bol, mélanger au fouet la cassonade, l’huile de sésame, le mirin et le vinaigre de riz. Ajouter les légumes et bien enrober de la marinade. Mettre de côté. 

Pour le chou 
Placer deux grilles au centre du four. Préchauffer le four à 450 °F. 

Déposer le chou sur une plaque antiadhésive. Ajouter les huiles, saler légèrement et poivrer. Répartir uniformément sur la plaque. Cuire au four 30 minutes ou jusqu’à ce que le chou soit rôti en remuant à mi-cuisson. 

Pour le porc 
Entre-temps, déposer le porc sur une autre plaque antiadhésive ou une plaque tapissée d’un tapis de silicone. À l’aide d’une cuillère de bois, émietter la viande. Saler légèrement et poivrer. Ajouter le reste des ingrédients et bien mélanger. Cuire au four, en même temps que le chou, 20 minutes ou jusqu’à ce que la viande soit bien dorée en remuant à mi-cuisson. (J’ai fait cuire le chou seul 10 minutes, puis j’ai ajouté le porc au four, et 10 minutes après ça, j’ai mélangé les aliments et remis au four 10 minutes.) 

Répartir les vermicelles de chou et la viande dans des bols. Garnir de légumes marinés et de coriandre, si désiré.


Tuesday, August 31, 2021

Poitrines de poulet grillées, salsa de melon d'eau

J’ai trouvé cette recette dans Coup de Pouce, mais elle n’est malheureusement pas sur leur site web. J’ai vraiment aimé ce plat! C’était simple à faire, très estival, et délicieux. Même qu’après y avoir goûté, le Renard (qui aimait déjà le melon d’eau) a déclaré qu’il aimait maintenant les concombres ET l’oignon rouge! Gagnant, comme plat! Veuillez noter que j’ai découpé les grosses poitrines de poulet du commerce en deux sur la longueur, question d’avoir non seulement des portions plus raisonnables, mais aussi du poulet qui cuit plus vite (dans une poêle au lieu du grill, chez moi). On en a eu environ 8 portions. 

2 tasses de melon d’eau coupé en dés 
1 concombre anglais coupé en dés (je l’ai pelé) 
½ tasse de coriandre fraîche, hachée 
1/3 tasse d’oignon rouge haché finement 
1 c. à soupe de miel liquide 
1 c. à thé de zeste de lime râpé 
2 c. à soupe de jus de lime 
4 poitrines de poulet désossées (voir note plus haut) 
1 c. à soupe d’huile d’olive 
sel et poivre, au goût 

Dans un grand bol, mélanger délicatement le melon d’eau, le concombre, la coriandre, l’oignon, le miel, le zeste de lime et le jus de lime. Saler et poivrer. Réserver. 

Régler le grill (voir note plus haut) à puissance moyenne. Badigeonner les poitrines de poulet d’huile d’olive. Saler et poivrer. Mettre les poitrines de poulet sur la grille huilée et fermer le couvercle du grill. Cuire 10 minutes ou jusqu’à ce que les poitrines soient marquées et qu’elles aient perdu leur teinte rosée à l’intérieur (les retourner à mi-cuisson). Déposer le poulet grillé dans une assiette de service et garnir de la salsa réservée.


Sunday, August 22, 2021

Golden Milk Chia Pudding


It’s been hard finding low-carb breakfast options, given that I love muffins and banana bread and baked goods in general! I did try Zero Net Carb bread, and it’s… not horrible? I mean, it won’t get any color on it when I toast it (because it’s the sugar content that would normally make it go darker), and if I’m eating it spread with peanut butter, it’ll do. But I have to admit I don’t like it in sandwiches (I tried both grilled cheese and fried egg sandwiches), and it’s not something that I enjoy eating. To be honest, I typically can’t quite finish the sandwich because I get really sick of it. I do think it could be something to buy once in a while, though, to help get me through a breakfast rut. And it comes in different flavors, so maybe I could explore those options at a later date. 

That being said, one of my favorite breakfast options these days is chia puddings. Chia seeds contain protein and fiber, so they help keep me full until lunch. They also contain calcium and omega-3s, so they are considered very healthy. I really enjoyed this raspberry coconut chia pudding from Ricardo, which I served with sliced bananas, raspberries, and pumpkin seeds. 


I also really enjoyed this golden milk pudding with orange and ginger from Vegan Richa. Turmeric has known anti-inflammatory properties, and inflammation is a symptom of PCOS, so this felt more targeted to me. That being said, as much as I liked it, this pudding (as well as the raspberry one above) is made with coconut milk, which is high in saturated fat. Next time, I will try using a plant-based milk, such as coconut milk beverage, to see if I can achieve a similar (or at least pleasant!) consistency with less fat. I garnished this pudding with coconut chips and raspberries. The quantities below yield 2 servings.

1 can coconut milk (or 1 1/3 cup non-dairy milk of choice?), divided 
1 tsp. turmeric 
¼ tsp ground ginger 
¼ tsp ground cinnamon or cardamom or other spices 
a good dash of black pepper 
1 Tbsp. orange preserves (or zest of half a small orange) 
2 Tbsp. maple syrup, or to taste 
6 Tbsp. chia seeds 

Heat 1 cup of the coconut milk, turmeric, ginger, cinnamon, pepper over medium heat until just boiling. Take off heat. 

Add rest of the coconut milk, orange preserves, maple syrup and chia seeds and mix vigorously. Taste and adjust sweet, flavor if needed. Let it sit to cool completely for 10 to 15 minutes. 

Whisk the mixture vigorously again. The chia seeds should have expanded a bit and should distribute well. You can directly serve at this point, or pour into serving containers and chill overnight for more hydrated chia seeds and thicker pudding (this is my preference).


Sunday, August 15, 2021

Phi Kind


As you know, I’ve been searching for options with lower carbs. And of course, algorithms picked up on this, so eventually I saw ads for Phi Kind Organics, a small company that makes low-carb chocolates with healthy, ethical ingredients (vegan and keto-friendly, but not allergy-friendly). They are sweetened with erythritol and stevia, which have a low glycemic index value. Honestly, they looked delicious, so I decided to try them! I got a sampler similar to this with five flavors of truffles: golden coconut milk, matcha ginger, almond butter cookie dough, strawberry coconut butter, and cherry almond butter. 

First, I need to admit it: I was really surprised by how small each box was! It’s not false advertising, in the sense that the product description does state a weight; it’s just that I hadn’t realized how dainty these are. That being said, they are well-packaged (albeit with a lot of plastic) and quite beautiful. 

The golden coconut milk truffles were delicious! It was just spiced enough while still being mellow.


The matcha ginger, though, was a bit overpowering, even though I love ginger. Perhaps it’s just not what I’m looking for in an evening treat? 


The almond butter cookie dough, with house-made almond butter, felt less refined, but not at all in a bad way. I didn’t really get a “cookie” vibe from this, though the almond butter filling is denser than that of the other flavors. 


The strawberry coconut butter truffles were melty at room temperature (my thermostat was set to 79 °F and the other truffles were fine). They taste really good, though I felt like the coconut butter was subduing the strawberry even while it was making the truffles extra creamy. 


As for the cherry almond butter, they were really flavorful and delicious! 


While these truffles are low in carbs, they are still a bit high in overall calories (50 per little truffle). Even if I were to dole them out in the evening while watching television, as I like to do with chocolate (instead of sneaking one during the day on occasion as I’ve been doing with these to make them last), I’d definitely be going through a whole package of four truffles in one evening, because it’s only four bites. And then they would be gone so very fast! Additionally, they are fairly expensive – even with the 10% off coupon I used, including shipping and taxes, it came out to $48.23 for 20 small truffles. The price may very well be justified based on the ingredients, but I can’t spend almost $10 on chocolate *daily*. So as much as I like them (love them, really), I don’t think that I’ll be buying them again.

Friday, August 13, 2021

Green Dip


Here’s a quick recipe for a delicious green dip that is a) full of vegetables, and b) eaten with vegetables. And, best of all, the Little Prince really liked it! He ate it heartily. I now serve dips and sauces in little individual melamine cups like these – they don’t break, there’s no double-dipping, and they’re just overall more fun. 

I served this green dip with carrots and broccoli; il would also be good with cucumber, sugar snap peas, cauliflower, or asparagus, for example. Or you could serve it with potato chips or pita chips. 

5 medium scallions, trimmed 
1/3 cup drained and rinsed canned cannellini beans 
1/3 cup roughly chopped chives 
¼ cup mayonnaise (or vegan mayonnaise or lactose-free yogurt) 
3 Tbsp. olive oil 
2 Tbsp. fresh lemon juice (from 1 lemon) 
½ tsp. kosher salt 
2 cups packed baby spinach 

Heat an oiled grill pan over medium-high. Add scallions to hot pan and cook, flipping once, pressing down with a spatula occasionally, until grill marks appear and scallions are charred in spots, 1 to 2 minutes per side. (Alternatively, broil scallions in oven on a baking sheet until charred in spots, about 3 minutes – this was my preferred method.) Transfer to a cutting board and roughly chop; you should have a heaping ⅓ cup. 

Add beans, chives, mayonnaise, oil, lemon juice, and salt to a blender or food processor and blend until smooth, about 30 seconds. Add spinach and chopped scallions; blend, stopping to push contents down and scrape sides of bowl as needed, until smooth and creamy, about 2 minutes. 

Dip can be made up to 2 days in advance; cover and refrigerate.

Thursday, August 12, 2021

Cloud Bread


I made cloud bread for the first time. It’s basically something that you can use instead of bread, but it’s more like a light omelet. It’s meant to be used in a sandwich, sort of like this keto bread. The thing is that I don’t really have it in me to make “bread” and then ALSO make a sandwich at the same meal. I think I’d do better at making this bread ahead of time (I don’t know if it freezes well, but cooked eggs usually do, right?). I’d suggest a BLAT, a tuna melt, or a grilled turkey-apple sandwich. The original post also has flavor variations for the cloud bread itself, like pumpkin spice, cinnamon raisin, or everything bagel. The one I made was quite good – I just need to remember to actually use it for sandwiches! Come to think of it, it would make a good substitute for a soft tortilla, too… 

This recipe yields 4 small breads. 

3 large eggs 
½ tsp. baking powder 
3 Tbsp. (1.5 oz.) lactose-free cream cheese 
¼ tsp. kosher salt 
1/8 tsp. onion powder 
2 tsp. white or black sesame seeds 

Arrange a rack in the center of the oven and heat the oven to 300 °F. Line a rimmed baking sheet with parchment paper. 

Separate 3 large eggs, placing the whites in a large bowl or bowl of a stand mixer, and the yolks in a smaller bowl. 

Add baking powder to the egg whites. Beat with an electric hand mixer or a stand mixer fitted with a whisk attachment on medium-high speed until stiff peaks form, about 5 minutes for a hand mixer or 2 minutes for a stand mixer. 

Place 3 tablespoons cream cheese in a small microwave-safe bowl and microwave in 10-second bursts until very soft, about 30 seconds total. Stir until smooth and let cool slightly. 

Add the cream cheese, kosher salt, and onion powder to the egg yolks and stir to combine. Add the egg yolk mixture to the whipped egg whites and gently fold until there are no visible streaks and completely combined. 

Dollop a quarter of the batter (about ¾ cup) onto the prepared baking sheet and, using a spoon, gently flatten into a round that's about 6-inches wide. Don’t fuss too much, it doesn’t have to be perfect. (Mine turned out oval for some reason, perhaps because my egg whites were a bit too loose?) Repeat with the remaining batter. Sprinkle each round with ½ teaspoon sesame seeds. 

Bake until golden brown, 25 to 28 minutes. Let cool on the baking sheet for at least 20 minutes (the “breads” will firm up slightly as they cool). Gently lift from the parchment paper.


Saturday, August 07, 2021

Raw Tuxedo Cheesecake Brownies


This is another recipe from Practically Raw Desserts (where I got the awesome marzipan buckeye bars). My only beef with the name here is what I expect from a brownie, because there is no “cake” at all here, only a mixture of nuts, dates, and cocoa – to me, that’s more like a gluten-free pie crust, not a gluten-free brownie. But hey, it’s raw too, so I guess a cake is not realistic. I was already used to cashew cream for vegan cheesecake, though, so that didn’t throw me! 

Once you know what to expect, these were really good. They are best served straight from the fridge (not the freezer), so that the “cheese” part has a creamy texture. And of course, they’re not too sweet, so that’s what I was looking for! The Fox wasn’t too fond of them, but everyone else liked them. 

For the “brownie” layers 
1 cup dry pecans 
1 cup dry walnuts 
1/3 cup cacao powder 
1/8 tsp. sea salt 
¾ cup pitted dates (I recommend chopping them, and perhaps softening them in hot water) 

For the “cheesecake” layer 
1 cup cashews, soaked for 2 to 4 hours and drained (I soaked them overnight) 
¼ cup water or nondairy milk of choice 
2 Tbsp. melted coconut oil 
2 Tbsp. lemon juice 
 ½ tsp. vanilla extract 
1/8 tsp. sea salt 
30 drops liquid stevia (or equivalent sweetener of choice – I used 3 Tbsp. maple syrup), or to taste 

For the brownie layers 
In a food processor, combine the pecans, walnuts, cacao powder, and salt and pulse until finely ground (be careful not to overprocess). Add the dates, 2 to 3 at a time, pulsing between additions until each date is well-incorporated and the mixture is sticky. Taste for sweetness and add another date or some stevia if desired. (I added a little maple syrup for both taste and consistency, but perhaps I would not have needed it had my dates been softer, hence my recommendation above.) 

Press half of the mixture (about 1 heaping cup) firmly and evenly into an 8-inch square baking pan lined with parchment paper for easy removal. Place the pan in the freezer to chill. Set the other half of the mixture aside while you make the cheesecake layer. 

For the cheesecake layer 
In a high-speed blender, combine the cashews, water, coconut oil, lemon juice, vanilla, salt, and stevia and blend until smooth. You can add more water, a teaspoon at a time, as needed to help the mixture blend. Taste for sweetness and add more stevia if desired. 

Remove the pan from the freezer and transfer the cheese- cake mixture onto the brownie layer, spreading it evenly with a spoon or spatula. Place the pan back in the freezer for 1 to 2 hours to allow the cheesecake layer to firm up. Once frozen, remove the pan from the freezer again, and evenly scatter the remaining half of the brownie mixture on top of the cheesecake layer. Gently but firmly press the brownie bits into the cheesecake. You may still be able to see the cheesecake layer underneath; that’s ok. Place in the refrigerator for at least 2 hours before cutting and serving. (It truly is best served from the fridge after this point, as opposed as from the freezer.) 

Store the brownies in an airtight container in the refrigerator for up to a week or in the freezer for up to a month.


Saturday, July 31, 2021

Batch of links

- I loved this article in Parents magazine about how to get your kids excited about space. It contains lots of fun, doable activities, including viewing the Perseid meteor shower, which will peak August 12th. 

- If the kids are really bored during the day, here are some paper airplane folding instructions


- I loved this essay about the Boomer generation, diet culture, and fat phobia. I particularly liked this line: “The thing about diet culture is that whenever we replace one diet with another, there are a lot of people who never quite let go of the previous food fear.” 

- Here’s an article by Dr. Jen Guter about menopause. I *really* enjoyed her latest book, The Menopause Manifesto, and strongly recommend it! (While I’m at it, here’s her TED Talk, Why can’t we talk about periods?


- And a Modern Love essay worth your time: Let’s Meet Again In Five Years.

Friday, July 30, 2021

Turkey Bolognese


This recipe is from The 30-minute Prediabetes Cookbook by Ranelle Kirchner. I’m enjoying all the information in here, and also the philosophy that the goal isn’t to eat zero-carb meals, just lower-carb. (The author also distinguishes between simple and complex carbs, which makes sense to me, even though my endocrinologist was warning against any kind of carb.) 

Boxes of chickpea pasta are closer to 8 ounces than to the usual 16 ounces, and as long as we were getting two boxes, we figured we might as well taste-test two different brands. We came to the conclusion that we much prefer Banza (we had the penne) to Barilla (we had the rotini). Compared to traditional wheat pasta, chickpea pasta has 10 grams fewer carbs per serving, as well as 6 grams more fiber and protein. A word of warning, though: you MUST watch the pot as it boils! Chickpea pasta will produce a lot more foam than wheat pasta and it will definitely boil over if you’re not stirring it occasionally. 

We all really liked this, including the kids! The recipe below is supposed to make 4 servings; I used more pasta and stretched it to 8 servings (half of which were small kid servings). 

1 onion, coarsely chopped 
1 large carrot, coarsely chopped 
2 celery stalks, coarsely chopped 
1 Tbsp. extra-virgin olive oil 
1 lb. ground turkey 
½ cup lactose-free milk 
¾ cup red or white wine 
1 (28-oz.) can diced tomatoes 
10 oz. cooked chickpea pasta (see note above) 

Place the onion, carrots, and celery in a food processor and pulse until finely chopped. 

Heat the olive oil in a Dutch oven or medium skillet over medium-high heat. Sauté the chopped vegetables for 3 to 5 minutes or until softened. Add the ground turkey, breaking the poultry into smaller pieces, and cook for 5 minutes. 

Add the milk and wine and cook until the liquid is nearly evaporated. 

Add the tomatoes and bring the sauce to a simmer. Reduce the heat to low and simmer for 10 to 15 minutes. 

Meanwhile, cook the pasta according to the package instructions and set aside. 

Serve the sauce with the cooked chickpea pasta.


Thursday, July 29, 2021

Carrot and Red Lentil Soup

 I hadn’t posted about this carrot and red lentil soup yet, perhaps because I already have recipes here along the same lines, but looking back, I realize that it was the best soup I’d made in a long time. I had tried a few new soup recipes in the spring, like a bacon-potato soup with cheddar and chives (it was too watery, and based on reviews, others felt the same!), and also a tomato pasta soup that I made by combining the best part of two recipes (Bon Appétit’s low broth-to-fillings ratio and Ricardo’s pasta coated in turmeric oil), but it was just okay. And then I made the carrot soup and all was right with the world again. 

At the time, I had served it with gluten-free bread from the now-closed Little Aussie Bakery. I couldn’t find the Glutino all-purpose flour they recommend, so I used a Just About Foods – I think it wasn’t the best choice, and next time I’ll make sure to get the right brand. That being said, neither kind is low-carb, so I’m not sure what I’d use as a side to soup now. Suggestions are welcome! 


1 tsp. cumin seeds 
2 Tbsp. olive oil 
1 ½ lbs. carrots, roughly chopped (about 4 cups) 
3 large shallots, thinly sliced 
a 1-inch piece of fresh ginger, peeled and grated (2 tsp.) 
2 tsp. ground turmeric 
4 cups low-sodium vegetable broth 
2/3 cups dried red lentils 
1 ½ cups well-shaken and stirred unsweetened coconut milk (from a 13.5-oz. can) 
½ tsp. kosher salt 
¼ tsp. freshly ground black pepper 
fresh cilantro leaves, for serving 

Toast cumin seeds in a large pot over medium-high, stirring often, until fragrant, about 1 minute. Remove from pot. Heat oil in pot. Add carrots and shallots; cook, stirring often, until shallots are very tender, about 6 minutes. Stir in ginger, turmeric, and toasted cumin. Cook, stirring constantly, until fragrant, about 30 seconds. Stir in broth and lentils; bring to a boil. Reduce heat to medium-low and simmer until carrots and lentils are tender, about 20 minutes. 

Blend carrot mixture in a blender, in batches if necessary, taking care when blending hot liquids. (Or use an immersion blender directly in the pot like I did.) Return puréed soup to pot. Stir in coconut milk, 1 cup water, salt, and pepper. Top with cilantro. (It occurs to me now that the leftover coconut milk would be nice drizzled on top of this as well.)


Wednesday, July 28, 2021

Citrus Chickpea Almond Muffins


As I was digging through my recipes to find a make-ahead breakfast dish that was low in sugar, I found these lemon chickpea muffins. I’ve decided to call them citrus muffins, given that there’s as much orange flavor as lemon! I’ve also decided that the aquafaba should be kept and whipped, then added in with the whipped egg whites. These muffins were good, though I’ll admit that I don’t like them as much as “regular” muffins. Also, since there’s not much sugar in them, they don’t keep long – I recommend keeping them in the fridge or freezing them. 

For the muffins 
1¾ cup (271 g) chickpeas from a 15 oz. can, drained (keep the aquafaba!) and rinsed 
1 Tbsp. (12 g) lemon zest 
1 Tbsp. (12 g) orange zest 
2 Tbsp. (28 g) fresh lemon juice 
2 Tbsp. (28 g) fresh orange juice 
¼ cup (52 g) extra virgin olive oil 
¼ cup (45 g) granulated sugar 
2 eggs, separated
⅔ cup (80 g) whole wheat flour, sifted 
2 tsp. (8 g) baking powder 
½ tsp. (2 g) salt 
½ tsp. (2 g) ground cardamom 
⅓ cup (30 g) ground almonds 

For the topping 
1 Tbsp. (8 g) ground or slivered almonds 
¼ tsp. (1 g) ground cardamom 
½ tsp. (2 g) granulated sugar (optional; I didn’t use it) 

Preheat oven to 325 °F. Line muffin tin with paper liners. 

Purée the chickpeas in a food processor until smooth. Add the lemon and orange zest, juice, olive oil, sugar, and egg yolks. Purée until smooth. 

Sift together the flour, baking powder, salt, and cardamom. Stir in the chickpea mixture, and then add the ground almonds. 

Whisk the egg whites until they hold semi-soft peaks. If using, whisk the aquafaba until it holds semi-soft peaks and fold into the egg-white mixture. Fold the egg whites into the batter carefully, so as not to deflate the egg whites. 

In a small bowl, combine the ground or slivered almonds, cardamon, and sugar (if using). Set aside. 

Scoop batter into muffin tin. Sprinkle the muffin batter with some of the almond-cardamom mixture. 

Bake in the oven 12 to 13 minutes (14 minutes in my case), or until a toothpick inserted in the center of a muffin comes out clean.


Monday, July 26, 2021

Stuffed Peppers


I tried making these stuffed tomatoes with lemon and garlic where, instead of rice, you used riced cauliflower. (I didn’t use the brand of flavored riced cauliflower that was recommended, because it contains lactose, so I had plain riced cauliflower that I flavored myself with lemon zest, garlic, salt and pepper.) And the truth is, I’m really not a big fan of riced cauliflower. So I decided to make the classic stuffed peppers, with a recipe that didn’t call for too much rice. I used this one, and it was delicious! 

Of course, you can adapt with the protein and cheese of your choice, and I threw in some cumin (I wrote it down below). You could also use brown rice or another grain altogether. This recipe calls for cutting the top off the peppers and stuffing them right-side-up, and they all fit in my 9”x13” baking dish; some people prefer to slice bell peppers lengthwise, and in that case, you’ll need a baking sheet or two. My kids were not really impressed, but at least you can take the stuffing out of the offending bell pepper and salvage something. But I loved this dish! 

½ cup uncooked rice 
2 Tbsp. extra-virgin olive oil, plus more for drizzling 
1 medium onion, chopped 
2 Tbsp. tomato paste 
3 cloves garlic, minced 
1 lb. ground beef 
1 (14.5-oz.) can diced tomatoes 
1 tsp. dried oregano 
½ tsp. cumin kosher salt 
freshly ground black pepper 
6 bell peppers, tops and cores removed 
1 cup shredded sharp cheddar (lactose-free) 
freshly chopped parsley, for garnish (optional) 

Preheat oven to 400 °F. 

In a small saucepan, prepare rice according to package instructions. 

In a large skillet over medium heat, heat oil. Cook onion until soft, about 5 minutes. Stir in tomato paste and garlic and cook until fragrant, about 1 minute more. Add ground beef and cook, breaking up meat with a wooden spoon, until no longer pink, 6 minutes. Drain fat. 

Return beef mixture to skillet, then stir in cooked rice and diced tomatoes. Season with oregano, cumin, salt, and pepper. Let simmer until liquid has reduced slightly, about 5 minutes. 

Place peppers cut side-up in a 9”x13" baking dish and drizzle with oil. Spoon beef mixture into each pepper and top with cheddar, then cover baking dish with foil. 

Bake until peppers are tender, about 35 minutes. Uncover and bake until cheese is bubbly, 10 minutes more. 

Garnish with parsley before serving.


Friday, July 23, 2021

Vanilla-Pecan Coffee Cake


I pulled out Joanne Chang’s Baking With Less Sugar again and took a look at the recipes I had flagged but hadn’t made yet. I zeroed in on the vanilla-pecan coffee cake, which she adapted from her bakery’s famous sour cream coffee cake. The cake itself has less sugar than the original version, and the streusel uses honey (still a sweetener, but one with a lower glycemic index). 

The method for the streusel, and especially for mixing it with the cake, was new to me, but it worked out well. The caveat of this cake is that since it is low in sugar, it will not keep for long – it’s best eaten within a day or two, but since we were making small slices, ours lasted longer and I stored it in the fridge. I think it would be fair to say that we all liked this cake, but I think no one loved it. 

For the streusel 
¾ cup (75 g) pecan halves 
3 Tbsp. honey 
1 tsp. ground cinnamon 
½ tsp. ground ginger 
¼ tsp. ground cloves 
½ tsp. kosher salt 
6 Tbsp. (45 g) cake flour 
2 Tbsp. lactose-free butter, at room temperature 

For the cake 
2 ½ cups (300 g) cake flour 
2 tsp. baking powder 
½ tsp. baking soda 
1 tsp. kosher salt 
2/3 cup (140 g) sugar 
1 cup (2 sticks) lactose-free butter, cut into 6 pieces, at room temperature 
2 large eggs 
3 egg yolks 
1 Tbsp. finely grated orange zest 
2 Tbsp. vanilla extract 
1 cup lactose-free sour cream (or crème fraiche if you’ve got it/can make it) 

Place a rack in the center of the oven and preheat to 350 °F. Butter and flour a 10-inch tube pan with a removable insert. (The removable insert is important. If you don’t have such a pan, I’d try using a springform instead.) 

Put the pecans on a baking sheet and toast for 8 to 10 minutes or until lightly toasted. Set aside to cool. 

In a food processor, combine the pecans, honey, cinnamon, ginger, cloves, salt, cake flour, and butter and pulse for about 20 seconds, or until the mixture comes together roughly and looks like quicksand. Transfer to a medium bowl and set aside; you should have about 1 cup. 

Using a stand mixer fitted with the paddle attachment, mix the cake flour, baking powder, baking soda, salt, and sugar on low speed just until well mixed. Add the butter, one piece at a time, and continue to beat on low speed for 3 or 4 minutes, or until the butter is well incorporated into the dry ingredients. The mixture will look like coarse meal. 

In a small bowl, whisk together the eggs, egg yolks, orange zest, vanilla, and sour cream until thoroughly mixed. With the mixer on low speed, slowly pour about half of the egg mixture into the flour mixture and mix until combined. Increase the speed to medium and beat for 1 ½ minutes. The mixture will go from looking thick, clumpy, and yellowish to light, fluffy, and whitish. Stop the mixer once or twice during the mixing and scrape down the sides and bottom of the bowl with a rubber spatula to make sure all the ingredients are mixed in. Decrease the speed to low, add the remaining egg mixture, and beat for about 30 seconds, or until combined. Again, stop once or twice during the mixing to scrape down the sides and bottom of the bowl. 

Spoon about 1 cup of the batter into the streusel and fold the streusel and batter together until well mixed. (This step helps keep the streusel from sinking directly to the bottom of the pan during baking.) Scrape all of the non-streusel batter into the prepared pan and smooth the top. Then top with the streusel batter, spreading it in an even layer and smoothing it out. 

Bake for 40 to 50 minutes, or until the center of the cake springs back when you press it and the top is pale golden brown. Let cool in the pan on a wire rack at least 3 hours, or until completely cool, then run a paring knife around the edge of the pan and carefully pop out the cake and the removable insert. Run the knife around the bottom of the pan and invert onto a wire rack or plate, gently shaking until the cake pops out; then top with a second wire rack or plate and flip so it is right-side up. 

The cake can be stored in an airtight container at room temperature for up to 2 days. Any longer than that and I recommend storing it in the fridge or freezing it.


Saturday, July 17, 2021

Taco Bowl


I got this recipe in a batch of free downloads from The Hormone Dietitian. It was originally a breakfast bowl, but I’m not yet into vegetables for breakfast; for me, this was a delicious lunch, though! What drew me to this recipe originally was that I wanted something low in carbs and high in protein, but you don’t need to be on a special diet to eat this. (If you want something that’s also TexMex-inspired for a family meal, you could always make these chicken and bell pepper fajitas and… omit the tortillas? Or at least serve components separately and let people who want tortillas have some, while you load up on vegetables?) 

1 ½ tsp. olive oil 
1 lb. extra-lean ground turkey 
1 pinch chili powder (or to taste) 
1 tsp. oregano 
1 tsp. cumin 
1 tsp. fine sea salt 
1 tsp. black pepper (I used less) 
½ cup water 
4 eggs (fried or done to your liking) 
4 cups baby spinach, chopped 
1 bell pepper, diced (I used an Aloha bell pepper
1 tomato, diced 
1 avocado, mashed or sliced or diced 

Heat a skillet over medium heat. Add the olive oil. Add the ground turkey and sauté to cook through, breaking up the meat as you go along. Once it is cooked through, add the chili powder, oregano, cumin, salt, and pepper. Add the water and sauté for another minute as you mix well. Reduce heat to the lowest setting and let simmer until all water has been absorbed. 

Meanwhile, fry the eggs and prep the vegetables. 

Divide the spinach between bowls. Top with dived bell pepper, tomato, avocado, turkey, and egg. Enjoy!


Saturday, July 10, 2021

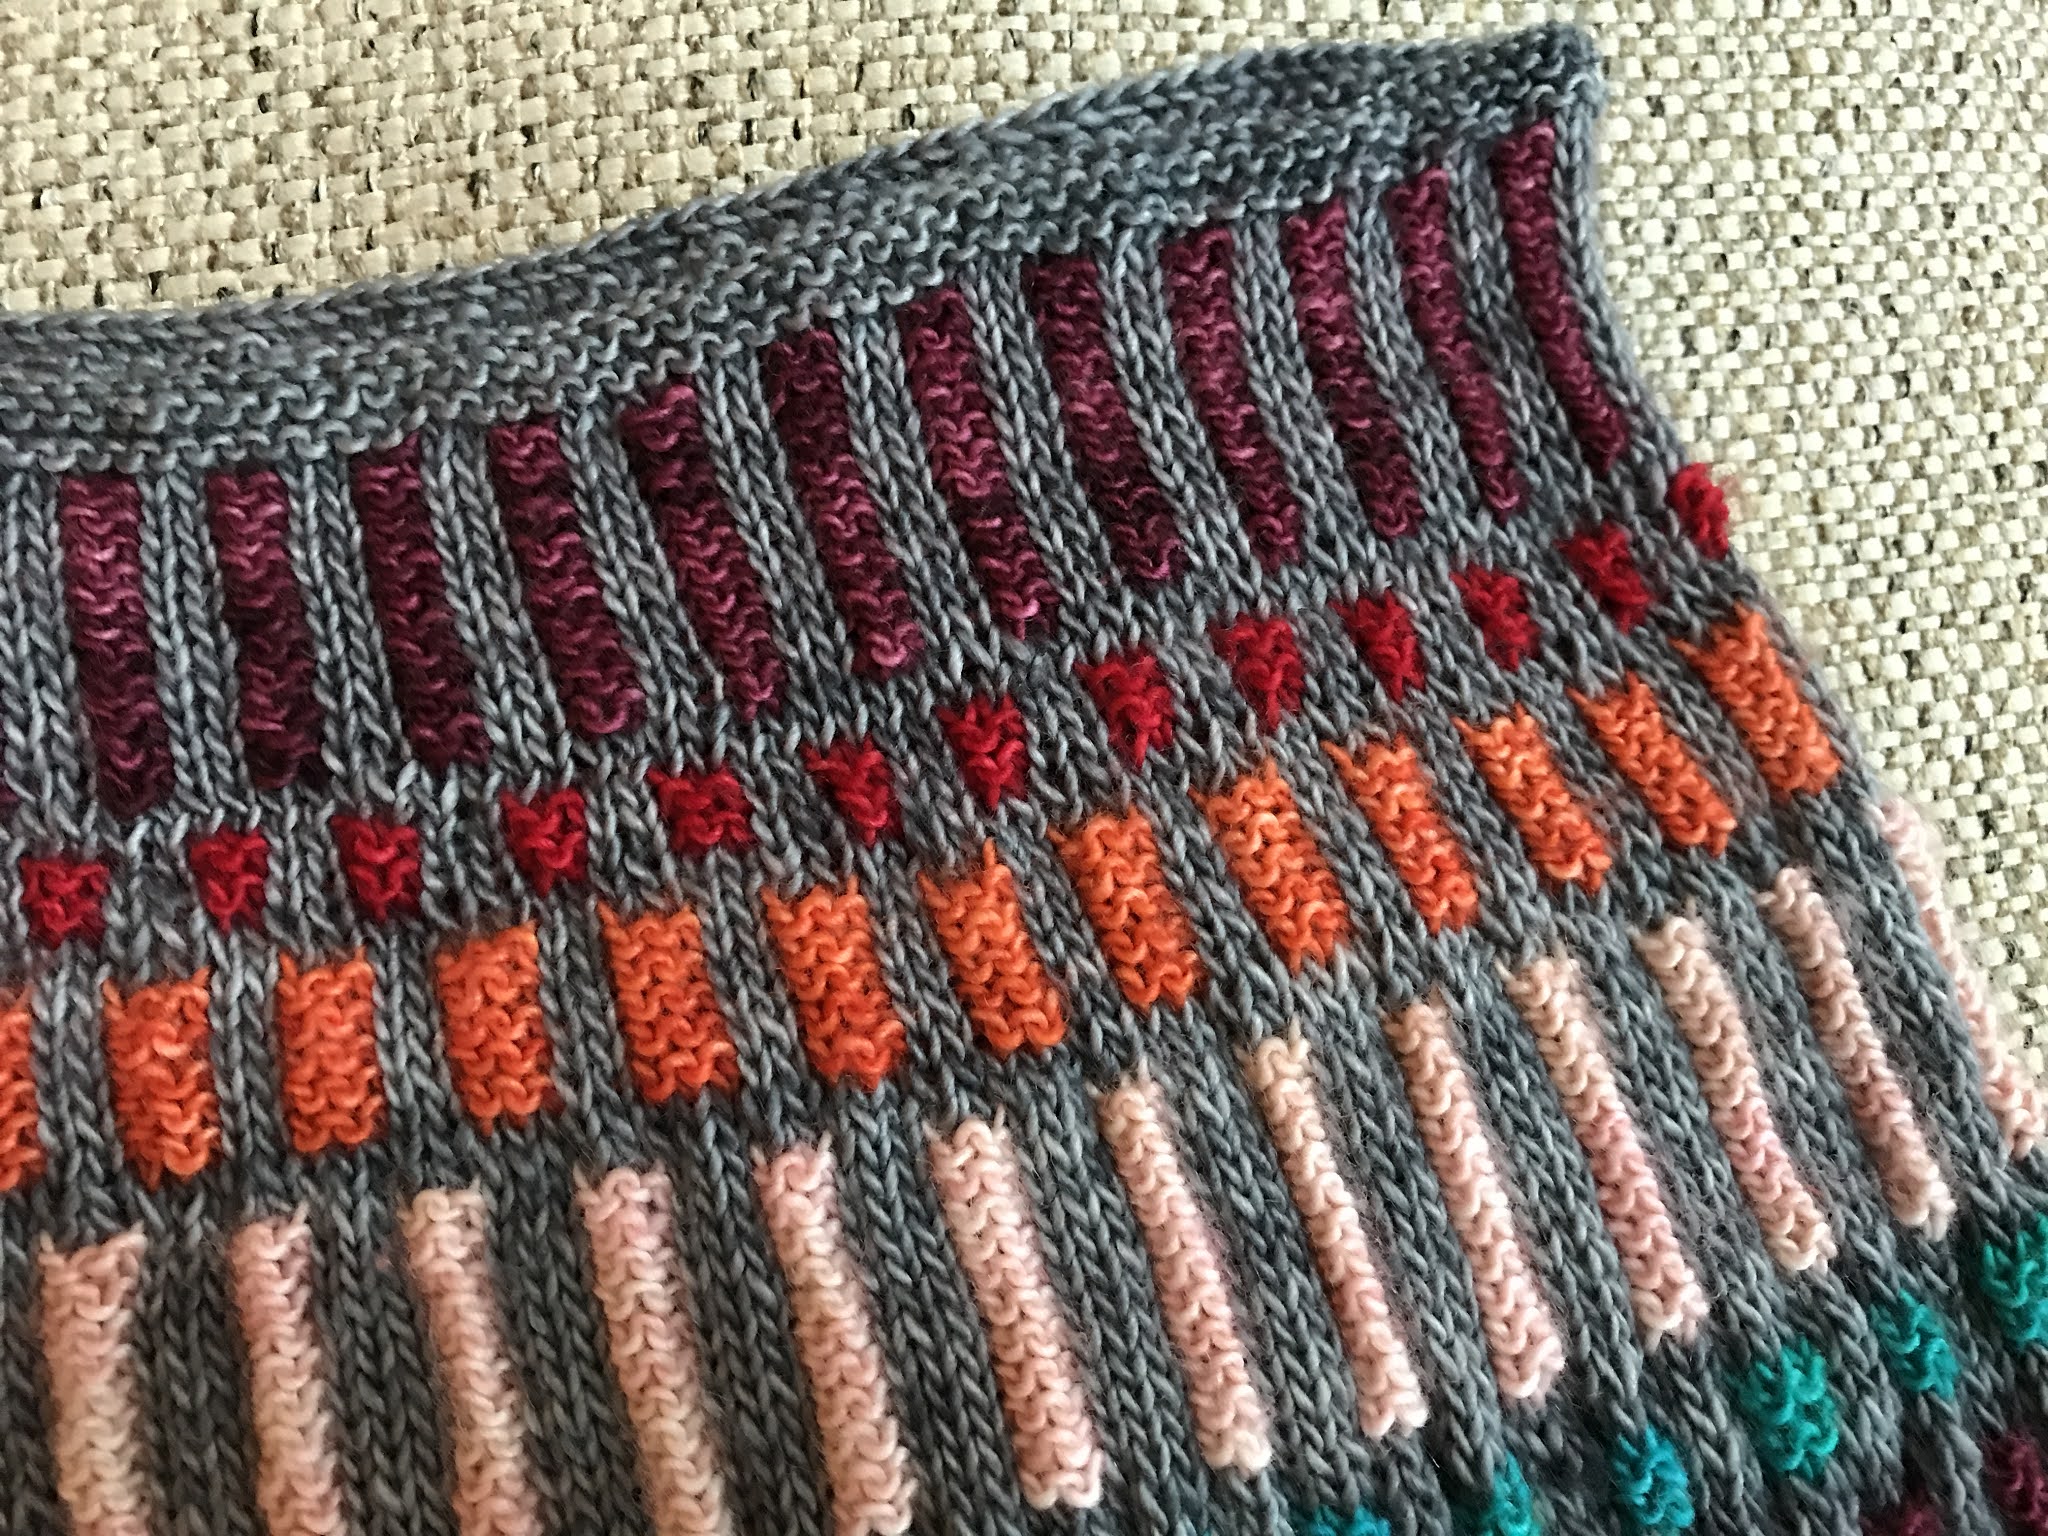
Wrist warmers and a cowl

 At some point last year, I decided to splurge and bought myself this kit to make wrist warmers. (It was a splurge insofar as I don’t normally drop that much money on a knitting project, but it was well within my self-imposed annual knitting budget.) The kit contained a pattern by Vickie Howell and 5 skeins of Madelinetosh Tosh Merino Light yarn in colors that she had designed (gray, turquoise, orange, purple, and pink); the color pairing just made me so happy! They were actually out of the Nassau Blue (turquoise) yarn, so I used the Nassau Blue Tweed yarn instead. And because I like red more than orange and just couldn’t help myself, I threw in a skein of red, actually called Blood Runs Cold. And then I downloaded the (free!) cowl pattern that had been in the back of my mind for a while, Inspira (which I had first seen in these colors). I love that it comes in three different patterns, based on the size of your yarn! 


I knew that I wanted to make that cowl as well as the wrist warmers, so I bought the full-sized skeins sold in the kit. That being said, if you only want to make a pair of wrist warmers, I definitely recommend buying the small size called Unicorn Tails, which should give you just enough of each color. 

So, first, the mitts. I’m not sure whether to call these “wrist warmers” or “fingerless gloves” – I reflexively used the second term, but the first seems more widespread, so that’s what I used in the title. The pattern specifies two sizes, but the colors on the photos correspond only to the smaller size – if you’re making the bigger size, like me, you’re left to your own devices regarding how to arrange the stripes. This wasn’t a big deal, especially considering that I was adding an extra color anyway! I changed the method used to increase on either side of the thumb gusset (m1l and m1r instead of ktbl twice) because it looked nicer to me. I made a beautiful pair on which the ribbed edge of the thumb is pink (both other edges are gray). 


Then I made the cowl. The version I went with was Steampunk, since I had fingering-weight yarn, but I changed it a bit because I decided to use the gray as a sort of frame for every rectangle of color. After reading comments on Ravelry, I decided to cast on more stitches to begin with (294 instead of 204, based on my shoulder measurements and the gauge of my swatch). And I used these instructions from a Ravelry user for the decreases, as they work better. I made my cowl longer as well, so I used the same basic principle for another round of decreases; it just looks better to me if you keep the pattern mostly intact. 

What I love here is that while this project is knit in the round, the author recommends knitting a few rows back-and-forth before joining, which greatly reduces the risk of twisting the first row. However, I would recommend starting with a smaller-size needle, which makes for a much cleaner edge. That’s what I did to finish at the top of the cowl, and since I didn’t like the wonky bottom and still had gray yarn left, I picked up stitches all around and did the edge over with my smaller needles. It looks much better! 


If I ever make this cowl again, I’d love to do it with a solid color as the “frame” and then a color-gradient yarn for the rectangles. There are also beautiful color combos on Ravelry for this project! 

At some point while knitting the cowl, I realized that based on the yardage in the pattern, I was going to need more gray yarn, so I bought a second skein. It turns out that I had *just* enough of the first skein to complete the project. But then, since I had the new skein just sitting there, I decided to make another pair of the fingerless mitts with a more-pleasing-to-me color arrangement. I made a sketch on paper and ended up with a pair that was a bit too long for me. I adjusted and made my perfect pair. 


There were no restrictions on the pattern, and since I actually have an Etsy shop, well, I’m now selling two pairs of wrist warmers! I’m only charging for the yarn (based on the Unicorn Tail prices) and the “free” shipping (which is rolled into the price, don’t let anyone tell you otherwise), and rounding up a dollar or two to cover Etsy’s fees. Proof that you can’t really be compensated for your knitting skills, since I’m already at the top end of the price range I see for similar items. Don’t hesitate to share the listings with anyone you think might be interested! If they sell quickly, I’ll consider making more with the rest of the yarn.