Saturday, December 31, 2016

Thanksgiving 2016

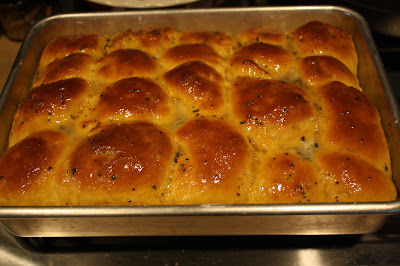
Somehow I always seem to be running a month behind in getting a post online… A little more than a month, in this case, but maybe I can get bonus points for putting this up before the end of the year? For this year’s Thanksgiving menu, I decided to do some repeats from last year, namely the caramelized onion and bacon gravy, the sautéed pears with bacon and mustard dressing, and the cranberry sauce with oranges and ginger. I also took some shortcuts and bought a rôtisserie chicken and cornbread dressing instead of making my own. That being said, the list might be harder to narrow down next year, because this year’s additions were winners as well! I made a cheddar-chive potato soufflé, some rosemary sea salt sweet potato rolls, and a sweet potato-miso pie with chocolate-sesame crust. And then I made myself a fancy drink with sparkling white grape juice, orange juice and grenadine, because why not.


To give you a timeline, you can start the rolls in the morning and they’ll be ready by early afternoon, as will the pie; the potato soufflé can be made ahead and reheated if need be. I made only a few changes: for the potatoes, I felt like 1 pound really wasn’t enough to make 8 servings, let alone fill my serving dish, so I decided to use 2 pounds of potatoes and left the rest of the ingredients with the same amounts (using coconut milk instead of cream) – they turned out great! As for the pie, I actually couldn’t find any chocolate wafer cookies (can you believe that?), so I substituted a (4.86-oz.) box of low-calorie Oreo thin crisp snacks – less than ideal, but it was all I could do short of buying Oreos and scraping off the frosting... And I baked the pie 2 gorram hours instead of 50 to 60 minutes, because it was only supposed to “still wobble slightly in the very center.” After that amount of time, it was still wobblier than described, but I also didn’t want burnt pie, so I took it out. Once cooled, it had just the right consistency. Also, I made my own sweet potato purée, since the pie recipe specifically said to use homemade instead of canned, and since I needed it for the rolls anyway. It came out beautifully! I just roasted the sweet potatoes in the oven at 425 °F for an hour, then puréed the flesh with my food processor. This can be done a day ahead without any problem. I also made both the cranberry sauce and the gravy a day ahead.


Rosemary Sea Salt Sweet Potato Rolls
For the rolls
½ cup water, between 102 and 110 °F
¼ cup lactose-free milk, between 102 and 110 °F
2 ¼ tsp (1 packet) active dry yeast
1 tsp. plus 1/3 cup sugar, divided
2 eggs
1 ½ tsp. salt
6 Tbsp. butter or margarine, melted and cooled
1 ½ tsp. fresh rosemary, minced
1 cup mashed sweet potato
4 ½ to 5 cups all-purpose flour, depending on moisture of dough

For the honey butter topping
¼ cup butter, at room temperature (I decided to use only 2 Tbsp. margarine instead)
2 Tbsp. honey
sea salt
minced rosemary

In a small bowl or measuring cup, combine milk and water. Heat in microwave until the temperature reaches between 102 and 110 °F. Stir in 1 teaspoon sugar to the mixture, and add in yeast. Gently mix yeast, and set aside to proof about five minutes.

With a stand mixer fitted with the dough hook attachment, add in remaining ingredients, and begin to mix until combined. Slowly pour in the yeast mixture, and allow to incorporate. Mix until the ingredients are smooth – the dough will pull away from the sides of the bowl, but still stick to the bottom.

Roll the dough out onto a lightly floured surface. Knead the dough until it becomes a smooth, uniform ball. Place into a lightly greased bowl, cover with plastic wrap, and place in a warm place for about 1 hour, or until the dough doubles in size.

Grease a 9”x13” baking dish and line the bottom with parchment paper. Roll dough out onto lightly floured surface and cut into 16-20 equal pieces. Roll each piece into a small ball and place seam side down in the prepared baking dish. Cover and let the dough rise another hour.

Preheat oven to 350 °F. Bake for 20-25 minutes or until the rolls are golden brown on top, and reach 200 °F when tested with a thermometer.

In a small dish, mix together butter and 2 tablespoons honey until smooth. Brush tops of baked rolls with mixture, sprinkle sea salt and additional minced rosemary on top. Allow to cool slightly. These rolls are good both warm and at room temperature.


Cheddar-Chive Potato Soufflé
1 Tbsp. unsalted butter or margarine, softened
2 Tbsp. grated parmesan cheese
2 lbs. Yukon gold potatoes, peeled and cut into 1-in. pieces (see note above)
½ cup lactose-free whole milk
½ cup lactose-free heavy cream (I used coconut milk instead)
2 oz. sharp cheddar cheese, shredded (about ¾ cup)
4 large eggs, separated
¼ cup chopped fresh chives
½ tsp. kosher salt
¼ tsp. black pepper

Preheat oven to 375 °F. Grease an 8-inch square baking dish with the butter; sprinkle the bottom and sides with the parmesan. Set aside.

Place the potatoes in a large pot with salted water to cover and bring to a boil over high heat. Reduce heat to medium-low and simmer until tender, about 12 minutes. Drain and place in a large bowl with the milk. Mash with a potato masher until almost smooth; cool 10 minutes. Whisk (or mash) in the cream, cheddar, egg yolks, chives, salt, and pepper.

Place the egg whites in the bowl of an electric mixer fitted with a whisk attachment. Beat on medium until the whites are glossy and stiff, 4 to 5 minutes. Stir a third of the beaten whites into the potato mixture. Fold in the remaining whites just until incorporated. Transfer to the prepared baking dish and bake until golden brown and puffy, about 30 minutes.


Sweet Potato–Miso Pie with Chocolate-Sesame Crust
For the sesame crust
6 Tbsp. unsalted butter or margarine
¼ cup (packed) light brown sugar
⅓ cup black sesame seeds
5 oz. chocolate wafer cookies (about 23), broken into small pieces
1 pinch of kosher salt

For the filling
2 small sweet potatoes (about 1 lb.; do not used canned sweet potato purée here)
½ cup (packed) light brown sugar
3 Tbsp. unsalted butter or margarine, melted
2 Tbsp. white miso
2 large egg yolks
1 large egg
1 cup lactose-free heavy cream (I used coconut milk)
Lactose-free whipped cream or Coco-Whip (for serving)

For the sesame crust
Heat butter and brown sugar in a small saucepan, stirring to dissolve sugar, until butter is melted.
Meanwhile, very finely grind sesame seeds in spice mill or with mortar and pestle. Pulse cookies in a food processor until finely ground.

Pour butter mixture into food processor; add salt and ground sesame and pulse to combine. Using a measuring cup, press cookie mixture firmly onto bottom and up the sides of a 9" pie dish. Freeze until very cold, 20–25 minutes.

Preheat oven to 350 °F. Bake crust until firm and slightly darkened in color, 15–18 minutes. If crust slides down sides, gently press back up. Let cool.

For the filling
Preheat oven to 350 °F. Roast sweet potatoes on a foil-lined rimmed baking sheet until tender, 50–60 minutes (I roasted mine at 425 °F for the same amount of time). Slice open lengthwise and let cool. Scoop out flesh from skins (you should have about 1 cup); pulse in food processor until very smooth. Discard skins.

Whisk brown sugar, butter, and miso in a medium bowl until smooth. Add egg yolks and egg and whisk just to incorporate. Whisk in sweet potato purée, then cream.

Reduce oven temperature to 300 °F. Pour filling into crust. Bake pie, rotating halfway through, until filling is set (it will still wobble slightly in the very center), 50–60 minutes (this took 2 hours for me – see note above). Transfer dish to a wire rack and let pie cool before slicing, about 2 hours.

Serve pie topped with whipped cream or Coco-Whip.

Thursday, December 29, 2016

Marbled Lemon Blueberry Bundt Cake

This started innocently enough, with a delicious-looking lemon blueberry bundt cake. The blueberries were basically sandwiched in between two layers of batter, and the finished cake was covered with a glaze. I foresaw a problem immediately, but since the author of that recipe didn’t encounter it, I thought I must be wrong, but it turns out I wasn’t. See, unmolding a cake which has a middle layer of fruit means that the cake will separate in the middle, with what should be the upper layer stuck in the pan. I did manage to get it out, but lost a few pieces on top, so I used the glaze to hide the unfortunate unmolding. It was a good cake, but I found it so frustrating that I had no interest in making it again. (I also had unmolding issues with this summer fruit bundt pound cake.)

Then I came across Cook’s Illustrated’s recipe for marbled blueberry bundt cake, and this one is a winner. Mixing the blueberries in the batter entirely solves the above problem, and blending them with fruit pectin avoids pockets of fruit that burst (this can be great in some desserts, but in a bundt cake, not so much). Plus, it unmolded beautifully!

I recommend starting with the filling (even though the original recipe has one make it after the cake batter). The recipe calls for fruit pectin such as Sure-Jell (Ball will not work). I couldn’t find any, so I ended up using a cornstarch slurry to thicken my blueberry purée. This means it was probably cloudier than what was desired, but I didn’t mind. I assembled the batter while the filling cooled.

For the filling
¾ cup (5¼ oz.) sugar
3 Tbsp. low- or no-sugar-needed fruit pectin (see note above)
1 pinch salt
10 oz. (2 cups) fresh or thawed frozen blueberries
1 tsp. grated lemon zest plus 1 Tbsp. juice

For the cake
3 cups (15 oz.) all-purpose flour
1½ tsp. baking powder
¾ tsp. baking soda
1 tsp. salt
½ tsp. ground cinnamon
¾ cup buttermilk (lactose-free milk with a splash of lemon juice)
2 tsp. grated lemon zest plus 3 tablespoons juice
2 tsp. vanilla extract
3 large eggs plus 1 large yolk, at room temperature
18 Tbsp. (2 ¼ sticks) unsalted margarine, softened
2 cups (14 oz.) sugar

For the filling
Whisk sugar, pectin, and salt together in small saucepan. Process blueberries in blender until mostly smooth, about 1 minute. Transfer ¼ cup purée and lemon zest to saucepan with sugar mixture and stir to thoroughly combine. Heat sugar-blueberry mixture over medium heat until just simmering, about 3 minutes, stirring frequently to dissolve sugar and pectin. Transfer mixture to medium bowl and let cool for 5 minutes. Add remaining purée and lemon juice to cooled mixture and whisk to combine. Let sit until slightly set, about 8 minutes.

For the cake
Adjust oven rack to lower-middle position and heat oven to 325 °F. Heavily spray 12-cup nonstick Bundt pan with baking spray with flour. (If you don’t have nonstick baking spray with flour, mix 1 tablespoon melted butter and 1 tablespoon flour into a paste and brush inside the pan.)

Whisk flour, baking powder, baking soda, salt, and cinnamon together in large bowl. Whisk buttermilk, lemon zest and juice, and vanilla together in medium bowl. Gently whisk eggs and yolk to combine in third bowl.

Using stand mixer fitted with paddle, beat butter and sugar on medium-high speed until pale and fluffy, about 3 minutes, scraping down bowl as needed. Reduce speed to medium and beat in half of eggs until incorporated, about 15 seconds. Repeat with remaining eggs, scraping down bowl after incorporating. Reduce speed to low and add one-third of flour mixture, followed by half of buttermilk mixture, mixing until just incorporated after each addition, about 5 seconds. Repeat using half of remaining flour mixture and all of remaining buttermilk mixture. Scrape down bowl, add remaining flour mixture, and mix at medium-low speed until batter is thoroughly combined, about 15 seconds. Remove bowl from mixer and fold batter once or twice with rubber spatula to incorporate any remaining flour. Cover bowl with plastic wrap and set aside while preparing filling; batter will inflate a bit. (If you made the filling beforehand, like me, it’s easy to just wait a bit here. But if you’re struggling to get the right consistency with your blueberry filling while worrying about your batter being too far gone now that you’ve mixed wet and dry ingredients, it’ll be nerve-wracking!)

Spoon half of batter into prepared pan and smooth top. Using back of spoon, create ½-inch-deep channel in center of batter. Spoon half of filling into channel. Using butter knife or small offset spatula, thoroughly swirl filling into batter (there should be no large pockets of filling remaining). Repeat swirling step with remaining batter and filling.

Bake until top is golden brown and skewer inserted in center comes out with no crumbs attached, 60 to 70 minutes. Let cake cool in pan on wire rack for 10 minutes, then invert cake directly onto wire rack. Let cake cool for at least 3 hours before serving.

Friday, December 23, 2016

Pear, Oat and Nut Muffins

This recipe is from Whole Grain Mornings, which I really love! These muffins were really great, too, and were very moist thanks to the pear. If you don’t have whole wheat pastry flour, you could just use 1 ½ cups of white whole wheat flour instead of both wheat flours in the recipe. Also note that I only used ½ cup nuts, chopped and sprinkled on top of the muffins, as I didn’t want nuts In the batter, so that’s what I wrote below. Hazelnuts would be ideal, but I didn’t have any, so I used walnuts, and I’d like pecans next time. Of course, you could omit the nuts entirely, and some bloggers have been adding chocolate chips to these muffins, although I really liked them just as they were.

¾ cup (75 g.) rolled oats
1 cup (120 g.) unbleached all-purpose flour
½ cup (60 g.) whole wheat pastry flour
¾ tsp. baking soda
2 tsp. baking powder
½ tsp. ground cardamom
½ tsp. ground nutmeg
¾ tsp. kosher salt
2 or 3 firm medium pears
2/3 cup (125 g.) natural cane sugar
6 Tbsp. unsalted butter or margarine
1 cup lactose-free buttermilk substitute (lactose-free milk with 1 Tbsp. lemon juice)
2 large eggs, beaten
1 ½ tsp. pure vanilla extract
½ cup (60 g.) hazelnuts, toasted, cooled and coarsely chopped (see note above)

Preheat oven to 425 *F. Butter a standard 12-cup muffin tin or line it with papers.

In a medium bowl, whisk together the oats, flours, baking soda, baking powder, cardamom, nutmeg, and salt. Mix well and set aside.

Peel and core the pears and grate them on the large holes of a box grater. You should end up with about 1 cup (215 g.) of shredded pear. (I had a bit more than that with 1 ½ pears already.)

Put the sugar in a large bowl. In a small saucepan over medium heat, melt the butter (I did this in the microwave). Add the butter to the sugar and stir until well combined. Whisk in the buttermilk, eggs, vanilla, and shredded pear until you have what resembles a loose batter. Add the flour mixture and fold in gently, being careful not to overmix.

Fill muffin cups almost to the top with batter and sprinkle with the chopped hazelnuts. Put the muffins in the oven and immediately decrease the heat to 375 °F. Bake until the tops are golden brown and feel firm to the touch, even in the center, 25 t o27 minutes. (These muffins get golden brown a bit before they are ready, so keep that in mind when you check them.)

Vegan Pear Trifles

I made this recipe from The Kind Life because I had a large can of pears to use up. So I switched things up a bit to accommodate what I had on hand and to make things easier on myself… In each of my 6 serving glasses, I used 3 Nilla wafers and one half of a small canned Bartlett pear, which I had chopped up in little cubes. Then, in the cashew cream, I used up the pear juice from the can (about ¾ cup) and topped it up with apple juice (¼ cup) instead of using white grape juice. Next time, though, I would add maple syrup in the cashew cream, because I felt it was too bland, though it’s obviously a good option if you want something that is nearly sugar-free. I also omitted the garnishes. I liked this dessert, but I think I’d need to tinker with it a bit to love it. The Little Prince liked the Nilla wafers, though he would only eat them if they had been cleared of any non-Nilla wafer debris, so I guess overall he wasn’t fond of this!

You could also soak the cashews overnight instead of boiling them; that being said, boiling cashews turns out to be a great time-saver if you’ve forgotten to soak them ahead of time! This would also be good with apples, though I think I’d cook the apples a bit first. – maybe I’d soften them directly in the apple juice as it heats. Instead of agar agar, you could use kudzu or even corn starch (if you don’t mind a cloudy appearance), or I’d consider fruit pectin.

1 ¼ cup apple juice
4 tsp. agar agar powder
18 Nilla wafer-type biscuits (depends on their size, but these are the quantities I used for 6 servings)
2 soft pears, chopped (I used 6 canned pear halves, chopped)
7 oz. cooked cashew nuts (boil nuts for 30 minutes; drain and rinse)
1 cup white grape juice (and/or some maple syrup; see note above)
garnishes as you see fit (chopped nuts, rice syrup, etc.)

Heat the apple juice and whisk in the agar agar. Simmer until agar agar dissolves.

Crush the biscuits and place in dessert glasses. Layer the chopped pears over the biscuits. Pour the apple juice jelly over the pears slowly and put in the fridge to set.

Blend the cashew nuts and grape juice together, adding the juice slowly until the mixture becomes thick and creamy. (Taste and add maple syrup if necessary.) Pour cashew cream over the top of the trifle and garnish as you see fit. Serve immediately or store in the fridge for up to a day.

Spring Onion Alphabet Soup

I’m not sure where this recipe originated. I got it in a promotional magazine in English, then later saw it in Coup de Pouce (I guess they don’t develop all their own recipes after all!). Here’s a link to it in Better Homes and Gardens. I made this because not only did it look good, but I thought the Little Prince would be into it given that he likes reading so much… I was wrong on that second count, he didn’t like the soup (even when I gave him very little broth and mostly pasta shapes). The soup itself was great, however, pairing leeks and green onions with lemon and basil, so here’s the recipe. Note that I couldn’t actually find alphabet pasta in stores, so I ordered it online – you could substitute acini de pepe or Israeli couscous. I served it with cheese toast (I eyeballed the amounts, really) and lactose-free sour cream.

¼ cup butter or margarine
1 Tbsp. olive oil
1 medium Vidalia onion, thinly sliced (1 cup)
1 large leek, white part thinly sliced (½ cup)
1 bunch green onions, thinly sliced (½ cup)
2 cups fresh or frozen shelled peas
4 cups reduced-sodium chicken broth or vegetable broth
4 cups water
1 cup small dried pasta (alphabet-shaped or acini di pepe)
1 tsp kosher salt
1 lemon, juiced (3 Tbsp.)
1 cup torn basil leaves
8 slices sourdough bread
3 oz. fontina cheese, shredded (I used lactose-free gruyère)
lactose-free sour cream, for serving

In a 4-quart Dutch oven, heat butter and olive oil over medium-low heat until butter is melted. Add Vidalia onion slices; stir until coated. Cook, covered, 15 minutes until translucent and soft, stirring occasionally. Stir in leek and green onions. Cook, covered, 10 minutes more or until leeks are softened. Stir in peas. Add chicken broth, water, pasta, and salt. Bring to a boil. Reduce heat. Simmer, uncovered 5 minutes. Stir in lemon juice and basil leaves.

Top slices of sourdough bread with fontina cheese. Arrange on a baking sheet. Broil 3 to 4 inches from the heat for 1 to 2 minutes or until cheese is melted. Top soup with bread slices and serve with lactose-free sour cream.

Sunday, December 18, 2016

Gingerbread for a panzanella

I decided to adapt a roasted squash and gingerbread panzanella recipe from Williams Sonoma. It was very good, but the gingerbread that I made for it (using their recipe) was fantastic, and that’s really the recipe I want to share today. Sadly, I only got a blurry picture of the cake, since I was only thinking about photographing the salad, not its components… We actually enjoyed it more as cake than as croutons, and we kept sneaking small slices off of it over the course of a few days. I used sorghum syrup to make it, which has a taste not quite as strong as molasses, but those would make a fine substitute if you can’t find sorghum syrup. Note that for the flour, I used the weight amount specified, even though it doesn’t match up with the volume (2 ½ cups of all-purpose flour should be somewhere around 300 g. in my book).

2 ½ cups (390 g.) all-purpose flour (see note above)
1 tsp. baking powder
1 tsp. salt
2 tsp. ground ginger
1 ½ tsp. ground cinnamon
1 pinch ground cloves
1 ½ cups boiling water
1 cup (345 g.) sorghum syrup (or molasses)
1 tsp. baking soda
8 Tbsp. (1 stick) margarine or butter, at room temperature
1 cup (220 g.) firmly packed brown sugar
1 egg

Preheat oven to 325 °F. Grease a 9”x13” pan.

In a medium bowl, whisk together the flour, baking powder, salt, and spices. Set aside.

In a small bowl, whisk together the boiling water, sorghum syrup, and baking soda. Set aside.

In the bowl of an electric mixer fitted with the flat beater, beat the margarine on medium speed for 30 seconds. Add the brown sugar and beat until fluffy, about 2 minutes, stopping the mixer occasionally to scrape down the sides of the bowl. Add the egg and beat until combined.

Reduce the speed to low and add half the sorghum mixture, then half the flour mixture, beating after each addition until just combined and stopping the mixer to scrape down the bowl as needed. Repeat to add the remaining ingredients.

Pour the batter into the prepared pan. Bake until the gingerbread springs back when touched, about 35-40 minutes. Transfer the pan to a wire rack and let cool completely.


From here, if you choose to make the panzanella, toast gingerbread cubes in a 400 °F oven for 7-8 minutes, turning once, until slightly crisped. Add to arugula, cooked crumbled bacon, roasted squash, and quick pickled onions. Make a dressing with olive oil, lemon juice, pumpkin butter, and salt and pepper to taste. I’m thinking pepitas would be a nice touch here!

Muffins au chocolat sans farine

J’ai fait ces muffins une première fois en suivant les instructions, mais le résultat était insatisfaisant. Ils étaient un peu grumeleux et n’avaient pas du tout l’air aussi appétissants que ceux sur la photo du site! Je les ai donc refaits en modifiant quelques petites choses. Ce n’était toujours pas comme sur la photo, mais c’était quand même nettement mieux! Vu les ingrédients, je trouve ça intéressant comme recette, alors je partage ma version. Par contre, l’Ingénieur trouve qu’ils goûtent comme si quelque chose les retenait (il les a même traités de « muffled muffins »), et j’avoue que c’est vrai que le chocolat est moins présent qu’on le penserait (j’ai pourtant utilisé du cacao de qualité irréprochable, alors je pense que c’est la faible quantité de sucre qui explique cela). On pourrait y ajouter des pépites de chocolat pour rehausser le goût, après l’étape du mélangeur.

1 boite de 19 oz. de pois chiches, rincés et égouttés (environ 2 tasses)
1 c. à thé de bicarbonate de soude
1 pincée de sel
3 c. à soupe d'huile de coco extra-vierge, fondue
3 gros œufs
½ tasse de sirop d'érable
1 c. à thé d'extrait de vanille
⅓ tasse de cacao

Préchauffer le four à 350 °F.

Préparer 12 coupes à muffin en y mettant des papiers à muffins. (Notez quand même qu’ils colleront au papier, et vaporiser le moule de graisse végétale était encore pire, alors je recommande les papiers.)

Ajouter dans le mélangeur (ou le robot) les pois chiches, le bicarbonate de soude et le sel. Mélanger jusqu’à l’obtention d’une consistance lisse. Ajouter ensuite l’huile de coco, les œufs, le sirop d’érable et la vanille et mélanger de nouveau jusqu’à homogénéité. Ajouter le cacao et mélanger une dernière fois.

Diviser également dans les 12 coupes à muffins. Cuire environ 20 minutes ou jusqu'à ce qu'un cure-dent piqué dans le muffin en ressorte propre. Refroidir complètement et déguster!

Friday, December 16, 2016

Mall Chicken Teriyaki

I know I’ve already posted a recipe for chicken teriyaki, but this recipe from The Woks Of Life is different in that it is closer to what would be served in mall food courts and restaurants (I mean this in a good way). It was easy to make and delicious! I served it with rice and roasted carrots (they should have been roasted carrots with orange, but I forgot to put an orange on the grocery list, so I omitted it and it was fine). Not only was this enjoyed by both adults, but the Little Prince actually finished his entire plate, which hadn’t happened in a while. So it was a double win! (Too bad I decided it looked a bit unappetizing and only took one picture…)

2 lbs. boneless skinless chicken thighs, cut into small chunks (I think I used breasts)
3½ Tbsp. mirin
4 Tbsp. soy sauce
2 Tbsp. brown sugar
1 tsp. grated ginger
1½ tsp. sesame oil
1Tbsp. cornstarch
2 Tbsp. oil

Put the chicken in a bowl, along with the mirin, soy sauce, brown sugar, ginger, sesame oil, and cornstarch. Mix together until all the ingredients are well combined. Allow to marinate for 2 hours.

Heat the oil in a wok or large skillet over medium high heat. Transfer the chicken to the pan in one layer (reserving the marinade), and allow it to sear on one side for 1 minute. Then start stir-frying for another minute or until cooked through.

Add the reserved marinade to the pan, reduce the heat to medium, and simmer to reduce the sauce until it thickens and coats the chicken.

Vegan Cheesecakes with Raspberry Sauce


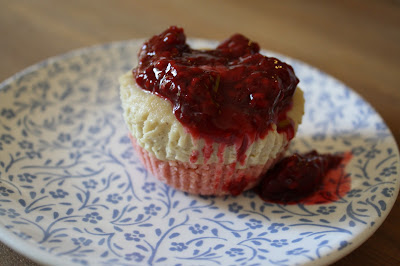
I made these little cheesecakes using a recipe from Nutritious Eats. They’re made with cashew cream and coconut milk (unlike my first version, which called for coconut oil). They tasted absolutely delicious! I think the coconut milk gave them a creamier mouthfeel. I served them with a raspberry sauce because I had raspberries left in the freezer, but these would be just as good with blueberries or strawberries, in my opinion. These cashew cakes called for the “typical” crust made with nuts and dates, but I wanted to use up the last of my biscuits roses de Reims, so I improvised a crust with those instead. I’m giving you the nut version below, though, because I didn’t use exact proportions – I was really trying to use up all the cookies, and it was a bit too much anyway.

For the crust

1 cup raw almonds
1 cup dates, pitted and halved
½ tsp. vanilla extract
2 Tbsp. water

For the filling
1½ cup raw cashews, soaked overnight
⅓ cup coconut milk
⅓ cup maple syrup
the juice from 1 lemon (about 2 Tbsp.)
½ tsp. vanilla extract

For the topping
2 cups fresh or frozen raspberries
1 tsp. lemon juice
1-2 heaping Tbsp. of sugar

Line a muffin tin with 12 cupcake liners.

To make the crust, place almonds, dates, vanilla extract and water in a food processor. Start pulsing and then blend together on high speed until mixture starts to come together (it will pull away from the sides and form a big hunk). Scoop 1 tablespoon of the mixture into each paper liner. Press down evenly to form a flat crust. Set aside.

To make the filling, add soaked cashews, coconut milk, maple syrup, lemon juice and vanilla extract to the bowl of a food processor. Blend for 1-2 minutes on high speed or until smooth and creamy. Scoop ¼ cup of batter and add onto each crust. Refrigerate overnight if possible or until firm.

To make the sauce, place the raspberries, lemon juice and sugar in a small saucepan. Cook on medium-low for about 15 minutes, stirring occasionally. Set aside to cool. (This can be made ahead of time and kept in the fridge to firm up a bit.)

When ready to serve the cheesecakes, top them with a spoonful of raspberry sauce.

Saturday, December 10, 2016

Gâteau magique aux pommes épicées

J’ai essayé plusieurs recettes de pommes cet automne. Avec mon reste de pommes Pink Pearl, j’ai fait un gâteau invisible aux pommes et à la vanille. C’était très bon, mais pas super photogénique – je pense que malgré mes efforts, mes tranches de pomme étaient un peu trop épaisses, puisque les Pink Pearl avaient tendance à se défaire. J’ai aussi fait un pouding chômeur aux pommes et à l’érable, mais en fin de compte, il n’était pas si bon que ça.


La recette que nous avons préférée, c’est le gâteau magique aux pommes épicées. C’est en gros le même principe que la tarte impossible ou les clafoutis : les ingrédients se séparent dans le moule, et on obtient un genre de croûte au fond, un mélange moelleux comme un flan au milieu, et un gâteau sur le dessus. Nous avons adoré! Je l’ai servi nature, mais on pourrait le saupoudrer de sucre à glacer ou encore l’accompagner de sauce au caramel. J’ai utilisé des pommes Granny Smith pour cette recette.

2 c. à soupe de beurre ou de margarine
½ tasse de beurre ou de margarine
¼ tasse de cassonade
2 grosses pommes (de type Golden), pelées et coupées en dés
1 pièce de gingembre frais de 2 po (5 cm), pelé et haché finement
½ c. à thé de cardamome moulue
4 œufs, jaunes et blancs séparés
½ tasse de sucre
1 c. à soupe d'eau
¾ tasse de farine
1 pincée de sel
2 tasses de lait sans lactose

Préchauffer le four à 300 °F. Graisser un moule carré de 8 po; tapisser le fond de papier parchemin et graisser de nouveau.

Dans un poêlon antiadhésif, faire fondre 2 c. à soupe du beurre. Ajouter la cassonade, les pommes et le gingembre. Cuire, en brassant souvent, pendant 10 minutes ou jusqu’à ce que les pommes soient dorées. Saupoudrer de la cardamome et réserver.

Dans une petite casserole, faire fondre le reste du beurre. Dans un grand bol, à l’aide d’un batteur électrique, battre les jaunes d’œufs avec le sucre et l’eau. Ajouter le beurre fondu, la farine, le sel et le lait en battant. Réserver.

Dans un autre bol, à l’aide du batteur électrique (utiliser des fouets propres), battre les blancs d’œufs en neige. Incorporer les blancs d’œufs à la préparation réservée sans trop mélanger pour qu’il reste des morceaux.

Mettre les pommes réservées au fond du moule à gâteau préparé. Couvrir de pâte à gâteau. Cuire pendant 55-60 minutes. Retirer le gâteau du four, laisser refroidir à la température ambiante et réfrigérer au moins 3 heures avant de démouler. (Notez que je ne l’ai pas démoulé, moi, je l’ai servi directement à partir du moule.) On peut conserver le gâteau à la température de la pièce s’il ne fait pas trop chaud, ou encore au réfrigérateur.

Quiche aux champignons et au bacon

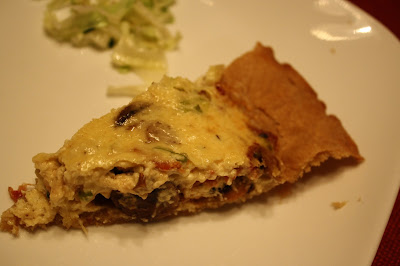
Il s’agit ici d’une recette de Coup de Pouce (toujours pas sur leur site, allez comprendre). Elle est différente de celle avec la croûte de quinoa, et l’Ingénieur et moi l’avons trouvée délicieuse! Malheureusement, le Petit Prince a décidé qu’il n’aime plus les quiches (alors qu’il y a eu une époque où j’en faisais exprès parce que je savais que ça, au moins, il allait en manger); même le bacon, qu’il adore, ne l’a pas convaincu. Dommage pour lui, mais ça en faisait plus pour nous!

La recette d’origine requiert une croûte à tarte profonde maison, mais il n’y avait pas assez de garniture pour une croûte profonde! Je recommande donc soit une croûte du commerce, soit une croûte maison déposée dans un moule à fond amovible.

4 tranches de bacon
1 ½ tasse de champignons hachés
¼ tasse d’oignons verts hachés
2 c. à soupe de thym frais haché
2 œufs légèrement battus
1 tasse de crème sure sans lactose
¾ tasse de gruyère râpé (et un peu plus pour le dessus)
1 croûte à tarte (voir note plus haut), précuite

Préchauffer le four à 375 °F.

Dans un grand poêlon, cuire le bacon à feu moyen de 3 à 5 minutes ou jusqu’à ce qu’il soit doré et croustillant. Égoutter le bacon sur des essuie-tout, puis l’émietter. Réserver.

Dans le même poêlon, ajouter les champignons et cuire en brassant pendant 5 minutes ou jusqu’à ce qu’ils soient tendres et que tout le liquide se soit évaporé (vous savez qu’il est presque impossible de trop faire cuire des champignons, n’est-ce pas ?). Ajouter le bacon réservé, les oignons verts et le thym, et mélanger. Réserver.

Dans un bol, à l’aide d’un fouet, mélanger les œufs et la crème sure. Ajouter la préparation de bacon et de champignons ainsi que le gruyère et mélanger. Verser cette garniture dans la croûte. (Ici, j’ai rajouté un peu de gruyère râpé sur le dessus, pour faire joli.)

Cuire de 25 à 30 minutes ou jusqu’à ce que le centre de la quiche ait pris, sans plus, et que le dessus soit légèrement doré (au besoin, couvrir la croûte de papier d’aluminium pour éviter qu’elle brûle). Laisser reposer 10 minutes avant de servir.

Friday, December 09, 2016

Vegan Pumpkin Cheesecake with Cranberry Topping


I didn’t go as pumpkin-crazy this year as I normally do. I didn’t even get around to my beloved pumpkin chocolate chip muffins or pumpkin brownies. I did try a wonderful chocolate-pumpkin cake with cinnamon ganache from the James Beard Foundation website, and sadly I don’t have any nice pictures of it, because otherwise that would definitely be worthy of a stand-alone post. The other pumpkin dessert I tried was this vegan pumpkin cheesecake that I adapted from The Kind Life. I didn’t feel like making candied cranberries that require pricking each fruit several times with a straight pin, 2 cups of my precious maple syrup and a candy thermometer, so I just made a quick cranberry sauce with 2 cups of cranberries, 1 cup of sugar and a pinch of ground ginger (I’d also like my regular cranberry sauce with orange segments here). You could make your own crust, of course, but I used a shortcut and bought a premade one.

I increased the amount of maple syrup to my taste, and baked the cheesecake longer to compensate. It might have been better to use sugar or a sweeter/thicker syrup instead of maple syrup to have a firmer consistency – as it was, I baked the cheesecake for 60 minutes and it was still wobbly, though it held up fine after a *full* day in the fridge (not after the recommended 3 hours). I haven’t compared the sugar content of Whole Foods’ pumpkin pie filling with other brands, but you might need less sweetener if you use another brand which happens to be sweetened more heavily. You can also just use pumpkin purée, sweetener and spices to your taste. Don’t be afraid to taste the mixture as you process it – you can always add more sweetener, so start with a small amount (the original recommendation was ¼ cup agave nectar).

12 oz. silken tofu
8 oz. vegan cream cheese
¾ can Whole Foods Organic Pumpkin Pie Filling
¾ cup maple syrup (this is my adjusted amount; see note above)
¼ tsp. ground nutmeg
¼ tsp. ground cinnamon
a 9-inch graham cracker crust
cranberry sauce, for topping (see note above)

Preheat oven at 350 °F.

Purée the tofu, cream cheese, pumpkin pie filling, maple syrup, nutmeg, and cinnamon in the food processor until very smooth, 3-5 minutes.

Pour into crust and bake for 50 minutes (I baked it 60 minutes).

Chill completely in refrigerator for at least 3 hours, ideally overnight (see note above).

Garnish with cranberry sauce, slice and serve. (If you’re not serving the whole cheesecake immediately, then only garnish individual slices with the cranberries.)

Thursday, December 08, 2016

Coconut and Ginger Oatmeal

I haven’t talked about it here, but I’ve had trouble with my teeth lately. I ended up with two crowns and a root canal on my lower left molars this fall. These weren’t my first crowns, so I knew what to expect. As it turns out, I can think of no better way to start “mindful eating” than by getting a temporary crown! You always have to pay attention to what you eat and how you eat it, and you often end up eating less overall. Anyway, that’s the reason I haven’t made granola in so long! My teeth were just too sensitive for it, so I’ve been more into oatmeal. My go-to is still this one, though I now make it with coconut milk. So I tried triple-coconut quinoa porridge from the same book, Whole-Grain Mornings. That particular recipe didn’t satisfy me as much as oats would have, though.

So when I saw coconut and ginger oatmeal on The Kitchn, I decided to try that as well. And it was wonderful! It really hit the spot. I only topped them with fruit, no nuts or seeds (as I was still recovering from my emergency dental procedures). I think this would be great with raspberries, too. The picture is poorly lit because mornings are dark now – maybe someday I’ll take myself more seriously and plate dishes in the middle of the day just for show. Until then, you’ll have to make do with a great recipe.

2 cups water
1 (13- to 14-oz.) can full-fat coconut milk
1 cup steel-cut oats
1 tsp. grated peeled fresh ginger
scant 1/8 tsp. kosher salt
toasted coconut flakes, toasted pepitas, and pomegranate seeds, for serving (optional)

Bring the water and coconut milk to a boil over high heat in a medium saucepan. Stir in the oats, ginger, and salt, and return it to a rolling boil. Reduce the heat to low and simmer, stirring occasionally and scraping the bottom of the pan, until the oats are very tender and the oatmeal is as creamy as you like it, 20 to 30 minutes. Serve immediately in bowls topped with coconut flakes, pepitas, and pomegranate seeds. (You can also save some in the fridge and reheat it before serving, perhaps adding a bit more liquid as needed.)

Wednesday, December 07, 2016

Chocolate-Ginger Shortbread Cookies


I like shortbread in theory, but I don’t use much butter now that I’m lactose-intolerant, and shortbread just isn’t quite the same with vegan margarine. Now that I know Natrel makes lactose-free butter (!), you can be sure I’ll make good use of that on my next trip to Canada, but in the meantime, I make do with margarine. I think that’s basically why I ended up not posting about these black sesame sablés, which turned out a bit dry and bland.

Nonetheless, I decided to try my hand at chocolate-ginger shortbread cookies, making some substitutions in the ingredient list along the way (because I was afraid that otherwise, I’d never get around to making them). This recipe is from Gluten-Free Girl. It was originally gluten-free, and you can use gluten-free all-purpose flour where I used wheat flour (white whole wheat, to be precise); Shauna James Ahern recommends a mixture of sorghum flour, sweet rice flour and potato starch for this particular recipe. The other change I made was to make two rolls out of the dough instead of four, because I feel like they crumble less that way (I probably slice them a bit thicker than recommended for that reason, too). I got a yield of about 32 cookies in all.

These cookies were really delicious! I love that they were a bit out-of-the-box, in that you can’t predict what it’s going to taste like just by looking at it, but the flavors went really well together.

For the cookie dough
1 ½ sticks margarine (or lactose-free butter!), cut into 1-inch cubes
1 cup sugar
1 tsp. kosher salt
2 egg yolks (I took the lazy way out and used 1 egg)
1 Tbsp. vanilla extract
½ vanilla bean, split down the middle and seeds scraped out (I used vanilla bean paste)
¼ tsp. orange blossom water
140 g. all-purpose flour (see note above)
70 g. white rice flour
70 g. cornstarch
1 tsp. psyllium husk (I used flaxseed meal)

Put the margarine into the bowl of a stand mixer. Run the mixer until the margarine is creamy. Add the sugar and salt and cream together until the mixture is light and fluffy, about 2 minutes. Add the egg yolks, one at a time, mixing until each one is incorporated. Add the vanilla extract, the vanilla seeds, and the orange blossom water. Mix, scraping down the sides of the bowl as necessary.

Whisk together the all-purpose flour, white rice flour, cornstarch and psyllium husk. Slowly add the dry ingredients to those in the stand mixer and mix until the flour is fully incorporated (the dough will look dry at first, but as you let the mixer run, it will come together).

Remove the dough from the bowl and divide into 2 equal parts (see note above). Form each half into a log about 10-12 inches long. Wrap each log of dough in wax or plastic paper and refrigerate for at least 4 hours or overnight.

For the chocolate-ginger topping
¼ cup sugar
¼ cup cocoa
1 Tbsp. peeled and grated fresh ginger
¼ cup minced candied ginger
¾ cup (about 3 oz.) bittersweet chocolate, shaved or chopped into tiny bits

Combine all ingredients on a large plate and set aside.

Preheat the oven to 325 °F. Cut each dough log into about 20 discs (I made about 16). Firmly press each disc into the cocoa mixture (you can also sprinkle extra cocoa mixture on top of the cookies). Place discs cocoa-side up on a baking sheet lined with parchment paper or a silpat.

Bake the cookies until they start to be firm to the touch and golden brown, about 15 to 20 minutes. Allow to cool before eating; once cool, store in an airtight container.

Teriyaki Latkes

This recipe was developed by Soy Vay, a company started by a Chinese woman and a Jewish man who bonded over their love of Asian flavors (and what a perfect name!). They make marinades, sauces and dressings, among other food items. I confess I didn’t use their brand of teriyaki marinade, since I already had another brand in the fridge, but the latkes turned out very well nonetheless. I’d just make one modification to the recipe: I wouldn’t soak the grated potatoes, because it relieves them of starch that would be wanted in latkes and it makes for that much more water to wring out (the wringing step wasn’t written in the recipe, but I’ve made enough latkes to know it’s essential!). That being said, I liked the step of chopping half the potatoes, which gave the latkes some bulk without making them too dough-y. The version below is my adaptation.

Surprisingly, as we were eating these, the Engineer said, “I love it when you make classic latkes!” It turns out that the teriyaki sauce wasn’t very present, and perhaps it just contributed a touch of umami to the latkes, because they did taste pretty classic. In any event, we really liked these! I served them with Asian cucumber salad and green beans.

4 potatoes
1 chopped onion (about ½ cup)
3 large eggs
¼ cup teriyaki marinade and sauce
1 tsp. salt
½ tsp. pepper
½ tsp. baking powder
¼ cup flour
vegetable oil (for frying)
lactose-free sour cream (for serving)
thinly sliced scallions (for garnish)

Grate the potatoes (I used my food processor). Take half the potatoes and chop finely (again, I used my food processor). Wring out as much water from the potatoes as possible using a clean tea towel.

In a large bowl, mix the potatoes with the onion, eggs, teriyaki sauce, salt, pepper, baking powder, and flour. If too much liquid accumulates in the bottom of the bowl, add flour as needed.

In a large frying pan, heat some vegetable oil over medium heat. Spoon some of the potato mixture into the hot oil and press down lightly to flatten. Fry until golden brown, about 4 minutes per side. Set aside on a plate lined with paper towels and repeat with remaining potato mixture.

Serve hot, garnished with lactose-free sour cream and scallions.

Tuesday, December 06, 2016

Beef and Beer Pot Pie

I got this super easy recipe from Real Simple. The pot pie is cooked right in the skillet, so you don’t lose any flavor, and it’s got carrots and squash to liven things up. The best part is the puff pastry top! It’s a great one-pot winter dish.

2 Tbsp. extra-virgin olive oil
1 lb. boneless chuck roast, fat trimmed, cut into ¾-in. pieces
1 tsp. kosher salt
1 tsp. black pepper
6 Tbsp. all-purpose flour, divided
1 ½ cups chopped leeks (from 2 medium leeks)
1 cup chopped carrots (from 2 large carrots)
2 Tbsp. chopped fresh thyme, divided
½ cup stout beer (we used non-alcoholic beer)
2 ½ cups beef stock
1 cup chopped butternut squash
½ (17.3-oz.) package of frozen puff pastry sheets, thawed
1 large egg, lightly beaten
1 Tbsp. water

Preheat oven to 425 °F. Heat the oil in a 10-inch cast-iron skillet over medium-high (I used non-stick – the main thing is that it can go in the oven, really). Toss together the beef, salt, pepper, and 2 tablespoons of the flour in a medium bowl. Add to skillet; cook, stirring often, until the pieces are browned on all sides, about 8 minutes. Add the leeks, carrots, and 1½ tablespoons of the thyme. Cook until the vegetables begin to soften, about 4 minutes. Add the beer; cook 1 minute, stirring to loosen any browned bits from the bottom of the skillet. Whisk together the stock and the remaining flour; add to the skillet and bring to a simmer, stirring frequently. Reduce heat to medium; cook, stirring occasionally, until the beef is tender and the sauce thickens, 30 to 35 minutes, adding the squash after 15 minutes.

Roll out the puff pastry gently into a 12-inch square. Place the pastry over the simmering beef mixture. Whisk together the egg and water; brush over the pastry. Cut several slits in the center of the pastry. Bake in oven until the
pastry is golden brown, about 15 minutes. Sprinkle with the remaining thyme and serve.

Nanaimo Bars

I wanted to make Nanaimo bars recently. I used this vegan recipe, but it was such an utter failure that I threw most of it away. The consistency was all wrong, I couldn’t get the three layers to set up properly, and it was a complete mess. It didn’t even satisfy my craving for Nanaimo bars, since it was so different from what it should have been! So I ended up making my friend Jen’s Nanaimo bars, since I knew her recipe worked. What was surprising was that her ingredients are very similar to those of the first recipe I tried, and yet the results were completely different! This recipe works, though, take my word for it.

The recipe calls for custard powder, which I don’t normally keep on hand, but it’s worth buying it for this. It’s actually corn starch-based and egg-free and contains just a bit of natural yellow coloring. You *could* replace it with vanilla pudding mix, and maybe throw in a drop of yellow food coloring for show, but I prefer the custard powder. Also, you could replace the egg in the base with flaxseed meal and water, and that way the dish would be entirely egg-free (assuming your graham crackers are egg-free as well).

For the base
½ cup margarine
¼ cup sugar
1/3 cup cocoa
1 egg
1 tsp. vanilla
1 ½ cup graham cracker crumbs
1 cup shredded coconut

For the filling
¼ cup margarine, at room temperature
2 Tbsp. custard powder
3 Tbsp. lactose-free milk
2 cups icing sugar

For the glaze
4 oz. semi-sweet chocolate
1 Tbsp. margarine

For the base
Grease an 8-inch square pan; lay a piece of parchment paper in it so that it overhangs, then grease again.

In a large microwavable bowl, microwave margarine until melted. Blend in sugar, cocoa, egg, and vanilla. Microwave uncovered for 1 minute, stirring after 30 seconds – the mixture should be roughly the consistency of custard (I think I accidently skipped this second step in the microwave, because I was actually using a double boiler for this). Add graham cracker crumbs and coconut and stir well. Press into the prepared pan and chill.

For the filling
Mix all the ingredients well. Spread filling evenly over base. Chill for 15 minutes.

For the glaze
Microwave chocolate and margarine on medium for 2-3 minutes, until melted, stirring after each minute (again, I did this in a double boiler because I didn’t want the chocolate to burn). Let cool for 10 minutes. Pour glaze over filling. Tilt pan back and forth so that glaze coats evenly. Chill. Cut into squares and serve.