Friday, December 20, 2019

Chocolate Tart


This chocolate tart is vegan and free of refined sugar and gluten, but that’s besides the point. I had first seen it here, but I am not crazy about crusts made out of chopped nuts, so when I saw it again here with a grain-free flour crust, I was in. It just so happened that I had all the necessary ingredients on hand, and since I wanted a gluten-free dessert for Thanksgiving, this was perfect (it would also be perfect for Christmas, just saying). You can easily make it a day ahead and keep it in the fridge until you are ready to serve it.

I changed the ingredients a bit, replacing some of the water of the filling with maple syrup, and I’m definitely recommending my way (below). That being said, as in the original recipe, there is too much filling for the crust, so what’s leftover can be refrigerated in ramequins and served as chocolate pudding. I’m sure I could fiddle with the quantities and get it just right, but who has time? I also use CocoWhip instead of making my own whipped coconut topping, because I’m never satisfied with the latter.

For the crust
½ cup (80 g) sweet white rice flour
½ cup (60 g) blanched almond flour
½ cup (45 g) cocoa powder
2 Tbsp. (12 g) tapioca flour (tapioca starch)
¼ cup (50 g) organic granulated cane sugar
¼ tsp. fine sea salt
6 Tbsp. (85 g) cold vegan butter (such as Miyoko’s or Earth Balance), diced into ½” cubes
1 tsp. vanilla extract
1 ½ oz dark chocolate, very finely chopped or grated

For the filling
1 ½ cups (225 g) raw cashews, soaked in cool water for 4-12 hours (or covered in boiling water and soaked 1-2 hours)
¾ cup (75 g) cocoa powder
2 Tbsp. (10 g) finely ground chia seed (use a spice grinder)
1 cup maple syrup
¾ cup water
1/8 tsp. fine sea salt
1 tsp. vanilla extract
½ cup + 2 Tbsp. (130 g) melted extra-virgin coconut oil

For the assembly
1 container of CocoWhip
pomegranate arils
dark chocolate shavings


For the crust
Position a rack in the center of the oven and preheat to 350 °F.

In the bowl of a stand mixer fitted with the paddle attachment, combine the sweet rice and almond flours with the cocoa powder, tapioca starch, sugar, and salt. Scatter the butter pieces over the top and drizzle with the vanilla extract. Turn the mixer to medium-low and run until the dough comes together in clumps and the butter is worked through, 3–5 minutes. (It will seem as though the dough won’t come together, but don’t worry – it will!)

Dump about half of the crumbs into a 5x13-inch rectangular loose-bottom tart pan (or 9-inch round tart pan) and press evenly into the sides of the pan. Add the remaining crumbs and press evenly into the bottom – it usually takes me a few minutes to make it look pretty.

Place the pan on a rimmed baking sheet to catch any drips and bake until slightly puffed and firm to the touch, 20-25 minutes. Remove the crust from the oven and, while it’s still hot, press the sides and bottom with the back of a spoon. (This will help it hold together when cool.) While the crust is still hot, scatter the chocolate in the bottom and let sit a few moments to melt. Use the back of a spoon or an offset spatula to spread the chocolate over the bottom and sides of the crust. Let cool completely.

For the filling
In the bowl of a blender (preferably high-speed, like a Vitamix) or food processor, combine the soaked and drained cashews, cocoa powder, ground chia seed, maple syrup, water, salt, and vanilla. Blend until very smooth, starting on low and gradually increasing to high, about 2 or 3 minutes in a high-speed blender and longer if needed. Add the coconut oil and blend briefly until smooth. Pour the filling into the crust; you’ll have about a cup left over to chill and eat as pudding. Chill the tart until firm, at least 4 hours and up to a day or two.

For the assembly
When ready to serve, remove the sides from the tart pan and place the tart on a serving board or platter. Top with CocoWhip and sprinkle with pomegranate arils and dark chocolate shavings (optional). To serve, use a large, sharp chef’s knife dipped in hot water and wiped clean between cuts to cut the tart into slices or wedges and serve. The tart will keep, refrigerated airtight, for up to several days.

More knitting from the stash

I did my best to use up some more yarn in my stash before starting another large project. I had one last skein of yarn from the Alaskan Yarn Company - it’s a sock yarn, and I believe the colorway is Denali Autumn (it looks like this). I decided to make the Sockhead Cowl, because a) the pattern was free, and b) it uses up the whole skein. At first, I wanted to make it slouchier, so I cast on more stitches than called for, but I then decided that it didn’t work. I had made enough ribbing on the first edge to satisfy me (on the right in the photo below), but then there wasn’t enough yarn to finish it symmetrically, and the stockinette part was too short as well. Plus, the way the colors lined up with my variegated yarn wasn’t pleasing.


So I cast on again with the number of stitches called for in the pattern, and it turns out it isn’t as tight as I feared, so that’s a relief. The color pattern still isn’t my favorite when it’s laid flat, but it’s better than before, and anyway it doesn’t lay flat when I wear it, so there’s that. I also learned new techniques for casting on and binding off, in a way that makes the edge particularly stretchy, and I love learning a new trick when I knit. The rest of the pattern was pretty mindless, perfect to do when watching television. I think I’ll wear this cowl when I go to Canada for the holidays!


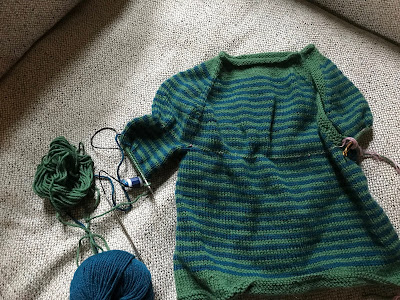
Then, I had to finish up my two skeins of green Rowan yarn, and I couldn’t find any pattern I liked. I decided to buy two skeins in a coordinating color (green teal) so that I could make the Tide Pools sweater in size 4T. I thought that if I changed the stripes pattern a bit and alternated 2 rows of each color, instead of 4 rows in the main color and 2 rows in the contrasting color, I’d have enough yarn. This is knit top down, so once I had finished the body, I knit up the collar and button bands in the main color, then weighed what I had left in order to divide it evenly between the sleeves. Well, I had a measly 11 grams left in my main color!


I figured I’d switch things up and use the contrasting color to knit the sleeve edges, but even then, the first sleeve was so short after using up 5 grams of the green that I knew I wouldn’t be happy with the sweater. I needed to get more green yarn, or frog it and start over in a smaller size. I sent an email to Jimmy Beans Wool, where I buy most of my yarn, and asked whether, by any chance, they still had a skein if green yarn left from the same dye lot. And miracle of miracles, they did! So I bought it and was able to complete the sweater, with long sleeves and green sleeve edges. I’m happy with how I did the color switch in the round, and hopefully it’ll show even less after a proper blocking. (The buttons were left over from the Gramps Cardigan.) I still have a bit of green and green teal left, so I’m adding that to the stash and hopefully I’ll get around to making fairisle hats one day!

Thursday, December 19, 2019

F*ck it, this is my meatloaf

So, I’ve been trying to make a meatloaf of which I can be proud, to no avail. I started with my grandmother’s recipe, which my mother makes as well. It’s always been good, but when I make it, it falls apart when I slice it, even when I use 2 eggs instead of 1 (as my grandmother and mother recommend for this specific reason). So eventually I tried this recipe from Pip & Ebby, called “Best Ever Meatloaf.” It specifically calls for lean meat (90% lean), there’s apricot preserves in the sauce, and the panade is made with Ritz crackers. Are you sold yet?

It was absolutely delicious, but it *still* fell apart, even though I was careful to let it rest 15 minutes after baking, as the recipe recommended. So I made it again, increasing the panade slightly (from 2 dozen Ritz crackers to a whole sleeve, which is just easier) and using fattier meat (85% lean, 15% fat) to help keep it together. This time, I had to drain the meatloaf at the halfway point in the baking time, before topping it with the sauce. It was delicious, but still crumbled. I mean, after spending a day in the fridge, it was fine, but who wants that? I *could* make it a day ahead, but I feel like a meatloaf recipe should be eaten the day of, warm from the oven.


I read refresher articles like how to make meatloaf (it’s not rocket science!), listened to Spilled Milk’s episode on meatloaf, guest-starring J. Kenji López-Alt, and then I read his recipe on Food Lab. I also used Google to find this detailed article on how to keep meatloaf from falling apart: knead the meat but not too much, salt properly, use panade, add an egg, pack it more tightly in the pan, let it rest after baking – I do all of that – then use gelatin and use different types of meat, like pork, which has more myosin.

So I halved the amount of milk in the panade and added gelatin to it, still using 85% lean beef and adding parchment paper in the pan. The meatloaf was better, especially after a day in the fridge, but still too crumbly (my notes include the acronym FFS, to give you an idea of how annoyed I was). Last week, I made one last try, using 90% lean pork and 90% lean beef in a 50-50 ratio. I made the mixture in the morning and let it rest in the fridge all day before baking it. Here’s the verdict:

This is how I will make my meatloaf from now on. It’s not perfect, but it is certainly good enough! The slices were a bit fragile, but held together, and I’m satisfied with it (especially considering that I had forgotten to line the pan with the gorram parchment paper, so unmolding was tricky). Without further ado, here is my recipe, adapted from Pip & Ebby.


For the meatloaf
½ cup lactose-free milk
1 packet gelatin
1 lb. lean ground beef
1 lb. lean ground pork
1 cup crushed Ritz crackers (from 1 sleeve of crackers)
2 eggs, beaten
½ cup ketchup
1/3 cup onion, finely chopped
1 tsp. salt
½ tsp. black pepper
½ tsp. garlic powder

For the sauce
¼ cup brown sugar
¾ cup ketchup
¼ cup apricot preserves
1 Tbsp. Worcestershire sauce

Preheat oven to 350 °F. Grease a 5”x9” pan; line it with parchment paper, leaving an overhang on 2 sides, and grease again. Set aside.

Sprinkle the gelatin over the milk, mix a bit, and set aside for 5 minutes.

In a large bowl, combine the ground meat, crackers, eggs, milk mixture, ½ cup ketchup, onion, salt, pepper and garlic powder. Mix together with your hands until thoroughly combined.

Pour the mixture into the prepared pan and spread evenly. Place the pan on a rimmed baking sheet and bake in the preheated oven for 1 ½ hours.

In a small bowl, combine ¾ cup ketchup, brown sugar, apricot preserves and Worcestershire sauce. Mix well. Spread the mixture evenly over the meatloaf halfway through baking. Let meatloaf sit for 15 minutes before slicing and serving.

Bubbie Gilda's Latkes


When I cook, I’m always very careful to keep my cookbooks away from my work surface. This means more back-and-forth between the book and the actual work being done, sure, but that way I get to keep my book clean. I even have a book holder with a splashguard. I’m the kind of person who always takes care of her books, not cracking the spine, not bending the pages, not writing in them… That being said, when I opened Second Helpings, Please! to make Bubbie Gilda’s latkes last December, the page was completely covered in splatters, and… I loved it. It makes me feel connected to family history, knowing that she stood at her counter with this book and made these same latkes year after year. Hanukkah is starting this weekend – I hope you get to make latkes! This recipe makes about 2 dozen.


6 potatoes
1 small onion
3 eggs
1 tsp. salt
¼ tsp. pepper
¼ cup flour
1 Tbsp. oil
2 tsp. baking powder

Peel and grate potatoes and onion; drain well (I have a dedicated dishcloth for squeezing liquid out of potatoes when I make latkes). Blend in remaining ingredients. Drop from a spoon into hot oil and brown on both sides, turning only once. Serve with applesauce or lactose-free sour cream.

Wednesday, December 18, 2019

Carrés aux cerises et aux amandes


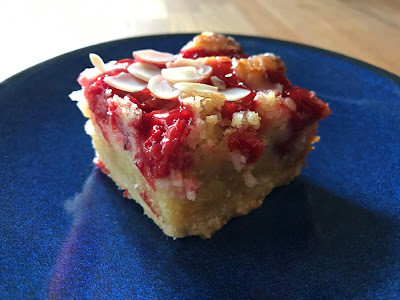
Il s’agit d’une recette de Ricardo, qui avait l’air vraiment excellente. Je me souviens d’avoir souvent vu (et parfois acheté) des griottes rouges dénoyautées à Montréal, dans un gros pot en verre. Je n’en ai pas trouvé ici, alors je me suis rabattue sur une boîte de garniture à la tarte aux cerises – les deux avaient environ le même format, les deux sont dans le sirop… C’est sûr que le sirop de la garniture à tarte est bien plus épais et ne peut pas vraiment être séparé des cerises, et donc elles restent plutôt en surface de la pâte, mais c’était ça ou rien. Et c’était absolument délicieux! On a vraiment adoré.

Dans les commentaires sur le site de Ricardo, c’est écrit qu’on peut remplacer l’amaretto par 1 c. à thé d’essence d’amande et 2 c. à thé d’eau. À noter que le dessert se conserve très bien à la température de la pièce.

Pour la pâte sablée
1 tasse (150 g) de farine tout usage non blanchie
¼ tasse (35 g) de sucre à glacer
6 c. à soupe (85 g) de beurre sans lactose ou de margarine, à la température de la pièce

Pour la crème d’amandes
1 tasse (130 g) de poudre d’amandes légèrement tassée
3 c. à soupe (25 g) de fécule de maïs
1 c. à soupe de farine tout-usage non blanchie
½ tasse (115 g) de beurre sans lactose ou de margarine, à la température de la pièce
¾ tasse (160 g) de sucre
2 œufs
¼ tasse de lait sans lactose
1 c. à soupe de liqueur d’amande (amaretto)
1 pot (19 oz.) de griottes rouges dénoyautées dans un sirop léger, égouttées (voir note plus haut)
¼ tasse (30 g) d’amandes tranchées

Pour la pâte sablée
Placer la grille au centre du four et le préchauffer à 350 °F. Beurrer un moule carré de 20 cm (8 po) et tapisser le fond de papier parchemin en le laissant dépasser sur deux côtés; beurrer de nouveau.

Dans un bol, mélanger la farine et le sucre à glacer. Incorporer le beurre. Presser la pâte dans le moule.

Cuire au four 10 minutes ou jusqu’à ce que la pâte soit légèrement dorée.

Pour la crème d’amandes
Entre-temps, dans un bol, mélanger la poudre d’amandes, la fécule de maïs et la farine.

Dans un autre bol, crémer le beurre avec le sucre au batteur électrique. Ajouter les œufs, un à la fois, et battre jusqu’à ce que le mélange soit homogène. À basse vitesse, ajouter les ingrédients secs en alternant avec le lait et la liqueur d’amandes. Répartir la crème d’amandes dans le moule sur la pâte encore chaude.

Répartir les griottes égouttées sur la crème d’amandes, puis parsemer des amandes tranchées.

Cuire au four 1 heure ou jusqu’à ce que la crème d’amandes soit ferme au centre et qu’elle soit dorée. Laisser refroidir complètement avant de démouler. Couper en carrés.

Tuesday, December 17, 2019

Sweet Potato Tacos

Hey, it’s Taco Tuesday! I realize that this is somewhat like the sweet potato fajitas I posted about two years ago. I mean, I love roasted sweet potatoes, and I love tacos, so… these sweet potato tacos from Smitten Kitchen were right up my alley. But it turns out they were even better than the sum of their parts! They were really fantastic. I made sure that they weren’t spicy, so both kids cleaned their plate (provided that they could decide which toppings, if any, to use in addition to the refried beans and sweet potatoes). The most brilliant thing here, though, was that the refried beans acted as a sort of glue that kept most of the toppings inside the taco, making for fewer tantrums from the youngest members of the family, plus it was easier for them to eat, so really, everybody wins. I need to remember to use refried beans in tacos from now on! (For the record, I called it a “purée” and didn’t mention the word “beans”, because both my kids like hummus but they won’t eat chickpeas, so there you have it.)

I made quick-pickled onions, which I recommend, and added sliced avocados and cilantro as toppings. I would have used lactose-free sour cream if I’d had it on hand, too. I couldn’t find black refried beans, so I used red. If you want to prep all the tacos in advance, take a page from Deb Perelman’s book and nestle them in a casserole dish to serve at the table (bonus points if you warm the dish first). As for me, I let the kids decide what they wanted in each of their tacos and made them one at a time, and we ate this over two nights.

For the quick-pickled red onions
¼ cup red wine vinegar
¼ cup cold water
1 ½ tsp. granulated sugar
1 Tbsp. Diamond Crystal kosher salt (or half as much Morton kosher salt)
1 thinly sliced red onion

Mix the sugar and salt into the vinegar and water until they have dissolved. Add red onion. Let marinate for at least 30 minutes; this will keep for a week or two in a jar in the fridge.

For the tacos
2 lb. sweet potatoes (about 4 medium), peeled and cut into ½ to ¾” cubes
2 Tbsp. olive oil
1 heaped tsp. kosher salt
1 heaped tsp. ground cumin
½ tsp. garlic powder
½ tsp. onion powder
1 generous pinch Korean pepper (or as much chili pepper or hot sauce as you want)
½ tsp. sweet smoked paprika
12 small (6-inch) tortillas
1 15-oz. can of refried black beans
1 lime, in wedges
sliced avocado, pickled red onions, chopped fresh cilantro, or your favorite taco toppings

Heat oven to 400 °F. Line a baking sheet with parchment paper (this makes cleanup easier, but your potatoes will get a bit crisper if you roast them directly on the baking sheet – if you do that, use 3 tablespoons of oil instead of 2).

Toss sweet potatoes with oil, then add salt, cumin, garlic powder, onion powder, chili powder, chipotle powder, and paprika and toss to evenly coat. Spread the potatoes in a single layer on the prepared baking sheet. Roast potatoes for 40 to 45 minutes, tossing once or twice for even color.

Wrap the tortillas in foil and put them in the oven for the last 5 minutes of baking.

To assemble, schmear refried black beans on each tortilla. Add a big spoonful or two of roasted sweet potatoes. Squeeze a little lime juice over the potatoes and black beans (don’t skip this, please), and finish with toppings of your choice, shown here with sliced avocado, pickled red onions, and cilantro. Repeat with the remaining ingredients.

Monday, December 16, 2019

Carrot Puddings

I got this recipe from Apricot Lane Farms (remember The Biggest Little Farm?). It was really good! Everybody liked it, and I don’t think anyone guessed what was in it.

I changed the recipe to make 8 servings, and those are the amounts I’m using below. I don’t have lactose-free cream here, so I used coconut milk instead. The original recipe also calls for coconut cream, by which they mean the fat at the top of a can of coconut milk, but I used the fat at the top of a can of coconut cream. That being said, I think that was a bit too much fat, because once refrigerated, it had a grainy mouthfeel that I found unpleasant; next time, I’d use just coconut milk, so that’s what I’m writing below (there’s also arrowroot starch and egg yolks as thickeners). I’m not sure what the exact amount should be, but I think somewhere around 3 cups – admittedly, that’s a bit inconvenient, because it’s less than 2 cans, but I think that 1 can would not be enough, and 2 full ones would be too much. Maybe it would work out better with 1 can of coconut milk and the fat from the top of a refrigerated can of coconut milk (instead of a can of coconut cream), but I haven’t tested it. And I used store-bought pasteurized carrot juice because it’s just so much easier, but if you make your own, make sure to strain the pulp.

3 cups coconut milk (see note above)
2/3 cup maple syrup
1 generous pinch sea salt
1 tsp. vanilla extract
1 cup carrot juice (see note above)
2 Tbsp. arrowroot starch
8 egg yolks

In a small pot, over medium heat, combine the coconut milk, maple syrup, vanilla extract and sea salt. Stirring frequently, heat liquid to a near simmer (liquid will be hot to the touch and beginning to steam). Use caution not to scald the mixture.

While warming mixture, in a small bowl, combine carrot juice, arrowroot starch, and egg yolks. Whisk until well combined.

When coconut milk mixture is very warm, add well-whisked carrot juice mixture. Whisk constantly until thickened, about 5 minutes.

Remove from heat and pour into ramequins (mine have roughly a ½-cup capacity, and I had 8 servings). Refrigerate until ready to serve, at least 1 hour. To serve, puddings can be topped with chopped nuts or raisins, finely grated carrots, or lactose-free whipped topping, if desired.

Friday, December 13, 2019

Olive Oil Bundt Cake with Beet Swirl


I first saw this cake on Instagram last May. It looked so beautiful that I took a screencap of it, to make sure I’d remember to look up the recipe. It was created by Jerrelle Guy, she of Chocolate for Basil. Her website was down at the time, but I eventually realized that she had created the recipe for New York Times Cooking, so I bookmarked it. And still I waited, because the Engineer had clearly told me that he’d had enough of my chocolate beet confections for a while… But I reasoned that since this isn’t chocolate, it’s not technically infringing upon the moratorium, so I made it this fall.

At first, I followed the instructions for the beets: peel, chop and roast before puréeing. But they just weren’t getting tender! After an hour, I wrapped them in foil to avoid losing too much moisture and left them in the oven another 20 minutes. Nope – they were still too hard to purée; so I chopped them smaller, put them in a bowl with some water, covered it and microwaved them a total of 6 minutes. Nope, nope, nope – I couldn’t save them – they were too dry and hard for anything good to come out of them. So I shelved the project and made something else for dessert that day. I bought more beets and tried it again my way: wrap in foil, roast, then trim and peel, and purée. It worked out perfectly, and I had gorgeous, smooth, tasty roasted beet purée, so I’m writing down my method below. I also reordered the ingredients and some of the steps to make it easier.

This cake was absolutely stunning! I don’t think you should wait for a special occasion, but if you did, it would look beautiful at Christmas. (Just make sure to let it cool all the way before you cut into it, or the colors might smear.) And it was absolutely delicious, not too sweet; you can taste the beet, but it’s not off-putting at all. Make sure you use a great olive oil for this, too. We loved this cake, even the Engineer.

1 ¼ lb./570 g. beets (I had 4 small ones)
3 ½ cups/450 g. all-purpose flour, plus more for dusting
1 ½ cups/300 g. granulated sugar
1 Tbsp. baking powder
¼ tsp. baking soda
1 tsp. kosher salt
1 cup lactose-free whole milk
1 Tbsp. lemon zest plus ½ cup fresh lemon juice (from 3 or 4 lemons)
5 eggs, beaten
1 ½ cups quality extra-virgin olive oil (plus a splash more for roasting the beets, optional)
confectioners’ sugar, for dusting

Preheat the oven to 425 °F. Grease and flour a 10-inch Bundt pan.

Wrap each of the beets in foil (you can add a splash of oil if you want), place them on a baking sheet, and roast until fork-tender (this was 1 ½ hours for me). Take them out of the oven and, once they have cooled, trim and peel them (the skin will slip right off). Purée the beets – I like using the food processor for this. Transfer the beet purée to a medium bowl and set aside. Lower the oven temperature to 325 °F.

In a large bowl, whisk together the flour, sugar, baking powder, baking soda and salt. Set aside.

In another medium bowl, whisk together the milk, lemon zest, lemon juice, and eggs. Whisk in the olive oil.

Make a well in the center of the dry ingredients and pour in the wet ingredients, continuing to whisk, beginning in the middle and moving outward, until just combined. Transfer 2 cups of the batter to the bowl with the beet purée and gently fold it in until combined.

Pour about half of the plain batter into the base of the prepared Bundt pan. Next, pour half of the beet batter on top, followed by half of the remaining plain batter. Top with the rest of the beet batter, then with the last of the plain batter. Bake until a toothpick inserted into the center comes out clean, 50 to 60 minutes (my oven runs hot, and this took 1 h 10 min for me).


Remove the cake from the oven and allow it to cool. (The original recipe had it cool in the pan for only 5 minutes, but I always let it cool completely.) Loosen the cake from the edges of the pan and carefully invert it onto a serving tray – for what it’s worth, the unmolding was textbook-perfect for me and it gave me a thrill to see it! (Let the cake rest for at least a few hours total, otherwise the swirls will blur together when you cut it.) Dust with confectioners’ sugar before serving.

Thursday, December 12, 2019

Snickerdoodles


I didn’t grow up with snickerdoodles, in part because they are largely unknown to francophones (or at least, they were when I was little), and in part because my mother hates cinnamon, so these are the last thing she would have made. But then there was an episode of Spilled Milk about them, and they talked about the Serious Eats recipe by Stella Parks. It calls for coconut oil instead of the typical shortening, which certainly tastes better. I don’t have lactose-free butter in the States, so I used Earth Balance butter. And I made them with ground Ceylon cinnamon, because I was a bit too lazy to grate my own cinnamon. But we all loved these cookies! They were absolutely delicious, and very addictive. It turns out the Little Prince is particularly fond of cinnamon, so this was a special treat for him. I’ll be making these again!

I’m leaving all the super precise weight measurements in there because Stella Parks obviously went through a lot of trouble to develop a precise recipe, but I measured some things by volume only (like the baking powder, vanilla, or egg).

For the cookies
4 oz. lactose-free butter or margarine (1 stick; 114 g.), firm but pliable, about 60 °F (16 °C)
3 oz. virgin coconut oil (heaping 1/3 cup; 85 g.)
10 ½ oz. sugar (about 1 ½ cups; 298 g.)
1 ¼ tsp. (6 g.) Diamond Crystal kosher salt (or the same weight of another salt)
1 tsp. (4 g.) baking powder
½ oz. vanilla extract (about 1 Tbsp.; 15 g.)
1 large egg, straight from the fridge (about 1 ¾ oz.; 50 g.)
10 ½ oz. ounces low-protein all-purpose flour, such as Gold Medal (about 2 1/3 cups, spooned; 295 g.)

For the cinnamon sugar
2 oz. sugar (¼ cup; 57 g.)
2 ¾ tsp. (5 g.) ground cinnamon
1 ½ tsp. (1.25 g.) freshly grated cinnamon

For the cookies
Adjust oven rack to middle position and preheat to 400 °F. Line a baking sheet with a silpat or parchment paper.

Combine butter, coconut oil, sugar, salt, baking powder, and vanilla in the bowl of a stand mixer fitted with the paddle attachment. Mix at low speed to combine, then increase to medium and beat until soft, fluffy, and pale, about 5 minutes, although the exact timing will vary. Halfway through, pausing to scrape the bowl and beater with a flexible spatula, and then resume mixing on medium speed. Add the egg and continue beating until smooth. Reduce speed to low, add flour, and mix to form a stiff dough.

Using a cookie scoop, divide dough into 2-tablespoon portions. If you like, these can be transferred to a zipper-lock bag and refrigerated for up to 1 week, or frozen for up to 3 months; soften to about 68 °F (20 °C) before baking.

For the cinnamon sugar
Mix sugar with ground and grated cinnamon in a small bowl, adding more spice if you prefer. (It should taste very intense, to offset the mild dough.) Roll each portion of dough into a smooth and sticky ball, then tumble in cinnamon sugar until fully coated. Arrange on a baking sheet, leaving 2 ½ inches between balls, then flatten into 2-inch disks about ½ inch thick. Generously cover with the remaining cinnamon sugar, creating a thick layer that will crack and crinkle in the oven. (I made a total of 20 cookies, so I baked half at a time and made sure to save half the cinnamon sugar for the second batch.)

Bake until the snickerdoodles begin to spread, about 5 minutes, then reduce temperature to 350 °F. Continue baking until firm around the edges but steamy in the middle, about 6 minutes longer (5 in my case, to get perfectly chewy cookies). Cool directly on half sheet pan until the crumb is set, about 8 minutes. Enjoy warm, or store in an airtight container for up to 3 days at room temperature.

Petites boulettes de porc laquées

Je sais, je vous ai déjà parlé de boulettes de porc de Ricardo pas plus tard que la semaine passée, pis là je vous reviens avec… des boulettes de porc… de Ricardo. Bon, mais ce ne sont pas les mêmes! Il s’agit ici d’une recette publiée dans La Presse+ il y a un an ou deux, pour faire des amuse-bouche pour Noël. J’ai transformé la recette un peu (les assaisonnements ci-dessous sont les miens) et je l’ai servie comme souper, avec du pain de maïs. Je vous donne quand même la recette version amuse-bouche, qui était faite pour être enfilée sur de petits bâtonnets (plus gros qu’un cure-dent, mais plus petits qu’une brochette). Pour en faire un repas, j’avais doublé la recette et obtenu 32 boulettes. On a tous adoré!


Pour la laque
¼ de tasse de sauce soya réduite en sodium
2 c. à soupe de cassonade
2 c. à soupe d’eau
2 c. à soupe de mirin

Pour les boulettes
225 g (½ lb) de porc haché maigre
15 g (¼ de tasse) de chapelure panko
1 jaune d’œuf (pour doubler, j’ai pris 1 œuf entier)
2 c. à thé de cassonade
½ c. à thé de sauce de poisson (nuoc-mam)
1 soupçon de sambal oelek ou de sauce tabasco
1 oignon vert, haché finement
10 g (¼ de tasse) de feuilles de basilic ciselées
2 c. à soupe d’huile végétale

Pour la garniture
1 pomme verte, épépinée et coupée en petits triangles de 5 mm (¼ de po) d’épaisseur
petites feuilles de basilic


Pour la laque
Dans une petite casserole, porter à ébullition tous les ingrédients. Laisser mijoter 5 minutes ou jusqu’à ce que la laque soit très sirupeuse. Couvrir et réserver.

Pour les boulettes
Entre-temps, dans un bol, mélanger tous les ingrédients, à l’exception de l’huile. Avec les mains légèrement huilées, former des boulettes avec environ 2 c. à thé du mélange de viande pour chacune.

Dans une poêle antiadhésive à feu moyen, cuire les boulettes dans l’huile de 6 à 8 minutes ou jusqu’à ce qu’elles soient complètement cuites. Éponger sur du papier absorbant. Nettoyer la poêle. Remettre les boulettes dans la poêle. Ajouter la laque et mélanger délicatement pour bien enrober.

Sur des brochettes, enfiler les feuilles de basilic, les boulettes et les morceaux de pomme.

Tuesday, December 10, 2019

Corn Dog Muffins

I don’t know if you remember the corn dog muffins I told you about late last spring. (I’m tempted to call them pogo muffins, because Pogo was THE brand of corn dogs when I was growing up, but I’m not sure non-Canadians get the reference.) We love the ones I make with Jiffy mix, but they crumble so much that I had to find an alternative. I could have tried more corn bread mixes in the hope of finding one that doesn’t crumble, and maybe I will eventually, but for now I wanted an actual recipe.

On the recommendation of a friend, I first tried Cook’s Illustrated’s all-purpose corn bread, which calls for fresh corn. It was great, but unfortunately the Little Prince didn’t like it (because of the corn kernels!), and since I was looking for a recipe primarily for his lunches, this won’t work. The recipe on Weelicious was for miniature muffins, and I didn’t feel like adapting it unless I really had to, so I set it aside. Then I saw that Deb Perelman had a recipe titled perfect corn muffins on Smitten Kitchen, and you guys, this is it.

These muffins are delicious and exactly the kind of cornbread I like, which is to say sweet Northern cornbread. They call for yellow cornmeal (NOT coarsely ground), and some of the cornmeal is cooked before being mixed in, which I believe is what helps these muffins hold together so well. The Little Prince, the Fox and I loved them! Note that the muffins plump up beautifully, so much so that the sausages were hidden, so you might want to pop them in the muffins halfway through baking. I got a total of 16 muffins, and can tell you that greasing the pan works better than using paper liners. They are also excellent without sausages, FYI.

2 cups (280 g.) yellow cornmeal, divided
1 cup (130 g.) all-purpose flour
1 ½ tsp. baking powder
1 tsp. baking soda
1 ¼ tsp. fine sea or table salt
1 ¼ cups lactose-free milk (ideally whole)
1 cup (240 g.) lactose-free sour cream (I used full-fat plain yogurt)
8 Tbsp. (1 stick) lactose-free butter or margarine, melted and cooled slightly
5 Tbsp. (60 g.) sugar
2 large eggs
4-5 cooked hot-dog sausages, cut crosswise into thirds (and lengthwise in half if serving to small children)

Preheat oven to 425 °F. Either grease or line a 12-cup standard muffin tin with disposable liners (again, I recommend greasing, and I got a total of 16 muffins).

Whisk 1 ½ cups cornmeal, flour, baking powder, baking soda and salt together in a medium bowl.

In a medium saucepan, combine milk and remaining ½ cup cornmeal. Cook cornmeal mixture over medium heat, whisking constantly, until it thickens so that the whisk leaves a clear line across the bottom of the pan that slowly fills in. Transfer to a large bowl and let cool a bit.

Whisk butter, then sugar, then sour cream into cooked cornmeal until combined. At this point, the wet mixture should be cool enough that adding the eggs will not scramble them, but if it still seems too hot, let it cool for 5 minutes longer. Whisk in eggs until combined. Fold in flour mixture until thoroughly combined and the batter is very thick. Divide batter evenly among prepared muffin cups; it will mound slightly above the rim. At this point, if you don’t mind the sausages ending up hidden, you can add a piece of sausage to each muffin.

Bake until tops are golden-brown and toothpick inserted in center comes out clean, 13 to 17 minutes, rotating muffin tin halfway through baking to ensure even cooking (if you haven’t inserted the sausages into the muffins yet, do it at the halfway point). Let muffins cool in muffin tin on wire rack for 5 minutes, then remove muffins from tin and let cool 5 minutes longer. These are great warm, but at room temperature and even cold, they were appreciated by my kids and husband.

Natural Bridge Caverns

For our October outing, we finally went to Natural Bridge Caverns. I say “finally” because we’d been meaning to go for a while, but it’s not stroller-friendly (the trail is paved, but there are stairs as well as steep inclines and curves, and it’s slippery), so we had to wait until the Fox was older. Even then, the Engineer had to carry him much of the way, but we’re glad we visited!

It’s a registered National Natural Landmark because of all the beautiful examples of geological formations (it’s also on the National Register of Historic Places because of the artifacts that were found there, some dating back 10,000 years). The cave was discovered in 1960 by four local college students (and the one who felt a draft from a crawlway, leading to the huge inner rooms, has the awesome name Orion Knox). The namesake natural bridge is outside the entrance of the cave; it spans roughly 60 feet and was formed about 5,000 years ago.

The temperature is 70 °F year-round, which sounds comfortable, but the humidity level is 99% AND you’re essentially hiking for over an hour, so things got hot and we were certainly glad to feel the breeze again once we got out (I believe it was in the 50s that day). The stalactite and stalagmite formations are very impressive and have names like “Castle of the White Giants” and “Watchtower” and well as the “Hall of the Mountain King”. There are even helictites!

The place also has a massive obstacle course, and it looks really fun, but it wasn’t open yet on our visit – we’ll have to come back someday.


On a separate outing, we went for a long walk on the paved trail in Panther Springs Park, turning back when the Little Prince was tired. It’s a really pleasant area and I hope to explore it more at some point.