- Reading the March issue of Bon Appétit, I got angry over a comment made by Andrew Knowlton: “Here are a few things I ate last week: pho ga, xiao long bao (a.k.a. soup duplings), migas tacos, and a falafel sandwich. I wasn’t even jet-setting around the globe – it was just another average week of great meals right here in the U.S.A. How many other places on the planet can you eat this diversely? Zero.” Um, what? Just off the top of my head, I’d say Canada (Montreal alone has all those things), and I’m sure my readers could chime in with their answers as well. To me, this reeks of misplaced American exceptionalism, and it’s odd coming from a man who is actually well traveled (he mentions unsuccessfully trying to find an edible burrito in Norway and decent sushi in China). He goes on to talk about America’s melting pot and fusion cooking, but again, it’s not like the U.S.A. is the only country to experience that phenomenon. That’s pretty disappointing.
- I’ve never eaten at Austin’s Franklin Barbecue, for the simple reason that I don’t want to spend hours standing in line. Turns out, I could hire a middle-schooler to do it for me.
- Edible spoons, people. As the Engineer said, “Shut up and take my money!”
- Are you looking for good gluten-free breading? Try rice cakes!
- I never buy pre-grated parmesan cheese because in my experience, it sometimes contains lactose, even when the label says “100% real parmesan cheese” – I buy wedges of it, which are a bit pricier but totally worth it. So I was feeling very pleased with myself when it came out this week that the parmesan you sprinkle on your penne could be wood and might contain no real parmesan whatsoever, despite what the label claims.
- There’s a charity called Lucky Iron Fish that aims to end iron deficiency worldwide with a simple, affordable iron trinket to be deposited into the pot while you cook. Ingenious!
- McDonald’s new kale salad has more calories than a Big Mac, so don’t feel too virtuous if you eat it (though I’m sure it has more vitamins and minerals, too). I think this is only available in Canada for the moment.
- A history of dinner at the Oscars, because the ceremony is this weekend.
- Pantelligent is a smart frying pan that aims to help you cook better.
- I talked about Soylent before, but I thought I’d share this article written by someone who tried it for a month. To recap, Soylent is a balanced food replacement whose aim is “delivering brutally efficient nutrition.” This is something of which I’m aware mostly because the Engineer “eats” Soylent for breakfast and lunch on weekdays, and it works for him. Soylent is now vegan and should become kosher again soon; they now deliver to Canada as well as the U.S. It certainly looks sounder, albeit less exciting, than the healthy ice cream diet.
- There is now such a thing as human libraries, where instead of borrowing books, you “borrow” humans – i.e. have a conversation with them. That way, if you’re trying to find out more about what it’s like to be autistic, immigrant, obese, chronically ill, etc., you can get it straight from the horse’s mouth, so to speak.
- Did you see Sports Illustrated’s swimsuit issue? There is a beautiful, curvy woman on the cover!
- You’ve heard by now that Barbie got a makeover last month: she now comes in four body types, and the skin and hair are customizable. Time had a great article about it (and if you don’t have access to it, you can check out the new Barbies in this article). My kneejerk reaction is that this is fantastic; however, as is explained on Epbot, we still have a long way to go. How is it that the “curvy” Barbie is still smaller than the average American woman, yet is perceived as fat? This is how Barbie would look like if she were an average woman. I’ve said it before and I’ll say it again: if you want realistic body types, natural looks, or dolls with disabilities, try Lammily, Tree Change Dolls (video here) or Makies, respectively. Also, see here for female superhero dolls. (To be clear: I grew up playing with Barbies, including my mother and my aunt’s vintage Barbie and Scooter, and I do have a soft spot for them despite their shortcomings.)
- An interesting article on Q-Tips (really). It’s “one of the only, if not the only, major consumer [product] whose main purpose is precisely the one the manufacturer explicitly warns against.”

Friday, February 26, 2016
Gloria Steinem's interview in Land's End
I received a Land’s End catalog in the mail yesterday, the Spring 2016 issue (it must have come with Wednesday’s mail, but I only checked our mailbox yesterday morning). In it there is an interview with Gloria Steinem, who appears in an accompanying photoshoot wearing Land’s End clothing. I thought it was pretty neat, though I wondered if maybe that could be considered selling out a bit (promoting clothes to get one’s message across). So imagine my disgust upon finding out last night that Land’s End has pulled the interview from their website and has apologized for it, in addition to removing the possibility on their website for customers to donate to the ERA Coalition’s Fund for Women’s Equality through monogramming. This was apparently done over complaints made by pro-lifers (or, as I like to call them, anti-choicers). Frankly, I think Land’s End should apologize for its apology, both to the rest of its customer base and to Gloria Steinem (and I’m not the only one)! This has me so upset that I’ve decided to reprint the interview here, in case anyone wants to read it who isn’t subscribed to the paper catalog. Any typos are mine. Note that there really isn’t anything controversial in this interview, quite the contrary. Also note that the introduction sentence to this article makes Land’s End look particularly in the wrong to have retracted it.
Introducing the Legend Series, our ode to individuals who have made a difference in both their respective industries and the world at large. We honor them and thank them for paving the way for the many who follow.
Gloria Steinem – The Woman Who Paved the Way
By Federica Marchionni, CEO
In her new book, My Life on the Road, legendary writer, lecturer, editor and activist Gloria Steinem writes, “If you want people to listen to you, you have to listen to them. If you want people to see you, you have to sit down with them eye-to-eye.” I couldn’t help but recall these messages when I sat down with her to discuss her life, her lessons and her legacy.
FM: When I first came to the United States, I started using a quote of yours as my own. It said, “Dreaming, after all, is a form of planning.” In my opinion being a dreamer means that along the way you’ll have to be brave. And you have proved that throughout your life. Where did that courage come from?
GS: The rest of the quote was, “If our dreams weren’t already real inside of us, we couldn’t even dream them.” I don’t think this requires a great deal of courage because our dreams already have a kind of reality. If we don’t imagine what could be, we can’t reach for it. Dreams are bigger than goals; they’re more personal.
FM: So are you a rule breaker?
GS: I felt that there was an unjust, irrational situation, and that we were just trying to say what made sense, what was rational, what was equal or what was kind. I didn’t feel that I was being so brash at the time, just pointing out unfairness – as I would want someone to say to me if I was doing something unfair.
FM: The other thing that I see from your experience that’s very close to my philosophy is change. You changed the landscape, creating Ms. magazine. What was your first step?
GS: We were simply trying to create a women’s magazine that we read – one that addressed real issues in women’s lives and could also publish new fiction writers and new poets and news of women in other countries. We wanted to create something that would be like a helpful friend coming into your house once a month.
FM: What do you think the key challenges are for women in today’s workplace?
GS: It differs from woman to woman. For some, it’s trying to both look after children and have a work life. For others, it’s inequality in general. Every group of women is most effective when we’re working on that which we really understand and know. We just need to support each other while we’re doing it.
FM: As a mother myself, I am well aware of the challenges facing working parents today. I’m so proud that for many years Land’s End has offered a subsidized childcare center on our campus.
Indeed, there is still so much that we need to teach our daughters and our sisters, the ones coming behind us. What is the project you feel you have yet to complete; the one that you would like to make sure is passed on to those behind you?
GS: We’re still not part of the Constitution of the United States. One reason we need an Equal Rights Amendment is because nowhere in the Constitution does the word “women” appear. We need a constitutional principle of female equality. The Equal Rights Amendment would give us a constitution that prohibits gender discrimination. That’s why we started the ERA Coalition (www.eracoalition.org).
FM: Tell me more about it. What is it you’d like to achieve with this amendment?
GS: It’s a statement of principle. It just says that men and women have equal rights, and that equality under the law shall not be denied. From 1972 to 1982, we tried to get the Equal Rights Amendment into the Constitution, but we fell short by three states of getting it ratified. So now, there is a new national effort to remedy this situation in which discrimination against women is not mentioned in the Constitution. The Equal Rights Amendment would be good for men as well as women, and equality is a fundamental American value.
FM: I have always strived to lead with purpose and can’t help but be inspired by your incredible life; if there were one lesson you could bestow on those who look to you as their beacon, what would it be?
GS: The truth is that each person is a unique miracle, a combination of millennia of heredity and environment that could never have happened before in exactly the same way, and could never happen again in exactly the same way. Yet at the same time, we share everything as human beings. We can both find our unique voice and realize that as human beings, we are linked, not ranked.
FM: Thinking about Land’s End, for me, it’s a journey, one that compels you to take whatever roads lead you in your own direction. In your new book, My Life on the Road, you write, “Taking to the road – by which I mean letting the road take you – changed who I thought I was.” Who was it that you thought you were all those years ago? And who is it you believe yourself to be now?
GS: I meant that literally because I was a writer, and before that I had been a dancer – both professions in which you don’t have to talk. When I couldn’t get articles about the then new women’s movement to be published, in desperation, I began to speak about it instead – though I was terrified of public speaking. In that way, I discovered that something happens when we are all together in a room with all five senses that cannot happen on the printed page or the screen. Some literal magic happens when we are in the same space with one another. Our species would not have survived if we didn’t automatically feel the urge to help another member when they’re in trouble – because of that leap of empathy.
FM: That is one of the reasons I was so pleased to introduce you as our Legend. Making personal connections and speaking to our customers on a much deeper level is so important to me and to Land’s End. You have spent your life making deep connections with people across the globe.
For many of us, personal style is what gives us the confidence we need to make lasting impressions on the world. How has your own personal style given you confidence in your endeavors as you make first and lasting impressions every day?
GS: Thankfully, I had an instinct that told me I didn’t need to dress a certain way to accomplish my goals, even if I still felt slightly at fault for not being a “lady.” Still, it took me a while to find my own authentic style and not be seduced by any passing fashion.
You might say that Land’s End is helping people become themselves by choosing exactly what suits them, what feels comfortable, and is an expression of themselves. I think what Land’s End offers is authenticity and simplicity.
Fashion is what someone else tells you to wear, but style is about personal expression and freedom.
FM: Any final words of wisdom?
GS: What I always tell people is that the wisdom about our lives is already within us. I’m here less to give advice than to urge people to listen to themselves and to offer support to each other. Just ask yourself: What do you love to do so much that you forget what time it is while you’re doing it?
FM: I just want to thank you for joining us, on behalf of myself, the men and women at Land’s End, and our customers. Thank you for sitting down with me and for everything you have done with your meaningful life.
In honor of Gloria’s work, we’ll donate 50% of the monogram fee to the Fund for Women’s Equality for every ERA logo ordered. Add it to your choice of styles. Find out more at landsend.com.
Chocolate, Peanut Butter and Banana Mousse Tart


This is a recipe I got from Call Me Cupcake. It was originally called a chocolate mousse cake, but I don’t like that name for two reasons: 1) this isn’t a cake; and 2) chocolate isn’t even the dominant flavor. You can very much taste the banana and peanut butter; it’s a good mix, but not the decadent chocolate treat I was expecting. I am omitting the coffee from the filling below, because I felt it was too much, but I’m leaving the coffee in the crust as is. Note that this makes a very small cake, but the original recipe says it could be doubled and put in a bigger mold (and it also says that if you forget to soak your cashews overnight, you can soak them in very hot water for 1 hour instead).
For the crust
½ cup (100 g) pitted dates
½ cup (85 g) almonds
¼ cup (25 g) shredded coconut
1 Tbsp. cocoa powder
pinch of salt
½ to 1 Tbsp. espresso or strong coffee (optional)
For the filling
½ cup (85 g) cashew nuts, soaked in water overnight, then drained
3 Tbsp. coconut oil
1/3 cup coconut milk
2 Tbsp. cocoa powder
2-3 Tbsp. maple syrup (to taste)
1/2 cup peanut butter
1 banana
For the chocolate sauce
1 Tbsp. coconut oil, melted
1 Tbsp. cocoa powder
½ Tbsp. maple syrup
For topping (optional)
cocoa powder
chopped pistachios or nuts of choice
shredded coconut
Soak the dates in warm water for 15 minutes, then drain.
Put almonds in a food processor and pulse until finely chopped. Add the dates, coconut, cocoa powder, salt and pulse until a paste forms. Add espresso as needed and pulse until paste is smooth.
Press mixture into a 6-inch springform pan with the bottom covered with plastic wrap (I covered mine with parchment paper). Put the pan in the freezer while you prepare the filling.
Put coconut oil, coconut milk, cocoa powder, maple syrup, and peanut butter in a saucepan and heat very gently until mixture is quite loose and all ingredients have melted.
Pour the ingredients from the saucepan plus the cashews and the banana into a blender or food processor and mix until mixture is as smooth as possible. Pour the filling into the crust, cover with plastic wrap and freeze for 2-4 hours or until filling is set. After that, I recommend keeping the tart in the fridge, because it will be easier to cut slices and the texture will be more pleasant to eat (but if you don’t think you’ll finish this within a few days, do put it in the freezer).
Mix all the chocolate sauce ingredients in a small bowl. Powder some extra cocoa powder on top of the cake. Drizzle sauce over cake and top with chopped pistachios and shredded coconut, if desired.


Wednesday, February 24, 2016
Jen's Grandma's Raisin Bran Muffins
My friend Jen recently shared this recipe on her Facebook page. I was looking for something to put a little more fiber in the Little Prince’s diet, so I decided to make them and modify the recipe a bit by using chopped prunes instead of raisins. I thought they were really good bran muffins; the Little Prince wasn’t too keen on them, but he disliked the prunes more than the crumb – maybe raisins would have been better after all. I rewrote the instructions slightly, just fleshing them out so that they are more in line with the way today’s recipes are written (they don’t have the charm of a handwritten recipe in a well-used notebook, but that’s what you get on the internet).
1/3 cup soft butter or margarine
1/3 cup sugar
3 Tbsp. molasses
1 egg
1 ¼ cups sifted all-purpose flour (I admit I didn’t sift mine)
4 tsp. baking powder
¾ tsp. salt
1 cup lactose-free milk
1 ¼ cups Quaker Natural bran
1 cup raisins
Preheat the oven to 400 °F. Grease a standard muffin tin.
Beat the butter, sugar, molasses and egg together until fluffy. Set aside.
In a small bowl, whisk together the flour, baking powder and salt.
Add the dry ingredients to the butter and sugar mixture in three additions, alternating with the milk. Stir in the bran and raisins. Spoon into the greased muffin tin and bake for 15 minutes, until the tops are firm and lightly brown.


Monday, February 22, 2016
Now that's a crêpe

As dictated by tradition, I made crêpes on February 2nd (for la Chandeleur, or Candlemas in English). This time, I tried Clotilde Dusoulier’s recipe from Chocolate and Zucchini. These turned out to be my favorite crêpes in a long time! The batter didn’t need to be sifted, yet my crêpes were as thin as I wanted (something which I often find lacking in other recipes). I got 12 crêpes out of this, and the first wasn’t even a dud. This batter was really great to work with! The crêpes themselves were delicious, too, and we ate most of them with maple syrup. This was a perfect recipe!
Note that if you want to use this recipe for savory crêpes, just omit the sugar and vanilla.
250 g. (2 cups) flour
¼ tsp. fine sea salt
50 g. (¼ cup) sugar
2 tsp. vanilla extract
3 eggs, lightly beaten
1 cup lactose-free milk (vegan milk is fine, too)
1 cup water
vegetable oil, for cooking (I used Crisco canola oil spray)
Pour the flour in a large mixing bowl and form a well in the center. Add the salt, sugar, vanilla, and eggs into the well. Whisk gently in the center so the eggs will blend with part (not all) of the flour. Pour in the milk and water slowly, whisking as you pour. Keep whisking until all the flour is incorporated; the batter will be thin. Cover the bowl with plastic wrap and refrigerate for 2 hours or overnight (I chose the former).
Remove the batter from the fridge and whisk it again. Set a thick-bottomed, low-rimmed skillet over high heat. Wait until it is very hot, enough to make a drop of water sizzle. Spray the pan with good quality vegetable oil, or dip a folded paper towel in a ramekin that contains a little vegetable oil and wipe it over the pan to grease it lightly.
Ladle a little batter in the pan, just enough to cover the pan thinly, and tilt the pan around in a slow circular motion so the batter forms a round disk. Cook for 40 seconds or so, until the edges start to turn golden and pull slightly away from the sides. Run the tip of a hard spatula around the crêpe to loosen, peek underneath, and flip the crêpe when you see that it is golden. Cook for 20 more seconds on the other side, or until golden as well, and slip out of the pan onto a plate. (Note that the first crêpe is usually a dud, and this is normal, but this time I didn’t get any duds in the batch.) Grease the skillet again every 2 or 3 crêpes.
Serve the crêpes from the skillet as you make them, or pile them in a heatproof plate set over a saucepan of simmering water, covering the crêpes with foil until ready to serve (you can also place them on a baking sheet in a warm oven). The batter and crêpes will keep for 2 or 3 days in the fridge, covered; they are great for breakfast the next day. Typical flavorings include maple syrup, Nutella, or lemon juice and sugar.

Friday, February 19, 2016
Overdue product reviews
I’m long overdue in posting product reviews, so I did a round-up of what had been piling up – hopefully I didn’t leave anything out!
I’d been approached by Jolly Llama last year to collaborate on a post, but at the time I couldn’t, because I couldn’t find their products in stores near me. I have found them since, though – they are sold in some, but not all, Whole Foods locations. Jolly Llama makes frozen sorbet pops and coconut cream pops that are tree nut- and peanut-free, gluten-free, dairy-free, non-GMO and kosher. I tried their dark chocolate coconut cream pops, and I really like them! I think coconut milk is my favorite plant milk to use in frozen treats, and these were really great. You do need to let the pops thaw a bit before you can push them up the cardboard tube, but it’s worth it!


I also tried a So Delicious frozen dessert made with cashew milk, the dark chocolate truffle flavor. I like it, but it’s really frozen solid when it’s straight from the freezer, so I think I prefer their desserts made with coconut milk. The texture is definitely different from that of my maple cashew frozen dessert!

I ordered one of Sirabella’s vegan cheesecake and I have to say, I LOVE it. It is by far the best vegan cheesecake I’ve ever had, and it is even better than some regular cheesecakes! I’m sure that if you didn’t tell anyone, people wouldn’t even notice it’s vegan. (FYI, this is good not only for the lactose-intolerant like me, but also for those who have egg allergies. And vegans, obviously.) Sirabella delivers to the continental US, and with shipping (in an insulated container with dry ice), it comes out to a little over $50 for a cake, which isn’t cheap. These cakes are not as rich as my go-to dairy one, so even though I cut mine into 12 pieces, I’d say perhaps 8 to 10 pieces would be better, especially if you are serving this to guests. I got the plain one and tried it that way as well as with homemade chocolate sauce drizzled on top, and it was great both ways.


As for chocolate, I tried another few brands. My favorite (that I’ve been buying on occasion since trying it) is Alter Eco’s deep dark sea salt chocolate bar. Alter Eco is one of those companies that makes you feel good about the ethics of your food (certified organic, fair trade, etc.), but this particular chocolate is really good, too. It reminds me a bit of Madécasse in its pleasant, slight bitterness and smooth mouthfeel. And now looking at the website, I realize they have truffles! I’ve never seen those on the shelves, but I’m absolutely keeping an eye out for them next time!

On our vacation to Mexico, I bought a bar of ki’XOCOLATL, specifically the dark chocolate with Lima lime from Campeche and almonds bar. I had tasted it in the display and really liked the lime flavor, but once I had a whole bar, the almonds were more prominent and I didn’t like how many pieces of almond remained in my mouth once the chocolate had melted. Plus, it turns out there’s butter in this chocolate, so it isn’t lactose-free. But hey, it was a nice treat to buy chocolate from a “local” (on vacation) bean-to-bar company!


I also tried two of Antidote’s bars, the lavender and red salt as well as the vanilla and cocoa nibs. In both cases, the 84% dark chocolate was too bitter for me, and I was disappointed that the lavender had lavender flowers instead of lavender extract (I find the texture of lavender flowers unpleasant in chocolate). On the plus side, Antidote’s chocolates are vegan, gluten-free, kosher, organic, and fair trade, so that broadens their appeal even if the health factor (antioxidants, raw nutrients, low sugar, etc.) doesn’t do it for you.

We also tried some more Trader Joe’s products over our visits in the past few months. I get why this store is almost like a religion, they have such awesome stuff! I tried the Greek Whole Milk Yogurt in both Chocolate Mousse and Maple Brown Sugar. Those turned out to have more sugar than I thought (the second one actually had more brown sugar than maple syrup), but they also come in 8-oz. containers, so that was more than a serving for me in both cases. The flavors were great with the tang of the yogurt, so I might get more next time. I tried the (seasonal) Whole Wheat Butternut Squash Gyoza, which also contains edamame, sweet potato and carrots. They were absolutely delicious but, as it turns out, not lactose-free, so I won’t get them again. I will get, however, the Julienned Root Vegetables in the frozen section – those make a great side! It’s a mix of carrots, beets, parsnips and sweet potatoes. They tend to disappear quickly, though; we literally got the last bag. I love Trader Joe’s Creamy Salted Cashew Butter, and I’m definitely getting more of that next time I shop there. Their fully cooked Maple Chicken Breakfast Sausage is great, too, but the last item I really recommend is the Cheddar Cheese with Caramelized Onions – absolutely delicious, and it makes the *best* grilled cheese sandwiches! It’s aged 15 months, so I haven’t had any issues with lactose.
Speaking of cheese, I also tried a Beemster goat cheese recently. The FAQ on the Beemster website actually says that all their cheeses that are aged 4 months or more are lactose-free. I’m not sure if that holds true for ALL types of cheese, but it’s good information to have! I know that I’ve never had a problem with anything 9 months or older, but I don’t remember trying anything younger recently. Well, except this cheese, that is; the packaging specifically said it’s lactose-free, so I trusted it. It’s actually quite good, not “goaty” at all, and it reminds me of the Murcia Curado. Now all I need is a locally available lactose-free fresh goat cheese and I’ll be all set!

I bought items from a new-to-me company called Soom. They specialize in sesame products. They make very good tahini (which is packaged in a jar like peanut butter and can stay at room temperature even once it’s opened), but my favorite discovery is their chocolate sesame butter. Picture Nutella, but not as sweet, and more nutritious (sesame has some fiber and iron, among other things). It’s vegan and allergen-free – except for sesame, obviously). This is something I’ll be buying again! I’m sorry I couldn’t get a better picture; it seems like there’s always a glare on the label.


Finally, we ate at Earth Burger two weeks ago. I’d been hearing about this place since the Kickstarter drive (by the co-owner of Green) to have it funded almost two years ago. It opened over a year ago, but we’d never gotten around to eating there! It’s a vegetarian fast-food place that offers burgers (“beef”, “chicken”, and “fish”) as well as fried “chicken” and wraps, and sides including fries, edamame, kale and hummus. But there isn’t any meat anywhere, and I think the only non-vegan item is a slice of cheese. Honestly, I think that if I hadn’t know my burger was vegetarian, I wouldn’t even have guessed. It certainly hit the spot as far as my fast-food craving went! The bun was whole-wheat, and there were some pickled onions along with the lettuce and tomato, and it was just delicious. Prices are comparable to other fast-food chains, and it’s just as convenient (there’s even a drive-through). They also have a coconut soft-serve ice cream that I’d like to try next time I’m there!
Thursday, February 18, 2016
Whole Wheat Date Scones

I love a good scone, and since I had dates in the pantry, these seemed like a no-brainer. I found the recipe on Orangette, and the only change I made was to use vegan margarine instead of butter. Note that I have Morton brand kosher salt, so I only put in ¼ teaspoon (if you use Diamond Crystal brand, those salt crystals are bigger than the Morton ones, so you should use ½ teaspoon in that case). We really enjoyed eating those scones – they are best warm, but they keep very well for a few days in an airtight container.
125 g. (¾ cup plus 2 Tbsp.) all-purpose flour
125 g. (1 cup) whole wheat flour
2 tsp. baking powder
¼ tsp. kosher salt (see note above)
¼ tsp. freshly grated nutmeg
2 heaping Tbsp. brown sugar
5 Tbsp. cold unsalted margarine, diced
90 to 100 g. (½ cup) pitted, chopped dates
2/3 cup lactose-free whole milk
1 egg, beaten well
Set a rack in the middle of the oven, and preheat to 400 °F. Line a baking sheet with parchment paper or a silpat.
In a large bowl, combine the flours, baking powder, salt, and nutmeg. Whisk to blend well. Add the brown sugar, whisking again, and then add the margarine. Using your fingers, work the margarine into the flour mixture, rubbing and pinching it until there are no lumps of margarine bigger than a pea. Stir in the dates. Add about three-quarters of the milk and, using a fork, stir it into the dry ingredients. If it seems too dry and crumbly, add more milk as needed, but start sparingly, so that the dough doesn’t wind up sticky.
Once the dough is coming together, put down the fork and finish bringing it together with your hand, pressing it and turning it to incorporate all the flour. Turn the dough out onto a lightly floured work surface, and massage it into a disk roughly 1 inch tall. Cut the dough into 10 even wedges (or squares, or you can use a cutter to make circles), and arrange them on the baking sheet. Brush lightly with egg.
Bake for about 15 minutes, or until the tops are lightly golden. Serve warm, ideally, but room temperature is fine too.


The only spiced nut recipe you'll ever need
I had bookmarked a recipe for maple roasted almonds, but when I decided to make it, I realized that the link is no longer active. I found others online by Googling, but somehow, they didn’t look as good to me as the one I had wanted to make. Luckily, I remembered that I had also bookmarked a recipe for spiced mixed nuts on Orangette, so I decided to try that instead. (It’s originally from Gramercy Tavern, though I’ve never been there.) It was hands down the best mixed nuts I’ve ever eaten, and I won’t be needing those maple roasted almonds in the future. I actually wasn’t sure I’d post this recipe, which is why I didn’t bother taking better pictures, but I’ve decided that it would be a shame not to share it – it’s just so good! The recipe yields about 4 cups, and the nuts should keep about 2 weeks in an airtight container (if you haven’t eaten them all by then). We were grabbing handfuls as we went. These nuts are crunchy, sweet, salty, and full of flavor.

Note that I don’t like spicy/hot foods, so I used a generous pinch of Korean pepper instead of the cayenne pepper. Also, I use Morton brand kosher salt, so the amount I wrote below corresponds to that brand. If you are using a brand with bigger salt crystals (like Diamond Crystal), increase the amount by up to half. To make simple syrup, I combined ¼ cup sugar and ¼ cup water in a small pan and brought it to a boil, stirring, until the sugar dissolved, then I let it cool. I had a bit more than I needed for the recipe – you can always make single servings of lemonade from the leftovers, if you have no other use for it.
1 cup raw almonds
3 Tbsp. turbinado sugar
1 ½ tsp. kosher salt (see note above)
1 ¼ tsp. fine sea salt
2 ¼ tsp. ground cumin
1 tsp. ground cinnamon
1 tsp. cayenne pepper (see note above)
¾ tsp. ground ginger
½ tsp. freshly ground black pepper
¼ tsp. freshly grated nutmeg
2 cups pecan halves
1 ¼ cup cashews
¼ cup (2 fl. oz.) simple syrup (see note above)
1 ½ tsp. light corn syrup
1 Tbsp. grapeseed oil, or another oil with a similarly high smoke point
Preheat the oven to 300 ˚F.
Spread the almonds on a rimmed baking sheet, and bake until lightly toasted and fragrant, about 10 minutes. Immediately transfer to a plate, and set aside to cool.
While the almonds toast, make the spice mix. Combine the sugar, salts, cumin, cinnamon, cayenne, ginger, black pepper, and nutmeg in a small bowl. Stir to mix.
Reduce the oven temperature to 275 ˚F. Line a rimmed baking sheet with parchment paper or a silpat (I recommend the latter, since there is melted sugar involved here).
In a large bowl, combine the almonds, pecans, and cashews. Toss to mix. Add the simple syrup, corn syrup, and grapeseed oil, and stir to coat the nuts. Add the spice mix, and toss gently until the nuts are evenly coated. Spread on the prepared baking sheet. Bake until the spice mixture is caramelized and the nuts are toasted, about 25-40 minutes. (To check for doneness, take a few nuts out of the oven and let cool for a few minutes; if done, they should be dry to the touch.)
Cool completely, then store in an airtight container.

Wednesday, February 17, 2016
Vegan Meyer Lemon Bars

My lemon tree suffered greatly over the summer (our drip irrigation wasn’t working properly), so I had no home-grown Meyer lemons this year. The good news is that the tree roots were healthy and seem to be growing a new plant, so I might have Meyer lemons again in the future, maybe even next season (though I won’t push it). I didn’t want to miss out on citrus season, though, so the Engineer bought a package of Meyer lemons at the grocery store (there were something like 8 in a clamshell box). I started by making Meyer lemon and Italian meringue verrines, but that was a fail. The yield was ridiculously small, the meringue never whipped up properly, and it was no more than alright (though the Little Prince flat out refused to eat it). Then I made buttermilk vanilla cupcakes with Meyer lemon glaze, but the cupcake recipe didn’t work (there were craters in the cakes, not domes) and the glaze was only, for lack of a better word, adequate. Neither recipe is one I’d make again.
Luckily, I still had some lemons after that, so I tried these vegan Meyer lemon bars from Sift and Whisk. I was a bit nervous, because I don’t think I’d ever made vegan lemon bars before (unless you count this tart that the Engineer didn’t like), but the recipe totally worked! It was a hit for everyone in our household. The eggs are replaced with tofu in this recipe, and turmeric is added to get that bright yellow color (I actually added a bit too much, but it came out fine). The result was delicious!
For the crust
½ cup (110 g.) vegan butter, at room temperature (I use Earth Balance sticks)
¼ cup (30 g.) confectioners' sugar
1 cup (120 g.) all-purpose flour
For the filling
1 cup (200 g.) granulated sugar
4 Tbsp. lemon zest, from about 4 Meyer lemons
1 cup (240 g.) firm silken tofu
½ cup fresh lemon juice, from about 4 Meyer lemons
2 Tbsp. (15 g.) all-purpose flour
2 Tbsp. (15 g.) tapioca starch
⅛ tsp. turmeric, for color
confectioners' sugar, sifted (optional, for serving)
For the crust
Preheat oven to 350 °F. Grease and flour an 8-inch square baking pan. Set aside.
Cream together vegan butter and confectioners' sugar in the bowl of a stand mixer until light and fluffy. Add the flour, and beat until the dough begins to clump together.
Turn out the dough into your greased baking pan and press evenly into the bottom. Poke a few holes in the top of the dough with a fork, then bake for about 20 minutes, or until the crust is light brown in color. Move to a wire rack and allow to cool while you make the filling.
For the filling
In a food processor, combine sugar and lemon zest and process until the sugar is yellow and fragrant. (This releases the oils from the lemon zest and will make the final lemon bars more flavorful, so don’t skip this step!) Add the tofu and process until smooth. Add lemon juice, flour, tapioca starch, and turmeric and process to combine.
Pour the filling over the crust and bake for 30-40 minutes, until the filling is mostly set (it may still be a little wiggly in the center). Cool completely on a wire rack, then transfer to the refrigerator and chill for at least 1 hour.
Slice the bars into even portions (the original recipe said 8 or 16 servings, but in my house, an 8-inch square pans turns out 9 servings, period). Right before serving, dust the tops of the lemon bars with confectioners' sugar, if desired.


Green Bean Casserole

I realized that I don’t have a good recipe for green bean casserole, so when I saw one on Minimalist Baker, I took note. It was a hit for the adults here; the Engineer approves of these green beans, and there’s enough creamy sauce and crisp fried onions to make things interesting for me. The Little Prince wasn’t crazy about it, but he did have a few bites, so that’s a start. I’d make this again! I served it here with meat pie.
1 lb. green beans, rinsed, trimmed and cut in half
sea salt and black pepper
2 Tbsp. vegan butter or olive oil
1 shallot, minced
2 cloves garlic, minced
1 cup finely chopped mushrooms (button, baby bella or cremini)
2 Tbsp. all-purpose flour
¾ cup vegetable broth
1 cup unsweetened plain almond milk
1 ½ cups crispy fried onions, divided
Preheat oven to 400 °F.
Bring a large pot of water to a boil and salt well - it will help season the green beans. Add green beans and cook for 5 minutes, then drain and place in an ice water bath to stop cooking. Drain and set aside.
In the meantime, start preparing sauce. In a large oven-safe skillet over medium heat, add vegan butter or olive oil and shallots and garlic. Season with salt and pepper and stir. Cook for 2-3 minutes, then add mushrooms and season with a bit more salt and pepper. Cook for 3-4 minutes more or until lightly browned.
Sprinkle in flour and whisk to stir and coat the veggies. Cook for 1 minute, then slowly add in veggie stock, whisking to incorporate.
Add almond milk next and whisk to stir again. Season with a touch more salt and pepper bring to a simmer, then reduce heat to low to thicken. Cook for 5-7 minutes more, or until thick and bubbly. Taste and adjust seasonings as needed.
Remove from heat and add ½ cup of the fried onions and all of the cooked green beans. Toss to coat well, (transfer the mixture to an 8”-square dish if you want, and) top with remaining fried onions.
Bake for 15 minutes, or until warmed through and bubbly and slightly browned on top. Serve immediately.

Monday, February 15, 2016
Banana Carrot Muffins
These banana carrot muffins are vegan and healthful to boot. They were good, albeit maybe a little spongy, but they stayed moist for a few days at room temperature. If you happen to have some lactose-free cream cheese to schmear on them, you’re in for an extra treat! This recipe makes a dozen muffins.
2 cups white whole wheat flour
1 ½ tsp. baking powder
½ tsp. baking soda
½ tsp. sea salt
1½ tsp. cinnamon
2 flax eggs (2 Tbsp. ground flaxseed] + 6 Tbsp. water)
½ heaping cup mashed banana (1 big or 2 small)
1 ½ tsp. vanilla extract
¼ cup coconut sugar
1 Tbsp. unsulfured molasses
½ cup maple syrup
1 ½ cups finely grated carrots
Pre-heat oven to 390 °F. Grease a muffin pan with coconut oil or non-stick cooking spray.
Add ground flax seed and water to a large size bowl, whisk together and leave to thicken up while preparing the dry ingredients.
In a medium sized bowl, add and mix dry ingredients (flour to cinnamon) together until evenly dispersed.
When the flax has reached an egg-like consistency, add the rest of the wet ingredients (mashed banana to finely grated carrots). Whisk together until well combined. Fold the dry ingredients into the wet ingredients until just combined, making sure not to overmix.
Scoop the batter into the muffin pan using an ice cream scoop or a ¼ cup measuring cup. Bake for 4 minutes and then turn the oven down to 350°F. Bake until an inserted toothpick comes out clear. The amount of time the muffins take to bake will depend on your oven - mine took 15 minutes at 350 °F (plus the initial 4 minutes at 390°F).
Remove the muffins from the oven and leave to cool in the pan for 5 minutes. Remove from the muffin pan and leave the muffins to cool on a cooling rack.


Tacos à l'effiloché végétalien
J’avais entendu parler, il n’y a pas si longtemps, d’une recette pour faire de l’effiloché végétalien sans avoir recours à des produits comme le seitan ou le tempeh. Il en existe plusieurs versions, mais j’ai choisi celle de Vert et Fruité. Il suffit d’utiliser des conserves de fruit du jacquier, qui s’effiloche quand on le fait cuire. Le résultat est à s’y méprendre : on jurerait que c’est de la viande! La texture et l’apparence y sont, et le mélange d’épices convient parfaitement aux tacos, le fruit lui-même étant assez fade. La préparation est assez simple, et on peut servir avec nos accompagnements préférés : j’ai choisi un mélange d’avocats, de tomates, de coriandre et de jus de lime, mais on pourrait y aller aussi avec de la salsa, du fromage, des haricots, de la laitue, des poivrons, du riz, etc. Attention cependant : il faut des conserves de fruit du jacquier dans l’eau ou dans la saumure, PAS dans le sirop!
2 boîtes de conserve de fruit du jacquier dans l’eau ou la saumure (environ 20 oz. chacune)
2 c. à thé de cumin
2 c. à thé de poudre de chili (j’ai mis une pincée de piment coréen)
1 c. à thé de paprika
1 pincée de cannelle
¼ c. à thé de poudre d’ail
¼ c. à thé de poudre d’oignon
1 c. à soupe de jus de lime ou de citron
1 c. à soupe de sauce soya sans gluten ou de tamari
1 c. à soupe d’huile d’olive
1 petit oignon, haché finement
2 gousses d’ail, hachées finement
1 ou 2 c. à soupe de sirop d’érable (au goût)
tortillas (farine de blé ou farine de maïs sans gluten)
garnitures, au choix (voir suggestions plus haut)
Égoutter les fruits du jacquier. Vous pouvez les utiliser tels quels, mais je recommande de couper le bout triangulaire (ils s’effilocheront mieux) et de retirer les graines. Réserver.
Mélanger les ingrédients de la pâte d’épices, du cumin jusqu’à l’huile d’olive.
Dans une grande poêle, faire suer l’oignon et l’ail dans la pâte d’épices.
Ajouter les fruits du jacquier et le sirop d’érable, et laisser cuire à feu moyen-doux en retournant les morceaux à l’occasion, jusqu’à ce que les morceaux se défassent facilement, soit environ 30 minutes. (Ajouter un petit peu d’eau si le mélange semble trop sec.) Au fur et à mesure que les morceaux sont cuits, défaire à la spatule ou à la fourchette (j’ai utilisé ma cuillère en bois).
Servir avec les tortillas et les accompagnements choisis.


Saturday, February 13, 2016
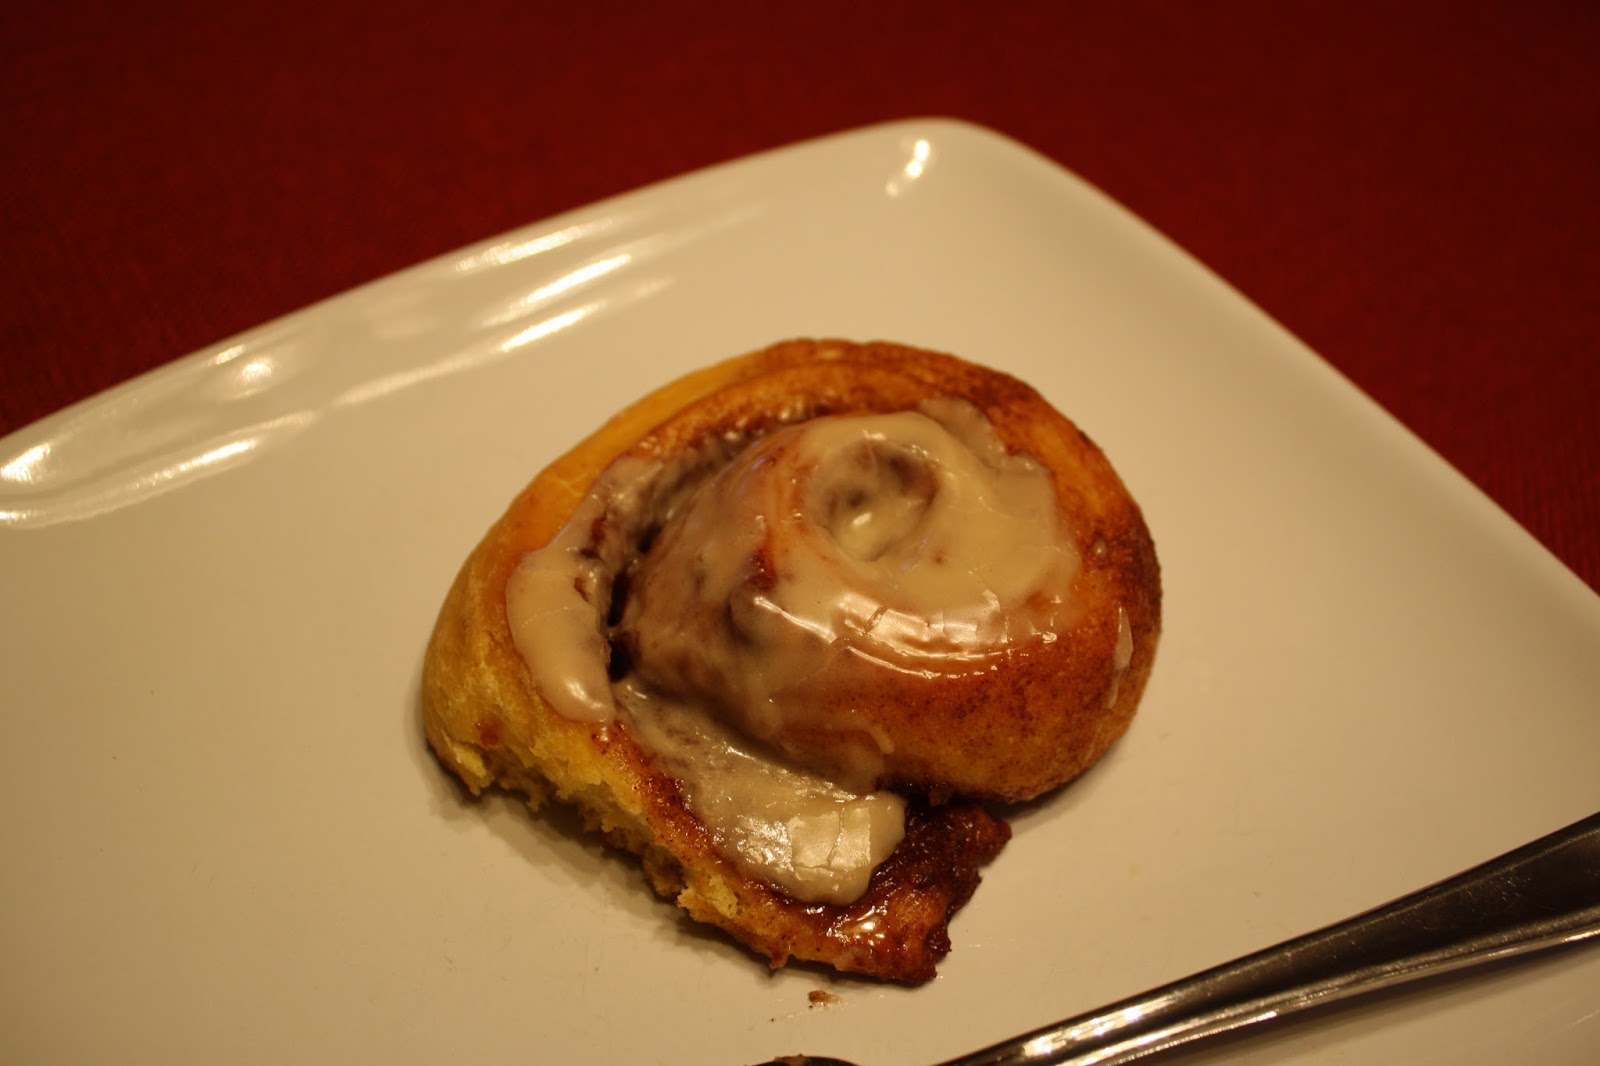
Pumpkin Cinnamon Rolls
Last fall, I realized that I had not one, not two, but three recipes for pumpkin cinnamon rolls that I wanted to try. I didn’t want to keep three recipes, though, so I decided to make each one and compare them, hoping a winner would emerge. (I did this over the course of a few months, taking notes and freezing samples for future reference.) Luckily for me, there is a clear winner, so that’s the recipe I’m sharing below!
The first recipe I tried was from Smitten Kitchen. The only change I made was to halve the amount of sugar in the frosting. The recipe made two pans of rolls, so I froze half. I thought they were really good and definitely a contender, despite the fact that they didn’t look as photogenic as I would have hoped…

The last recipe I tried happened to be gluten-free (and vegan), and let me tell you, that dough was an effing nightmare to work with. I ended up with what I called buns rather than rolls, because it was just pieces of dough scraped off the counter, shoved in a pan, baked, and schmeared in icing. Basically, I have too much self-respect to ever attempt that one again.

It was the second recipe that turned out to be the winner, producing rolls that are both delicious and aesthetically pleasing. They are actually pumpkin maple rolls from The Nonpareil Baker. They could easily be veganized if you wanted. I would perhaps use less sugar in the filling next time, because this had a few unpleasantly sticky/hard clusters. I also halved the amount of frosting while changing the amounts of extracts, but I think I should have used a bit more than 3 ½ Tbsp. of liquid to get more of a glaze consistency – that’s easy enough to fix. My quantities are below. That being said, a lactose-free cream cheese frosting would be nice, too; you can refer to the Smitten Kitchen link above. The recipe makes 16 rolls.


For the dough
2 ¼ tsp. active dry yeast
¼ tsp. + 2/3 cup granulated sugar, divided
½ cup warm water
½ cup warm lactose-free milk
¼ cup butter or margarine, melted
1 tsp. salt
2/3 cup pumpkin purée
6 cups all-purpose flour (I only used 3 cups, see note below)
For the filling
2 Tbsp. butter or margarine, melted
¼ cup maple syrup
¾ cup brown sugar, packed (I’d use less next time)
2 Tbsp. cinnamon
½ tsp. nutmeg
For the glaze
2 cups powdered sugar, sifted
1 tsp. vanilla
1 tsp. maple extract
3 ½ Tbsp. lactose-free milk (or more, see note above)
In a large bowl, stir together the yeast, ¼ tsp. granulated sugar, and warm water. Allow to proof for 5-10 minutes, or until the yeast becomes foamy. If the yeast does not foam, discard and start over with new yeast.
To the same bowl, add the warm milk, butter, sugar, salt, and pumpkin purée and stir well. Add the flour ½ cup at a time, until you can no longer stir the dough. Transfer the dough to a lightly floured surface and knead in the remaining flour until the dough is sticky, but does not stick to your hands. I used the dough hook in my stand mixer for this and added flour until I got the right consistency. I somehow only needed 3 cups of flour, which seemed like a ridiculously low amount, but it worked!
Transfer the dough to a lightly greased bowl and cover with plastic wrap. Allow the dough to rise in a warm, draft-free area for about two hours, or until doubled in volume.
While the dough is rising, combine the melted butter and maple syrup in a small bowl.
In a separate bowl, combine the brown sugar, cinnamon and nutmeg.
Grease a 9”x13” pan and an 8” square dish.
Punch down the dough and transfer it to a lightly greased surface. Roll the dough out into a rectangle approximately 12 inches by 24 inches. Using a pastry brush or small spatula, spread the butter and syrup mixture evenly over the surface of the dough. Sprinkle the brown sugar and spice mixture evenly over the moistened surface, and gently press it into the dough.
Roll the dough up as tightly as possible into a log. With a sharp knife, trim about one inch off each end of the log and discard. Cut the log into 16 equal pieces. The easiest way to do this is to cut the log in half, then cut the halves in half, and so on. You can do this with unflavored dental floss, tying it around the log and tightening the knot to cut off pieces with clean edges. Carefully transfer the slices to the prepared pans (12 in the large pan, 4 in the small pan) and reshape if necessary. Cover the pans with plastic wrap.

Place a baking dish filled with about 1" of boiling water on the bottom rack of a cold oven. Place the covered pans on the top rack of the oven and allow to rise for about one hour, or until almost doubled in size. (I didn’t bother with the warm water. I recommend putting the rolls in the microwave oven with the door ajar or in another warm place. Note also that you can refrigerate the rolls overnight at this point, which is what I do to have them for breakfast without waking up at 4 in the morning.)
Remove the pan of boiling water and the risen rolls from the oven and preheat to 350 °F. Once the oven is heated, remove the plastic wrap from the pans and bake for 20-25 minutes, or until the rolls are golden brown. (I took my risen rolls out of the fridge while the oven was preheating and I baked them for 25 minutes.)
While the rolls are baking, prepare the glaze. Combine the powdered sugar, vanilla, maple extract, and milk in a medium bowl. Whisk until the ingredients come together to form a thick glaze. Drizzle the glaze over the hot rolls. Serve warm.


The first recipe I tried was from Smitten Kitchen. The only change I made was to halve the amount of sugar in the frosting. The recipe made two pans of rolls, so I froze half. I thought they were really good and definitely a contender, despite the fact that they didn’t look as photogenic as I would have hoped…

The last recipe I tried happened to be gluten-free (and vegan), and let me tell you, that dough was an effing nightmare to work with. I ended up with what I called buns rather than rolls, because it was just pieces of dough scraped off the counter, shoved in a pan, baked, and schmeared in icing. Basically, I have too much self-respect to ever attempt that one again.

It was the second recipe that turned out to be the winner, producing rolls that are both delicious and aesthetically pleasing. They are actually pumpkin maple rolls from The Nonpareil Baker. They could easily be veganized if you wanted. I would perhaps use less sugar in the filling next time, because this had a few unpleasantly sticky/hard clusters. I also halved the amount of frosting while changing the amounts of extracts, but I think I should have used a bit more than 3 ½ Tbsp. of liquid to get more of a glaze consistency – that’s easy enough to fix. My quantities are below. That being said, a lactose-free cream cheese frosting would be nice, too; you can refer to the Smitten Kitchen link above. The recipe makes 16 rolls.

For the dough
2 ¼ tsp. active dry yeast
¼ tsp. + 2/3 cup granulated sugar, divided
½ cup warm water
½ cup warm lactose-free milk
¼ cup butter or margarine, melted
1 tsp. salt
2/3 cup pumpkin purée
6 cups all-purpose flour (I only used 3 cups, see note below)
For the filling
2 Tbsp. butter or margarine, melted
¼ cup maple syrup
¾ cup brown sugar, packed (I’d use less next time)
2 Tbsp. cinnamon
½ tsp. nutmeg
For the glaze
2 cups powdered sugar, sifted
1 tsp. vanilla
1 tsp. maple extract
3 ½ Tbsp. lactose-free milk (or more, see note above)
In a large bowl, stir together the yeast, ¼ tsp. granulated sugar, and warm water. Allow to proof for 5-10 minutes, or until the yeast becomes foamy. If the yeast does not foam, discard and start over with new yeast.
To the same bowl, add the warm milk, butter, sugar, salt, and pumpkin purée and stir well. Add the flour ½ cup at a time, until you can no longer stir the dough. Transfer the dough to a lightly floured surface and knead in the remaining flour until the dough is sticky, but does not stick to your hands. I used the dough hook in my stand mixer for this and added flour until I got the right consistency. I somehow only needed 3 cups of flour, which seemed like a ridiculously low amount, but it worked!
Transfer the dough to a lightly greased bowl and cover with plastic wrap. Allow the dough to rise in a warm, draft-free area for about two hours, or until doubled in volume.
While the dough is rising, combine the melted butter and maple syrup in a small bowl.
In a separate bowl, combine the brown sugar, cinnamon and nutmeg.
Grease a 9”x13” pan and an 8” square dish.
Punch down the dough and transfer it to a lightly greased surface. Roll the dough out into a rectangle approximately 12 inches by 24 inches. Using a pastry brush or small spatula, spread the butter and syrup mixture evenly over the surface of the dough. Sprinkle the brown sugar and spice mixture evenly over the moistened surface, and gently press it into the dough.
Roll the dough up as tightly as possible into a log. With a sharp knife, trim about one inch off each end of the log and discard. Cut the log into 16 equal pieces. The easiest way to do this is to cut the log in half, then cut the halves in half, and so on. You can do this with unflavored dental floss, tying it around the log and tightening the knot to cut off pieces with clean edges. Carefully transfer the slices to the prepared pans (12 in the large pan, 4 in the small pan) and reshape if necessary. Cover the pans with plastic wrap.

Place a baking dish filled with about 1" of boiling water on the bottom rack of a cold oven. Place the covered pans on the top rack of the oven and allow to rise for about one hour, or until almost doubled in size. (I didn’t bother with the warm water. I recommend putting the rolls in the microwave oven with the door ajar or in another warm place. Note also that you can refrigerate the rolls overnight at this point, which is what I do to have them for breakfast without waking up at 4 in the morning.)
Remove the pan of boiling water and the risen rolls from the oven and preheat to 350 °F. Once the oven is heated, remove the plastic wrap from the pans and bake for 20-25 minutes, or until the rolls are golden brown. (I took my risen rolls out of the fridge while the oven was preheating and I baked them for 25 minutes.)
While the rolls are baking, prepare the glaze. Combine the powdered sugar, vanilla, maple extract, and milk in a medium bowl. Whisk until the ingredients come together to form a thick glaze. Drizzle the glaze over the hot rolls. Serve warm.


Subscribe to:
Posts (Atom)