Thursday, October 24, 2019

Barbara's squash soup


A woman who had been very dear to me passed away a week ago today. Her husband had been dear as well, and he passed less than a year ago, but I didn’t find out until months later. It’s times like these when I feel very far from Montreal. I don’t usually share last names on this blog, for privacy and all, so I’ll just call this woman Barbara. And I want to share Barbara’s recipe for butternut squash soup with ginger and lime. It’s a great seasonal dish I’m sure you’ll love.

The first time the Engineer’s family invited me for Rosh Hashanah dinner, Barbara had made this soup, and I liked so much that I just had to get the recipe. I highly doubt it was the first squash soup I ate, but it really stood out from the rest because of the unexpected bright notes, thanks to the lime juice and the warm ginger. It was absolutely delicious! The recipe is below.

Note that 6 cups of butternut squash cubes is about one large squash, or two small ones. Barbara liked to microwave the squash first so it was easier to cut, though I never tried it that way. This recipe yields a lot, but the soup freezes well. Barbara usually served it plain, like in the first photo, but I also like it topped with plain yogurt and pepitas, or you could use a good olive oil or maybe even cilantro.


½ onion, chopped (about ½ cup)
1 ½ Tbsp. fresh gingerroot, peeled and minced
2 cloves garlic, minced
3 Tbsp. butter or margarine
6 cups butternut squash, peeled, seeded, and chopped
6 cups chicken stock
2 Tbsp. fresh lime juice
salt and pepper, to taste

In a large saucepan, sauté the onion, garlic, and gingerroot in butter until onion is soft.

Add the chicken stock and squash. Simmer, covered, for 15-30 minutes or until the squash is tender.

Purée the solids (I do this with an immersion blender now, but a food processor or blender work too). At this point, you can add extra stock if you want a thinner consistency, but I rarely do – I think it’s because I usually serve it as a lunch or a light dinner with some bread, but if it’s an appetizer, you could thin it out a bit.

Add lime juice, salt, and pepper, and serve warm.

Sunday, October 20, 2019

Strawberry Mini-Muffins


I found this recipe in Parents magazine. You can easily vary the flavor, using small blueberries instead of strawberries for example, or making a piña colada version by replacing them with finely chopped pineapple and shredded coconut and swapping lemon for lime. I ended up adding strawberry powder in the batter, to make it pinker (strawberry powder is really finely crushed freeze-dried strawberries); I mixed it in with the dry ingredients. The muffins were delicious, with or without frosting, but the Little Prince said he didn’t like the strawberries in them. While I initially thought that defeated the purpose of strawberry muffins, I think that he may have a point here – the small pockets of fruit in a miniature muffin aren’t that pleasant, and there was already strawberry flavor and color from the strawberry powder. I’ll consider just making “pink muffins” next time. Without icing, they are GREAT in a lunchbox! That being said, once the icing has dried up (say, a whole day later), that would work too.

Note that for the flour, I just used 1 ½ cups of white whole wheat flour.

For the mini-muffins
¾ cup whole wheat flour
¾ cup all-purpose flour
1 tsp. baking powder
½ tsp. baking soda
1 pinch of salt
¾ cup lactose-free milk
2 eggs
1/3 cup honey
¼ cup lactose-free butter or margarine, melted
1 tsp. vanilla extract
1 cup finely chopped strawberries, fresh or frozen (see note above)
¼ cup freeze-dried strawberries (optional; I used strawberry powder, see note above)

For the icing
1/3 cup plain, full-fat, lactose-free Greek yogurt
¼ cup powdered sugar
1 Tbsp. fresh lemon juice

Preheat oven to 400 °F. Grease a 24-tin mini-muffin pan.

In a small bowl, whisk together the flours, baking powder, baking soda, and salt. Set aside.

In a medium bowl, whisk together milk, eggs, honey, butter, and vanilla. Gently fold in dry ingredients, followed by strawberries and freeze-dried strawberries.

Divide batter among mini-muffin cups, filling to the edge. Bake for 10-12 minutes or until a toothpick inserted into a muffin comes out clean. Cool in pan for 10 minutes, then transfer muffins to wire rack to cool completely (I tend to let them cool longer in the pan).

Just before serving, make the icing by mixing together the yogurt, powdered sugar and lemon juice. Drizzle icing over muffins and top with freeze-dried strawberries, if desired (I again used strawberry powder here).

Tuesday, October 15, 2019

Double Chocolate Granola


I used to make granola all the time, and then my teeth started bothering me enough that I no longer wanted to eat it. This was a particular bummer when I was trying to empty the pantry, because I could no longer make kitchen-sink granola! I ended up enjoying make-ahead frozen oatmeal, though. In a nutshell, you make oatmeal, pour it in a greased muffin tin, top with nuts and/or dried fruit, then freeze until solid and transfer the frozen pucks to a freezer bag. To serve, just put a few pucks in a bowl and microwave; top with milk and/or maple syrup, as desired.


Three crowns and a root canal later, plus like three years of healing, and I felt ready for granola again. I made this nut-free double-chocolate granola, and it was delish! I baked it at a lower temperature and saved half of the chocolate chips to be added after baking; the instructions below are mine. The blackstrap molasses may seem like an unusual ingredient here, but apparently they help show off the deep chocolate flavor and they make the granola clump nicely. It wasn’t too sweet, but I still enjoyed it on top of plain Greek yogurt (or on top of vanilla yogurt once for dessert). Even the Little Prince liked it, which surprised me because I’m not sure he’s ever liked any of the granolas I’ve made when he can get perfectly good chocolate chip granola from a box. This is a win!

2 cups (190 g.) old fashioned rolled oats
¼ cup (30 g.) unsweetened cocoa powder
¼ (45 g.) cup unsalted sunflower kernels
¼ tsp. fine sea salt
¼ cup (50 g.) mini chocolate chips, divided
¼ cup creamy sunbutter (or almond butter if allergies aren’t an issue)
¼ cup + 2 Tbsp. maple syrup
½ Tbsp. blackstrap molasses

Preheat oven to 300 °F and line a sheet pan with parchment paper.

In a large bowl, mix the oats, cocoa powder, sunflower kernels, salt and half of the chocolate chips. Then warm up the sunbutter to a smooth consistency if it's really thick or cold. Stir in the syrup and molasses. Add to the dry ingredients and stir until it all comes together and is very sticky.

Spread out evenly flat onto the pan. Bake in the lowest third of the oven for 15 minutes; remove and stir the granola thoroughly so it will cook evenly. Place back in the oven on the low rack and bake another 8 minutes. Watch closely so the edges don't burn. Let cool 10 minutes while it crisps up. Once it has cooled down, add the remaining chocolate chips and mix thoroughly. Store in an airtight container.

Thursday, October 10, 2019

Purple Sweet Potato Pie

I sometimes see purple sweet potatoes at the grocery store, but they’re not always there, so I never really plan to buy them. But I knew I wanted to try this recipe for vegan purple sweet potato pie with almond coconut crust, so I made sure to have all my non-perishables on hand, including CocoWhip for the topping. I figured that since sweet potatoes are a root vegetable, it was a safe bet to expect them to make an appearance in the fall. So when I saw the purple sweet potatoes again, I bought some and made the pie!

I didn’t like the almond coconut crust of the original recipe. I mean, I liked the ingredients individually, so it sounded good, but I found that it fell apart and got soft after a while and thus did not fulfill its basic function as a crust. I think that even assuming you want a vegan/paleo/gluten-free/keto/whatever crust, there are other options. I don’t have those food restrictions, so I recommend a graham cracker crust. Parbake it if you make your own, or follow the instructions on the package if you buy it premade.

As for the purple sweet potatoes, I used this variety, but any sweet potato should do, including regular orange ones. I added nutmeg and a bit of sugar to the filling (the ingredients below are mine), and it was great! As a matter of fact, the filling was so good that I might make it my default sweet potato pie. The purple sweet potatoes obviously make the pie stand out, though, so buy them if you can find them.


2 lb. purple sweet potatoes, peeled and cut into 1-inch rounds (about 4 cups)
¼ cup sugar
¾ cup canned coconut milk
½ cup maple syrup (see notes)
1 ½ Tbsp. tapioca starch
1 Tbsp. fresh lime juice
2 tsp. ground cinnamon
1 tsp. sea salt
1 tsp. ground ginger
½ tsp. allspice
¼ tsp. nutmeg
¼ tsp. cayenne pepper (I used 1 pinch of Korean pepper)
¼ tsp. ground cloves
1 graham cracker crust (see note above)
CocoWhip or equivalent, for topping

Bring a medium-sized pot of water to a boil. Add the purple yams and boil for 10 minutes, or until the yams can be pierced with a fork. Drain the yams then put them in a high-powered blender or food processor.

Add the rest of the pie filling ingredients and blend on high until everything is smooth and creamy.

Pour the pie filling into the baked pie shell and smooth out the top. Bake in the preheated oven for 45 minutes, or until the pie has set but still has some jiggle in the middle. Remove the pie from the oven and let it cool completely before serving it. Top with CocoWhip if desired.

Monday, October 07, 2019

Guide francophone du Texas


J’ai entendu parler de ce guide en lisant cet article où il en était question (partagé par un Français sur un groupe Facebook, si ma mémoire est bonne). Il s’agit d’un guide autopublié en 2017 par Sophie Auzerau, une Française qui a habité à Dallas pendant cinq ans. Comme elle le dit, « En arrivant, je craignais de m’ennuyer et de ne rien avoir à découvrir. Cinq ans après, je m’inquiète de ne pas avoir tout vu ! »

Bon, commençons par les défauts. Ce qui m'a sauté aux yeux, en tant que réviseure-traductrice, ce sont les coquilles (ou la mauvaise mise en page) et les anglicismes. Pour ce dernier cas, il s’agit surtout de mots non traduits, comme « poison ivy » laissé tel quel dans le texte. J’ai l’impression que les Européens oublient toujours de regarder ailleurs dans la Francophonie pour trouver l’équivalent d’un mot d’une langue étrangère si le concept n’existe pas dans leur pays… Au Canada, on en a, de l’herbe à puce! Sans compter la sempiternelle « Thanksgiving » pas traduite par Action de grâce… Il y a aussi des mots carrément laissés en anglais même si l’équivalent est évident, comme « park » au lieu de parc.

Aussi, il s’est glissé quelques erreurs dans le guide (par exemple, le lac Caddo n’est pas le seul lac naturel du Texas, bien qu’il soit le plus connu; les dunes du White Sands National Monument au Nouveau-Mexique sont faites de gypse et non pas de sable). De plus, San Antonio est présentée seulement pour l’Alamo (plus les lieux classés au patrimoine mondial de l’UNESCO) et la River Walk, mais on a aussi tant d’autres attraits! La cathédrale San Fernando, Market Square, les musées, les parcs, le jardin botanique, la Pearl Brewery… Sans compter tous les restaurants que l’auteure aurait pu inclure dans le chapitre sur ce sujet! San Antonio est pourtant la 7e plus grosse ville aux États-Unis (plus peuplée que Dallas!), c’est donc à la fois étonnant et dommage qu’elle soit laissée-pour-compte par une locale dans un guide touristique. Rien sur El Paso non plus, tiens.

Quand même, ce guide a de nombreux bons points. Je trouve ça *génial* d’avoir un guide non seulement en français mais surtout écrit par quelqu’un comme moi, c’est-à-dire local mais sans être natif. J’aime aussi que le guide parle des attraits de chacune des régions géographiques du Texas, qui est quand même grand! Hill Country, Piney Woods, Upper Gulf Coast, Big Bend, Panhandle, South Texas Plains et Prairies and Lakes, chacune y est. J’y ai trouvé des idées pour d’éventuels voyages ainsi que pour Houston, que nous n’avons toujours pas visitée. Je vais laisser le guide dans la chambre d’amis, avec les dépliants touristiques locaux!

Vous pouvez vous procurer le guide en version papier ici; pour la version numérique, vous avez le choix entre PDF et Kindle.

Sunday, October 06, 2019

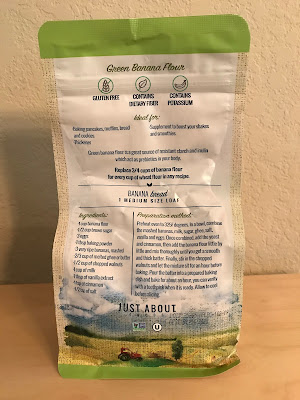
Banana flour


I’d been curious about banana flour for a while, so when I saw a smallish bag of it at my grocery store, I decided to try it. It’s a good source of fiber and potassium, in addition to being gluten-free, obviously. Based on the recipes I found, it seems that you have to let the batter rest for a while so that the flour can hydrate properly before being baked; that being said, it doesn’t absorb moisture nearly to the same extent that coconut flour does.

I couldn’t resist making the banana bread recipe on the back of the package (Just About Foods brand). The banana bread recipe was a hot mess as written, so my version is clarified (but still calls for the same ingredients). I found it a bit too moist for my liking, even when fully baked, but it improved when I had a slice of it toasted and buttered the next day.


I also tried banana flour pancakes – the recipe gave me 8 beautifully golden pancakes, but I much prefer my regular recipe.


Banana flour is made with green bananas, and doesn’t actually taste like bananas at all (or at least, not like those we are used to eating); I think “unripe” would be the best way to describe it. Sadly, I’ve decided that I’m not fond of banana flour. I’m glad I tried it, but won’t buy it again. That being said, some of you might be curious, so here’s the recipe!

1 cup (160 g.) banana flour
1 Tbsp. baking powder
½ tsp. salt
1 tsp. cinnamon
3 very ripe bananas
½ cup brown sugar
1 cup lactose-free milk
2/3 cup melted ghee or lactose-free butter
3 eggs
1 Tbsp. vanilla extract

In a small bowl, whisk together the banana flour, baking powder, salt, and cinnamon. Set aside.

In a bowl, combine mashed bananas, brown sugar, milk, ghee, eggs, and vanilla. Once combined, add the banana flour mixture little by little and mix thoroughly until you get a smooth and thick batter. Let the mixture sit for 1 hour before baking.

Preheat oven to 325 °F. Grease a 9”x5” loaf pan.

Pour the batter into the prepared baking pan and bake for 1 hour, or until a toothpick inserted in the middle comes out clean. Let cool before slicing.