Showing posts with label style. Show all posts

Wednesday, March 27, 2013

Transformation de vêtements - Maternité

Ça fait un bail, hein, que je vous ai parlé de transformation de vêtements? Et pourtant, je me suis un peu recyclée dans la transformation de vêtements à ma taille et leur confection à partir de drap… Je vous montre donc en vitesse le résultat de mes deux dernières transformations, avec des liens vers les tutoriels, pour les intéressées. Pour les deux, je suis partie de chemises d’occasion : quand on achète une chemise qui a déjà été portée, l’important est surtout de vérifier s’il y a des taches (visibles sur le devant, oui, mais aussi sous les aisselles). Une couture défaite, ça se refait, mais une déchirure ou un trou, c’est plus grave. Est-ce que tous les boutons y sont, aussi?

Tout d’abord, j’ai acheté une grande chemise d’homme pour 2,50 $ et je l’ai transformée en me basant sur le tutoriel de DIY Maternity. J’ai commencé par raccourcir les manches, puis avec une retaille, j’ai fait du ruban de biais. J’ai donc cousu le ruban de biais sous le buste et j’y ai passé un ruban décoratif du commerce, pour cintrer la taille un peu. J’ai par contre eu de la misère avec le col. Je voulais faire comme dans le tutoriel, mais sans patron, c’était assez difficile; mes fronces ne faisaient pas un bel effet. J’aurais pu y aller avec une version découvrant les épaules, et même faire une couture ballon à la taille, mais j’y suis allée plus simplement en utilisant le reste de mon ruban de biais pour finir le col agrandi, sans fronces. Je vous mets les photos avant et après.


Ensuite, j’ai acheté une autre chemise d’homme, bleue cette fois, pour 3,50 $. J’en ai fait une tunique en me basant sur un magnifique modèle vu chez Prudent Baby. Encore une fois, j’ai arrangé le col (que je porte de l’une des deux façons montrées sur les photos ci-dessous) et les manches, puis utilisé du fil élastique pour froncer l’avant. Un truc qui n’est écrit nulle part : mettez votre fil élastique en face d’une paire bouton-œillet, pour éviter que la chemise s’ouvre à cause de l’élastique par la suite! Je suis super contente du résultat, d’autant plus qu’il fait très féminin.


Je me limite à cela pour l’instant. Il y a bien sûr des tutoriels pour faire des jeans de grossesse, par exemple, mais encore faut-il sacrifier une paire de jeans et être à l’aise de coudre du tissu si épais avec du tricot, alors très peu pour moi, merci. On peut aussi commencer avec un t-shirt et ajouter des élastiques, sur les côtés ou sous le buste.

Monday, December 17, 2012

Ressac

L’été dernier, j’ai passé quelques jours dans les Cantons de l’Est, que j’ai trouvés magnifiques. Lors de mon séjour, j’ai visité une charmante boutique où j’ai vu un sac à main de la marque Ressac. Je ne l’ai pas acheté, parce qu’il était un peu cher et un peu trop gros pour mes besoins, mais il m’est resté en tête. J’ai fini par aller flâner sur le site, que j’ai beaucoup aimé, et je suis allée voir d’autres modèles de sacs à Montréal, chez Il était deux fois (un magasin génial où presque tous les objets sont réutilisés, ou « upcyclés »). Finalement, j’ai décidé que mon préféré était le modèle R14 (sur cette page-ci).

Les sacs à main de Ressac sont faits par une artisane de Sherbrooke, Anne Painchaud-Ouellet, qui réutilise des matériaux usagés (comme des chambres à air de vélo) pour en faire de nouveaux objets. Le nom « ressac » est donc particulièrement bien choisi, puisqu’il fait référence à la fois au retour d’une vague sur elle-même et aux sacs à main recyclés. L’apparence et la texture se rapprochent de celles du cuir, en fait; les sacs sont donc agréables au toucher et esthétiques, tout en étant durables et végétaliens (la combinaison des deux n’étant pas évidente).

Dès que j’ai reçu un chèque de paie cet automne, j’en ai profité pour me gâter en me commandant le R14! (On peut commander avec ce formulaire; la livraison aux États-Unis n’a pas été problématique.) On peut choisir la couleur complémentaire du sac; j’ai choisi rouge, puisque mon autre sac à main était rouge. Le sac comporte trois pochettes à l’intérieur, mais j’y aurais aimé aussi une petite poche avec fermeture éclair, pour un rangement discret. Quand même, il est très bien fait, et le tissu choisi pour l’intérieur s’harmonise bien avec l’extérieur. Il reste un peu grand pour mes besoins actuels, mais je le trouve plus confortable à porter que le sac en bandoulière que j’avais auparavant. Je suis donc bien contente de mon achat.

Pour ceux et celles qui sont à Montréal, Ressac est au Salon des Métiers d’Art jusqu’à samedi!


Wednesday, November 07, 2012

Featherweight wrap, and a tip or two

My latest knitting project was this Featherweight Wrap. I once again used 4 skeins of yarn from See Jayne Knit Yarns, this time a 100% superwash merino that is 105 grams for 500 yards, in the gorgeous color called Cranberry. On paper, it’s lighter than what the pattern called for, but I still ended up with something heavier than I was expecting. I think the yarn also stretched a bit after being wet, and the edges of the collar band are now pointy. As I did last time, I made the sleeves a little bit shorter than what the pattern called for, so they’d hit at the elbows. The detail I like, which you can see further down, is that underneath each armpit and down the back are two decorative rows of little holes, created with a yarn over.


I ran into a bit of a problem: while I know that hand-dyed yarns should be knit alternating skeins (the shop owner even suggested I do so), I’ve never had a problem before, so I just used one skein after another. But it turns out I have a visible color demarcation in the lower part of my cardigan… It’s my own fault, but I’ll still wear the shirt instead of frogging it and starting over. I’ve got too many things to knit to just make the same shirt over again right now. From now on, though, I’ll be more thorough.

The edge of this shirt has 3 rows of purl stitches and 4 rows of knit stitches before being bound off. While it looks beautiful, it does have the unfortunate tendency of curling up, even after being blocked. Luckily, though, I found this trick via Pinterest. Basically, after finishing the edge called for in the pattern, instead of binding off, you purl one row, then work an inch or two in rib stitch. You then only need to fold the ribbing under the edge and tack it into place with matching yarn, and the extra structure there will keep the edge straight! It’s brilliant, really. So I did that on the bottom edge, but left the collar and sleeves as they were, since I was afraid I wouldn’t have enough yarn for all of that. This is a tip I’ll definitely keep as well!


Monday, August 27, 2012

Green cardigan

Sorry about the radio silence over the past week. It seemed like I just didn’t have anything to post. I made a very simple, delicious dessert that was basically white chocolate yogurt swirled with matcha and served with chopped mango. Unfortunately, I served it in bowls, not glasses, so it really wasn’t photogenic. I also made a chocolate almond torte from a recipe in Coup de Pouce (not on their website). It had the unusual addition of balsamic vinegar and was very pretty, but had a chemical aftertaste I can only describe as “straight from the grocery-store”. I had no idea I could reproduce that taste in my kitchen, but in any event, it is not something I want to eat again. And finally, I made little meringues with white chocolate pastry cream, again from Coup de Pouce without an online recipe; while the white chocolate pastry cream was delicious, it turns out it’s too humid in San Antonio for proper meringues, even though I let them rest in the oven with the door closed overnight. San Antonio is known for being hot and sunny this time of year, and it hardly ever rains, but for whatever reason, it’s still humid (especially in the morning, when I walk Darwin – my hair looks like I touched a Van der Graaf generator). I’m really not sure when would be a good time to make meringues here, but I don’t remember dealing with this problem in Montreal, so it’s quite frustrating. It’s not like we’re wanting in the dessert department, though, as the Engineer has been making cookies (most notably a double chocolate cookie, plus the best peanut butter cookies I’ve ever had – I’m eating one right now and typing one-handed).


So anyway, I’ve had an insatiable urge to knit lately. I’ve been pinning dozens of patterns, but here’s one I started over the summer and finished recently, a nice cardigan with raglan sleeves. The pattern was originally a featherweight cardigan from Knitbot, which I made with a heavier yarn. I found it via Jejune.net, and Katie Jejune made it with a bantamweight yarn in a lovely shade of green. I immediately got it in my head that it would go beautifully with my green and white strapless tunic, so I looked around and finally settled on yarn from See Jayne Knit Yarns on Etsy. I chose a 100% superwash merino yarn (100 g for 400 yards) in the lovely shade called Green Tea (though The Lettuce Lesson would have been beautiful, too). This yarn was soft and truly a pleasure to work with, so I might be ordering from that shop again.

I ended up making the same modifications to the pattern as Katie Jejune had done, because they made a lot of sense: make the front border a bit longer by picking up every stitch along the edge, and make the sleeves shorter. I made mine elbow-length, because I realized that if they were just a little longer, as the original pattern suggested, I would always end up pushing the sleeves up, which would stretch them out and be impractical to boot. I also made the cardigan longer. I had ordered 4 skeins of yarn to make the large size on 4 mm needles, but I only needed a few dozen yards of the last skein. So 3 skeins should be sufficient to anyone attempting it, and I recommend this nifty trick Katie Jejune used: knit the cardigan body and border first, then use your kitchen scale to divide the remaining yarn in two equal amounts for the sleeves! It’s genius. I love the end result, and I’m looking forward to cooler temperatures so that I can wear it.


Monday, May 14, 2012

Coral obsession

Pinterest serves many wonderful and indispensable purposes in my life, one of which is to highlight particular obsessions I might have. I started my account around the time that Dear Sister told me her wedding color was coral. Obviously, I was aware of the color before, and as a matter of fact, liked it very much. But ever since she told me, I’ve been pinning coral dress after coral dress (even though I hardly wear dresses, which itself has more to do with shoes than anything). My boards have a knitting pattern for a coral cardigan, coral shoes that did not fit me and a tutorial for coral barrettes. Coral pyjamas, a coral jacket and coral throw pillows. Even coral furniture, coral flowers and coral accessories. So I gave in to the coral obsession and bought some coral fabric to make a dress, finally.

The pattern I used was Simplicity 2362, view E (which is meant as either a day or an evening dress, and really wasn’t too hard to make). Let me say it loud and clear: Thank God for muslins! I actually took the time to make a muslin with my dress pattern, and it was a life saver. It allowed me to make mistakes on a practice dress and also showed me how to alter the pattern to get something that fit me well. I lengthened the hem, added more elastic under the arms, and did away with the interlining altogether. I also shortened the width of the back and added a pleat on each side of the back of the skirt to compensate. And I made straps instead of a halter top. I’m still not quite happy with the zipper, though this time part of that has to do with the fact that I preferred an invisible zipper to a regular one, and I had to make do with something that’s not quite the right shade. That being said, this dress fits me quite well. I love the empire waist and the fact that it has pockets!


According to the pattern, I should have needed 2 ½ yards of fabric (including lining), but the 2 yards of dark coral linen I had bought from Mood Fabrics were enough. I paid $10.15 for the pattern, plus $27.99 for the fabric (including taxes and shipping). I already had the thread, the elastic, and the hook-and-eye closure and paid $2.99 for the zipper. Factor in maybe $5.00 for 2 yards of muslin, and that brings the grand total to just over $46.00. Not bad! As of now, my plan is to wear it to my sister’s wedding, since I’m not quite happy with the result of my dress alteration (orange dress) and haven’t found a shrug, despite lots of searching. I’m really happy with how this dress turned out, though, and I’m considering making another one in black.

Tuesday, April 24, 2012

Another tunic with leftover fabric, and a plant coaster

I still had some green print fabric left over from my dress update, so I used a pattern from One-Yard Wonders to make a tunic top. There was some adjusting needed for a proper fit, but overall, it was really quite easy! Just two rectangles of fabric (one with a rounded short edge, for the front), thread and elastic. Make a slit at the bottom of each side for ease around the hips, and sew what is basically double-fold tape for a belt. Done!


I used the last remnants to make what I’m now calling my “plant coaster”. Basically, I had a clay pot / saucer combo that was scratching up an end table, so I needed something underneath the saucer to protect my furniture. I suppose some people use doilies, but those are just not my style. So I’m sticking with my plant coaster! I just determined what finished size I wanted and accounted for seams. When I realized that I didn’t have enough fabric to cut two squares of that size, I broke it down into eight squares (once again, taking new seams into consideration), and when I still didn’t have enough, I made one square on each side itself composed of four squares! Great way to use up all my remnants and whip up a plant coaster for free.


Friday, April 13, 2012

Rose barrettes - or, why is it so hard to find an outfit for this wedding?

Dear Sister is getting married next month. And for whatever reason, I think I’m having more trouble getting my outfit together than she is! What I had in mind was a coral dress, but I couldn’t find any (some I saw online but they are no longer available, some I saw in stores but they didn’t fit). I ended up buying this orange dress, which is slightly too big in the upper back. Unfortunately, after some investigation and basting trials, I think it is beyond the scope of what I can fix. If I could just find a nice shawl, shrug or wrap, though, I could keep that problem hidden most of the time… I’d feel a little white trash, but no one would have to know. I managed to find shoes and a purse to go with it, though, because none of what I owned went with orange! That’s really what I’m dealing with for the shawl; orange is a tough color to coordinate. The other dresses I own don’t seem nice enough for this wedding, with the exception of one that is unfortunately a bit too short (come to think of it, that’s why I never wear it; I should consider adding fabric to make a new ruffled hem or something).


In an effort to look nice, I wanted to put some color in my hair, and I had thought of a flower barrette, like this one or that one from Etsy.

In the end, I decided to make my own, using this tutorial from The Purl Bee. The result is surprisingly similar to what I had in mind, and even goes with the dress. The problem is that when I put one on, I’m not sure it looks quite right. So I’ll take them with me and decide on the spot whether I’m wearing one.


All this to say: I’m not 100% sure what I’ll wear to my sister’s wedding, and I’m not 100% sure I’ll wear this rose barrette. But I like this rose barrette and hope you will, too.

Monday, April 09, 2012

Tatami shirt

It may be hard to believe, but this is actually the first piece of clothing I’ve knit for myself. Sure, I’ve knit hats and scarves and mittens before, and a shawl, plus tons of stuff for babies, but never actual adult clothing. I decided to go with this piece because the fit is forgiving; it’s a wrap shirt that doesn’t need to be tailored perfectly to look good, so I figured I could handle it.


The pattern, with a view pictured above, is called Tatami and is from NeoKnits. I got my yarn from Jimmy Beans Wool; I picked a Madeline Tosh superwash merino woolin a beautiful blue-green color called Forestry. I needed 6 skeins of it, so the shirt wasn’t cheap. That being said, I’m really happy I went with something that is both soft and machine washable! Plus, Jimmy Beans Wool gives out 5% cash-back.

Keep in mind that I only knit when watching television, but it took me a few months to knit this, mostly because at one point, I realized that I was supposed to continue in pattern (p1, k5, p1, k5, p1), but it wasn’t crystal clear, so I ended up with p1, k11, p1 from the armpits up. I had gone on a long time like that before really questioning how it would look, and then when I looked at the original picture, I realized that I should have kept up with the regular pattern. So I unraveled the equivalent of about half of the total shirt and started over from mid-back, at armpit level. Apart from that and from a typo in the pattern, it was actually pretty easy. The scary part comes when you drop a stitch in the pattern and unravel it along the whole length of the shirt; when I do that, I’m always afraid that just maybe I did something wrong ages ago and I’ll only find out when everything comes undone suddenly! It all went well, though, and made quite a difference in the final dimensions (the picture below shows the shirt folded in half, one side with dropped stitches and the other side still done up).


I’m quite happy with this shirt overall, even though the edges have a tendency to roll up (even after blocking), and I feel like the ties are a bit too long (I like the way they look on the pattern more than what I got). And because summer is pretty much here to stay in Texas, I’ll have to wait until next fall to wear it. That being said, I’m happy enough with my first clothing experience that I’m planning on making a cardigan or two next.


*Update: I forgot to mention that the yarn I picked is bleeding out color like crazy. My fingertips are stained each time I knit, the bamboo needles I used are stained, and it bled a lot when I wet it to block it. I’m planning on wearing only dark colors underneath, and I really don’t know when it’ll be safe to wear a white tank top with it!

Friday, March 23, 2012

Two tunics, on the cheap

I was inspired by this post on Jejune.net to use an old bed sheet as fabric for making clothes. Sadly, it probably wouldn’t even have occurred to me if I hadn’t seen it done before, despite all the online tutorials for toddler dresses made from pillowcases. I didn’t have any old bed sheets lying around (and if I’d had any and had been willing to part with them, I might I have been so sick of them that I would have refused to actually wear them!), but I found a nice purple flat sheet at the Salvation Army for $2.99. It’s good quality fabric, much cheaper than if I bought it by the yard at a fabric store, and was only a little ripped at the seams on top and had a small tear in the bottom; the rip was easy to fix, and the tear was easy to avoid. It was a single twin sheet, not even a set, and I got two tops out of it.

The first was a Simplicity pattern for a top with a gathered front and small cap sleeves gathered with elastic. I adapted it so that I could use the top band of the sheet as the belt on the top, keeping the shiny ribbon detail from the sheet to embellish the belt. I’m more or less pleased with the result. I like the look of the top, and really what I dislike about it isn’t visible from the outside. You see, the pattern did call for nicely finished seams around the neck and sleeves thanks to the use of bias tape (this is the trick that I reused for my pyjama), but it left other seams looking entirely horrible, mainly the one under the bust (plus a bit of the neckline that just didn’t line up and from which a piece of elastic is visible on one side). I realize that no one but me will see it, and even then, not most of the time, but I feel so much better about the clothes I make when they look properly finished! Anyway, now that summer has started here (well, officially it’s spring, but I’m Canadian, so this is getting warm), I’m sure I’ll have plenty of occasions to wear it.


I used up the leftover fabric to make a simple cotton tunic, from a free tutorial found on A Beautiful Mess. It’s a bit of a paradox, though, because I’ve come to realize that patterns that sound really easy because the directions are vague and super simple often end up being more of a hassle to make. Sure, you don’t have to cut your fabric as precisely as a pattern, and you’ve got more room for error, but that also means that it’s much harder to get a proper fit! I had to try on this top several times and do a lot of adjusting before I was happy with it (whereas a pattern in my size would have been much faster to assemble correctly right away). That being said, the measurements were generous enough that it allowed me to use up the rectangle of fabric that I had left, and once I use a belt to cinch the waist of the tunic, it looks pretty good.


Total cost of both projects together: $2.99 for the fabric, $2.79 for the thread, $0.99 for the Simplicity pattern and maybe $0.25 worth of ¼-inch elastic, for a grand total of just over $7.00 plus taxes. For two tops! I’m now keeping an eye open for old sheets at discount stores.

Tuesday, January 10, 2012

Chapeaux boutonnés et mitaines

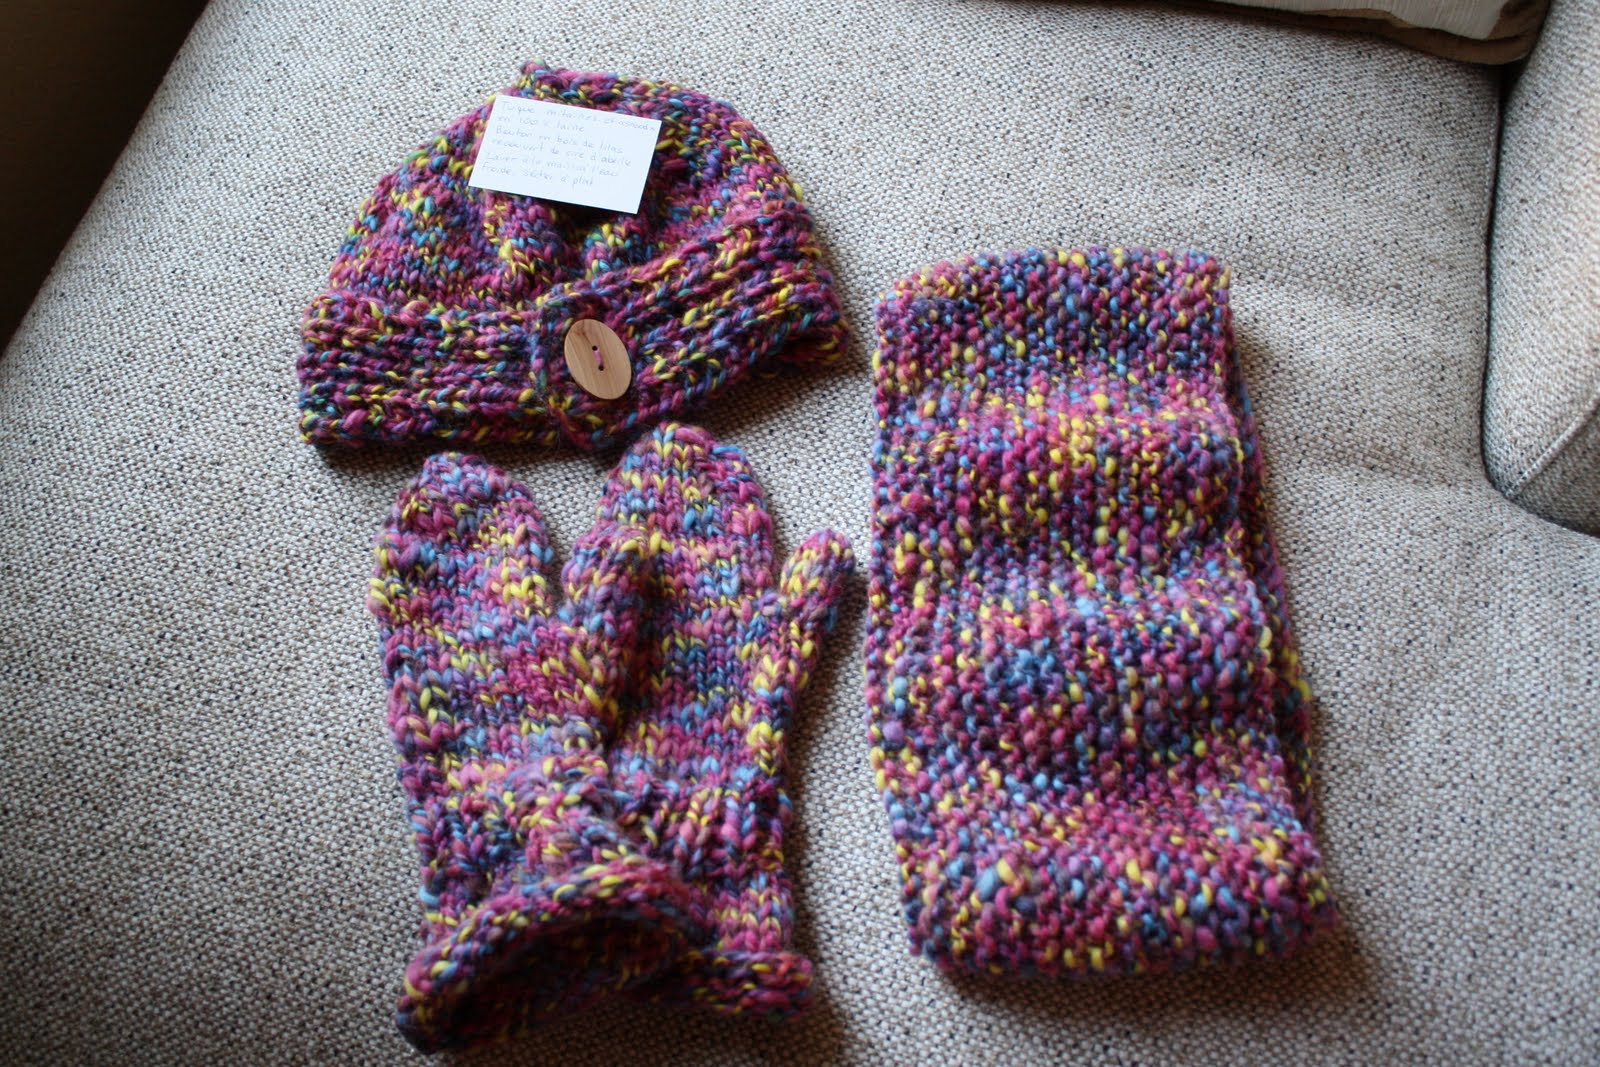
Je ne pouvais pas en parler avant, pour ne pas gâcher la surprise, mais j’ai tricoté des cadeaux de Noël pour ma mère et pour ma sœur, avec de la laine qu’elles avaient choisi elles-mêmes il y a des années et qui se languissait depuis, entreposée dans une boîte. Pour ma sœur, avec une balle de Rowan Big Wool blanche, j’ai pu faire un chapeau; pour ma mère, avec trois balles de Rowan Big Wool multicolores, j’ai fait un chapeau, une paire de mitaines et un « snood » (tour de cou).


Pour les chapeaux et les mitaines, j’ai suivi le patron Plymouth 2119, acheté chez Jimmy Beans Wool. C’était ma première paire de mitaines, et je les ai beaucoup aimées car elles sont assez longues pour cacher les poignets (et on déteste toutes avoir froid aux poignets l’hiver!). Les chapeaux étaient amusants aussi, car l’ajout d’un bouton est à la fois stylé et pratique (pour ajuster la taille du tour de tête). Je ne peux plus aller chez mon fibulanomiste préféré et je n’ai pas trouvé de boutique équivalente ici, alors je suis devenu accro à Etsy pour la mercerie. J’y ai déniché entre autres un bouton en bois de lilas recouvert de cire d’abeille pour une des tuques!

Pour le snood, qui semble être la grosse mode dans les catalogues français ces temps-ci, j’ai pris un patron de Phildar (semblable à ceci. Ce n’est pas compliqué à faire, et on peut y passer tous nos restants de laine jusqu’aux derniers pouces! Ça me donne presque envie d’habiter dans un climat avec des hivers plus rigoureux…


Wednesday, December 14, 2011

Sewing with knits - An adventure

I know I’ve said that sewing with knits is hard and that I didn’t want to open that can of worms any time soon. But then I read this fantastic tutorial on Prudent Baby, which explained how to deal with knits. Yes, they stretch, but you can use a walking foot to help minimize the problem! This made a world of difference to me, and also helps in quilting projects, as it moves the fabric along from the top (while the machine’s feeder dogs move it along from the bottom). A serger would help for hems, as would twin needles, but as far as I know, I can’t do that on my machine (and I don’t have a serger). I also don’t have the option to do a stretch stitch (nor do I have a good basting stitch, really, but that’s another issue entirely), so I used a zigzag stitch. I did, however, buy ballpoint needles, which help because they can sew knits without tearing through the fibers.

I installed the walking foot and ballpoint needle and decided to practise a bit by upcycling some old knit t-shirts into trivets. I made two 9-inch squares ones, for each of which I used a piece of 9-inch square Insul-Bright (which acts as heat-proof padding), a 10-inch square of scrap fabric (I used a woven one), three 4”x10” strips of knit t-shirts in coordinating colors, and bias tape (made from the woven scrap fabric). All of this assumes ½” seams. Of course, keep in mind that if you want to actually use your trivets, your fabric has to be heat-resistant (everything I used was 100% cotton, so I’m fine, though linen would work too). I started by sewing the strips of knit fabric together on the long side, then I put them right-side-together with the woven backing and sewed along three sides. I flipped the pouch so that the right side was out, inserted the Insul-Bright, folded the edges in and sewed the last seam. Then I added the bias tape on the perimeter, though it’s optional. You could also use it to make a loop on one corner of the trivet. A walking foot was really a godsend for this project!


That had gone well, so I took the plunge. I bought some knit fabric and polyester thread (which has more stretch than cotton thread and therefore more appropriate than the latter for sewing with knits) and practised. It took me a while to adjust the tension properly, but I finally got it right and was able to sew seams that lay flat. So I used this free pattern to make a skirt. I started by adding an interlining of the same fabric, since I had read that it was recommended for skirts. I ended up with fabric that was too heavy: when the skirt was upright (as opposed to laying flat on the table), gravity pulled the 8 panels of fabric down and made them droop at the seams. I had enough fabric to make a 6-panel skirt without an interlining, so I did that, all the while thinking that I would have to make an additional lining or wear the skirt with a half-slip, but the same thing happened again! I think perhaps the knit fabric really wasn’t meant for this pattern (regardless of the fiber content).


I didn’t want to throw all of it away, so I recycled the interlined skirt into two pleated scarves seen on Make It And Love It. It was an easy project, was good to practise sewing with knit fabric, and gave me something I can use out of this whole thing; the scarves were still cheaper than the store-bought equivalent. I since bought fabric that was better suited for the skirt, using the recommendations directly on the pattern’s website, so I’ll report back on that! I haven’t figured out what to do with the fabric from the 6-panel skirt, so it’s going in my stash for now.