Monday, September 28, 2020

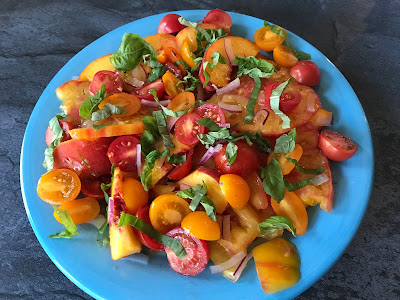
Salade caprese aux pêches


Vous le savez, il y a toujours un battement entre le moment où je fais une recette et celui où je la mets en ligne… Le confinement n’aura pas arrangé les choses! Il n’y a donc probablement plus de pêches ni de tomates de variétés anciennes là où vous êtes, mais ça vous donnera une autre raison d’anticiper l’été prochain… 

Soit dit en passant, j’ai aussi fait une excellente salsa estivale avec de petits cubes de melon d’eau, des tomates cerises, de la coriandre, des oignons verts et du jus de lime, et ces ingrédients se trouvent souvent à l’année! Puis, bon, il y a eu aussi cette salade de tomates à la mayonnaise qui était assez bonne, et une croustade pêche et sésame qui avait l’air excellente en théorie, mais qui ne l’était pas en pratique (surtout une question de texture et un manque de croustillant, justement). 

Quand j’ai assemblé la salade caprese pour la photo, j’avais complètement oublié d’y mettre le fromage! Le Petit Prince et moi sommes d’accord : c’était plus joli en version végétalienne! Je conseille le fromage mozzarella frais sans lactose (assurez-vous que l’étiquette indique 0 g de sucre) ou alors une version végétalienne comme celle de Miyoko, ou alors omette-le complètement. 

Pour la vinaigrette, il suffit de mélanger les ingrédients (j’aime le faire dans un petit pot, question de bien émulsifier le tout sans me casser la tête). J’aime un ratio plus près de moitié-moitié pour la vinaigrette et l’huile, mais c’est au goût. La recette d’origine précise que si on ne trouve pas de vinaigre balsamique blanc, on peut remplacer par la même quantité de vinaigre blanc additionnée d’une pincée de sucre; on pourrait aussi utiliser du vinaigre de vin blanc. 

Pour la salade 
2 pêches jaunes, coupées en quartiers 
1 grosse tomate ancestrale, coupée en tranches 
12 tomates cerises, coupées en deux 
¼ oignon rouge, coupé en fines rondelles 
4 oz. de mozzarella fraîche sans lactose, déchirée en morceaux 
12 feuilles de basilic 
sel et poivre, au goût 

Pour la vinaigrette 
2 c. à soupe d’huile d’olive 
1 c. à soupe de vinaigre balsamique blanc 
1 petite gousse d’ail, hachée finement 
sel et poivre, au goût 

Sur une assiette de service, répartir les pêches, les tomates, l’oignon et le fromage mozzarella. Arroser de la vinaigrette. Saler et poivrer. Parsemer de feuilles de basilic.


Sunday, September 27, 2020

Strawberry Lemon Curd Tart


This dessert didn’t quite work out the way I wanted, but I liked it so much that I’m sharing it anyway. I think it would just need a few small tweaks to be perfect! 

First of all, I used an extra tablespoon of water in the crust; I’ve decided that next time, it should just be patted directly into place in the pan; and the quantities for a 9-inch tart pan should be increased by 50%, so what I’m writing below reflects that. I really liked the addition of almond extract in there! As for the curd, I used 4 eggs instead of 3, but even then, the curd was too loose. It should really thicken significantly (I’ve added that below), and I wouldn’t hesitate to use a cornstarch slurry next time to help things along. 

For the tart crust 
1 ½ cup (200 g) all-purpose flour 
1 ½ Tbsp. dark brown sugar 
heaping ¼ tsp. salt 
1 ½ tsp. lemon zest 
12 Tbsp. (1 ½ stick or ¾ cup) cold lactose-free butter, cut into ½-inch pieces 
2-3 Tbsp. cold water 
¾ tsp. vanilla extract 
¼ tsp. almond extract 

For the strawberry lemon curd 
1½ cups strawberries 
¾ cup sugar zest of two lemons 
½ cup freshly squeezed lemon juice, from 3-4 lemons 
4 large eggs (more eggs will give you a firmer curd) 
6 Tbsp. lactose-free butter, cut into 1-inch pieces, softened but not melting 

For the tart crust 
Combine flour, sugar, salt, and lemon zest in a food processor. Pulse to combine. 

dd in butter and pulse until butter is in pea-sized pieces. 

Combine water, vanilla, and almond extract and drizzle over the mixture. Pulse to combine until the mixture resembles coarse crumbs – it should not be fully combined into a ball. 

Turn out mixture into a 9” round tart pan and gently press in place (if you have trouble making it stick together, add a few more drops of water). Make sure to spread the dough out and up evenly to prevent an overly thick bottom or sides (I like to use the bottom and sides or a glass for this). You may have leftover dough. 

Chill tart pan in refrigerator while preheating the oven to 375 °F. 

Spray one side of a piece of foil and set it down on the pie dough. Fill with pie weights. Bake tart shell for 15-20 minutes (I baked it for 12 minutes, but had a bit less dough). 

Remove the foil and bake until golden, 12 to 15 minutes more (12 minutes in my case). 

Remove tart shell from oven and let cool. 

For the strawberry lemon curd 
Purée the strawberries in a food processor until smooth. Set aside. 

Create a water bath by placing a saucepan of water over heat to simmer and placing a metal bowl unto the pan so that its bottom does not touch the water. 

Combine the sugar and lemon zest together with your fingers and add to the metal bowl. 

Whisk in the eggs and lemon juice. Whisk in the strawberry purée. 

Cook the mixture over the simmering water, whisking constantly, until the cream reaches 180 °F and thickens significantly (see note above). Keep whisking while the mixture is heating up to prevent the eggs from cooking. 

Take the mixture off the heat and strain it into the bowl of a food processor or blender. Let it rest for a bit until it cools to about 140 °F. 

Add in the butter pieces a few at the time and combine on high speed. Once all of the butter has been added, let the mixture combine for a few minutes longer to ensure the mixture is perfectly smooth. (I honestly think this can be done by hand with a whisk, and you can also strain the mixture at that point to make sure it is smooth.) 

Once the curd is finished, pour it into a container and let it chill in the refrigerator for about half an hour before assembly. 

For assembly 
Spoon the strawberry lemon curd into the tart shell and spread out evenly with a small offset spatula or back of a spoon. Place back into the refrigerator for another hour (or overnight) to let the curd firm up more. 

Decorate top with fresh berries and/or lactose-free whipped topping. Serve soon after assembly.


Wednesday, September 23, 2020

Skillet Chicken Thighs with Balsamic Glaze and Fresh Cherry Salsa


I realize that title is quite a mouthful, but it’s also very descriptive, so I find it useful! I got the recipe from Real Simple. This was my first time using storebought balsamic glaze (instead of reducing balsamic vinegar over low heat), and it is such a time saver! And it’s delicious, too. 

The recipe called for bone-in, skin-on chicken thighs, and while that would be delicious, our family just doesn’t want to deal with bone, so I got some boneless, skinless upper thighs; you could do chicken breasts too, and just adjust the cooking time slightly. I also forgot to chop the cherries, but the salsa was fantastic nonetheless! I’d use it as a side for other dishes too in the summer. I loved the originality of this dish, and all the flavors paired together surprisingly well. The Engineer liked it as well, but the Little Prince was bitterly disappointed that the cherries on his plate were not the maraschino cherries he had envisioned. I served this with a simple side of arugula and potatoes with pesto. 

8 bone-in, skin-on chicken thighs (or your favored cut), patted dry 
1 ½ tsp. freshly ground black pepper, divided 
1 ¼ tsp. kosher salt, divided 
1 Tbsp. olive oil 
2 small shallots, thinly sliced 
1 Tbsp. fresh lemon juice 
 1 tsp. honey 
8 oz. fresh cherries, pitted and chopped 
¼ cup chopped fresh flat-leaf parsley 
1 tsp. fresh thyme 
2 Tbsp. lactose-free butter, melted 
2 Tbsp. bottled balsamic glaze 

 Preheat oven to 400 °F. 

Season chicken on both sides with 1 teaspoon each pepper and salt. Heat oil in a large skillet over medium-high. Working in batches, add chicken to skillet, skin side down, and cook until browned, about 5 minutes. Transfer, skin side up, to a rimmed baking sheet. Roast until skin is crispy and chicken is cooked through, 15 to 20 minutes. 

Meanwhile, mix shallots, lemon juice, honey, and remaining ¼ teaspoon salt in a small bowl. Let stand 10 minutes; stir in cherries, parsley, and thyme. Stir butter, balsamic glaze, and remaining ½ teaspoon pepper in a separate small bowl. 

Serve chicken topped with balsamic glaze and cherry salsa.


Tuesday, September 22, 2020

Orange Olive Oil Cake


This cake is from Leite’s Culinaria. It was in my to-try recipe list, so I finally got around to making it, and was later surprised to come across it on this blog – turns out I had made it once before and was not impressed. But something must have changed, because this time, everyone loved it! 

The thing that I noticed while making this cake is that the amounts seem really large compared to the average cake recipe, so make sure that your bundt pan holds at least 12 cups (the one in the original post is 15 cups). The instructions also say that the pan must be light-colored, as a dark pan will turn out a cake that is “unpleasantly brown” – I didn’t buy a new one just for this, but I would say that mine is halfway between light and dark. Medium? I tented the cake with foil after 45 minutes in the oven and the color was fine. 

The instructions also say to let the cake rest for at least a whole day before eating it (I left the last paragraph of the instructions verbatim). Let me say right now that I didn’t do it – sorry not sorry! That being said, it stayed moist and delicious for days! Plus, the confectioners’ sugar with which I dusted the top remained visible for days instead of disappearing into the cake after a few hours, so that was nice too. 

nonstick baking spray with flour (I used butter spread and flour) 
4 or 5 large navel oranges 
3 ½ cups all-purpose flour 
1 ½ tsp. baking powder 
1 ¾ tsp. kosher salt 
5 large eggs 
3 cups granulated sugar 
1 ½ cups mild, fruity extra-virgin olive oil 
confectioners’ sugar, for dusting 

Position a rack in the middle of the oven, remove any racks above, and preheat to 350 °F. Coat a 12-cup bundt or tube pan with baking spray and set aside. 

Finely grate the zest of 3 oranges and then squeeze the juice from 4 of them. You should have 1 ½ cups orange juice; if not, squeeze the 5th orange. 

Whisk together the flour, baking powder, and salt in a large bowl. 

In the bowl of a stand mixer fitted with a paddle attachment or with a handheld mixer in a large bowl, beat the eggs on medium-high speed until well combined, about 1 minute. Slowly pour in the granulated sugar and continue to beat until thick and pale yellow, about 3 minutes. Switch to low speed and alternate adding the flour mixture and the oil, starting and ending with the flour and beating until just a few wisps of flour remain. Pour in the orange juice and zest and whirl for a few seconds to bring the batter together. 

Gently scrape the batter into the prepared pan and bake until a cake tester comes out with a few moist crumbs clinging to it, about 1 ¼ hours. Check the cake occasionally and if the top begins to brown a touch too much, loosely cover it with foil (I tented mine with foil after 45 minutes). When the cake is done, transfer the pan to a wire rack and let the cake cool in the pan for 15 minutes. (Don’t forget to come back after 15 minutes. Seriously. If the cake remains in the pan too long, the sugars begin to cool and stick to the pan. Mine stuck a bit, but the confectioners’ sugar hid the damage.) 

Turn the cake out onto the wire rack and let it cool completely. Place the cake on a covered cake stand and let it sit overnight. (Seriously. This dense, moist, fruity cake only gets better with age. Don’t even think about taking a bite until the day after you make it—or even the day after that.) Just before serving, dust with confectioners’ sugar.


Monday, September 21, 2020

Beurre de biscuits maison

J’ai fait deux sortes de tartinades maison dernièrement. Il y avait le beurre de noix de macadamia aux fraises de Coup de Pouce : la recette est introuvable sur leur site, mais il s’agit de passer au robot 3 tasses de noix de macadamia rôties et 1 ¾ tasse de fraises lyophilisées (j’ai pris 1,2 oz de poudre de fraises lyophilisées). J’ai trouvé ça délicieux, et très joli du surcroît! Je pense qu’on pourrait en faire aussi avec des amandes, mais alors ce serait sûrement un peu moins rose. Malheureusement, mes enfants ont été intimidés par la nouveauté (même si j’en ai un dont la couleur préférée est le rose!), alors ils ont refusé d’y goûter. 


L’autre recette (ci-dessous) est celle de Fraîchement Pressé, pour faire un beurre de biscuits maison. Quand j’entends « beurre de biscuits », je pense surtout à celui fait à base de Spéculoos, mais on peut vraiment en faire de n’importe quelle saveur – celui-ci est fait avec des biscuits-sandwichs à l’érable! On peut utiliser des biscuits Graham, des biscuits au beurre d’arachide, des sablés, voire même des biscuits Oreo, pourquoi pas! Peu importe qu’il y ait du glaçage ou pas, l’important est de se retrouver avec environ 1 tasse de miettes de biscuits. Pour le reste des ingrédients, assurez-vous qu’ils soient sans lactose – ça se trouve, mais il faut bien lire les emballages! Pour ce beurre de biscuits à l’érable, j’en ai obtenu 2 petits pots; j’ai gardé le premier à la température de la pièce quelques jours (le temps qu’il se fasse manger!), puis j’ai sorti le deuxième parce que je préfère la consistance à la température de la pièce. Dans ce cas, le Renard a refusé de goûter (alors qu’il aurait pourtant adoré!), tandis que le Petit Prince a vraiment apprécié – mais peut-être pas autant que l’Ingénieur et moi! 

Dans les deux cas, on peut bien sûr déguster la tartinade sur du pain rôti, un croissant ou un muffin anglais pour déjeuner, mais je recommande également d’en mettre sur des crêpes ou des gaufres, ou alors de l’utiliser comme trempette pour des fruits. 

Pour le beurre de biscuits maison 
environ 10 biscuits feuilles d’érable (ou autres, au goût) 
¼ tasse de beurre sans lactose, à la température de la pièce 
½ tasse de lait concentré sucré sans lactose (type Eagle Brand, par exemple avec du lait de coco) 

Mettre les biscuits dans le robot culinaire. Laisser fonctionner pendant 1 minute, le temps que les biscuits soient complètement écrasés. 

Ajouter le beurre et le lait concentré sucré. Mélanger jusqu’à ce que tout soit bien incorporé. 

Le beurre de biscuits devrait environ être de la même consistance que du beurre d’arachide. Transférer dans un contenant hermétique et conserver au frigo (voir note plus haut).


Friday, September 18, 2020

Jessica Fechtor's Challah


I believe I haven’t talked about Jessica Fechtor’s Stir yet – it’s a memoir of her recovery from a brain aneurysm, and it’s by far one of the best books I’ve read this year. It’s also full of recipes, so it’s currently in my kitchen with a bunch of Post-It tabs sticking out of it! I’ve enjoyed her butter almond cake, but the recipe that’s really wowed me so far is her challah, which uses an interesting technique of folding instead of straight-up kneading the dough (it was created by her friend Andrew Jianjigian). It’s perfect on holidays like Rosh Hashanah, but there’s no need for a special occasion – she makes it almost every Friday. 


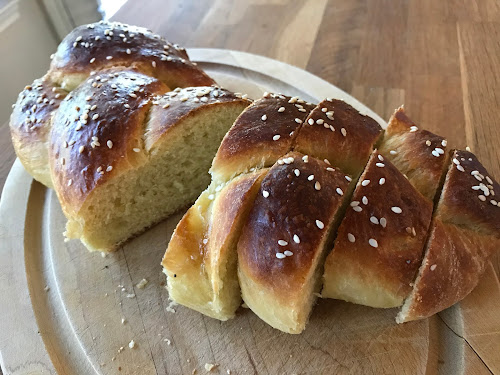
This challah was fantastic! The dough was easy to braid, and I’m sure it could be shaped differently too. The loaves were beautifully golden (maybe a smidge too golden?) and the crumb was soft and delicious. I also loved this bread toasted and lightly buttered, though it should be said that it was still perfectly moist on day 2. The recipe makes two loaves; I sprinkled one with sesame seeds and one with poppy seeds, which are classics, but Jessica Fechtor also recommends rolled oats, flax seeds, pumpkin seeds or sunflower seeds. You could also use no seeds at all. 


For the dry ingredients

4 cups (500 g) bread flour

11/2 tsp. instant dry yeast

2 tsp. fine sea salt


For the wet ingredients

2 large eggs plus 1 large egg yolk (save the extra white in a covered glass in the fridge for glazing later on)

3/4 cup (190 g) water

1/3 cup (75 g) olive oil

1/4 cup (85 g) honey

For sprinkling, before baking (optional): sesame seeds, poppy seeds, flaxseeds, rolled oats, sunflower seeds, and/or pumpkin seeds


Whisk together the dry ingredients in a large bowl, and the wet ingredients in a smaller bowl. Dump the wet ingredients into the dry ingredients and stir with a rubber spatula until a wet, sticky dough forms. Cover the bowl with plastic wrap and let sit for 10 minutes. 

Peel back the plastic. Grab an edge of the dough, lift it up, and fold it over itself to the center. Turn the bowl a bit and repeat around the entire lump of dough, grabbing an edge and folding it into the center, eight turns, grabs, and folds in all. Then flip the dough so that the folds and seams are on the bottom. Cover tightly again with the plastic and let sit for 30 minutes. 

Repeat the all-around folding, flipping, covering, and resting four more times. (She keeps track by drawing hash marks in permanent marker right on the plastic, but you could also set a timer on your phone for all rises, 5 in all.) The dough flops more than it folds in the first round or two. Then, as the gluten develops, you’ll get proper folds. By the final fold, the dough will be wonderfully elastic, and you’ll be able to see and feel the small pockets of air within. Pull the plastic tight again over the bowl and refrigerate for 16 to 24 hours—any longer and you risk over-proofing. 

Cover a baking sheet with parchment paper and set aside. Transfer the dough to a lightly floured surface and divide into six equal pieces. Roll into six strands, each about a foot long and ¾ inch in diameter, dusting sparingly with flour when necessary to prevent sticking. (You’ll want to add as little extra flour as possible.) Form two three-strand braids, and transfer the loaves to the prepared pan. Cover with plastic and let proof at room temperature for 2 to 3 hours, until the dough is noticeably swollen and puffed and bounces back very slowly, if at all, when you poke it lightly with your finger. 

Preheat the oven to 375 °F. Remove the plastic wrap from the loaves and brush with the reserved egg white. If you’d like, sprinkle with seeds. Poppy and sesame seeds are traditional challah toppings. 

Bake for about 20 to 25 minutes, until the bread is golden and gorgeous and a tester inserted into the center comes out clean. You can also check for doneness with a thermometer; the internal temperature of the loaves will be 190 °F when fully baked. 

Transfer to racks and let cool.


Thursday, September 17, 2020

Sheet Pan Chicken Meatballs and Broccoli

 I knew I had to make these meatballs after I saw them on Deb Perelman’s column on Bon Appétit (recipe here). The big draw was supposed to be the ketchup in the sauce, but honestly, we found the sauce much too spicy! There was definitely too much ginger. Maybe I should cut back on the mirin and Worcestershire sauce too? Only as I was typing this recipe did I realize what the mistake might have been: the list of ingredients said “1 ½” piece ginger” and I thought it meant one piece of ginger that was 1 ½” long, but looking at the ingredients for the meatballs, those say “1 2” piece ginger”, which logically means that the sauce actually called for one piece of ginger that was ½” long. I guess this is where it pays off to use hyphens properly and not abbreviate to the point of confusion… Anyway, I corrected it below and it should be fine! 

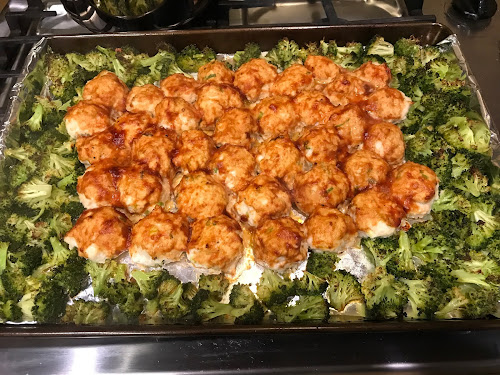
Since I wanted to make sure I had leftovers, I doubled the quantities for the meatballs, though admittedly my baking sheet was overcrowded and I should have used two. I also omitted the broccoli stems, since we’re not such huge fans over here, but roasting broccoli is a pretty good way to eat it. I think that next time, with a proper amount of ginger in the sauce, it’ll go over better! I started with 1 ½ cups of dry jasmati rice to make a side, because that’s typically a good amount for us (2 meals for 2 adults and 2 kids). I’ll definitely be making this again, with a less spicy sauce! 

For the sauce (see note above) 
2/3 cup ketchup 
¼ cup Worcestershire sauce 
2 Tbsp. rice cooking wine or water 
2 Tbsp. honey 
4 tsp. soy sauce 
½” piece ginger, peeled and finely grated 
½ tsp. freshly ground black pepper 

For the meatballs (see note above) and assembly 
2 heads broccoli (about 1 ½ lbs.) 
2 Tbsp. vegetable oil, divided 
2 ½ tsp. kosher salt 
crushed red pepper flakes (optional; I used a pinch of Korean pepper) 
1 lb. ground chicken 
1 large egg, beaten to blend 
4 scallions, thinly sliced 
2 garlic cloves, finely grated 
2” piece of ginger, peeled and finely grated 
½ cup panko (Japanese breadcrumbs) 
1 Tbsp. toasted sesame oil 
¼ tsp. freshly ground black pepper 
¼ cup water cooked rice and sesame seeds, for serving 

For the sauce 
Mix ketchup, Worcestershire sauce, wine (if using), honey, soy sauce, ginger, and pepper in a small saucepan. Measure out ¼ cup mixture into a small bowl; set aside for glazing meatballs later. Bring remaining mixture to a simmer over medium-high heat, stirring occasionally and reducing heat if needed, until sauce thickens, about 5 minutes. Transfer sauce to a small bowl. 

For the meatballs and assembly 
Place a rack in upper third of oven; preheat to 450 °F. Line a rimmed baking sheet (or two, if doubling the recipe) with foil. Trim broccoli stems and remove from crown. Peel off tough outer skin; slice crosswise into ½" pieces. Cut florets into 2" pieces. Toss on prepared baking sheet with 1 Tbsp. vegetable oil, 1 tsp. salt, and a few pinches of red pepper flakes (if using). Push to the edges of baking sheet to create a space for meatballs. Brush space with remaining 1 Tbsp. vegetable oil. 

Mix chicken, egg, scallions, garlic, ginger, panko, sesame oil, pepper, remaining 1½ tsp. salt, and water in a medium bowl. Using wet hands, form into twelve 1½"-diameter meatballs (I made mine smaller). Arrange on baking sheet; brush with some of the reserved glazing mixture. Bake until meatballs are cooked through, 14–18 minutes (15 minutes in my case). Remove from oven; heat broiler. Brush meatballs with remaining glazing mixture; broil until broccoli is charred and meatballs are browned in spots, about 5 minutes. 

Spoon meatballs and broccoli over rice in bowl. Drizzle with sauce and sprinkle with sesame seeds.


Wednesday, September 16, 2020

Blueberry Lavender Icing


I talked about the lavender and rose syrups from Le Monin that I bought, but I forgot to attach this photo to show just how big the bottles are… Luckily, they are so pretty that they actually look really nice sitting on the countertop, but it *is* going to take a long time to get through them. So every once in a while, I used them in a recipe. 


I zeroed in on this blueberry lavender icing recipethe rest of my sugar cookie dough as a vehicle for this. I only used half of the blueberry purée, so I’m reducing the amounts below (as it is, I’ve got a fair amount of blueberry-lavender purée in my freezer, so I’ll have to figure out a smoothie combination for it!). I still had about half of the icing itself left over after glazing all the cookies, so it would definitely be enough for a cake. 

 If you don’t have storebought lavender syrup, you can make simple syrup and steep lavender in it (see the original recipe for precise amounts). I used ½ cup in the recipe; I started out with ¼ cup, but it didn’t taste pronounced enough to me. Even then, I’m using less liquid than the original recipe called for, and I increased the sugar! I ended up with icing that would be the right consistency to flood cookies – what you see here happened by itself after I dolloped each cookie with a bit of icing. I stored the cookies in the fridge once they were decorated. 

5 oz. blueberries 
1 tsp. lemon juice 
½ cup lactose-free butter, at room temperature 
4 cups powdered sugar, sifted 
½ cup lavender syrup, or to taste 
½ tsp. vanilla 

In a saucepan, on low to medium heat, simmer the blueberries and lemon juice until the berries bubble and release their juices. Using the back of a wooden spoon, mash the berries into a mushy, juicy consistency. Try to squish all of the blueberries, so they will be easier to blend. (I ended up using a hand mixer and straining the mixture afterwards.) Pour the lavender syrup into the berry mixture. Remove from heat and let cool completely. 

Using a hand mixer or stand mixer, cream the butter and powdered sugar until smooth. Add the berry mixture and the vanilla. If you want it thicker, add more butter and/or powdered sugar, or add the berry mixture only a little at a time. Ice or glaze your confection.


Monday, September 14, 2020

Sunscreen

My family and I just spent the weekend on Padre Island. The Fox had never seen the ocean, and the Little Prince didn’t remember it; I had wanted to stop there on our way up to Montreal this year, but we stayed put all summer… So when a friend of mine went to Port Aransas a few weeks ago and reported back that it was totally possible to do this while socially distancing, we decided to take a mini-vacation! We got a hotel room with kitchenette, so we ate all our meals by ourselves, and kept our distances from anyone on the beach or in the pool, even though there were more people than I expected.

I decided to dig up this post about sunscreen because of a particularly bad experience we had, though. (The skeleton of this post had been languishing on my hard drive for a long time, but I’ve now updated it in the hopes that it can be useful.) I want to add a bit of an introduction because of an article that came my way recently, so here we go.

First, it turns out that most people don’t apply sunscreen properly – here’s what proper usage looks like. Second, here’s a thread with lots of links about the fact that chemical sunscreens (as opposed to physical ones) are absorbed by the body and we don’t have data to show whether or not this is potentially dangerous. Also, surprisingly, there aren’t any studies that conclusively link use of sunscreen with decrease in melanoma. (It’s not that studies prove it doesn’t help, it’s that there aren’t any well-done trials.) And third, I just read this a few weeks ago and had my mind blown: Is sunscreen the new margarine? This article essentially explains that people who use sunscreen have a higher mortality rate from various diseases, even when you adjust for exercise and lifestyle. This actually explains why low levels of vitamin D are correlated with higher mortality rates, but vitamin D supplements have zero effect on health (see here too, and keep in mind that supplements can cause more harm than good). Essentially, it seems that exposing the body to sunlight, without any filters like sunscreen, is essential and that the tendency to get sunburn is in part caused by lack of exposure. It’s a negative feedback loop, in a way.

I know that this has been true for me to a certain extent: I used to get sunburned on my feet and shoulders at the beginning of summer when I was a child, but by the end of summer I had the clear white markings of my sandals and swimsuit straps on much browner skin, and would keep those markings right through the following spring. So while I am predisposed to getting sunburns, if I were to power through without sunscreen for a summer and made it through the burns, I’d be less fragile after several months. (As it is, after living in Texas for one year, the skin on my forearms was already darker than it had ever been, BUT I’m still pale compared to the general population and still fully capable of getting a sunburn on my forearms.) That being said, I remember reading an article years ago (in… Marie Claire magazine?) that listed the five most important risk factors for skin cancer as, in no particular order and to the best of my recollection: having fair skin that tends to burn easily; having more than 20 moles on your body; having pale eyes or hair (like blue or green eyes, or blonde hair even if only as a child); having had painful sunburns in the past, especially before the age of 5; and a family history of skin cancer. The only risk factor I don’t have is the family history, and since my annual visits to my primary care physician haven’t revealed an increased risk of any of the diseases associated with low levels of vitamin D, I think that the best thing for me to do is to continue wearing sunscreen, especially now that I live in South Texas. I do get an annual checkup at the dermatologist, too.

So, back to last weekend at the beach… You see, I thought that I should try some sunscreen with a spray applicator, so that I could be self-reliant and apply sunscreen to my back without asking for help. I bought Sun Bum SPF50 water-resistant spray; I figured it was a good brand because I really like their (“regular”) cream/lotion sunscreen in a tube. Turns out that I still needed help, because the can is hard to angle right, and directions say you have to rub it in. But still, it’s very easy to apply, so I thought it would be great for the kids – I used a regular cream sunscreen on their face and the spray on their body, which was a breeze. And I used this spray to reapply throughout the morning at the beach. And… we all got sunburns. For both my kids, it was the very first sunburn they’d ever had. Remember how one of the risk factors for skin cancer is getting a sunburn before the age of 5? I got the Little Prince through that window unscathed, but now I’ve dropped the ball with the Fox and I feel really guilty about it (even though, again, it’s not because I didn’t put sunscreen on him or didn’t reapply, it’s because I chose a product that, it turns out, doesn’t work).

Let me tell you about a few products that DO work. I’ve been using Supergoop! for a few years now and I really like it. It’s a local (San Antonio) company that makes 100% mineral sunscreens, and they really live up to their promise. I first tried their Unseen Sunscreen, which is an invisible, fragrance-free SPF40 sunscreen. I believe it’s their bestseller. I love it because it really does go on clear, and it doesn’t smell like sunscreen so it’s that much more unobtrusive. It also absorbs really quickly in the skin. For those who wear makeup, it works as a primer. I really don’t feel like I’m wearing anything, which makes me more likely to use it. However, at $32 for 1.7 ounces, I feel like I have to use it sparingly, so I’ve never used it to cover my whole body when I go swimming, for example. But it’s great for my face, and I’ve used it as an on-the-go touch-up so I wouldn’t have to worry about whether I had white streaks left on my face.

I later bought their Glowstick, which is convenient to keep in my purse (though I’ve put it in a plastic baggie because I’m afraid it might melt); that being said, even though it’s also streak-free, it does leave a shiny finish that isn’t really what I’m going for. I now have two go-tos for use on my face on a near-daily basis: Supergoop’s Superscreen Daily Moisturizer, which feels great and has an SPF of 40 (I highly recommend that one!); and I also use Olay Complete’s daily moisturizer with SPF 30 for sensitive skin. There are still days when I forget, but I now try not to beat myself up about it, given the article I linked to earlier. That article also made me decide not to order this 18-oz pump of sunscreen after all, but don’t think I’m not tempted.

I’ve also been using Neutrogena Hydro Boost Water Gel Lotion Sunscreen regularly (it’s a mouthful, I know!). It’s absorbed by the skin quickly so there are no white streaks, and it feels very light. It has a smell that reminds me of a Dove deodorant I once used (it was called “cucumber” or something, but it obviously doesn’t smell like produce). This is to say that it has a fragrance, but not something that screams “sunscreen”, which makes it more pleasant to use on a daily basis. I first bought the SPF 50, but when I needed more, the bigger format (5 fluid ounces as opposed to 3) of SPF 30 was on sale, so I’ve used that too. The smaller format fit in my countertop tray better, but the bigger one is more economical, so it’s a toss-up. Anyway, price-wise, it’s a good value, at roughly $12 for 3 fluid ounces. But I have to say that whenever I used it on my face, it wasn’t long before it got in my eyes, and then my eyes would periodically burn until I showered it off, so I use it on my arms and other exposed body parts rather than my face.

For the kids, I’ve been using Banana Boat Sport Performance in SPF60 (this is the closest I can find on their website) and Babyganics SPF50; both are waterproof. It takes a while to rub it in, but it’s effective. Even though their skin is more like the Engineer’s skin (prone to deep tans instead of burns), it’s obviously made a difference, as evidenced by the one time I used something else last weekend.

In conclusion, if anyone can recommend either a good product or a good method to sunscreen one’s own back, I’m all ears.