Friday, February 26, 2021

Meyer Lemon Marmalade


We got nine Meyer lemons from our dwarf tree this year. (Well, there were ten in all, but a squirrel got to one of them. I don’t know why squirrels would eat some of a lemon and leave tomatoes untouched, but there you have it.) I used some for a double-recipe of Meyer lemon pudding cake in a large oval dish, which was delicious. And then I decided to finally tackle Meyer lemon marmalade. I halved the amounts: 4 of my lemons weighed 1 ½ pounds, so I used that along with 1 ½ cups of sugar. It worked really well! The amounts below are the original ones. 


Making marmalade, jams and preserves in general has always intimidated me, because proper canning requires both equipment and know-how that I do not possess. So I decided to put my marmalade in two clean (not sterilized) jars and refrigerate them, making sure to use them up promptly. 

Toward the end of cooking, I wasn’t sure how to check that the marmalade had set. I remembered something about cold saucers – turns out I should have stashed several saucers in the freezer ahead of time. I did some quick googling and found this great post, which explains that another way to test it is to make sure it reaches between 217 °F and 221 °F. I may have overshot it slightly, because my thermometer takes a while to show the accurate temperature, but I was still overjoyed with the results! I thought it was absolutely delicious. 

I have the Blue Chair Jam Cookbook and I fully intend to use it someday! I think maybe I need to take a class on this, or at the very least watch a video. And get some supplies, which also means storing the supplies. But making this marmalade wasn’t nearly as hard as I thought it would be, so I have renewed enthusiasm for this future version of me that would make preserves! 

12 organic Meyer lemons (3 pounds) 
3 cups sugar 

Rinse the lemons and pat dry. Halve the lemons crosswise and juice them, reserving the juice. Using a spoon, scrape the pulp and seeds from the halves. Using a sharp knife, slice the peels 1/8 inch thick. 

In a large, heavy saucepan, cover the strips with 8 cups of cold water and bring to a boil; boil for 1 minute. Drain the strips and rinse under cold running water. Blanch two more times; the final time, drain the strips but do not rinse them. 

Return the strips to the saucepan. Add the reserved juice and the sugar. Simmer over moderate heat, stirring to dissolve the sugar, then skimming any foam, until the marmalade sets, about 30 minutes. (See note above.) 

Spoon the marmalade into 5 hot ½-pint canning jars, leaving ¼ inch of space at the top, and close with the lids and rings. To process, boil the jars for 15 minutes in water to cover. Let stand at room temperature for 2 days before serving. Refrigerate any open jars.


Saturday, February 20, 2021

Marzipan and Orange Blossom Morning Buns

I meant to post more last week, but my heart wasn’t in it. We’ve been hit with some very cold (for Texas) weather and were without water for a few days, so I had other things on my mind. We were lucky to have electricity, and now water is back, albeit with a boil advisory. Hundreds of thousands of people in Texas are not so lucky. The Little Prince’s school might also be closed a while longer, as it seems to have sustained the most damage in the district. But I want to get back to normal, were it only so I feel like I’ve done one thing today, and I figured that the weekend is a good time for a breakfast bun recipe. 

The original version of these buns was from 
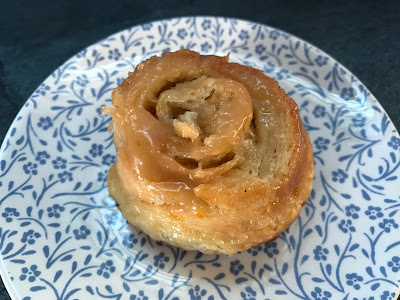
Love & Olive Oil. I served them on Christmas morning, and while I loved the flavors, I wasn’t crazy about them. They were very flaky, which was nice, but also unpleasantly sticky. It was the kind of confection for which you butter a muffin tin and dust it with sugar, then bake each bun in a little tin and flip them out of the pan when they are still very warm, or else they will never come out at all (and even then, they unrolled themselves quite a bit and were baked unevenly). I was so afraid of having some sort of dental emergency while eating them that they were clearly not enjoyable! So I decided to adapt them to a non-sticky format. 


I decided to use the dough recipe from these orange sweet rolls and keep the filling from the original recipe, reducing the sugar. I ended up using powdered sugar instead of granulated sugar, too, more like the chocolate tahini challah buns. I also made them in a pan rather than a muffin tin, which I find easier. And as I did for the first batch, I changed up the spices a bit (the version below is mine). This second batch was a big hit! 

The recipe specifically said to stay away from tubes of marzipan sold in grocery stores, because those tend to be rock-hard, and the key here is that you want it to be workable. I bought this one. It is 16 ounces of marzipan, so I had enough to make these buns twice. That being said, I’d consider just using more marzipan next time even if that means rolling it thicker, because I had trouble rolling it out to the proper size – feel free to use more than is called for below. 


For the rolls 
3 Tbsp. warm water 
1 envelope active dry yeast (about 2 ¼ tsp.) 
2 Tbsp. sugar, divided 
1 egg yolk, lightly beaten, at room temperature 
1/3 cup fresh orange juice (zest the orange first and reserve the zest for the filling!) 
2 Tbsp. melted coconut oil, cooled 
½ tsp. kosher salt 
1 2/3 cup cups all-purpose flour, plus more for surface 

For the filling 
½ cup powdered sugar, sifted 
1 Tbsp. finely grated orange zest (from 1 medium orange, see above) 
1 pinch of ground cinnamon 
1 pinch ground nutmeg 
1 pinch of salt
8 oz. high-quality marzipan (see note above) powdered sugar, for rolling marzipan 
2 Tbsp. orange blossom water, divided 

For the rolls 
Pour 3 Tbsp. warm water (105 °F–115 °F) into a small bowl. Add yeast and 1 tablespoon sugar and whisk to combine. Let sit until foamy, about 10 minutes. 

Using electric mixer on medium-high speed, beat egg yolk, orange juice, oil, salt, and remaining 1 tablespoon sugar in a large bowl. Add 1 2/3 cups flour and yeast mixture. Beat until dough just comes together. (At this point, I switched to the dough hook and didn’t need to knead by hand.) Turn out dough onto a lightly floured surface. Knead several times with floured hands until smooth, about 5 minutes (dough will be sticky). 

Spray a clean large bowl with nonstick spray. Place dough in bowl and turn to coat. Cover with a towel and let sit in a warm place until doubled in size, about 45 minutes. 

For the filling 
Meanwhile, Line a 9”x13” pan with parchment paper and grease it. Set aside. 

Mix together the powdered sugar, orange zest, cinnamon, nutmeg, and salt. Set aside. 

On a lightly floured surface, roll the dough to a 9”x18” rectangle, with the long edge closest to you. 

Lightly dust a clean surface with powdered sugar. Roll marzipan into a 7”x18” rectangle. (You may need to knead your marzipan into a workable dough if it is on the hard side. You can also use almond paste, just knead in powdered sugar as needed until it forms a workable dough.) 

Evenly brush dough with 1 tablespoon of orange blossom water. Lay marzipan on top, lining up the bottom long edge closest to you as well as short sides. There should be a few inches of dough along the top edge; this is important for the buns to seal properly. 

Brush marzipan with remaining 1 tablespoon of orange blossom water, then sprinkle evenly with the sugar mixture. 

Starting with the long edge closest do you, tightly roll into a tight cylinder; pinch to seal along edge. Using a sharp serrated knife, gently cut cylinder into 12 even discs 1½-inches thick. Gently pull the knife back and forth through the dough, letting the teeth do the work; do not squish or press down too much. Place the rolls in the prepared pan (cut-side up would be prettier). 

Set pan in a warm spot (like on top of the preheating oven) to rise until buns are noticeable puffed, about 45 minutes to 1 hour (slightly longer if they had been refrigerated). Preheat the oven to 350 °F. 

Bake for 20 minutes or until lightly browned on top. Let cool before serving. (You *could* make a glaze for them with orange blossom water and powdered sugar, but I find them sweet enough as it is.)


Wednesday, February 17, 2021

Salade-repas au porc et aux canneberges

C’est mon amie la Maman des Zigotos qui a mis une photo d’un plat alléchant sur Facebook, en précisant qu’il s’agissait de cette salade-repas au porc et aux canneberges. Cependant, sa version avait l’air bien meilleure, et c’est parce qu’elle avait ajouté de la roquette. Je la rajoute donc dans les ingrédients ci-dessous, en précisant que vous pourriez en mettre encore davantage! 

Je l’ai faite un peu à ma manière aussi, parce que je ne voulais pas acheter de nouveaux ingrédients. Alors j’ai pris du cocktail de canneberges au lieu du jus de canneberges pur, du vinaigre de vin rouge au lieu du vinaigre de canneberges, des pignons au lieu des noisettes (on peut les omettre carrément)… J’ai aussi augmenté certaines quantités, pour avoir des restes. Adaptez à votre goût! Moi, j’ai adoré ça. 

Pour la vinaigrette 
2 c. à soupe de jus de canneberge pur 
1 c. à soupe de sirop d'érable 
2 c. à thé de moutarde de Dijon 
1 c. à thé de vinaigre de canneberge ou de framboise (j’en ai mis 2 c. à thé) 
¼ tasse d'huile d'olive 
sel et poivre, au goût 

Pour la salade 
1 pomme rouge (j'ai pris une Envy), non pelée, sans le cœur, en dés 
2 tasses de riz à grains entiers étuvé (de type Uncle Ben's), cuit (je suis partie de 1 tasse sec) 
1 ½ tasse de filet de porc, cuit, coupé en dés (j’ai fait cuire 1 filet de porc) 
¼ tasse de fromage cheddar fort sans lactose, en dés (j’en avais ½ tasse) 
¼ tasse de noisettes rôties à sec (facultatif), concassées ou entières (voir note plus haut) 
½ tasse de canneberges séchées 
2 branches céleri, hachées 
1 poivron jaune, en petits dés 
2 oignons verts, hachés (partie verte et blanche) 
1 grosse poignée de roquette (ou davantage) 

Dans un grand bol, mélanger tous les ingrédients de la vinaigrette, sauf l'huile. Verser l'huile en un mince filet et fouettant vigoureusement pour créer une émulsion. (Je fais toujours ça dans un petit pot.) 

Ajouter d'abord les dés de pomme dans le bol de vinaigrette et mélanger pour enrober, afin de prévenir le brunissement des pommes. 

Ajouter ensuite le reste des ingrédients (sauf la roquette). Mélanger délicatement et ajuster les assaisonnements au goût. 

Répartir la roquette dans des assiettes creuses, puis garnir de la salade.


Tofu magique

J’avais déjà entendu parler du tofu magique de Loounie Cuisine, mais je ne l’avais encore jamais apprêté. Il a suffi que Chère Sœur m’en vante les mérites récemment pour que je me lance! J’ai fait une double recette, pour avoir des restes (que j’ai réchauffés au four plutôt qu’au micro-ondes). Quand les enfants ont demandé ce que c’était, j’ai appelé ça des « croquettes » et je les ai servies avec du ketchup. Le Renard a daigné y goûter, ce qui est une victoire, et le Petit Prince en a redemandé! Les adultes ont bien aimé ça aussi. J’ai servi ça avec une salade de légumes à la thaïlandaise. Les quantités ci-dessous font 4 portions. 

Je partage également le lien suivant (en anglais), un excellent guide sur le tofu publié dans Bon Appétit le mois dernier. 

1 bloc de 450-454 g de tofu extra-ferme, épongé dans un linge sec 
1 c. à soupe de vinaigre de cidre de pommes ou de jus de citron 
1 c. à soupe de sauce soya ou tamari 
1 c. à soupe de sirop d’érable 
2 c. à soupe de fécule de maïs 
30 g (½ tasse) de levure alimentaire en flocons 
1 c. à soupe d’huile végétale, pour la cuisson 

Préchauffer le four à 375 °F. Tapisser une plaque de cuisson de papier parchemin ou d’un silpat. 

Dans un bol, défaire le tofu avec les doigts en morceaux de la grosseur d’une bouchée. Les morceaux n’ont pas besoin d’être uniformes. (Je trouve que c’est justement le fait que le tofu soit déchiré avec les doigts, plutôt que tranché, qui fait son charme!) Ajouter le jus de citron, la sauce soya et le sirop d’érable. Bien mélanger. Ajouter la fécule de maïs et la levure alimentaire. Bien mélanger à nouveau pour enrober tous les morceaux. 

Déposer les morceaux de tofu sur la plaque préparée. Cuire 25 minutes, ou jusqu’à ce que les morceaux soient bien dorés. (On peut aussi les faire cuire à la poêle, mais je préfère ne pas me compliquer la vie! J’ai profité du temps de cuisson pour faire ma salade en accompagnement.)


Monday, February 15, 2021

Cheater Cassoulet

It is *really* cold in San Antonio this week, and we’ve even got a significant snow fall. I mean, I know it’s colder-than-average in most of North America right now, and I’ve certainly known much colder temperatures in Canada. But here it feels more worrisome, because South Texas just isn’t built for it. For one thing, the houses aren’t insulated nearly as well as the last places where I lived in Canada, so it’s quite cold even indoors. (This is a constant annual complaint of mine – the ground floor of our house, like many, is tile set directly on the foundation, and the ceilings are high. Great to keep the house cool in summer, but absolutely freezing in the winter, to the point where I am often physically miserable.) Plus, even when the wind chill factor brought it down to – 40 degrees in Canada, we didn’t have freezing pipes. But here, there’s the very real threat that the pipes will freeze – if not in the house, then a water main in the street – and there could be a power outage. Of course, people don’t have winter tires, there are no trucks to clear snow, and no one to spread sand or salt, so driving is very hazardous as well. Schools are closed tomorrow, perhaps even longer. 

All this to say that given this cold, cold day, I want to eat something warm and comforting. Cassoulet would hit the spot, but the real thing takes something like 3 days to make from scratch, whereas this version from Real Simple takes about an hour. When I made this, I used pork andouille (the only one I could find), but it was too spicy for my liking. I’d use a smoked sausage next time. It was really great otherwise! 

¼ cup olive oil, divided 
1 12-oz. package andouille chicken sausage (see note above), pricked with a fork 
1 cup panko 
1 ¼ tsp. kosher salt, divided 
1 yellow onion, chopped 
1 carrot, grated 
4 cloves garlic, crushed 
1 lb. ground pork 
½ tsp. freshly ground black pepper 
2 Tbsp. tomato paste 
1 14.5-oz. can crushed tomatoes 
2 sprigs thyme, plus leaves for serving 
1 15.5-oz. cans cannellini beans, drained and rinsed 

Heat 2 tablespoons oil in a large, heavy-bottomed pot or Dutch oven over medium. Add sausage; cook, turning often, until browned on all sides, about 8 minutes. Transfer to a plate. Add panko and ¼ teaspoon salt to pot; cook, stirring constantly, until golden, about 2 minutes. Transfer to a bowl. 

Wipe pot clean. Heat remaining 2 tablespoons oil over medium. Add onion, carrot, and garlic; cook, stirring often, until softened, about 5 minutes. Increase heat to medium-high. Add ground pork, pepper, and remaining 1 teaspoon salt; cook, breaking up pork with a wooden spoon and stirring occasionally, until browned, 6 to 8 minutes. Add tomato paste; cook until darkened and coating pork, about 2 minutes. Stir in 1¾ cups water, crushed tomatoes, and thyme, scraping up browned bits; bring to a boil. Reduce heat to medium-low. Simmer, stirring often, until sauce thickens slightly, about 10 minutes. Meanwhile, diagonally slice sausage. 

Add beans and sliced sausage to pot. Cook over medium, stirring occasionally, until warmed through, about 2 minutes. Discard thyme sprigs. Sprinkle with panko and thyme leaves before serving. (The seasoned panko can be stored at room temperature in an airtight container for a few days, while the rest of the stew is refrigerated and warmed up before being topped and served.)


Friday, February 12, 2021

Buttermilk Biscuits

I ended up making two different kinds of buttermilk biscuits recently. First, I tried the ones in Jessica Fechtor’s Stir. They were quick and super easy to make as well as delicious, especially when warm, even though they were a bit homely-looking. I was delighted with them when they were fresh out of the oven, though! I got a total of 14 biscuits, so I froze 6 of them and later pulled them out to make creamed chicken and biscuits; I served the first batch with cream of carrot soup


Then I decided to try the (apparently) famous biscuits from the Fox in the Snow bakery (just scroll all the way down for the recipe and a video demonstration with a lot of explanations). I found them via The Kitchn and Instagram. They call for a whole lot of flour and butter and are so flaky that they’re more like the lovechild of a traditional biscuit and a croissant. They are also the tallest biscuits you’ve ever seen, coming in at about 3 inches. Mine fell over while baking, but you know, aim for the moon and you’ll still land among the stars and all that! The original recipe has you brush them with salted honey butter and serve them with jam, which sounds fabulous, but I decided to go the less decadent route and serve them plain. 

What I need to make clear about these biscuits is that… they will ruin you for all other biscuit recipes out there. I mean, I was disappointed when I saw that they had fallen over, but OMG, they were *so* good! And they’re actually pretty quick to make, too. There’s nothing to redeem them from a nutritional standpoint, so I can’t justify making them too often, but their memory is haunting me… 

5 ½ cups all-purpose flour, plus more for surface 
1 ½ tsp. granulated sugar 
3 ½ tsp. baking powder 
1 Tbsp. plus 1 tsp. kosher salt (I used half as much Morton brand kosher salt) 
½ tsp. baking soda 
1 ½ cups (3 sticks) lactose-free butter, chilled 
2 cups buttermilk (or 2 Tbsp. vinegar topped up with lactose-free milk) 
¼ cup lactose-free cream (or coconut milk or, in my case, just lactose-free whole milk) 
2 large egg yolks, beaten to blend (I used 1 whole egg) 

Preheat oven to 375 °F. 

Pulse 2 cups flour, sugar, baking powder, salt, baking soda, and chilled butter in a food processor until largest pieces of butter are the size of a nickel. Transfer to a large bowl with the remaining flour and toss together until butter appears evenly distributed. Add buttermilk over entire mixture all at once and knead mixture until a shaggy dough forms and almost no dry is left at the bottom of the bowl. Turn out onto a lightly floured surface and pat into a thick, roughly 12”-14” rectangle. 

Begin by doing a tri-fold: starting from the left, fold the dough halfway to the center, and then fold from the right over top of the first fold. Press down to make sure dough is compact and flatten out again to make a rectangle shape. Rotate dough 90 degrees and fold the dough from the top down. Again, press dough down and reshape into a rectangle. Rotate 90 degrees again, and fold from left to right. Repeat the process 2 more times, ending with a fold from left to right. (I found this description to be confusing – I folded the dough like a letter, and kept folding left-right after I rotated 90 degrees so that it felt more “even”.) 

Using a rolling pin, adjust dough to desired thickness, about ¾ of the height of your biscuit cutter (I left mine taller, more like in the video). Dip biscuit cutter into the flour to prevent sticking, and then cut straight up and down, careful not to twist the biscuit cutter (twisting it would prevent the biscuit from rising properly). You should get about 4 biscuits out of your first rectangle (I got 6). 

Press remaining dough together and reshape into a small rectangle. Cut out 2 additional biscuits. Repeat as many times as necessary until only a small amount of dough remains. (My biscuit cutter was 3” in diameter, and I made 6 biscuits the first time around and 9 more from the scraps. Were the first 6 more beautiful than the next 9? Yes. But would it have been a sin not to make the next 9 to get as much as I could out of that dough? Also yes.) 

Mix egg yolks and heavy cream with a fork until blended. Brush tops of biscuits lightly with mixture and place on a baking sheet. Bake until golden brown, about 30-35 minutes. (You could also freeze some of them for later.) Serve with whatever makes you happy.


Thursday, February 11, 2021

Pain orange-cannelle au goût du jour


Quand j’étais jeune adolescente, notre voisine d’en face, Mme F., avait une recette de pain-gâteau à l’orange et à la cannelle. Sa recette faisait deux pains-gâteaux, alors c’était pratique pour en faire congeler un – ou le donner aux voisins, et voilà comment nous avons découvert ce pain! J’ai retrouvé la recette dans mon cahier récemment et j’ai décidé de la refaire; ça faisait plus de 10 ans que je n’en avais pas mangé! 

Il fallait de la graisse alimentaire (shortening), que je n’utilise que très rarement maintenant. Et les deux pains-gâteaux étaient… très plats, beaucoup plus que dans mon souvenir. On en a passé tout un pour déjeuner, c’est dire! J’ai donc décidé de revisiter la recette. 

Pour la graisse végétale, c’est vrai qu’il existe plusieurs options, mais j’ai préféré un substitut. Alors après avoir lu ceci, j’ai décidé de la remplacer par du beurre et d’enlever un peu de liquide. Et tant qu’à râper le zeste d’une orange, pourquoi ne pas en utiliser le jus? J’ai donc remplacé le lait par une quantité moindre de jus d’orange. Les quantités ci-dessous sont les miennes. Et je n’en fais qu’un pain, qui dure environ deux jours chez nous. 

2 tasses de farine tout-usage 
1 ½ c. à thé de poudre à pâte 
1 c. à thé de bicarbonate de soude 
½ c. à thé de sel 
1 tasse + ¼ tasse de sucre 
2 c. à thé de cannelle zeste d’une orange, râpé 
½ tasse de beurre sans lactose, à la température de la pièce 
2 œufs 
1 c. à thé de vanille 
1 tasse de crème sure sans lactose 
2 c. à soupe de jus d’orange frais 

Préchauffer le four à 350 °F. Graisser un moule à pain de 9"x5". 

Tamiser ensemble la farine, la poudre à pâte, le bicarbonate de soude et le sel; mettre de côté. 

Dans un petit bol, mélanger ¼ tasse de sucre avec la cannelle et le zeste d’orange râpé. Mettre de côté. 

Dans un grand bol, défaire en crème le beurre avec 1 tasse de sucre jusqu’à consistance légère. Ajouter les œufs et la vanille et bien battre. Incorporer la crème sure et le jus d’orange, puis ajouter le mélange de farine et bien incorporer. 

Étaler la moitié de la pâte dans le moule. Soupoudrer la moitié du mélange de cannelle sur la pâte dans le moule. Recouvrir du reste de la pâte, puis saupoudrer du reste du mélange de cannelle. Avec un couteau, tracer des spirales dans la pâte. 

Faire cuire de 50 à 55 minutes. Laisser refroidir avant de démouler.

Wednesday, February 10, 2021

Vanilla Custard Slices


This recipe is from Smitten Kitchen, and it’s a simplified version of the British classic. Simplified in the sense that it has been scaled down to use Pepperidge Farm puff pastry, the most widely available here in North America, and the methodology for the custard is also Deb Perelman’s “shortcut” version. If you’ve never seen this dessert before, you can think of it as an easy napoléon or a mille-feuille that’s missing a few pieces. It was easier to make than I expected, the slices held together quite well for transfer to a plate (though they are always a bit messy to eat), and it was delicious! 

2 8.5-oz. sheets ready-rolled puffed pastry, defrosted [from a 1.1-lb. (490-g.) package] 
¾ cup (150 g.) granulated sugar 
6 Tbsp. (50 g.) cornstarch 
¼ tsp. fine sea salt 
1 ½ tsp. vanilla bean paste, or 2 tsp. vanilla extract 
2 large eggs 
2 cups lactose-free whole milk 
¾ cup lactose-free cream or coconut milk 
3 Tbsp. lactose-free butter, diced 

Preheat oven to 375 °F. 

On a lightly floured counter, roll each sheet of puffed pastry to roughly a 9-inch square. Place each on a large baking sheet lined with parchment paper. Dock all over with a fork. Place another piece of parchment paper on top, then another 1 or 2 baking sheets on top of the parchment paper to weight it down. Bake in oven for 18 to 20 minutes, then remove the baking sheet weights and top sheet of paper and bake for another 5 to 10, or until golden brown. If pastry isn’t lightly browned, it will not stay flaky and crisp against the custard. Set pastry aside to cool completely. 

Line the base and sides of an 8”×8” cake pan with a large sheet of foil so the excess goes up the sides. It can help to first mold the foil over the outside of the baking pan and then transfer it inside, for fewer tears. 

Place first cooled square of pastry on a cutting board and use bottom of cake pan to cut it into a square that will fit tightly inside the pan. Repeat with second square. Place first square inside the pan; save second until needed. Set aside. 

In a medium saucepan, whisk together sugar, starch, and salt. Add the eggs, one at a time, whisking until smooth and no pockets of sugar-starch remain before adding the second. Whisk in vanilla bean paste, and then, very gradually, whisking the whole time, pour in milk, then cream. Bring mixture to a simmer over medium heat, whisking the whole time. As the custard begins to bubble, it will thicken. Remove from heat and stir in the butter until it is fully melted. If you want it extra silky-smooth, pour the custard through a fine-mesh sieve before continuing (I didn’t bother and it was fine). 

Immediately pour the warm custard into the baking pan over the first sheet of puff pastry and spread evenly. Place the second sheet of pastry on top, pressing gently to secure in place. 

Wrap the pan in plastic and refrigerate for at least 4 hours or overnight to allow the custard to fully set. Once chilled and set, use the foil to carefully lift the mixture from the tin. Dust with powdered sugar — you could use strips of paper to create a decoration — then use a sharp, serrated knife to cut it into slices. 

Stored in a sealed container in the refrigerator, these will keep for a couple of days. They will keep for up to 5 days, but the pastry will soften a bit.


Rustic Pie

I came across this recipe for pizza rustica last Easter, as it is traditionally an Italian Easter pie. But I didn’t serve it at Easter, and I didn’t even call it pizza, because it’s nothing like what we know as pizza, and my kids would be entirely deflated if they heard the P-word and were served something else! (For etymology buffs, “pizza” just means pie in Italian, but in North America it’s definitely a very specific type of dish!) This rustic pie is more akin to a super-thick double-crusted quiche. 

It came out of the oven looking fabulous, but unfortunately, it wasn’t cooked all the way through! I’m not sure how to check for that, short of poking through the top with a thermometer? Would it be worth cooking the eggs to a soft scramble beforehand? It was still really good (I used pasteurized eggs, so I wasn’t really bothered by cross-contamination or anything) , and it was structurally better after a day in the fridge. You could make this vegetarian by using vegetables instead of meat – perhaps mushrooms and sun-dried tomatoes would be a particularly good choice here. For the ricotta, I always make this recipe; to get the 16 ounces called for in this pie, you’ll need 8 cups (2 liters) of lactose-free whole milk. I didn’t have enough milk left, so I made 8 ounces of ricotta, used 4 ounces of lactose-free cream cheese that I had in the fridge, and was generous with the other cheeses in the recipe to compensate. 

For the crust 
4 cups all-purpose flour 
1 tsp. kosher salt 
1 cup (2 sticks) lactose-free butter, cold and cut into cubes 
3 large eggs, beaten 
6 Tbsp. ice water (I needed 8 Tbsp.) 

For the filling 
1 Tbsp. extra-virgin olive oil 
1 lb. Italian sausage, casings removed 
3 cloves garlic, minced 
3 cup baby spinach 
8 large eggs 
16 oz. lactose-free ricotta 
1 cup lactose-free shredded mozzarella 
½ cup freshly grated parmesan 
4 oz. salami, chopped 
kosher salt 
freshly ground black pepper 
egg wash, for brushing 

For the dough 
In a large bowl, whisk together flour and salt. Add butter and cut into flour with a pastry cutter or your hands until pea-size and some slightly larger pieces form. Add eggs and knead with your hands to combine, then add cold water 1 tablespoon at a time until dough comes together. Cut off ⅓ of the dough. Form both pieces of dough into discs and wrap in plastic wrap. Refrigerate until well chilled, at least 1 hour. 

For the filling 
Meanwhile, in a large skillet over medium heat, heat oil. Add sausage and cook, breaking up meat with a wooden spoon, until no longer pink, 6 minutes. Add garlic and spinach and cook until spinach is wilted, 2 minutes more. Remove from heat and let cool. In a large bowl, combine eggs, ricotta, mozzarella, parmesan, salami, and cooled sausage mixture. Season with salt and pepper. 

Preheat oven to 375 °F and grease an 8" springform pan with cooking spray. On a lightly floured surface, roll out the larger piece of dough into a 16" circle. Transfer to prepared pan, guiding dough upward and letting excess hang over the sides. Roll smaller piece of dough into a 12" circle. Pour filling over bottom crust, then top with smaller crust. Trim overhang to 1" then pinch crusts together and crimp. 

Cut slits in pie crust for steam to escape. Brush top with egg wash and bake until golden, 1 hour and 15 minutes. Let cool 15 minutes, then remove springform ring to serve.


Tuesday, February 09, 2021

Lemony Chicken Soup with Spring Vegetables and Quinoa


This soup really hit the spot! It was much better than the sum of its parts, and I’ll certainly have to make it again. It manages to be both bright and comforting. It’s also highly adaptable: I had to use onion instead of leek, and the original post suggests the addition of corn. It was great with the quinoa, but I could see another grain in its place, like barley or farro; I’d also make this with Meyer lemons if I had them on hand, and you could use rotisserie chicken instead of cooking it yourself if you want. And switch out the herbs, why not? I highly recommend this one! 

2 Tbsp. lactose-free butter 
1 Tbsp. olive oil 
1 leek, quartered, and white part sliced
2 carrots, peeled and diced small (if you can find multi-colored carrots, those are beautiful) 
2 cloves garlic, pressed through garlic press 
salt and black pepper, to taste 
1 tsp. herbes de Provence 
4 cups warm chicken stock/broth 
1 cup fresh English peas (or frozen peas) 
1 cup baby zucchini, small dice 
2 cups cooked chicken, shredded or cubed 
2 tsp. lemon zest 
2 Tbsp. fresh lemon juice 
2 cups cooked quinoa 
¼ cup chopped, fresh basil leaves (I made a chiffonade) 
4 lemon wedges, to garnish (optional) 

Place a medium-large soup pot over medium heat, and add in the butter and olive oil; once melted, add in the sliced leek and diced carrots, and sweat for about 3-5 minutes, or until slightly tender and the leeks are becoming translucent. 

Add in the garlic, and once that becomes aromatic, add in a pinch or two of salt and pepper, and the herbs de Provence; stir to combine. 

Next, add in the warm chicken stock or broth, and bring to a gentle simmer; cover partially with a lid, and cook for about 15-20 minutes, or until carrots are tender. 

Turn the heat off; add in the English peas (or frozen peas), the diced baby zucchini, the shredded or cubed chicken, and the lemon zest and juice; stir to combine, and allow the peas/zucchini to become crisp-tender and bright green in the hot stock, about 3-4 minutes; check to see if additional salt or pepper is needed. 

To serve, add about ½ cup of the cooked quinoa to a bowl, and ladle some of the soup with the veggies and chicken over top; sprinkle over some of the fresh basil, and squeeze in some additional lemon juice from the lemon wedge garnish, if desired.

Monday, February 08, 2021

Eggnog Cupcakes with Vegan Crusting Buttercream


I couldn’t resist making eggnog cupcakes over the holidays, and I paired them with my friend Jen’s recipe for vegan crusting buttercream. 

The cupcakes were fine. The center had sunk by the time they came out of the oven, but the icing covered that up. I’m actually not sure if I could have tasted the difference between “eggnog” cupcakes and “holiday spice” cupcakes, to be honest! I’m wondering how eggnog would work in a custard of some sort. Anyway, it was the buttercream that really made this for me – it’s a great recipe! 

The link above has a recipe for soy eggnog, and you can find other plant-based eggnogs around the holidays, but if you don’t need this to be vegan, there’s also lactose-free eggnog by Lactaid, for example. I changed the cupcake recipe below a bit by adding salt and reordering the ingredients. 

For the vegan eggnog cupcakes 
1 ¼ cup all-purpose flour 
2 Tbsp. cornstarch 
¾ tsp. baking powder 
½ tsp. baking soda 
¼ tsp. salt 
1 tsp. cinnamon 
¾ tsp. nutmeg 
½ tsp. cloves 
1 cup vegan eggnog 
1 tsp. apple cider vinegar 
¾ cup granulated sugar 
1/3 cup vegetable oil 
2 tsp. vanilla extract 
¼ tsp. almond extract 

Preheat the oven to 350 °F. Grease a muffin pan or line it with paper molds (I got 11 cupcakes). 

In a medium bowl, whisk together the flour, cornstarch, baking powder, baking soda, salt, and spices. Set aside. 

In a small bowl, whisk the apple cider vinegar into the vegan eggnog. Set aside to curdle for 10 minutes. 

In a large mixing bowl, mix the sugar, oil, vanilla, and almond extract together until combined. Add the vegan eggnog mixture and combine. Add all dry ingredients. Mix until smooth. Pour batter prepared tins. 

Bake for 15-20 minutes, or until an inserted knife comes out clean. 

For the vegan crusting buttercream 
1 cup (2 sticks) vegan margarine, such as Earth Balance 
vanilla, to taste (maybe 1 Tbsp.?) and butter flavoring (optional) 
3 ½ cups icing sugar, sifted 
½ cup cornstarch 
water or non-dairy milk 

Mix margarine, vanilla, and butter flavoring (if using) until blended. Mix in icing sugar and cornstarch. Keep mixing until it comes together; do not add liquid until it does, and do not whip it or beat it too strongly. Once it comes together, add in liquid a teaspoon at a time until you get the desired texture (the icing should still be fairly stiff).


Friday, February 05, 2021

Gâteau aux framboises et aux betteraves


C’est ma mère qui m’a fait parvenir cette recette de Geneviève O’Gleman pour un gâteau marbré aux framboises et aux betteraves, qui est aussi joli que bon! J’ai changé un peu l’ordre des ingrédients pour simplifier les choses et j’ai utilisé un moule à charnière pour la même raison. 

Pour les betteraves, on peut les faire bouillir entières pendant 45 minutes, les faire rôtir entières pendant 1 h à 425 °F dans du papier aluminium, ou les peler et les couper en cubes et faire cuire ceux-ci à la vapeur. J’aime faire plus de purée qu’il en faut et congeler le reste! Visez environ 2 petites betteraves pour donner 1 tasse de cubes, puis ½ tasse de purée. 

½ tasse de framboises surgelées 
1 tasse de cubes de betterave cuite ou ½ tasse de purée de betterave 
1 ½ de farine tout-usage 
2 c. à thé de poudre à pâte 
1 pincée de sel 
2/3 tasse de sucre 
1/3 tasse d’huile végétale 
2 œufs 
1 tasse de yogourt grec sans lactose 
2 c. à thé de vanille 

Préchauffer le four à 350 °F. Placer la grille au centre du four. Huiler un moule rond (j’ai pris un moule à charnière) de 20 cm (8 po) de diamètre. Tailler un rond de papier parchemin de la même dimension et le déposer au fond du moule; huiler de nouveau. 

Directement dans le récipient du pied-mélangeur, décongeler les framboises 1 minute à puissance maximale au four à micro-ondes. 

Ajouter les betteraves cuites dans le récipient du pied-mélangeur. Mixer jusqu’à l’obtention d’une consistance lisse. Réserver. 

Dans un petit bol, mélanger la farine, la poudre à pâte et le sel. Réserver. 

Dans un grand bol, à l’aide d’une fourchette, mélanger le sucre, l’huile, les œufs, le yogourt et la vanille. Incorporer les ingrédients secs. 

Transvider la moitié du mélange à gâteau dans le moule et étendre à l’aide d’une spatule en silicone. 

Répartir la moitié de la purée de framboises et de betteraves en cuillerées d’environ 15 ml (1 c. à soupe) dispersées sur le mélange à gâteau. 

Étendre le reste du mélange à gâteau dans le moule. Répartir le reste de la purée en cuillerées dispersées sur le mélange à gâteau. 

Avec la pointe d’un couteau, mélanger partiellement la purée et le mélange à gâteau en faisant des mouvements circulaires en surface, pour obtenir un effet marbré. 

Cuire au four de 55 à 60 minutes ou jusqu’à ce qu’un cure-dent inséré au centre du gâteau en ressorte propre. 

Laisser tiédir le gâteau avant de le démouler et de servir.


Thursday, February 04, 2021

Muffins aux bananes et aux lentilles


Vous le savez, je fais parfois des recettes santé, ou des versions santé de plats qui le sont habituellement moins. J’ai donc essayé ces « pop tarts » au fudge chocolaté et… j’ai été tellement déçue! Ce n’était même pas bon, alors ça ne valait pas du tout le temps que j’ai mis à les faire. J’ai ensuite essayé une recette du livre Viens manger! Le végétarisme en toute simplicité, publié sous la direction de l’Université de Montréal. (Je sais que j’en ai parlé il n’y a pas très longtemps, mais je ne sais plus quand). Le livre est disponible intégralement en ligne, alors je l’ai « feuilleté » et j’ai tout de suite été attirée par la recette de muffins aux bananes et aux lentilles en page 76. 


Normalement, pour des muffins, j’utilise de la farine Nutri. Par contre, ici, je me suis dit qu’il y avait assez de fibres (sans compter les protéines!) avec les lentilles, alors j’ai utilisé de la farine blanche. Les quantités ci-dessous donnent 12 muffins. (J’ai passé le reste des lentilles dans un genre de bol Buddha pour dîner.) Nous avons adoré ces muffins – personne n’aurait deviné l’ingrédient secret! 

1 1/3 tasse de farine tout usage 
½ tasse de sucre 
1 c. à thé de poudre à pâte 
1 pincée de sel 
¼ tasse de graines de tournesol 
2 bananes, coupées en rondelles 
1 tasse (ou ½ boîte de 540 ml/19 oz) de lentilles, égouttées et rincées 
½ tasse d’huile végétale 
1 œuf 
1 c. à thé d’extrait de vanille 

Préchauffer le four à 375°F. Huiler un moule à muffins. 

Dans un bol de taille moyenne, mélanger la farine, le sucre, la poudre à pâte, le sel et les graines de tournesol. Réserver. 

Dans un grand bol, à l’aide d’un pied mélangeur, mélanger les bananes, les lentilles, l’huile, l’œuf et la vanille jusqu’à l’obtention d’une préparation homogène. À l’aide d’une spatule, incorporer les ingrédients secs. 

Mettre la pâte dans les moules et cuire au four pendant 25 minutes. Laisser refroidir, démouler et déguster.


Wednesday, February 03, 2021

Poulet croustillant, sauce au miel et au poivron rouge


J’ai fait cette recette de Coup de Pouce, un peu à ma manière. Je dois dire tout d’abord que c’était délicieux, surtout la sauce! 

J’ai augmenté un peu la quantité de poudre d’ail dans la panure. J’ai fait cuire le poulet au four au lieu de le frire à la poêle (mes instructions sont ci-dessous). J’ai doublé la quantité de poulet pour avoir des restes (j’ai utilisé 2,34 lb de poitrine de poulet) et je me suis rendu compte que je n’avais plus d’œufs pour y tremper le poulet avant de le rouler dans la panure. J’ai donc fait une recherche Google pour voir par quoi je pouvais les remplacer dans ce contexte, et la première suggestion était de la mayonnaise. Et ça fonctionne! Sauf que je n’avais pas assez de mayonnaise pour faire tout le poulet (décidément!), alors la deuxième suggestion étant du lait, j’ai essayé ça ensuite, et… ça fonctionne très bien aussi! La recette d’origine demandait 3 tasses de panko, mais moi avec le double de poulet, je n’ai eu besoin que de 2 tasses de panko – il faut dire que ça aurait peut-être été différent si j’avais eu des œufs. De plus, j’ai fait la quantité recommandée de sauce, mais j’en avais presque 2 tasses, ce qui était vraiment trop! Elle était plus liquide que ce à quoi je m’attendais, mais absolument délicieuse! Je réduis donc les quantités ci-dessous; je pense que cela donnerait 4 bonnes portions de poulet et bien assez de sauce. Depuis, j’ai acheté de petits ramequins en mélamine (pratiques pour des enfants) avec lesquels je compte servir ce plat la prochaine fois, et ils me permettraient de servir davantage de sauce… 

J’ai servi ça avec une salade de carottes rôties au miel et au cumin. C’était un excellent repas! 

Pour la sauce au miel et au poivron 
½ tasse de poivrons rouges rôtis en pot, égouttés 
1 petite gousse d’ail, hachée finement 
1 c. à thé de zeste de lime râpé 
1 c. à soupe de jus de lime 
1 c. à soupe de coriandre fraîche, hachée 
1 pincée de piment coréen (ou un peu de sambal olek si vous voulez du piquant) 
½ tasse de miel doré liquide 

Pour le poulet croustillant 
¼ tasse de farine 
1 c. à soupe de poudre d’oignon 
1 ½ c. à thé de poudre d’ail 
1 tasse de chapelure panko (ou plus, voir note plus haut) 
3 œufs (ça me semble beaucoup, mais j’ai testé avec de la mayonnaise et du lait) 
1 ¼ lb de poitrines de poulet désossées, coupées en tranches 

Pour la sauce 
Au pied-mélangeur, réduire en purée lisse les poivrons, l’ail, le zeste et le jus de lime, la coriandre et le piment coréen. Ajouter le miel et mélanger. Saler et poivrer. Réserver. (La sauce se conservera jusqu’à 3 jours au réfrigérateur.) 

Pour le poulet 
Faire chauffer le four à 350 °F. Recouvrir une plaque de papier aluminium et vaporiser d’huile. 

Dans un plat peu profond, mélanger la farine et les poudres d’oignon et d’ail. Dans un autre plat, mettre la chapelure. Dans un bol, battre les œufs. Saler et poivrer le poulet. Passer les tranches de poulet, une à la fois, dans le mélange de farine, en secouant pour enlever l’excédent, puis les tremper dans les œufs et les passer dans la chapelure en les retournant pour bien les enrober. Poser les tranches de poulet sur la plaque. 

Cuire au four 20 minutes ou jusqu’à ce que le poulet ait perdu sa teinte rosée à l’intérieur. 

Servir le poulet avec la sauce au miel et au poivron.

Monday, February 01, 2021

Chocolate Coconut Cupcakes

I had been eyeing this recipe on The Kitchn for a long time. The chocolate cupcakes are vegan and gluten-free (though they do not contain specialty ingredients), while the frosting is made with coconut oil and is dairy-free. The cupcakes and frosting were delicious, but I felt like the “frosting” was very homely-looking and unpleasantly grainy. It broke apart very easily. This seemed to be by design, but I felt that it could be better. 


Luckily, I remembered that my friend Maman des Zigotos had sent me this recipe for a vegan buttercream that was also made with coconut oil. The main difference is in technique, as the oil is melted and frozen before being used in the recipe. I don’t know why this works, but it really does! I think it helps prevent separation in the oil or something? So anyway, I made the cupcakes a second time (with white whole wheat flour instead of all-purpose gluten-free flour) and this luscious frosting, and that’s what I’m writing down below. These were fantastic! Plus, the almond extract really plays well with the chocolate and the coconut here. 

Note that while I haven’t tried these cupcakes with 2 eggs instead of 2 flax eggs, I see no reason why you couldn’t make the swap if you don’t have ground flaxseed. Also, if you are using the frosting for another cake, you can use vanilla extract instead of almond extract. You can also use agave syrup or maple syrup instead of corn syrup, but then you might need more powdered sugar to compensate for the more liquid consistency. 

For the cupcakes 
2 Tbsp. ground flaxseed 
1/3 cup warm water 
1 cup almond milk (or lactose-free milk) 
1 Tbsp. apple cider vinegar 
1 ¼ cups gluten-free all-purpose flour (or regular all-purpose flour) 
¾ cup granulated sugar 
½ cup cocoa powder, sifted 
1 tsp. baking powder 
½ tsp. baking soda 
1 tsp. salt 
1/3 cup coconut oil, liquefied and at room temperature 
1 tsp. almond extract 

Preheat the oven to 350 °F with a rack in the middle. Line 12 standard muffin cups with paper liners. 

In a small bowl, combine the ground flax seeds and warm water. Set aside to gel, about 10 minutes. In another small bowl, combine the almond milk and cider vinegar. Set it aside for a few minutes to curdle. 

Sift together the flour, sugar, cocoa powder, baking powder, baking soda, and salt into a large mixing bowl. 

Whisk the coconut oil and almond extract into the curdled almond milk mixture, and then immediately stir both the wet ingredients and gelled flax mixture into the dry ingredients. Beat vigorously for about one minute. (If you are using regular flour, i.e. with gluten, only beat until well combined.) 

Pour the mixture into the prepared cupcake tin. Bake about 20 minutes, or until just barely set in the middle. Set aside to cool before frosting. 

For the frosting 
1 cup coconut oil 
1 tsp. almond extract 
2 2/3 cups powdered sugar, sifted (I only needed 2 cups) 
2 tsp. vegetable oil 
2 tsp. light corn syrup 
coconut chips or flakes, toasted or not, for decorating 

Melt the coconut oil in the microwave for about 1 minute, then stir it until all the solid bits are dissolved. Place it in the freezer for 25 minutes or until it has solidified. 

Allow the coconut oil to come to room temperature before processing. If it is too cold/hard, breaking it up with a fork or a hand mixer will help it soften. 

Whip the room-temp coconut oil with a hand mixer (I used my stand mixer) until it is creamy. Check for any lumps and crush them up. (I switched to the paddle attachment at some point and it worked better.) 

Cream the almond extract with the coconut oil. 

Mix in the powdered sugar in 3 goes, then add in the syrup and oil and whisk until light and fluffy, about 2 more minutes. 

When the cupcakes are completely cool, frost with the coconut icing, then sprinkle each cupcake with a spoonful of flaked coconut.