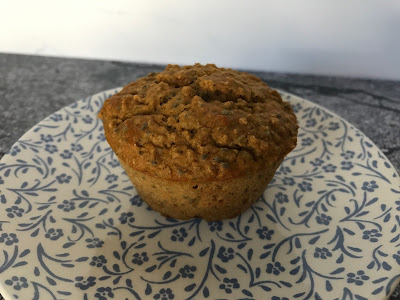
Sunday, January 30, 2022

Vegetable Protein Muffins


It feels like I’m always trying to find interesting new muffin flavors. Apple cranberry muffins were fine but unimpressive, as were protein avocado chocolate chip muffins. I then decided to make protein vegetable muffins, adding in some miniature chocolate chips. Those were great! 

I still haven’t found a good protein powder, so I’m currently using collagen peptides. It’s not vegetarian, and even though it’s a powder, it’s not the same consistency as protein powder, which made for a wetter muffin batter than intended. (I just baked them a little longer and it was no big deal.) We all loved these muffins! 

¼ cup lactose-free plain Greek yogurt 
¾ cup unsweetened applesauce 
½ cup brown sugar 
1 egg 
½ tsp. vanilla extract 
1 cup grated carrot (I used 1 carrot) 
1 cup grated zucchini (I used 1 large zucchini) 
¾ cup whole wheat flour 
¾ cup all-purpose flour 
¼ cup protein powder (or flour; see note above) 
2 tsp. baking powder 
1 tsp. cinnamon 
½ tsp. nutmeg 
½ tsp. salt 
1/3 cup miniature chocolate chips 

Preheat oven to 400 °F. 

In a large bowl, whisk together yogurt, applesauce, brown sugar, egg and vanilla. Add in grated carrot and zucchini and set aside. 

In a separate bowl, whisk together flour, protein powder, baking powder, cinnamon, nutmeg, salt, and chocolate chips. Fold dry ingredients in with the wet and mix until just combined. 

Spoon mixture into greased muffin cups, filling to the top, and bake for 18 minutes to 20 minutes (a tad more if you had a lot of vegetables or if you had collagen peptides instead of protein powder). Enjoy!


Saturday, January 29, 2022

Protein Pumpkin Brownies


I’ve been following an Instagram account called Petite Pancakery, which specializes in low-calorie high-protein treats. I made these fudgy pumpkin brownies in October and ended up not talking about them, through no fault of their own. 

The protein powder I had at the time was Vega Protein and Greens Vanilla protein powder. I tried it in several applications, both smoothies and baked treats, and I’ve had to admit that I just don’t like it. It has an after-taste that reminds me of artificial sweeteners and I don’t enjoy that at all. All this to say that were it not for the taste of this specific protein powder, these brownies would have been really good – YMMV. Let me know if you have a good lactose-free protein powder to recommend! 

Note that I did not have applesauce that day, so I used a total of 280 grams of pumpkin purée. And I did not weigh my egg. 

For the brownies 
60 g all-purpose flour 
20 g protein powder of your choice 
30 g monkfruit sweetener (I used Lakanto) 
60 g unsweetened cocoa powder 
½ tsp. baking powder 
½ tsp. salt 
220 g pumpkin purée 
60 g unsweetened applesauce 
20 g pancake syrup (pick a brand with 0 net carbs) 
1 raw egg white (~35 g; save the yolk for the second part) 
2 Tbsp. coconut oil 
2 Tbsp. almond milk 

For the cheesecake swirl 
75 g pumpkin purée 
30 g (1 oz.) lactose-free cream cheese 
10 g monkfruit sweetener (I used Lakanto) 
1 egg yolk (~17 g) reserved from egg white above 
½ tsp cinnamon 

Preheat oven at 350 °F. Line and grease an 8”x8” tray and set aside. 

In a small bowl, combine the flour, protein powder, monkfruit, cocoa, baking powder, and salt. Set aside. 

In a larger bowl, combine the pumpkin purée, applesauce, pancake syrup, egg white, coconut oil, and almond milk. Add dry ingredients and combine until a thick batter forms. Spread batter evenly in prepared tray. 

Mix cheesecake swirl ingredients together and drop spoonfuls on top of brownie batter. Swirl around with a toothpick. 

Bake for about 50 mins. A toothpick test should come out fairly clean, or with a bit of moist crumbs if you prefer it extra fudgy. Let cool in baking tray so it sets further before transferring to a cooling rack. Slice and enjoy!


Friday, January 28, 2022

Beignes au cidre de pomme


Une recette de beignes, ça vous dit? J’en avais promis aux enfants (qui sont toujours partant pour des beignes, soit dit en passant), alors j’ai essayé beignes au cidre de pomme. Ils les ont beaucoup aimés! Les bonbons décoratifs sont entièrement facultatifs, mais encore une fois, c’est toujours vendeur avec mes enfants. 

J’ai eu cette discussion avec l’Ingénieur et je pense que ça peut être utile à d’autres, alors voici: le cidre de pomme, c’est en fait du jus pressé et non filtré, donc bien plus opaque que le jus de pomme habituel. C’est souvent, mais pas tout le temps, vendu réfrigéré. 

Pour les beignes 
2 tasses de farine tout-usage (j’ai pris de la farine de blé blond) 
¾ tasse de cassonade 
1 c. à thé de bicarbonate de soude 
1 c. à thé de cannelle moulue 
¼ c. à thé de muscade 
¼ c. à thé de sel 
2 œufs 
¾ tasse de cidre de pomme 
2 c. à soupe d’huile végétale 
½ c. à thé d’essence de vanille 

Pour le glaçage 
2 tasses de sucre à glacer, tamisé 
3 c. à soupe de cidre de pomme 
½ c. à thé de sirop de maïs blanc 
1 pincée de cannelle ou de cardamome moulue 

Préchauffer le four à 325 °F et vaporiser deux moules à beignes (12 beignes en tout) d’enduit à cuisson. Réserver. 

Dans un grand bol, mélanger la farine, la cassonade, le bicarbonate de soude, la cannelle, la muscade et le sel. Réserver. 

Dans un bol moyen, fouetter les œufs, le cidre de pomme, l’huile végétale et la vanille. Verser les ingrédients humides sur les ingrédients secs et bien mélanger. 

Remplir une poche à pâtisserie avec la pâte. Remplir les cavités du moulue préparé en formant des cercles de pâte. 

Enfourner de 10 à 12 minutes ou jusqu’à ce qu’un cure-dents inséré dans un beigne en ressorte propre. Laisser refroidir complètement sur une grille avant de glacer. Dans un bol, fouetter tous les ingrédients pour le glaçage. 

Tremper chaque beigne dans le glaçage et les déposer sur une grille. Saupoudrer les beignes de cannelle ou de cardamome si désiré, puis laisser le glaçage figer avant de déguster.


Friday, January 21, 2022

Everyday Lentil Soup

 Last fall, I made a few soups that were unremarkable. There was a carrot, apple, and curry soup topped with extra-sharp cheddar that, while good, was nothing to write home about. I also tried a soup with TVP, cabbage, sweet potato and tomatoes – I thought it was fine, but the kids refused to touch it, and the Engineer was flat-out repulsed by it, although he couldn’t figure out which ingredient it was (he said it tasted bitter to him, so maybe the cabbage?). Anyway, obviously not making that again. 

This everyday lentil soup, however, was just what I was looking for! It’s also perfect for the cold weather we’re having right now. It was savory and hearty and just hit all the right notes for me. 

There are two types of lentils in here, because the red lentils will dissolve and thicken the broth while the green lentils will hold their shape. The original recipe made 4 servings, but I wanted more, so I changed the proportions a bit – the amounts below are mine. Keep in mind that you can always add more broth to taste, but this was the right consistency for me. 

Suggested toppings are parsley and parmesan, but I imagine that this would also be great with feta, or roasted nuts and seeds. You could also serve the soup with crusty bread. 

2 Tbsp. extra-virgin olive oil 
1 yellow onion 
2 large carrots 
1 medium sweet potato 
2 stalks of celery 
3 garlic cloves, minced 
½ tsp. sea salt, plus more to taste 
½ tsp. lemon pepper (I used black pepper and a splash of lemon juice) 
1 tsp. dried Italian herbs 
¼ tsp., red pepper flakes, or to taste 
¾ cup green or du Puy lentils 
¾ cup red lentils 
6 cups vegetable or chicken broth 
½ tsp. turmeric or coriander 
2 Tbsp. lactose-free butter or olive oil (I omitted it) 
3 cups roughly chopped kale garnish of choice (see note above), optional 

In a large Dutch oven, over medium heat, warm the olive oil. Chop the onion, carrots, sweet potato, and celery into roughly ¼” pieces. Put all the vegetables, including garlic, into the warm pot with the sea salt and sauté until just softened, about 5-6 minutes. 

Stir in the lemon pepper, Italian herbs, red pepper, green lentils, and red lentils. Add the broth and stir. Turn the heat to low and cover. Cook for 30 to 40 minutes until everything is tender but not mushy. 

Using an immersion blender (or a regular blender), blend up about half of the soup just so it gets thicker (but nowhere close to purées – you still want the texture of the vegetables to come through). Turn off the heat. Stir in the turmeric, butter/oil and kale and stir for the greens to just soften and marry into the soup. Taste for seasoning. 

Serve each bowl with a squeeze of lemon and a generous sprinkle of parsley and parmesan.


Thursday, January 20, 2022

Raspberry-Hibiscus Poke Cake


I decided to make 
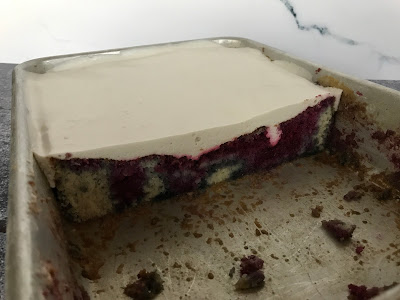
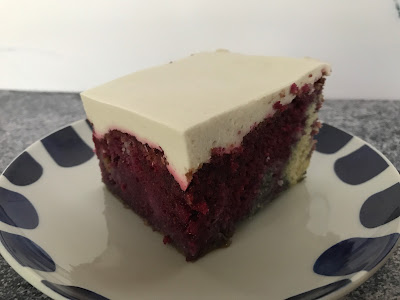
this raspberry-hibiscus poke cake from Bon Appétit because we had a lot of hibiscus tea left over from one of the Engineer’s recipes, plus egg whites in the freezer. We really liked this cake! To be fair, the Fox didn’t eat it much, but the Little Prince said it was one of his favorite cakes ever. 

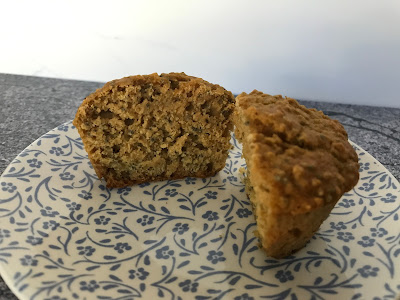
I have to say that this cake definitely wasn’t going to come out of the pan in one piece, so I left it in the pan. Individual pieces could be removed without too much trouble, so it worked out fine, but if unmolding it is important to you, line the pan with parchment paper first. Also, the topping never whipped up to stiff peaks like it was supposed to, but that could be my fault because I used a vegan substitute for the whipping cream and it may not have reacted properly to the recipe. That’s on me. However, since my cake was still in the pan, the frosting just levelled itself evenly over the surface and, once refrigerated, gelled with a nice smooth top. Perhaps this would not have happened had my cake not still been in the pan, so I guess two wrongs make a right? 


For the cake 
1 cup (2 sticks) lactose-free butter, at room temperature, cut into pieces 
3 cups (345 g) cake flour 
1 ½ tsp. baking powder 
1 tsp. baking soda 
½ tsp. Diamond Crystal or ¼ tsp. Morton kosher salt 
2 cups (400 g) sugar
6 large egg whites 
2 tsp. finely grated lemon zest 
1 tsp. vanilla extract 
½ tsp. almond extract 
1 ½ cups buttermilk substitute (1 ½ Tbsp. lemon juice + top up with lactose-free milk) 

For the filling
2 12-oz. bags of frozen raspberries, thawed 
1 Tbsp. unflavored powdered gelatin 
½ cup (100 g) sugar 
¼ cup dried hibiscus flowers 

For the topping 
1 10-oz. bag of mini marshmallows 
1 tsp. vanilla extract 
1 ½ cups lactose-free whipping cream or substitute (see note above), divided 


For the cake 
Place a rack in middle of oven; preheat to 325 °F. Grease a 13”x9" baking dish (as per my note above, I would also line it with parchment paper and leave some overhang on the long sides of the pan). 

Whisk flour, baking powder, baking soda, and salt in a medium bowl to combine. 

Using an electric mixer on medium-high speed, beat butter and sugar in a large bowl until light and fluffy, about 4 minutes. Add egg whites, one at a time, beating to blend after each addition and scraping down sides and bottom of bowl occasionally, until very light and airy, about 3 minutes. Beat in lemon zest, vanilla extract, and almond extract. 

Reduce mixer speed to low, add dry ingredients in 3 additions, alternating with buttermilk in 2 additions, starting and ending with dry ingredients. Increase speed to medium-high; beat 2 minutes. Scrape batter into prepared pan and smooth out evenly to edges. 

Bake cake until golden brown and a tester inserted into center comes out clean, 45–55 minutes. Transfer pan to a wire rack and let cake cool in pan 15 minutes. 

For the filling 
While the cake is cooling, place raspberries in a fine-mesh sieve set over a medium bowl. Using a wooden spoon, press down on raspberries until you have 1 cup juice; discard solids (or save for another use). Sprinkle gelatin over; let sit 10 minutes. 

Meanwhile, stir sugar, hibiscus flowers, and 1½ cups boiling water in a small bowl to combine and let sit 10 minutes. Strain through a fine-mesh sieve into bowl with raspberry mixture; discard solids. Whisk until filling is smooth. 

Using a chopstick, poke holes down into the cake at 1" intervals. Slowly pour filling over cake, letting it seep into holes. Chill cake while you make the topping to let the filling set up a bit. 

For the topping 
Heat marshmallows, vanilla extract, and ½ cup cream in a medium saucepan over medium, stirring constantly, until marshmallows are melted, about 3 minutes; chill remaining 1 cup cream until ready to use. Let marshmallow cream cool, about 30 minutes. 

Using an electric mixer on medium-high speed, beat chilled 1 cup cream in a large bowl until soft peaks form. Scrape in marshmallow cream and beat until almost stiff (see note above). 

Turn cake out onto a platter. Turn right side up and spoon marshmallow whipped cream on top. Spread to edges, making dips and swirls. 

Note that I froze several individual pieces, and they were great when thawed!


Tuesday, January 18, 2022

Chia Quinoa Muffins


The Fox often needs to have options for breakfast, otherwise he is likely to have a meltdown (assuming he didn’t get enough sleep and doesn’t have something delicious offered to him). He tends to like muffins if they are “dry” (as opposed to, say, these moist chocolate protein muffins), so I decided to try these chia quinoa muffins

I used 2 cups of white whole wheat flour instead of a mixture of white and whole wheat. I liked these muffins, but must admit that they were a bit bland – they were best spread with butter or jam. They placated the Fox, though, so that’s a win! 

2 cups cooked quinoa
1 cup whole wheat flour 
1 cup all-purpose flour 
1 ½ tsp. baking powder 
1 tsp. salt (I would use ½ tsp. next time) 
2 Tbsp. chia seeds 
¾ cup unsweetened almond milk 
1 egg 
¼ cup lactose-free plain Greek yogurt 
1/3 cup honey 
1 tsp. vanilla extract 

Preheat oven to 350 °F. Grease a muffin tin and set aside. 

If you haven’t done so already, cook quinoa according to package directions and let cool for at least 5 minutes. 

In medium bowl, combine quinoa, flours, baking powder, salt and chia seeds. 

In a smaller bowl, whisk together milk, egg, yogurt, honey and vanilla extract. Slowly add to quinoa mixture and stir until just combined. 

Divide mixture evenly among muffin cups and bake for about 25 to 30 minutes, until a toothpick inserted in the center comes out clean. Let cool until warm or at room temperature.