Saturday, July 31, 2021

Batch of links

- I loved this article in Parents magazine about how to get your kids excited about space. It contains lots of fun, doable activities, including viewing the Perseid meteor shower, which will peak August 12th. 

- If the kids are really bored during the day, here are some paper airplane folding instructions


- I loved this essay about the Boomer generation, diet culture, and fat phobia. I particularly liked this line: “The thing about diet culture is that whenever we replace one diet with another, there are a lot of people who never quite let go of the previous food fear.” 

- Here’s an article by Dr. Jen Guter about menopause. I *really* enjoyed her latest book, The Menopause Manifesto, and strongly recommend it! (While I’m at it, here’s her TED Talk, Why can’t we talk about periods?


- And a Modern Love essay worth your time: Let’s Meet Again In Five Years.

Friday, July 30, 2021

Turkey Bolognese


This recipe is from The 30-minute Prediabetes Cookbook by Ranelle Kirchner. I’m enjoying all the information in here, and also the philosophy that the goal isn’t to eat zero-carb meals, just lower-carb. (The author also distinguishes between simple and complex carbs, which makes sense to me, even though my endocrinologist was warning against any kind of carb.) 

Boxes of chickpea pasta are closer to 8 ounces than to the usual 16 ounces, and as long as we were getting two boxes, we figured we might as well taste-test two different brands. We came to the conclusion that we much prefer Banza (we had the penne) to Barilla (we had the rotini). Compared to traditional wheat pasta, chickpea pasta has 10 grams fewer carbs per serving, as well as 6 grams more fiber and protein. A word of warning, though: you MUST watch the pot as it boils! Chickpea pasta will produce a lot more foam than wheat pasta and it will definitely boil over if you’re not stirring it occasionally. 

We all really liked this, including the kids! The recipe below is supposed to make 4 servings; I used more pasta and stretched it to 8 servings (half of which were small kid servings). 

1 onion, coarsely chopped 
1 large carrot, coarsely chopped 
2 celery stalks, coarsely chopped 
1 Tbsp. extra-virgin olive oil 
1 lb. ground turkey 
½ cup lactose-free milk 
¾ cup red or white wine 
1 (28-oz.) can diced tomatoes 
10 oz. cooked chickpea pasta (see note above) 

Place the onion, carrots, and celery in a food processor and pulse until finely chopped. 

Heat the olive oil in a Dutch oven or medium skillet over medium-high heat. Sauté the chopped vegetables for 3 to 5 minutes or until softened. Add the ground turkey, breaking the poultry into smaller pieces, and cook for 5 minutes. 

Add the milk and wine and cook until the liquid is nearly evaporated. 

Add the tomatoes and bring the sauce to a simmer. Reduce the heat to low and simmer for 10 to 15 minutes. 

Meanwhile, cook the pasta according to the package instructions and set aside. 

Serve the sauce with the cooked chickpea pasta.


Thursday, July 29, 2021

Carrot and Red Lentil Soup

 I hadn’t posted about this carrot and red lentil soup yet, perhaps because I already have recipes here along the same lines, but looking back, I realize that it was the best soup I’d made in a long time. I had tried a few new soup recipes in the spring, like a bacon-potato soup with cheddar and chives (it was too watery, and based on reviews, others felt the same!), and also a tomato pasta soup that I made by combining the best part of two recipes (Bon Appétit’s low broth-to-fillings ratio and Ricardo’s pasta coated in turmeric oil), but it was just okay. And then I made the carrot soup and all was right with the world again. 

At the time, I had served it with gluten-free bread from the now-closed Little Aussie Bakery. I couldn’t find the Glutino all-purpose flour they recommend, so I used a Just About Foods – I think it wasn’t the best choice, and next time I’ll make sure to get the right brand. That being said, neither kind is low-carb, so I’m not sure what I’d use as a side to soup now. Suggestions are welcome! 


1 tsp. cumin seeds 
2 Tbsp. olive oil 
1 ½ lbs. carrots, roughly chopped (about 4 cups) 
3 large shallots, thinly sliced 
a 1-inch piece of fresh ginger, peeled and grated (2 tsp.) 
2 tsp. ground turmeric 
4 cups low-sodium vegetable broth 
2/3 cups dried red lentils 
1 ½ cups well-shaken and stirred unsweetened coconut milk (from a 13.5-oz. can) 
½ tsp. kosher salt 
¼ tsp. freshly ground black pepper 
fresh cilantro leaves, for serving 

Toast cumin seeds in a large pot over medium-high, stirring often, until fragrant, about 1 minute. Remove from pot. Heat oil in pot. Add carrots and shallots; cook, stirring often, until shallots are very tender, about 6 minutes. Stir in ginger, turmeric, and toasted cumin. Cook, stirring constantly, until fragrant, about 30 seconds. Stir in broth and lentils; bring to a boil. Reduce heat to medium-low and simmer until carrots and lentils are tender, about 20 minutes. 

Blend carrot mixture in a blender, in batches if necessary, taking care when blending hot liquids. (Or use an immersion blender directly in the pot like I did.) Return puréed soup to pot. Stir in coconut milk, 1 cup water, salt, and pepper. Top with cilantro. (It occurs to me now that the leftover coconut milk would be nice drizzled on top of this as well.)


Wednesday, July 28, 2021

Citrus Chickpea Almond Muffins


As I was digging through my recipes to find a make-ahead breakfast dish that was low in sugar, I found these lemon chickpea muffins. I’ve decided to call them citrus muffins, given that there’s as much orange flavor as lemon! I’ve also decided that the aquafaba should be kept and whipped, then added in with the whipped egg whites. These muffins were good, though I’ll admit that I don’t like them as much as “regular” muffins. Also, since there’s not much sugar in them, they don’t keep long – I recommend keeping them in the fridge or freezing them. 

For the muffins 
1¾ cup (271 g) chickpeas from a 15 oz. can, drained (keep the aquafaba!) and rinsed 
1 Tbsp. (12 g) lemon zest 
1 Tbsp. (12 g) orange zest 
2 Tbsp. (28 g) fresh lemon juice 
2 Tbsp. (28 g) fresh orange juice 
¼ cup (52 g) extra virgin olive oil 
¼ cup (45 g) granulated sugar 
2 eggs, separated
⅔ cup (80 g) whole wheat flour, sifted 
2 tsp. (8 g) baking powder 
½ tsp. (2 g) salt 
½ tsp. (2 g) ground cardamom 
⅓ cup (30 g) ground almonds 

For the topping 
1 Tbsp. (8 g) ground or slivered almonds 
¼ tsp. (1 g) ground cardamom 
½ tsp. (2 g) granulated sugar (optional; I didn’t use it) 

Preheat oven to 325 °F. Line muffin tin with paper liners. 

Purée the chickpeas in a food processor until smooth. Add the lemon and orange zest, juice, olive oil, sugar, and egg yolks. Purée until smooth. 

Sift together the flour, baking powder, salt, and cardamom. Stir in the chickpea mixture, and then add the ground almonds. 

Whisk the egg whites until they hold semi-soft peaks. If using, whisk the aquafaba until it holds semi-soft peaks and fold into the egg-white mixture. Fold the egg whites into the batter carefully, so as not to deflate the egg whites. 

In a small bowl, combine the ground or slivered almonds, cardamon, and sugar (if using). Set aside. 

Scoop batter into muffin tin. Sprinkle the muffin batter with some of the almond-cardamom mixture. 

Bake in the oven 12 to 13 minutes (14 minutes in my case), or until a toothpick inserted in the center of a muffin comes out clean.


Monday, July 26, 2021

Stuffed Peppers


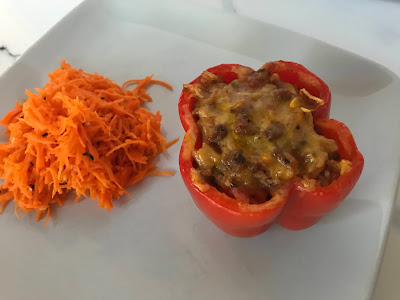
I tried making these stuffed tomatoes with lemon and garlic where, instead of rice, you used riced cauliflower. (I didn’t use the brand of flavored riced cauliflower that was recommended, because it contains lactose, so I had plain riced cauliflower that I flavored myself with lemon zest, garlic, salt and pepper.) And the truth is, I’m really not a big fan of riced cauliflower. So I decided to make the classic stuffed peppers, with a recipe that didn’t call for too much rice. I used this one, and it was delicious! 

Of course, you can adapt with the protein and cheese of your choice, and I threw in some cumin (I wrote it down below). You could also use brown rice or another grain altogether. This recipe calls for cutting the top off the peppers and stuffing them right-side-up, and they all fit in my 9”x13” baking dish; some people prefer to slice bell peppers lengthwise, and in that case, you’ll need a baking sheet or two. My kids were not really impressed, but at least you can take the stuffing out of the offending bell pepper and salvage something. But I loved this dish! 

½ cup uncooked rice 
2 Tbsp. extra-virgin olive oil, plus more for drizzling 
1 medium onion, chopped 
2 Tbsp. tomato paste 
3 cloves garlic, minced 
1 lb. ground beef 
1 (14.5-oz.) can diced tomatoes 
1 tsp. dried oregano 
½ tsp. cumin kosher salt 
freshly ground black pepper 
6 bell peppers, tops and cores removed 
1 cup shredded sharp cheddar (lactose-free) 
freshly chopped parsley, for garnish (optional) 

Preheat oven to 400 °F. 

In a small saucepan, prepare rice according to package instructions. 

In a large skillet over medium heat, heat oil. Cook onion until soft, about 5 minutes. Stir in tomato paste and garlic and cook until fragrant, about 1 minute more. Add ground beef and cook, breaking up meat with a wooden spoon, until no longer pink, 6 minutes. Drain fat. 

Return beef mixture to skillet, then stir in cooked rice and diced tomatoes. Season with oregano, cumin, salt, and pepper. Let simmer until liquid has reduced slightly, about 5 minutes. 

Place peppers cut side-up in a 9”x13" baking dish and drizzle with oil. Spoon beef mixture into each pepper and top with cheddar, then cover baking dish with foil. 

Bake until peppers are tender, about 35 minutes. Uncover and bake until cheese is bubbly, 10 minutes more. 

Garnish with parsley before serving.


Friday, July 23, 2021

Vanilla-Pecan Coffee Cake


I pulled out Joanne Chang’s Baking With Less Sugar again and took a look at the recipes I had flagged but hadn’t made yet. I zeroed in on the vanilla-pecan coffee cake, which she adapted from her bakery’s famous sour cream coffee cake. The cake itself has less sugar than the original version, and the streusel uses honey (still a sweetener, but one with a lower glycemic index). 

The method for the streusel, and especially for mixing it with the cake, was new to me, but it worked out well. The caveat of this cake is that since it is low in sugar, it will not keep for long – it’s best eaten within a day or two, but since we were making small slices, ours lasted longer and I stored it in the fridge. I think it would be fair to say that we all liked this cake, but I think no one loved it. 

For the streusel 
¾ cup (75 g) pecan halves 
3 Tbsp. honey 
1 tsp. ground cinnamon 
½ tsp. ground ginger 
¼ tsp. ground cloves 
½ tsp. kosher salt 
6 Tbsp. (45 g) cake flour 
2 Tbsp. lactose-free butter, at room temperature 

For the cake 
2 ½ cups (300 g) cake flour 
2 tsp. baking powder 
½ tsp. baking soda 
1 tsp. kosher salt 
2/3 cup (140 g) sugar 
1 cup (2 sticks) lactose-free butter, cut into 6 pieces, at room temperature 
2 large eggs 
3 egg yolks 
1 Tbsp. finely grated orange zest 
2 Tbsp. vanilla extract 
1 cup lactose-free sour cream (or crème fraiche if you’ve got it/can make it) 

Place a rack in the center of the oven and preheat to 350 °F. Butter and flour a 10-inch tube pan with a removable insert. (The removable insert is important. If you don’t have such a pan, I’d try using a springform instead.) 

Put the pecans on a baking sheet and toast for 8 to 10 minutes or until lightly toasted. Set aside to cool. 

In a food processor, combine the pecans, honey, cinnamon, ginger, cloves, salt, cake flour, and butter and pulse for about 20 seconds, or until the mixture comes together roughly and looks like quicksand. Transfer to a medium bowl and set aside; you should have about 1 cup. 

Using a stand mixer fitted with the paddle attachment, mix the cake flour, baking powder, baking soda, salt, and sugar on low speed just until well mixed. Add the butter, one piece at a time, and continue to beat on low speed for 3 or 4 minutes, or until the butter is well incorporated into the dry ingredients. The mixture will look like coarse meal. 

In a small bowl, whisk together the eggs, egg yolks, orange zest, vanilla, and sour cream until thoroughly mixed. With the mixer on low speed, slowly pour about half of the egg mixture into the flour mixture and mix until combined. Increase the speed to medium and beat for 1 ½ minutes. The mixture will go from looking thick, clumpy, and yellowish to light, fluffy, and whitish. Stop the mixer once or twice during the mixing and scrape down the sides and bottom of the bowl with a rubber spatula to make sure all the ingredients are mixed in. Decrease the speed to low, add the remaining egg mixture, and beat for about 30 seconds, or until combined. Again, stop once or twice during the mixing to scrape down the sides and bottom of the bowl. 

Spoon about 1 cup of the batter into the streusel and fold the streusel and batter together until well mixed. (This step helps keep the streusel from sinking directly to the bottom of the pan during baking.) Scrape all of the non-streusel batter into the prepared pan and smooth the top. Then top with the streusel batter, spreading it in an even layer and smoothing it out. 

Bake for 40 to 50 minutes, or until the center of the cake springs back when you press it and the top is pale golden brown. Let cool in the pan on a wire rack at least 3 hours, or until completely cool, then run a paring knife around the edge of the pan and carefully pop out the cake and the removable insert. Run the knife around the bottom of the pan and invert onto a wire rack or plate, gently shaking until the cake pops out; then top with a second wire rack or plate and flip so it is right-side up. 

The cake can be stored in an airtight container at room temperature for up to 2 days. Any longer than that and I recommend storing it in the fridge or freezing it.


Saturday, July 17, 2021

Taco Bowl


I got this recipe in a batch of free downloads from The Hormone Dietitian. It was originally a breakfast bowl, but I’m not yet into vegetables for breakfast; for me, this was a delicious lunch, though! What drew me to this recipe originally was that I wanted something low in carbs and high in protein, but you don’t need to be on a special diet to eat this. (If you want something that’s also TexMex-inspired for a family meal, you could always make these chicken and bell pepper fajitas and… omit the tortillas? Or at least serve components separately and let people who want tortillas have some, while you load up on vegetables?) 

1 ½ tsp. olive oil 
1 lb. extra-lean ground turkey 
1 pinch chili powder (or to taste) 
1 tsp. oregano 
1 tsp. cumin 
1 tsp. fine sea salt 
1 tsp. black pepper (I used less) 
½ cup water 
4 eggs (fried or done to your liking) 
4 cups baby spinach, chopped 
1 bell pepper, diced (I used an Aloha bell pepper
1 tomato, diced 
1 avocado, mashed or sliced or diced 

Heat a skillet over medium heat. Add the olive oil. Add the ground turkey and sauté to cook through, breaking up the meat as you go along. Once it is cooked through, add the chili powder, oregano, cumin, salt, and pepper. Add the water and sauté for another minute as you mix well. Reduce heat to the lowest setting and let simmer until all water has been absorbed. 

Meanwhile, fry the eggs and prep the vegetables. 

Divide the spinach between bowls. Top with dived bell pepper, tomato, avocado, turkey, and egg. Enjoy!


Saturday, July 10, 2021

Wrist warmers and a cowl

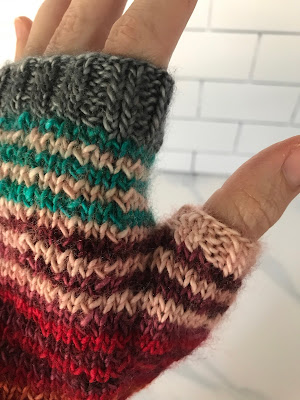
 At some point last year, I decided to splurge and bought myself this kit to make wrist warmers. (It was a splurge insofar as I don’t normally drop that much money on a knitting project, but it was well within my self-imposed annual knitting budget.) The kit contained a pattern by Vickie Howell and 5 skeins of Madelinetosh Tosh Merino Light yarn in colors that she had designed (gray, turquoise, orange, purple, and pink); the color pairing just made me so happy! They were actually out of the Nassau Blue (turquoise) yarn, so I used the Nassau Blue Tweed yarn instead. And because I like red more than orange and just couldn’t help myself, I threw in a skein of red, actually called Blood Runs Cold. And then I downloaded the (free!) cowl pattern that had been in the back of my mind for a while, Inspira (which I had first seen in these colors). I love that it comes in three different patterns, based on the size of your yarn! 


I knew that I wanted to make that cowl as well as the wrist warmers, so I bought the full-sized skeins sold in the kit. That being said, if you only want to make a pair of wrist warmers, I definitely recommend buying the small size called Unicorn Tails, which should give you just enough of each color. 

So, first, the mitts. I’m not sure whether to call these “wrist warmers” or “fingerless gloves” – I reflexively used the second term, but the first seems more widespread, so that’s what I used in the title. The pattern specifies two sizes, but the colors on the photos correspond only to the smaller size – if you’re making the bigger size, like me, you’re left to your own devices regarding how to arrange the stripes. This wasn’t a big deal, especially considering that I was adding an extra color anyway! I changed the method used to increase on either side of the thumb gusset (m1l and m1r instead of ktbl twice) because it looked nicer to me. I made a beautiful pair on which the ribbed edge of the thumb is pink (both other edges are gray). 


Then I made the cowl. The version I went with was Steampunk, since I had fingering-weight yarn, but I changed it a bit because I decided to use the gray as a sort of frame for every rectangle of color. After reading comments on Ravelry, I decided to cast on more stitches to begin with (294 instead of 204, based on my shoulder measurements and the gauge of my swatch). And I used these instructions from a Ravelry user for the decreases, as they work better. I made my cowl longer as well, so I used the same basic principle for another round of decreases; it just looks better to me if you keep the pattern mostly intact. 

What I love here is that while this project is knit in the round, the author recommends knitting a few rows back-and-forth before joining, which greatly reduces the risk of twisting the first row. However, I would recommend starting with a smaller-size needle, which makes for a much cleaner edge. That’s what I did to finish at the top of the cowl, and since I didn’t like the wonky bottom and still had gray yarn left, I picked up stitches all around and did the edge over with my smaller needles. It looks much better! 


If I ever make this cowl again, I’d love to do it with a solid color as the “frame” and then a color-gradient yarn for the rectangles. There are also beautiful color combos on Ravelry for this project! 

At some point while knitting the cowl, I realized that based on the yardage in the pattern, I was going to need more gray yarn, so I bought a second skein. It turns out that I had *just* enough of the first skein to complete the project. But then, since I had the new skein just sitting there, I decided to make another pair of the fingerless mitts with a more-pleasing-to-me color arrangement. I made a sketch on paper and ended up with a pair that was a bit too long for me. I adjusted and made my perfect pair. 


There were no restrictions on the pattern, and since I actually have an Etsy shop, well, I’m now selling two pairs of wrist warmers! I’m only charging for the yarn (based on the Unicorn Tail prices) and the “free” shipping (which is rolled into the price, don’t let anyone tell you otherwise), and rounding up a dollar or two to cover Etsy’s fees. Proof that you can’t really be compensated for your knitting skills, since I’m already at the top end of the price range I see for similar items. Don’t hesitate to share the listings with anyone you think might be interested! If they sell quickly, I’ll consider making more with the rest of the yarn.


Friday, July 09, 2021

Marzipan Buckeye Bars


I made this chocolate almond tart from Famille futée 3 not once, but twice. It’s a recipe that, according to the headnote, “only calls for 5 ingredients, one of which is chocolate. Case closed.” The first time, I used natural almond butter, but the crust fell apart and the chocolate part was too hard. The second time, I used creamy peanut butter, which the headnote said would make the dessert taste like a giant Reese’s. It didn’t! It was better, but it still had all the problems of the original to some extent, and it really wasn’t as good as it looked. 

Then I ended up making marzipan buckeye bars from the book Practically Raw Desserts by Amber Shea Crawley. I used an 8-inch square baking pan and made a few substitutions based on what I had on hand (see below). This was so delicious! The almond extract here was wonderful. All 4 of us loved it, which is really rare! And, bonus, it doesn’t have *too* many carbs. 

For the marzipan layer 
1 cup almond butter (I used ½ cup natural almond butter and ½ cup creamy peanut butter) 
¼ cup coconut nectar (I used maple syrup) 
½ tsp. almond extract 
1 big pinch of sea salt 
¼ cup coconut flour 

For the chocolate glaze 
½ cup melted coconut oil 
¼ cup cacao powder 
¼ cup maple syrup 
½ tsp. vanilla extract 
1 big pinch of sea salt 

For the marzipan layer 
Combine the almond butter, coconut nectar, almond extract, and salt in a food processor, and pulse until smooth and combined. Add the coconut flour and pulse until the mixture comes together and starts to ball up. Transfer the ball of dough to a 6- to 8-inch square baking pan (lined with waxed paper for easy removal, if desired) and use a spatula or your fingers to press it down evenly. Place the pan in the freezer while you make the topping. 

For the chocolate glaze 
Combine the oil, cacao powder, maple syrup, vanilla, and salt in a blender. Blend on low speed until smooth, stopping to scrape down the sides if necessary. Alternatively, thoroughly whisk all ingredients together in a medium bowl (this is what I did, but I could have rinsed out the food processor and reused it too – no point in getting the blender dirty for this, really). 

Remove the pan from the freezer and immediately pour the glaze over the marzipan, tilting the pan to spread it around evenly. Freeze for at least 2 hours before slicing and serving. 

Store the bars in an airtight container in the freezer for up to 3 weeks. Serve frozen (don’t worry, they’re not super hard).


Thursday, July 08, 2021

PCOS and stuff

[This is another rambling, personal post about health and, while it may seem specific to me, enough women suffer from PCOS (anywhere between 1 in 10 and 1 in 4, depending on the source) that it could be relevant to others as well. As always, feel free to skip it and wait for the next recipe!] 

In late 2020 and early 2021, it seemed like I was suffering from a few very minor health issues here and there, and my complaints were split between a few health practitioners with their own specialties. Then, right before the new year, I got some lab work that showed an increase in my cholesterol and my blood sugar (the latter was all the more out of left field considering that I never even had any signs of gestational diabetes); plus, there’s 20 pounds I never lost from my last pregnancy and I’m carrying it in my midsection instead of the pear shape I’m used to. I started wondering whether all my minor ailments and these new lab results were connected, and perhaps I needed a doctor who had an overview of the whole thing. So, I connected some dots on my own (unregulated PCOS? potential hypothyroidism? they are correlated, after all) and brought my concerns to my gynecologist at my annual visit; he agreed with some of my hypotheses and added some questions of his own (potential Hashimoto’s disease?). He wrote me a prescription for birth control to handle some of my symptoms and recommended I see an endocrinologist to rule out other stuff. 

So, I found an endocrinologist specialized in diabetes, metabolism, and thyroid disorders. He ordered more tests and concluded that my numbers are “borderline” (hypothyroidism, maybe Hashimoto), but at this point, they do no warrant such a diagnosis and do not require treatment beyond a diet change. He also brushed off my PCOS since I’m on birth control. Essentially, his diagnosis was that I’m getting older and my metabolism is slowing down, both of which are admittedly true. The nurse practitioner told me I need a low-carb diet, and I should eat more protein to feel full. This is already more helpful that simply being told “Try to lose weight” or “Just eat less” when, really, I’m hungry. It’s still a big adjustment! I was turning to whole grains to keep me full, but now I’m told that scrambled eggs would be better for me than oatmeal. Except I’m not going to cook eggs every morning, and besides, what should I eat as a side to the eggs if toast is off the table – yeah, I still have a lot of questions. 

Then, just a few days after that appointment, the Engineer forwarded me an article on CNN stating that women with PCOS are more at risk of complications from COVID-19 than the average patient, and… it wasn’t that fact so much as ALL THE COMORBIDITIES mentioned in that article that really got my attention. The PCOS itself puts me at risk for insulin resistance and Type II diabetes, obesity, inflammation, endometrial cancer, and a whole bunch of other things (like high LDL and low HDL, according to the Office on Women’s Health). This is in addition to possible symptoms like menstrual irregularities, obesity, hirsutism and male-pattern baldness (because of excess androgen hormones) that I already knew about. 

It turns out that PCOS is typically treated as a reproductive disorder, but it’s actually a metabolic disorder and the anovulation is just a symptom. It should really be renamed, because PCOS makes it sound like it’s strictly a reproductive disorder, and even the endocrinologist specialized in metabolism didn’t seem aware of its ramifications! 

As you know, I do my best to use reputable sources, but there’s still a lot more scientists can learn from this disease, even though PCOS was first reported 300 years ago this year and is “the most common hormonal condition for women of reproductive age” (Cleveland Clinic). It turns out that simple calorie restriction is not a good solution for patients with PCOS (or for those with insulin resistance in general), and I really should focus specifically on a low-carb diet. There are also symptoms like being hungry a few hours after eating and craving carbs that are more specific to those patients than to the general population (hence my sweet tooth?). At this point, this all makes sense to me, because I tried Noom for several months two years ago and even though I was consuming the amount of calories that should have had me going down to my goal weight, I was still stalled at more than 10 pounds over it for months and I eventually quit the program (which was overwhelming anyway). 

There are more symptoms and risks that no healthcare professional had discussed with me (some of these check out for me, some don’t): sleep apnea, depression, anxiety, inflammation, metabolic syndrome (Mayo Clinic); boils (Cleveland Clinic); acne, dark skin patches, skin tags, pelvic pain, fatigue, heart attacks and cardiovascular disease in general (PCOS Awareness Association); plus deficiency in vitamin D, magnesium, and iron (though these are also common in the general population). 

Here’s something that really stood out, given my lab results: according to the Office on Women’s Health, more than half of women with PCOS will develop Type II diabetes or prediabetes (insulin resistance) by age 40, and they will often have high levels of LDL and low levels of HDL cholesterol (whereas the opposite would be desirable). The CNN article I linked to above also quoted a doctor as saying that if two women both weigh 100 kg (roughly 212 lbs.), and one has PCOS but the other doesn’t, the one with PCOS is more likely to develop Type II diabetes – proving that the issue isn’t simply linked to her being overweight, but to the underlying condition. 

All this to say that I’m reading up on low-carb diets and have joined mailing lists of/bought cookbooks by registered dieticians specialized in nutrition for PCOS. (I’m avoiding some of the ones who are Instagram influencers and seem to me to be trying to make money through sensationalist means rather than consultations or online classes.) This is all still new to me, but I’m trying to navigate it as best as I can. In parallel, I’m reading The Menopause Manifesto by Dr. Jen Gunter and also learning a lot from that (because admittedly, the risks of some of these conditions just increases with age and/or menopause, regardless of a PCOS diagnosis).

Tuesday, July 06, 2021

Mafé de poulet sénégalais


J’ai fait cette recette tirée de Famille futée 3. Je n’avais jamais mangé de mafé de poulet auparavant, et je ne peux bien sûr pas dire que cette recette soit authentique, mais nous avons beaucoup aimé! J’ai servi le plat avec du riz, mais on pourrait aussi servir avec du pain ou des légumes. J’avais utilisé un peu plus de poulet un peu pour nous faire des restes. 

1 lb. de poitrines de poulet, désossées et taillées en cubes de 2 cm (1 po) 
6 gousses d’ail, hachées finement (environ 2 c. à soupe) 
2 c. à soupe de gingembre haché finement 
1 échalote française, hachée finement 
1 pincée de flocons de piment fort (ou plus, au goût) 
sel et poivre au goût 
1 boîte (14 oz.) de lait de coco, divisé 
2 tomates en dés 
¼ tasse de beurre d’arachides naturel (j’ai pris du crémeux) 
2 c. à soupe de pâte de tomates 
le jus de 1 lime (2 c. à soupe) 
1 c. à soupe de sauce de poisson 
2 c. à soupe de coriandre fraîche, hachée (pour garnir) 
2 c. à soupe d’arachides non salées, concassées (pour garnir) 

Dans un grand poêlon antiadhésif à haut rebord, mélanger hors du feu les cubes de poulet, l’ail, le gingembre, l’échalote et les flocons de piment. Saler et poivrer généreusement. 

Chauffer le poêlon à moyen-vif sous le poêlon et cuire 3 minutes. Retourner les cubes et cuire encore 2 minutes. 

Réserver 1 c. à soupe de lait de coco pour la garniture; verser le reste du lait de coco dans le poêlon avec les tomates, le beurre d’arachides et la pâte de tomates. Réduire le feu à doux et poursuivre la cuisson 10 minutes.
 
Ajouter le jus de lime et la sauce de poisson. 

Servir le poêlon au centre de la table. Garnir de coriandre fraîche, d’arachides et du reste de lait de coco. Accompagner de riz ou de pain avec des légumes, si désiré.


Thursday, July 01, 2021

Florida

Since we’ve been cooped up for the past year and a half, and since the adults in our household are fully vaccinated, we decided to treat ourselves to a road trip to Florida. It was relatively last-minute (everything was booked in late May for an early-to-mid-June trip) and budget-conscious; we decided to mostly stick to the west coast and make it down to Key West. Overall, I would say this trip was both disappointing and totally worth it. 

Our first stop in Florida was Destin. The Engineer managed to find a hotel not far from Miramar Beach without having to resort to a second mortgage, though it was obviously more expensive than the side-of-the-highway hotels we’re used to. The beach was beautiful: soft white sand, blue-green water, and some space to spread out our blanket even though it was busy. Unfortunately, there were both a red flag (rough waters) and a purple one (wildlife), so we weren’t supposed to go into the water deeper than our knees, which was disappointing. The next morning, both kids voted to swim in the hotel pool instead of going back to the beach. 

We moved on to Gainesville, where we visited the Florida Museum of Natural History (free visit, $4 for parking). They had an impressive collection of butterfly specimens, as well as exhibits on local flora and fauna, both prehistoric and modern. It was well worth the visit! 


The next stop (and hands-down highlight of the whole trip) was two days on Sanibel Island. I wanted to go there because it is renowned for shelling – its east-west orientation means that lots of shells make it there intact, as opposed to most of the Florida coastline, which has a north-south orientation. The view from the bridge on the way there is breathtaking! The island felt like a tropical paradise to me, with luxuriant palm trees and exotic flowers everywhere, a street lined with little shops (let me name-drop Love Boat Ice Cream, where a small serving of sorbet allows you to get 3 flavors, and Cip’s Place, where we ate very well), and a wide bike path all along it. Had the kids been older, we would have rented bikes for a day! For what it’s worth, we stayed at Shalimar Cottages and Motel, which is right on the beach and absolutely lovely. The water was blue and warm, but as it’s a shelling beach, there are more pieces of seashells than white sand near the water. This isn’t a problem as long as you have water sandals or water shoes – or, as long as your kids agree to wear said sandals and shoes! There were also sea turtle nests on the beach. Our two days there were heaven, and we’d love to go back someday for a longer stay (though it would make more sense to fly to Tampa or Miami rather than drive, at that point). 


From there, we went to Miami for the afternoon; we drove near the Skyviews Miami Observation Wheel, then found public parking near Ocean Drive and 5th. We walked up the Art Deco district, then back down through the park near South Beach (definitely more pleasant). Honestly, I’m glad I saw it, but I wouldn’t care to go back. Miami did have museums that looked interesting, had we had the time to visit them. 


The next day was a round-trip to Key West (if we had been less last-minute and less budget-conscious, we would have spent the night, but it was not to be). As a passenger, I thought the drive was beautiful, though it’s obviously tougher for the driver! Once in Key West, we walked around a bit, mostly near Whitehead Street (we saw, but did not enter, Ernest Hemingway’s house and the lighthouse). We had a great al fresco lunch at the famous Blue Heaven and made sure to order key lime pie for dessert! After lunch, we went to the Southernmost Point Buoy; unfortunately, by that time, it was really hot and my family was tired, so I got outvoted and didn’t get to stand in line for a photo. We made our way back to the mainland, again with those gorgeous views from the road. 


Our last beach stop was Clearwater. We went to the beach twice in those two days, but it was a time when it seemed like the ocean was roiling up everything that was at the bottom and spewing it out onto the beach. It was impossible to set foot in the water without being covered in pulverized seaweed, there were several fish carcasses, and it was just unpleasant all around. We also went to the Clearwater Marine Aquarium, which is a big local attraction. That being said, unless your kids are fans of the Dolphin Tale movies, I wouldn’t recommend it. I mean, the dolphins are great, but apart from that, there isn’t much to see (two otters, a few sea turtles and pelicans, some rays and fish; plus an exhibit on whales with life-sized models at the time of our visit). Given that the price of admission is similar to that of the aquariums in Vancouver or Boston, but the offering is so paltry in comparison, it was actually quite disappointing. 


The final thing I wanted to see was Manatee Springs State Park. It’s inexpensive ($6 per vehicle) and there is a nice boardwalk that goes alongside the spring to the Suwannee River. The water from the spring was really clear, and we considered swimming, but opted to let the kids lose on the playground instead. Unfortunately for me, it wasn’t the right season for manatees, though we did see birds and turtles. For what it’s worth, the brochure we picked up on site says the manatees are regular visitors from November through April. 


Despite the lowlights of this adventure, the kids still regularly talk about the trip and are often asking to go back. I learned that Florida has a lot more conifers and Spanish moss than I was expecting, and also way fewer postcards. (Is this a thing now? You’d be hard-pressed to find a public phone, and postcards aren’t really popular anymore, even though they used to be?) We’ll definitely keep Sanibel in mind for future vacations.