Wednesday, December 15, 2021

More Sheet Pan Gnocchi

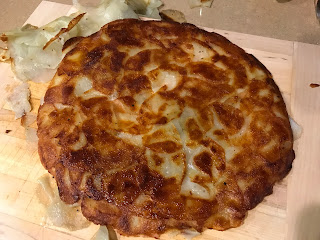
 Last winter, I tried a few potato dishes that looked very impressive (and, in one case, both labor-intensive and time-consuming), but they were a big let-down. There was this potato galette, for which I actually got the golden crust I was looking for, but the galette came apart in the middle upon unmolding just the same. 


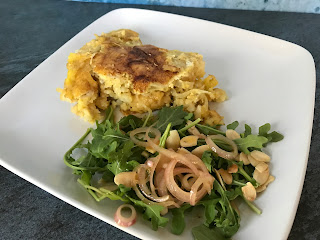
I also made this tater tot egg bake, which also just fell apart. I should have been more aggressive using a spatula to loosen it before flipping it, and it seems like the whole thing would have been better made in the oven anyway! 


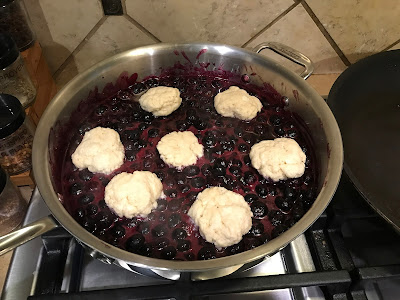
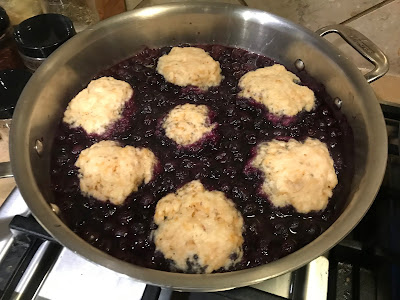
Then I found out I needed fewer carbs, so I haven’t eaten as many potatoes, but recently I’ve been steering back toward a flexitarian diet and was at a loss for a vegetarian main, so I made sheet-pan gnocchi. Lots of carbs, but really good and so easy! The quantities below yield 4 servings. 

½ large red onion, cut into ½"-thick wedges 
2 large garlic cloves, unpeeled 
2 pints cherry tomatoes 
a 17.6-oz. package shelf-stable or refrigerated potato gnocchi 
4 Tbsp. extra-virgin olive oil, divided, plus more for drizzling 
1 ½ tsp. Diamond Crystal or 1 tsp. Morton kosher salt, divided, plus more to taste 
freshly ground black pepper, to taste 
1 Tbsp. fresh lemon juice 
2 cups baby arugula 
1 cup basil leaves, large leaves torn 
2 oz. parmesan, shaved 

Place a rack in middle of oven; preheat to 425 °F. Toss onion, garlic, tomatoes, gnocchi, 3 Tbsp. oil, and 1¼ tsp. Diamond Crystal or ¾ tsp. Morton kosher salt on a rimmed baking sheet to coat; season generously with pepper and toss again to combine. 

Roast, stirring once or twice, until gnocchi are golden and starting to crisp, most of the tomatoes have burst, and onion is golden, 25–30 minutes. 

Remove garlic from baking sheet, peel, and place in a small bowl. Mash with ¼ tsp. salt (garlic should be quite soft). Whisk in lemon juice and remaining 1 Tbsp. oil; season dressing with pepper and more salt if needed. 

Add arugula, basil, and Parmesan to baking sheet and drizzle dressing over; toss to combine. Divide among plates and drizzle with a little more oil.


Tourtière de ville


Une recette de tourtière avant les Fêtes, ça vous dit? C’est une recette que j’avais faite l’année dernière et dont j’ai oublié de vous parler en délai raisonnable, alors j’ai attendu cette année (donc je ne suis pas en retard, mais en avance). Il s’agit d’une recette de 3 fois par jour. C’est une tourtière de ville parce qu’en ville, on n’a pas de gibier, alors on prend du porc, j’imagine! Nous avions beaucoup aimé. Comme accompagnement, j’avais une salade de brocoli une fois, puis des patates douces rôties à l’érable (délicieuses, mais il faudrait les couper en cubes bien plus petits que sur la photo). 

4 abaisses de pâte brisée (maison ou du commerce) 
1 c. à soupe d’huile végétale 
1 tasse d’oignons hachés 
1 gousse d’ail hachée 
2 lb. de porc haché 
1 ½ tasse d’eau froide 
1 pomme, pelée et râpée (½ tasse) 
1 pomme de terre, pelée et râpée (½ tasse) 
1 c. à thé de sirop d’érable 
½ tasse de flocons d’avoine instantanée 
1 c. à thé de sarriette 
1 c. à thé (moins, pour moi) de quatre-épices (ou cannelle, clou de girofle, muscade) 
2 feuilles de laurier 
2 c. à thé de sel 
1 œuf battu (pour badigeonner la pâte) 

Dans une casserole, à feu moyen, faire chauffer l’huile végétale, puis faire revenir l’oignon et l’ail pendant 5 minutes. Ajouter le porc haché et l’eau froide, puis porter à ébullition. 

Ajouter le reste des ingrédients, à l’exception de l’œuf. Couvrir et cuire à feu moyen pendant 45 minutes en remuant régulièrement. (J’ai ensuite fait cuire un peu plus longtemps à découvert, pour que l’eau s’évapore.) 

Enlever les feuilles de laurier, rectifier l’assaisonnement au besoin et laisser refroidir complètement au réfrigérateur. 

Foncer 2 moules à tarte avec 2 abaisses de pâte brisée. Garnir du mélange de tourtière froid (environ 2 tasses par tourtière). 

Badigeonner le rebord extérieur de la pâte avec l’œuf battu. Placer une 2e abaisse sur chaque tourtière et refermer les bords. Réfrigérer pendant 30 minutes, puis badigeonner le dessus de chaque tourtière avec l’œuf battu. 

Cuire au four à 425 °F pendant 15 minutes. Réduire la température à 400 °F et cuire pendant 30 minutes supplémentaires, ou jusqu’à ce que la croûte soit dorée.


Tuesday, December 14, 2021

Don't mind me...


… I’m just over here, stuffing peppers. As one does. I don’t want to make my family sick of them, but bell peppers are one of my favorite vegetables (even though I disliked them as a child), so this is an easy one for me right now. I tried this version with lentils and TVP and really enjoyed it (I actually have enough filling for another 6 bell pepper halves or so in the freezer). 

I also tried scrambled egg whites, both with and without cheese, but they are not for me. 


Then I married the bell peppers and the eggs with these bell pepper eggs-in-a-hole. I made them a bit differently, cutting my bell peppers in half lengthwise and using 8 eggs (instead of taking off the top and using 4 eggs – but it was 4 servings anyway). These were great! 

4 bell peppers (assorted colors), tops and seeds removed (see note above) 
1 cup shredded lactose-free cheddar 
4 slices bacon, cooked and chopped
 kosher salt 
freshly ground black pepper 
4 large eggs (see note above)
freshly chopped parsley or cilantro, for garnish 

Preheat oven to 400 °F. 

In each bell pepper (half), add cheddar and cooked bacon. Crack an egg on top and season with salt and pepper. 

Bake until whites are cooked and yolks slightly runny, 20 to 25 minutes. 

Garnish with parsley or cilantro.


Friday, December 10, 2021

Cookies and Cream Pie


I had originally planned on making this Oreo pie for Thanksgiving dinner, but I decided that we had quite enough food (including a dessert already), so I made it the following week. It’s super easy to make (it sets up in the fridge), and, you know, you can’t go wrong with Oreos, right? Well… it turns out that my family didn’t like the cream cheese in this particular dish. (For the record, I used lactose-free cream cheese that is real dairy and tastes the exact same as “regular” cream cheese.) I really liked it, though! I recommend this despite my family odd tastes. 

The recipe calls for a total of 36 Oreos, which is one 14.3-ounce package. I bought a slightly bigger package so that I’d have a few with which to decorate, as well as a few to eat straight up. 

For the crust 
24 whole Oreos (Double Stuf or regular) 
5 Tbsp. lactose-free butter, melted 

For the filling 
1 cup lactose-free whipping cream or substitute, cold 
8 oz lactose-free cream cheese, at room temperature 
¾ cup (90 g.) confectioners’ sugar, sifted 
1 tsp. vanilla extract 
12 whole Oreos (Double Stuf or regular), chopped 
more Oreos or whipped cream, as desired for topping 

Preheat oven to 350 °F. 

In a food processor, pulse the whole Oreos into a fine crumb. You should have about 2 cups. Add the melted butter and process again. Press tightly into the bottom and up the sides of a 9-inch pie plate. Bake for 10 minutes. Allow to cool (and turn off the oven) as you prepare the filling. 

Using a hand mixer or a stand mixer fitted with a whisk attachment, whip the cream into stiff peaks on medium-high speed, about 4 minutes. Set aside. 

Using a hand mixer or a stand mixer fitted with a paddle attachment, beat the cream cheese on medium speed until perfectly smooth and creamy. Scrape down the sides and up the bottom of the bowl with a rubber spatula as needed. Add the confectioners’ sugar and vanilla and beat on medium-high speed until combined. Make sure there are no large lumps of cream cheese left. 

With a rubber spatula, fold the whipped cream and chopped Oreos into the cream cheese mixture until combined. Go slowly, as you don’t want to deflate the air in the whipped cream. 

Spread the filling into the cooled crust. Use an offset spatula to smooth down the top. 

Cover tightly with plastic wrap and refrigerate for at least 6 hours and up to 2 days. (You could also freeze the pie.) 

Before serving, feel free to garnish the pie with more Oreos and whipped cream (keep in mind that the Oreos will soften up over time). Use a clean, sharp knife to slice the pie (to get really neat slices, clean the knife between each slice).


Sweet Potato Pancakes


Thanksgiving was pretty uneventful this year. I made my usual line-up of sides and threw in a vegetarian gravy for good measure – it was, indeed, good, but I was the only one eating it, and I still prefer my cranberry sauce, so I won’t make it again. I also made a sweet potato and marshmallow pie, but it didn’t work out. While the filling was fantastic, the crust sucked and the marshmallow topping was a burnt, gooey disaster. Luckily, I had leftover sweet potato purée with which to make these sweet potato pancakes the following weekend. 

This makes 14 pancakes. I’m leaving the instructions to make sweet potato purée below because some of you might appreciate the faster microwave method, but I just did this ahead of time my usual way (1 hour in the oven at 425 °F, then peeled and puréed in the food processor). 

¾ cup cooked and mashed sweet potato (from one 9-oz. sweet potato) 
2 large eggs 
2 cups lactose-free buttermilk substitute 
2 Tbsp. maple syrup 
2 Tbsp. lactose-free butter, melted 
2 cups all-purpose flour (I used white whole wheat) 
1 ½ tsp. baking powder 
1 ¼ tsp. kosher salt 
1 tsp. baking soda 
½ tsp. ground cinnamon 
¼ tsp. ground nutmeg 

Preheat oven to 200 °F. Set a wire rack inside a rimmed baking sheet. 

Prick potato all over with a fork. Place in a microwave-safe bowl with 1 teaspoon water and cover. Microwave on high until tender when pierced with a fork, 5 to 7 minutes. Let cool. Discard water. Split potato and scoop flesh into bowl; discard skin. Mash to make ¾ cup. 

Beat eggs and buttermilk in a large bowl. Add potato, syrup, and butter; whisk until well combined. 

Whisk flour, baking powder, salt, baking soda, cinnamon, and nutmeg in a medium bowl. Add to buttermilk mixture. Gently stir until few dry spots remain; do not overmix. 

Heat a large nonstick skillet or griddle over medium-high. Brush with oil; reduce heat to medium. Cooking in batches, add ⅓-cupfuls of batter to skillet, flattening tops slightly. Cook until bubbles rise to surface and underside is golden brown, 2 to 4 minutes. Flip and cook until puffed and golden brown on other side, 2 to 4 minutes. Transfer to wire rack; keep warm in oven. Repeat with oil and remaining batter. Serve with chopped pecans and more syrup, if desired.


Thursday, December 09, 2021

Dark Chocolate Sea Salt Tahini Brownies

I realized that I had never made any recipes from Real Sweet by Shauna Sever, so I set out to remedy that with her dark, fudgy muscovado brownies. And it turns out… they were way too sweet for me! You see, Real Sweet isn’t a no-sugar cookbook so much as a no-refined-white-sugar cookbook. This recipe still had muscovado sugar and brown rice syrup, and perhaps those do have more nutrients than cane sugar, but they’re still sweeteners. Anyway, I’ll try more recipes from that book eventually, but I won’t make that one again. 


I also made a recipe that I had kept in my pantry for a long time: Scharffen Berger’s velvet chocolate cake (the recipe is no longer on their website, but here’s a photo of it if anyone’s interested). This cake, while good, was a complete disaster because it completely fell apart upon unmolding, despite all the precautions I took. I served it like chunks of mousse in a bowl, and it still tasted fab, but I was disappointed. 


Then I tried Soom’s new dark chocolate tahini with sea salt. It’s really good, though I was disheartened to see that their chocolate tahinis now use cane sugar instead of maple syrup. Anyway, I couldn’t resist making these dark chocolate sea salt brownies of theirs, which happen to be gluten-free and dairy-free. These were really good! Coincidentally, the kids had been craving brownies, so they were really happy with these as well. 

If you want to make these but don’t have access to Soom, try the substitute listed here

1 cup Soom Dark Chocolate with Sea Salt Tahini 
1 cup brown sugar 
2 large eggs 
1/3 cup semi-sweet chocolate chips 
2 Tbsp. coconut oil 
½ cup (50 g) cocoa powder 
flaky sea salt and more chocolate tahini, for topping (optional) 

Preheat to 350 °F. Line an 8” square baking pan with parchment paper and lightly coat with non-stick cooking spray. 

In a large bowl, whisk tahini, brown sugar, and eggs until combined. 

Combine chocolate chips and coconut oil in a small microwave-safe bowl. Microwave for 75 to 90 seconds, stopping to stir every 30 seconds, until melted and smooth. (I did this in a double boiler.) Let cool for 5 minutes. 

Pour melted chocolate mixture into tahini mixture; mix well to combine. Fold in cocoa powder. (Batter will be thick.) 

Transfer to prepared baking pan and spread evenly. Bake for 28 to 32 minutes, or until a toothpick inserted in the center comes out mostly clean. Let cool in pan for 30 minutes. 

Use flaps of parchment paper to remove brownies from pan and let cool completely on a wire rack before slicing into squares. If desired, drizzle extra chocolate tahini on top and sprinkle with flaky sea salt.


Tuesday, December 07, 2021

An adventure in dyeing

 Last Christmas, the Engineer got me a kit I had been eyeing: this yarn-dyeing kit from Jimmy Beans Wool. It comes with a skein of white yarn, a mason jar, gloves, a mask, and five different colors of powdered dye. Since there’s enough powder for more than one skein, I bought two more (it’s Cascade Heritage, which is a fingering-weight mix of superwash merino and nylon). I gave some thought to what I wanted, and got started. 


I decided that I only wanted to do the messy part once, so I sacrificed a glass jar and a plastic container to this project in addition to the mason jar (they shouldn’t be reused for food afterwards). The first skein I made was meant to be a gradient of turquoise and blue, from dark to light. I followed directions, and though I ended up with something similar to what is shown online, I was expecting less white in the middle. Since this was rolled up in a ball, I had to use the container with the widest mouth – keep that in mind if you ever attempt a similar project! 


The second skein, I dyed using blue, red, and pink, layered as best as I could from bottom to top of the mason jar. In my opinion, this one came out best! 


Finally, for the third skein, I wanted it speckled with the remaining colors. I *loved* the look of it when it had just come in contact with the powder dyes! Unfortunately, these dyes were meant to be set in hot water, and the soaking process blurred the colors and got pink everywhere. I might try again someday using a hand-painting technique rather than this one, but it’ll do for now. The paper towels I used to protect the countertop looked fabulous, though! 


I’ve got a pattern set aside for the second skein, and don’t know what I’ll end up doing with the turquoise one. For the third skein, however, I decided to knit a headband. I chose a stitch similar to this one and used this method for the front knot assembly. I doubled up on the yarn as I was knitting, and it turns out that it made the fabric so much prettier! The way the colors were arranged was very pleasing to me, and I decided I really liked that yarn after all. One skein, even doubled up, had just enough for two headbands. I decided to put one in my Etsy shop, and it sold immediately! I’ll keep headbands in mind when I want to use up a skein. 


I also knit a dozen or so Christmas ornaments like the ones I made a year ago to use up some leftover yarn. With the permission of Julie Williams (Little Cotton Rabbits on Ravelry), I’m selling those in my Etsy shop as well. As a matter of fact, until December 15th, you can get a 25% discount if you buy two or more by using the code BUY2SAVE. Shipping is free in the U.S.!


Saturday, December 04, 2021

Fall 2021 outings

After out June trip to Florida and the kids’ Bubbie visiting in July, we tried to go back to our regularly scheduled outings. In August, we went for a hike at the new Robert L.B. Tobin Land Bridge in Phil Hardberger Park. The kids were disappointed because it felt a bit anticlimactic, given that there isn’t much to see, but it was still nice to walk around. Here’s a map of the trails; we came in via the Blanco entrance, on the side of the skywalk, and made sure to cap off the visit with a stop at the playground. (While we didn’t see any wildlife on the bridge, and it seemed ridiculous to me that there would be any in broad daylight, we did see five deer at the playground.) 


In September, we skipped the outing altogether. In October, we decided to go to the Quadrangle, a part of Fort Sam Houston that’s open to the public. Despite checking on both the website and Google to confirm that it was open, we showed up on Columbus Day (the only day when all four of us were free) only to be told that it was closed, since it’s a federal holiday. So we went downtown to Alamo Plaza and to the Riverwalk – it’s nothing new to us, but neither kid remembered it, so they were happy! We ended up not visiting the Alamo (kids didn’t feel like waiting for the next tour) and not visiting the Guinness World Records Museum (it is grossly overpriced). We decided to treat the kids to lunch at the Rainforest Cafe, only to wait for almost an hour because, even though it wasn’t busy, it was severely understaffed. Turns out the food isn’t that good either. So, the kids were overall happy, but the grownups were underwhelmed. 

In November, the Engineer called Fort Sam Houston to get opening hours and precise directions, and we tried the Quadrangle again. For the record, because this can save you a headache: the visit is free, but you need to sign in at Fort Sam Houston Visitor Center at 892 Hood Street. (I mean, based on the map, you’d think you could just walk in from Grayson Street, but in person that didn’t look doable.) From there, you are on the military base – make a left on Wilson Way, then another left on Liscum Road and drive until you get to the parking lot. The kids were immediately interested because there is a tank displayed there! Inside the walls of the Quadrangle are ornamental trees, some deer, and dozens of peacocks, ducks and geese. There is also a limestone clock tower with replicas of cannons at its base. It’s a nice place to relax, though I’m not sure that I’d bring a picnic there just because I think the animals would want our food! There is also a museum about the base and the army in general, where the visit was pleasant – even for the kids, who had a scavenger hunt with a prize at the end! The Quadrangle was once used as a prison and housed Apache Chief Geronimo for a few weeks in 1886; it was entered in the National Register of Historic Places in 1974. We enjoyed the visit, and it seems to be a place that even most locals don’t know about!


Thursday, December 02, 2021

Blueberry Slump


Fruit-based desserts can be hit-or-miss. It’s often dependent on how ripe your fruit is, sure, but sometimes it’s just the recipe. Take this rhubarb and strawberry crisp with basil and white chocolate – sounds great, right? But it sucked. I like fruit crisps and love rhubarb, and this wasn’t for me. Luckily, blueberry slump was there to save the day. 

I had listened to the Spilled Milk episode about slumps and ended up bookmarking this blueberry slump recipe. Honestly, it’s a homely dish with a homely name, but it was so good! In a nutshell, it’s fruit that is cooked on the stovetop with a few dumplings plopped on top. The Little Prince was apprehensive about it, but tried it to be polite, and he ended up deciding that it was much better than he expected! He even looked forward to it the second night. So we give it three thumbs up! 

This would be good with any summer berries, frozen or not; I think a blackberry slump would be particularly nice. I would consider not adding the water next time, as I think the filling would have been easier to serve with less liquid, but it does prevent scorching. I also cut the amount of cinnamon in half; the quantity below is mine. In this case, I served it with lactose-free lime sherbet the Engineer had made, but you could use lactose-free vanilla ice cream or whipped cream or just eat it plain. 

For the dumplings 
1 cup all-purpose flour 
1 ½ tsp. baking powder 
½ tsp. salt 
2 Tbsp. sugar 
2 Tbsp. lactose-free butter 
1/3 cup lactose-free milk 

For the blueberries 
4 cups of fresh or frozen blueberries 
½ cup sugar 
½ tsp. ground cinnamon 
¼ tsp. ground nutmeg 
1 ½ tsp. lemon juice 
1 tsp. lemon zest 
1/3 cup water 

For the dumplings 
In a medium bowl, whisk together the flour, baking powder, sugar, and salt. (I did this and the next step in the food processor.) 

Cut the butter into small cubes and use your clean hands to work the pieces of butter into the flour until the mixture resembles a coarse meal. 

Make a well in the center and add the milk. Mix together with a fork or wooden spoon just until the dough comes together. Form it into a ball. It should be rather shaggy. Do not knead or over work it or the dumplings will be tough. 

For the blueberries 
Place the blueberries, sugar, cinnamon, nutmeg, lemon juice, lemon zest, and water into a medium (2 quart) saucepan (I actually used a deep pan with a lid). Stir so that the berries are well coated with everything. Heat on high heat until the berries start to boil. 

When the blueberry mixture is boiling, pull off clumps of dumpling dough from the ball of dough and place on top of the berries. You should have enough dough for 6 or so dumplings – portion accordingly. 

Cover the pan and lower the heat to maintain a low simmer. Cook for 25 minutes. Do not uncover to peek at the dumplings while cooking! The dumplings need the steady steam and pressure from being covered to cook properly so they are light and fluffy. 

To serve, portion into individual serving bowls and top with vanilla ice cream or whipping cream, if desired.