Friday, September 27, 2013

Spaghetti au bacon, aux tomates cerises et au basilic


On ne se réinvente pas. En tout cas, pas quand on essaie de faire à manger quelque chose de pas compliqué! Je partage donc un autre plat de pâtes, avec une recette adaptée de Coup de Pouce. Je l’ai adaptée surtout pour être davantage compatible avec l’allaitement, donc pas d’alcool ni d’ail (ni de piment fort, question de goût), et une seule échalote au lieu de deux. J’ai pris toute la boîte de spaghetti, soit 16 oz au lieu de 12 oz. Et du bacon au lieu de la pancetta, juste parce que c’est plus facile à trouver! La recette ci-dessous est la mienne. J’ai fait ce plat quand Chère Sœur est venue nous rendre visite pour faire la rencontre du Petit Prince – un franc succès d’un bord comme de l’autre!

16 oz de spaghettis ou autres pâtes longues (pour au moins 4 portions)
2 c. à soupe d'huile d'olive
8 oz de tranches de bacon, coupées en lanières
1 échalote française coupée en tranches fines
3 ½ tasses de tomates cerises ou de tomates raisins coupées en deux
½ tasse de feuilles de basilic frais, légèrement tassées
3 c. à soupe de pignons grillés (ou plus)
sel et poivre noir du moulin
parmesan râpé (facultatif mais recommandé)

Dans une grande casserole d'eau bouillante salée, cuire les pâtes de 8 à 10 minutes ou jusqu'à ce qu'elles soient al dente. Égoutter les pâtes en réservant ½ tasse de l'eau de cuisson et les remettre dans la casserole.

Entre-temps, dans un grand poêlon, chauffer 1 c. à soupe de l'huile à feu moyen-vif. Ajouter le bacon et cuire, en brassant de temps à autre, jusqu'à ce qu'il soit croustillant. Mettre le bacon dans une assiette tapissée d'essuie-tout et laisser égoutter. Dégraisser le poêlon et y chauffer le reste de l'huile à feu moyen-vif. Ajouter l’échalote et cuire, en brassant, pendant 3 minutes ou jusqu'à ce qu'elle soit dorée et commence à devenir molle. Ajouter les tomates et cuire, en brassant, de 1 à 2 minutes ou jusqu'à ce que la peau commence à plisser.

Sur une surface de travail, superposer les feuilles de basilic, quelques-unes à la fois, puis les couper en lanières fines. Dans la casserole, ajouter aux pâtes le bacon, la préparation aux tomates, les pignons, l'eau de cuisson réservée et le basilic et mélanger pour bien enrober les pâtes. Saler et poivrer. Servir accompagné de parmesan, si désiré.

Monday, September 23, 2013

Fudgy Cocoa Nib Brownies

I got this recipe from The Sprouted Kitchen, but the recipe is originally from David Lebovitz (in Ready for Dessert). These are very fudgy, not cakey, so adjust your expectations accordingly. (The Engineer and I prefer cakey brownies, but I’m aware that opinions vary wildly on this.) You could also add cocoa nibs, chopped nuts, dried fruit or coffee to the batter, but we opted to keep things simple. In any event, it’s a great way to end a meal. While they survived the freezer quite well, I must admit that I preferred them at room temperature rather than straight from the fridge, where I normally keep fudgy things. I made them with white whole wheat flour, but it should be noted that on The Sprouted Kitchen, Sara Forte made them with gluten-free oat flour, so they are easily adaptable.

5 Tbsp. vegan margarine (or unsalted butter)
8 oz. quality bittersweet or semisweet chocolate, chopped
¾ cup natural cane sugar (or regular granulated sugar if that’s what you use)
1 tsp. vanilla extract
2 large eggs, at room temperature
1/3 cup unbleached all-purpose flour (see note above)
1 pinch salt
¼ cup cocoa nibs for topping

Preheat oven to 350 °F. Line the inside of an 8-inch square pan with parchment or foil, allowing excess to extend beyond the edges of the pan. Lightly grease with butter or cooking spray.

In a medium saucepan, melt the margarine, then add the chocolate and stir over low heat until the chocolate is melted and smooth. Remove from the heat and stir in sugar and vanilla. Beat in the eggs one at a time. Add the flour and salt and stir energetically for 1 full minute, until the batter loses its graininess, becomes smooth, and begins to pull away from the sides of the pan. The minute-long stir is crucial for everything to stay together. (Stir in any additions to the batter, like nuts, at this point.)

Scrape the batter into the prepared pan, sprinkle the cocoa nibs on top and bake until the center is almost set, 25-30 minutes (don’t overbake). Let the brownies cool completely before lifting out the parchment from the pan. (Freeze if desired. They keep well at room temperature for a few days, but to get clean edges when you cut them, chill them first and run the knife under hot water between each slice.)

Thursday, September 19, 2013

Liens de la semaine

Rebonjour tout le monde! Voici des liens en français cette semaine, dont certains datent un peu…

- Le thon en conserve n’est pas toujours du thon… C’est souvent de la bonite. Je déteste les appellations mensongères!

- Ça aussi, je déteste ça. Comme quoi pour le marketing, tout est dans la formulation…

- Les concours de beauté pour enfants sont désormais interdits en France. « Ne laissons pas nos filles croire dès le plus jeune âge qu'elles ne valent que par leur apparence. » Je trouve ça génial et j’aimerais que la même chose se produise dans mon coin!

- Notre Québec, expressions québécoises illustrées par une française. Très joli!

- Une animation montrant les différences de parcours pour une femme et un homme de carrière. C’est drôle parce que c’est vrai!

- Les p’tits pis moé, scénettes de vie au quotidien avec deux enfants. Hilarant!

- Ça fait un petit bout que je n’ai pas parlé de Galant, tu perds ton temps? Pourtant, j’ai beaucoup aimé leur dernier album.

- Voici un exemple d’accommodement « raisonnable » qui se trouve à être injuste, puisqu’au lieu de rendre le terrain égal pour tous, il pénalise la majorité.

- Et voilà qui me mène à la Charte des valeurs québécoises. Ou plutôt, celles des valeurs maroises, parce que cette xénophobie n’est pas le Québec que je connais. La Charte proposée interdirait le port de vêtements ou signes religieux par les employés de l’État, y compris ceux qui travaillent dans les hôpitaux ou les écoles. C’est du Hérouxville réchauffé, tout ça, alors que la Commission Bouchard-Taylor avait déjà conclu qu’il n’y avait aucune crise sociale au Québec et que ces anecdotes avaient été exagérées par les médias.

Les quatre principaux candidats à la mairie de Montréal ont rejeté la Charte, tout comme certains hôpitaux. Un texte, La Barbe nationale, tourne au ridicule le projet en l’appliquant au port de la barbe pour raison religieuse. D’autres expliquent les mythes et les préjugés sur lesquels sont fondés la Charte.

Il y a bien sûr des lettres ouvertes, comme celle d’un animateur anglophone à CJAD, celle d’une musulmane québécoise portant le hijab ou celle d’un québécois juif en exil.

J’ai aussi lu les articles tentant de dédramatiser ou de défendre le tout, comme celui-ci de L’Actualité, celui-là d’un immigré musulman ou celui de Pierre Foglia (quoi que…).

Il n’en demeure pas moins que la neutralité à laquelle je m’attends de la part d’un employé du gouvernement est tout à fait compatible avec la diversité, religieuse ou autre; c’est une question de simple professionnalisme. Oui, il faut s’adapter à la culture d’accueil et contribuer à la société, mais cela peut tout à fait se faire dans le respect de nos différences et de notre individualité. D’autant plus que le crucifix reste accroché à l’Assemblée nationale et visible sur le drapeau québécois! En présentant « nos » valeurs comme neutres, en plus d’être naïf, c’est qu’on pense que « les autres » s’opposent à nous, alors que ce n’est pas du tout le cas au Québec.

Selon moi, Mme Marois tente de faire oublier les sujets plus graves tels que le système de santé, l’éducation, les nids de poule, alouette, et surtout la rapidité avec laquelle le pourcentage de satisfaction des Québécois a chuté après sa montée au pouvoir, dans le but de se faire réélire avec un gouvernement majoritaire en effrayant les gens habitant hors des métropoles tout en semant la discorde dans celles-ci. De toute façon, le PQ n’a jamais eu beaucoup de vote à gagner à Montréal… Mme Marois semble être devenue experte dans l’art d’inventer des solutions à des problèmes qui n’existent pas (comme c’était le cas avec son projet de loi 14). Le Manifeste pour un Québec inclusif résume bien ma position, et je vous invite à le signer si vous vous y reconnaissez aussi.

Wednesday, September 18, 2013

Batch of links

It’s nice to be doing one of these again! I have too many links to round up into one post, so I’ll try to group them by theme and save some for later…

- If you’ve been reading this blog for a while, you probably remember me talking smack about GMOs. Recent conversations with my parents and with the Engineer, however, made me think that perhaps I haven’t made my position entirely clear. It’s not the GMOs themselves that I have anything against. We eat tons of foods that Nature didn’t create but that are not at all harmful. What bother me personally are the crops engineered (and copyrighted) by certain companies (like one that starts with “Mon” and rhymes with “santo”) specifically to withstand tons of their proprietary pesticide. This bothers me because a) it means the food is saturated with pesticides that I’d rather not have in my diet; b) it is environmentally unsound and affects even plots of land not used for this type of cultivation; and c) it is very unfair, even unethical, as far as the farmers are concerned. But here’s a really good article explaining why genetic manipulation might be necessary to save the orange, and why this isn’t a bad thing at all. (On a related note, I’m not against banning all GMOs, of course, but labeling products so that the consumers know what they are getting seems like a no-brainer.)

- 7 scientific terms that are misused by the general public. Now if we could only get mainstream reporters to read this article…

- How self-awareness and suggestion can influence our food choices.

- Another guide to navigating food allergies and restrictions, be it your own or someone else’s. (And I found out, to my horror and dismay, that a certain tick can make you “allergic” to meat!)

- Great video about the real cost of the American healthcare system. And this is just one of the many reasons why Obamacare is so important.

- 4 sisters, photographed every year for 36 years. Awesome.

- Remember the woman on page 194? I salute Glamour for continuing the dialogue with the women on page 198. And here’s also a really great post about real women.

- A 96-year-old man entered a song contest to honor his wife of 75 years. His entry wasn’t eligible, because he sent it on paper instead of online, but his song was professionally recorded after all. And you may need some tissues.

- I had never understood how cow-tipping could work, and it turns out I was right. If there is such a thing as a rural (not urban) legend, this is it.

- Stop-motion animation with knitting makes for a great natural gas ad!

Saturday, September 07, 2013

The definitive yellow layer cake

I don’t have much time to spend in the kitchen these days, but for the Engineer’s birthday, I’ll make it happen. The Little Prince was just over a month old and I was home alone with him most of the day, so it took me the better part of 5 hours to bake and assemble a birthday cake, but it was well worth it...

If you’ve been reading this blog for a while, you know I’ve been looking for a good recipe for yellow layer cake. When the Engineer asked for a yellow cake with chocolate frosting for his birthday, I knew I had to make something good, and I certainly didn’t have time to test recipes! I did what I probably should have done in the first place: I used the yellow layer cake recipe from Baking Illustrated. It was different from “typical” cakes in that instead of creaming the butter with the sugar, adding eggs, and then alternating with flour and milk, you instead mix the flour with the butter, then add the liquid ingredients in two steps. (It should also be noted that because I wanted to make sure I got it right, I used cake flour instead of my usual substitute and weighed it, and I used real butter instead of vegan margarine, since the lactose content was still low enough for me to enjoy the cake.) The result was a light, moist, fluffy cake that was absolutely perfect for the occasion, and from now on, this will be my go-to yellow layer cake. I used lactose-free sour cream to make a chocolate sour cream frosting.

7 oz. (1 ¾ cups) cake flour, plus extra for dusting pans
4 large eggs, at room temperature
½ cup lactose-free whole milk, at room temperature
2 tsp. vanilla extract
1 ½ cups sugar
2 tsp. baking powder
¾ tsp. salt
16 Tbsp. (2 sticks or 1 cup) butter, softened but still cool, cut into 16 pieces

Adjust oven rack to middle position and preheat oven to 350 °F. Grease two 9-inch round cake pans and line bottoms with parchment paper. Grease paper rounds, dust pans with flour, and tap out excess.

Beat the eggs, milk and vanilla with a fork in a small bowl. Measure out 1 cup of this mixture and set aside.

Combine flour, sugar, baking powder and salt in the bowl of a stand mixer. Beat the mixture at lowest speed to blend, about 30 seconds. With the mixer still running at the lowest speed, add the butter 1 piece at a time; mix until the butter and flour begin to clump together and look sandy and pebbly, with pieces about the size of peas, 30 to 40 seconds after all the butter is added. Add the reserved 1 cup of egg mixture and mix at the lowest speed until incorporated, 5 to 10 seconds. Increase the speed to medium-high and beat until light and fluffy, about 1 minute. Add the remaining egg mixture (about ½ cup) in a slow steady stream, taking about 30 seconds. Stop the mixer and scrape the sides and bottom of the bowl with a rubber spatula. Beat at medium-high speed until thoroughly combined and the batter looks slightly curdled, about 15 seconds.

Divide the batter equally between the prepared cake pans; spread to the sides of the pans and smooth with a rubber spatula. Bake until the cake tops are light gold and a toothpick inserted in the centers comes out clean, 20 to 25 minutes. Cool on a wire rack before running a knife around the pan perimeter and unmolding to peel off the parchment. Cool completely before icing.

Tuesday, September 03, 2013

I feel like chicken tonight

Dinner’s in the freezer! (And hi, everyone. Still alive and well, albeit somewhat sleep-deprived. Apparently, time doesn’t stop when you have a baby. Did you know everyone’s posting about fall recipes already?) So, I said last time that one of our freezer meals was make-again good, but I now realize I don’t have a good shot. My camera is filled with pictures of the Little Prince, with only a few food shots sprinkled here and there… Here’s what you might end up with if you make these pesto chicken stuffed shells.

Except I couldn’t find shells at the grocery store, so I stuffed manicotti instead. I also made this with a dairy-free cream cheese substitute, but I used real parmesan (the dish is therefore lactose-free, though not dairy-free). I also omitted the garlic, since it was the early days of breastfeeding, but obviously it would be good with garlic too! The Engineer and I both loved this dish, and I’ll definitely be making it again.

12-16 jumbo pasta shells (or manicotti)
4 oz. cream cheese substitute (such as Tofutti), softened
1 cup freshly grated parmesan + ¼ cup for topping
3 Tbsp. prepared pesto (homemade or store-bought)
2 cups shredded cooked chicken (I used 2 breasts)
2 cloves garlic, minced (if desired)
salt and pepper, to taste

In a large pot over high heat, boil water and prepare pasta shells as directed on package. Cook pasta shells only until al dente; the pasta will finish cooking when the dish is baked. Drain the pasta shells and set aside.

In a large bowl, combine the rest of the ingredients, except the ¼ cup of cheese for the topping. Fill the pasta shells with the filling and place in a baking dish. Sprinkle the remaining ¼ cup of cheese over filled shells.

Freeze if desired, and thaw overnight in the fridge before continuing.

Preheat oven to 350 °F and bake shells covered for 30 minutes, then uncovered for 10 minutes, or until shells are bubbling hot and cheese melts.


If you are in the mood for chicken, though, you might also try this parmesan chicken cutlet recipe from Bon Appétit. It was actually created with a freezer in mind, and it worked beautifully. I’m sure the basic principle would work with any breaded chicken or pork recipe you like, too. You just need to come up with a side dish, but in a pinch, a green salad works fine.

¾ cup all-purpose flour
2 large eggs
1½ cups panko (Japanese breadcrumbs)
¼ cup grated parmesan
1 Tbsp. mustard powder
Kosher salt and freshly ground black pepper
4 small skinless, boneless chicken cutlets (about 1½ lb. total), pounded to ¼” thickness
8 Tbsp. vegetable oil, divided
1 lemon, halved (for serving)

Place flour in a shallow bowl. Beat eggs in a second shallow bowl. Combine panko, parmesan, and mustard powder in a third shallow bowl and season mixture with salt and pepper.

Season chicken with salt and pepper, then dredge in flour, shaking off any excess. Transfer to bowl with beaten egg and turn to coat. Lift from bowl, allowing excess to drip back into bowl. Coat with panko mixture, pressing to adhere.

Chicken can be breaded 3 months in advance. Place between pieces of freezer paper or waxed paper and freeze in resealable freezer bags. Thaw before continuing.

Heat 6 Tbsp. oil in a large heavy skillet or a cast-iron skillet over medium-high heat. Working in 2 batches, cook cutlets, adding remaining 2 Tbsp. oil to pan between batches, until golden brown and cooked through, about 4 minutes per side. Transfer cutlets to a paper towel–lined plate and season with salt. Serve with lemon.

Thursday, August 08, 2013

Hear ye, hear ye!

To use the royal British phraseology, I was safely delivered of a son on July 25th, 2013, hence the silence on the blog since then. The Engineer and I are adjusting to our new roles as parents, so I won’t be posting with the same frequency as before (although we did try a few of the dishes I’d frozen ahead of time, and at least one is make-again good – more on that later – and I’m still bookmarking links for the “weekly” round-ups, though I couldn’t tell you when the next one will be).

I’d long ago decided to try to respect my son’s privacy the same way I’m respecting the Engineer’s, so I’m not telling you his name (although I will say that he weighed in at a whopping 10 lb. 6 oz. at birth for 22 inches in length, so he is somewhat Texas-sized). His nickname on the blog will be the Little Prince. I realize the timing of it is somewhat unfortunate, as people right now will assume I’m referring to that little prince, but really in my mind it’s always been a reference to this little prince.

I’ll leave you with two pictures, because as a new mother, I do think my baby is the most beautiful little boy there is.

Wednesday, July 24, 2013

Pasta with Yogurt and Peas


I found this recipe on Orangette, where Molly Wizenberg adapted it slightly from Jerusalem (a cookbook about which I’ve heard a lot of good things). This pasta dish seemed right up my alley, what with the Greek yogurt and peas and garlic folded in. It also has a spicy sauce (well, oil and chile flakes and pine nuts) that I thought the Engineer would like. I felt so confident about it that I decided to follow the recipe as it was, without reducing the amount of chile pepper like I normally do, and I only put a little bit on my pasta (mostly pine nuts), while I gave more to the Engineer. Yowza! That was way too spicy for me (though it should be noted that it did not bring on labor), and he didn’t like how oily it was. So we actually chucked the sauce and, on the second night, I topped the dish with plain toasted pine nuts and that was much better for us. Obviously you are free to use the spicy sauce and adjust it to your liking, but we’re going to stick to just the pasta. On the bright side, I really liked this dish! The recipe makes about 6 servings.

For the pasta
2 ½ cups (500 g) whole-milk Greek yogurt (lactose-free kinds are often fat free, though)
6 Tbsp. olive oil
2 medium cloves garlic, crushed or pressed
1 pound (500 g) fresh or thawed frozen peas
Kosher salt
1 pound (500 g) pasta shapes of your liking (I recommend conchiglie, little shells, because of the peas)
1 2/3 cups (40 g) basil leaves, coarsely torn
8 ounces (240 g) feta cheese, coarsely crumbled (this is not lactose-free, but the saltiness adds to the dish)

For the spicy sauce (optional)
1/3 cup olive oil
Scant ½ cup pine nuts
2 tsp. Turkish or Syrian chile flakes, or red pepper flakes

In the bowl of a food processor, combine the yogurt, 6 Tbsp. the olive oil, the garlic, and 2/3 cup (100 g) of the peas. Process to a uniform pale green sauce, and transfer to a large mixing bowl. (So, I’m operating with pregnancy brain again and accidently put in 2/3 of the peas, not 2/3 cup of the peas. The bright side is that more of them were incorporated into the sauce, making it easier to trick certain people into eating their peas, but I did add a bit of pasta water to help with the consistency.)

Meanwhile, bring a large pot of water to a boil, and salt it until tastes like pleasantly salty seawater. Add the pasta, and cook until it is al dente.

If you are making the sauce: while the pasta cooks, warm the remaining olive oil in a small frying pan over medium heat. Add the pine nuts and chile flakes, and cook for 4 minutes, or until the pine nuts are golden and the oil is deep red. You can also opt to toast some pine nuts in a pan, plain, or omit those entirely.

Also, warm the remaining peas in some boiling water (you could scoop out a bit of the pasta water for this), then drain.

Drain the cooked pasta into a colander, and shake it well to get rid of excess water that may have settled into the pasta’s crevices. Add the pasta gradually to the yogurt sauce; adding it all at once may cause the yogurt to separate. Add the warm peas, the basil, feta, and 1 tsp. kosher salt (if desired). Toss gently. Serve immediately, with pine nuts and chile oil spooned over each serving if desired.

Odds and ends - Product reviews

I figured I’d do a little round-up of frozen treats I’ve enjoyed lately. First, there’s the vanilla “ice cream” by Nada Moo, made with coconut milk (it happens to be vegan and gluten-free, too). There’s a warning that it contains tree nuts, but it appears to refer only to coconuts, which aren’t actually nuts. That being said, other flavors include pecans, and I’m not sure if they’re made in the same factory or not… I also tried the chocolate flavor, but I have to say I did not like that one – it felt like there was too much water in the mixture, perhaps, as the ice cream was hard and somewhat bland. The vanilla, on the other hand, was creamy and tasty and very satisfying!

Another new-to-me frozen dessert is Coconut Bliss in Salted Caramel and Chocolate. Coconut Bliss brand has consistently been one of my favorites, but this flavor is just awesome. There are dark chocolate shavings, plus a soft caramel swirl that’s just the right amount of salty to contrast with the sweetness of the coconut milk ice cream. There are no allergen warnings on the package, and the product is vegan/pareve, soy-free, gluten-free, organic and fair trade – and although those things are all nice, just the taste sold me.

We also went to Trader Joe’s for the first time, as we now have one in town. I tried their non-dairy frozen dessert (made with coconut milk) in strawberry flavor, and was pleasantly surprised! It tasted like real strawberries, and was creamy like ice cream, so all in all, it was a great discovery. (The only allergen warning is coconut.) While we were there, we also picked up more of their famous house-brand products, all of which were hits: pork dumplings, maple leaf sandwich cookies, Fruity O’s (fruit-loop style cereal made with natural food coloring), crumpets, blueberry juice (unsweetened, so I found it best mixed with lemonade), aioli garlic mustard sauce and red velvet chocolate cupcakes (not very red, definitely not lactose-free, but delicious). Plus non-pareils, dark chocolate peanut butter cups, and vanilla meringues, though those are more treats than real food… And there was so much more stuff that looked good! We rarely buy premade food, but these items were both good and inexpensive, so hopefully we’ll go back and stock up every once in a while (particularly when we have less time to spend in the kitchen later this summer).

While at our regular HEB store, I also tried two new products. First, a marshmallow cereal by Bear River Valley, which is basically a healthier version of Lucky Charms. It still has sugar, obviously, but all the colors and flavors in the marshmallows are natural, the cereal is made with whole grain oats, and there are no artificial preservatives, hydrogenated oils or HFCS. I’m really enjoying them! I also tried a new kind of jam, made by Zena, and it’s – get this – baobab jelly! It’s got the consistency of chestnut paste, and a faint aftertaste of citrus. It actually tastes surprisingly familiar, or perhaps I should say less exotic than I expected, and I loved it on a croissant. They also make have flavors like mango, papaya, lime, hibiscus, coconut and pineapple. The company is based in Senegal and employs 90% women, giving back 1% of profits to non-profit organizations that support the education of young children. I need to eat breakfast with jam more often – it seems that I pair it more with croissants than toast, and I rarely have croissants, but I love them so!

And while we’re at it, a quick round-up of our outings so far this year: I talked about our outings to the Tower of the Americas and the Asian Festival (January and February). In March, we went to Corpus Christi, where my favorite part of the trip was walking along the beach on Mustang Island. We went to Fredericksburg the week after, to see wildflowers, bluebonnets in particular, and to eat great burgers. Then in May, there was our trip to New Orleans, which I loved. We didn’t actually do anything in June or July, because I have to admit I’m getting tired and unmotivated. I’m sure we’ll get back in the swing of things in the fall, perhaps picking something easy and baby-friendly from this list of 52 things every San Antonian must do – I think I’ll enjoy crossing items off that one!

Monday, July 22, 2013

Honey Ginger Tofu with Quinoa and Kale Pilaf


This recipe is from Châtelaine. I made it with plain quinoa instead of red quinoa (which seems hard to come by, here), but it was really good. I also like how easy the whole meal was to prepare! I love having instructions for a balanced meal all in one recipe, particularly when it’s an easy meal. This was really good, too – for a vegan version, use syrup instead of the honey. We got 4 servings out of this, though be warned that they’re not big servings.

For the honey-ginger tofu
350-g. package extra-firm tofu
2 Tbsp. low-sodium soy sauce (or GF tamari sauce)
1 Tbsp. honey
2 tsp. grated ginger
1 tsp. canola oil

Pat tofu dry with paper towels. Cut into 2 squares crosswise, then cut each lengthwise, forming 4 pieces. Cut each piece diagonally, making 8 triangles. Stir soy with honey, ginger and oil in an 8 × 8-inch baking dish. Add tofu and turn each triangle to coat. Let stand 15 min.

Heat a non-stick frying pan over medium. Add tofu, reserving marinade. Cook until dark golden, 2 to 3 min per side. Serve with quinoa and kale pilaf (see below). Drizzle with reserved marinade.

For the quinoa and kale pilaf
1 tsp. canola oil
½ onion, finely chopped
1 cup vegetable broth
½ cup water
1 cup red quinoa, rinsed and drained
1 bunch kale, chopped, about 8 cups

Heat a medium saucepan over medium. Add oil, then onion. Cook until soft, about 3 min. Add broth and water. Bring to a boil. Stir in quinoa, then reduce heat to medium-low. Simmer, covered, until tender, about 20 min. Stir in kale until it wilts, 2 to 3 min. Remove pan from heat.

Saturday, July 20, 2013

Knitting round-up

Alright, so here’s a round-up of what I’ve been knitting lately. I’ve been doing my best to knit from my stash, so to speak, using up yarn that I already had, but I couldn’t resist a few more purchases last month (one of which is for Baby’s Christmas outfit, so hopefully I’ll have time to make it in the fall).

First, I made this sunnyside baby cardigan, a free pattern by Tanis Fiber Arts. The yarn had been in my stash for only a little while, and it was Sublime Baby Cashmere Merino Silk DK in color 337. This cardigan was my first foray into cables – I don’t know why I waited so long, because cables look fantastic and they’re really not hard! It’s knit in one piece from the top down, and I think those have become my favorite kind of pattern. I got the buttons at Hobby Lobby a while back and those were in my stash, too.


I then made a seamless kimono found on Ravelry. I made it with a waist band in contrasting pattern, though I kept using the same color; I could also have kept the whole thing in stockinette stitch like this, but it would have looked a bit plain with my solid-colored yarn – a variegated one would have worked better. My yarn was Debbie Bliss Rialto Lace in color Sky, though I used two strands of it for this kimono. (Actually, always using it two strands thick, I got a total of 4 baby sweaters from 4 skeins. And it’s so, so soft!)


I also made another puerperium cardigan in green, with star-shaped buttons this time, for a neighbor, who is having a little girl next month; plus another cardigan from Sirdar’s Early Arrivals 3, again with Debbie Bliss Rialto Lace in color Sky and star-shaped buttons (this one for us).


At that point, I had only a little of the green yarn left one the penultimate skein and even less of the bossa nova left at all, so I used them to make two pairs of booties. The green ones sorta remind me of Shrek feet… The multicolor ones are in a smaller size, and I fudged it at the end because I didn’t even have enough yarn to do the soles properly – it’s not like the baby will be walking in these anyway, though, and after washing and blocking, they look just fine.


After that, I went way back into my stash for something I’d put off for a long time: a sweater pattern by Phildar that I found at Mouliné in Montreal. The sweater had been knit as a demonstration product and I just fell in love with it, so the store owner gave me a photocopy of the pattern, as she said it was out of print (though the link I gave you is from Ravelry, so there might still be a way to get your hands on it). I bought Cascade 220 Heathers Yarn in color 2444 to make it – I bought the yarn at Mouliné, but the link above is to Jimmy Beans Wool, in case anyone is interested. In person, this yarn is much less pink than on the image at the link; it’s more of a coral color that I felt looked quite autumnal, though perhaps a little more orange would make it more unisex. The colors on my photo are accurate. I used 1.5 out of my 3 skeins for this, so I still had enough for another project (see last cardigan below).


This next cardigan is feminine, with leaf patterns for the buttonhole band, but I figured it was appropriate for my yarn, since it had a sparkly thread in it and that, to me, isn’t great on boys. It’s Cascade, by Petite Purls, and the yarn was Berroco Bonsai Yarn in Akane Red, which is 97% bamboo cellulose and 3% sparkly nylon. It’s a ribbon yarn, which may not have been the perfect structure for the cardigan. I used wooden buttons from my stash. Overall, while the pattern wasn’t really complicated, I’m not crazy about the result. Well, at least the bamboo is breathable, so I’ll probably get some mileage out of it – assuming I have a girl at some point.


I followed this up with the Provence Baby Cardigan by Classic Elite Yarns (note that the link is full of spam, but does contain the free pattern), again with the green yarn that won’t quit and wooden buttons from my stash. This was knit in pieces (front left, front right, back and two sleeves), and while this is how I used to make all my baby cardigans a few years ago, it now feels surprisingly amateurish because of all the seams you have to create afterwards! It is cute, though.


I then made what might be my new favorite pattern with the last of the blue merino yarn: a garter yoke baby cardigan. This one is knit in one piece from the top down, and it’s pretty fast work, too. I paired it up with this hat, but I knit the edge in garter stitch instead of ribbing, so that it would match the sweater. I hope I get around to making another one! As it is, this one is for dear friends of ours who are expecting a baby boy this fall – I didn’t get around to mailing it yet, so I guess they’ll see it here before they receive it, but it’s the thought that counts, right?


I got around to making a cardigan based on this image. It’s adapted from an existing pattern on Ravelry, but I decided that I could make something similar without buying the pattern, and I was right! I used the softest grey yarn in sport weight, Blue Sky Alpacas, and combined three patterns I already had: the Little Pearl Vest for the shoulders, the Pebble Yoke Cardigan for the body (sleeves and button band), and the V-neck Baby Vest for the line pattern on the body. The yarn I used probably wasn’t the best choice, though, as it is a bit fluffy (and shedding), so it doesn’t show the line pattern very well. It is so soft, though, that I really don’t care!


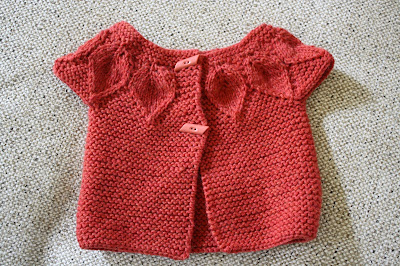
Finally, I made a cardigan based on this beauty. I emailed both the recipient of the cardigan (well, her mother) and the knitter, but neither one had a pattern – it turns out the knitter just improvised it based on a photo and knit it in three days. I’m not that good, but I wasn’t going to give up, especially given that I had the exact same yarn (1.5 skeins of leftover Cascade 220) along with exactly 2 matching buttons from my stash. So I decided to use a cardigan pattern as a base (though I only used it for the first 6 rows of the collar, really) along with a leaf pattern found online. I adapted the knitting to stick as closely to the picture of the original leaf cardigan as I could: 11 leaves spread around the yoke, on a garter-stitch cardigan. For the record, it took me much longer than 3 days: I knit several versions of the leaf to get it to the right scale, then calculated how to space them out evenly on the yoke, did a lot of math on paper, and spent several days literally knitting a few rows and ripping them up because I thought of a modification. The basic idea, if anyone wants to try it, is that when you are increasing the number of stitches on the leaf (in the top half), you need to decrease the number of garter stitches that separate each leaf; then when you decrease the number of stitches in the leaf (in the bottom half, where it tapers off to a point), you increase the number of garter stitches in between the leaves accordingly. I’d also put the second buttonhole higher next time, if I make another one. Overall, though, I’m really happy with it, as it’s by far the most complex thing I’ve ever made without a pattern!

I’m now knitting another kimono, in varied shades of blue, and I’m pretty sure I’ll still be knitting it when the baby comes, but it’s a simple pattern in garter stitch, so I might be able to finish it even with my brain turned to mush from hormones and lack of sleep. And then I’ll get started on the Christmas outfit, part of which will be substantially more complicated.

Birthing choices

I wanted to write up a post about our birthing choices, since this is such a hot topic in the mommy blogosphere. (And after this, I think I won’t post about babies until I actually have one, unless you count knitting.) First off, I’d like to share a post with a great title, The Lazy Birthing Manifesto – because sometimes, having too many choices isn’t a good thing. I do believe in educating oneself about all the options, though, as well as their risks and benefits, and to figure out how this jives with one’s values and feelings. On that topic, here are two awesome posts, one about a woman’s choice to give birth in a hospital setting and another about a woman’s choice to give birth at home, both of which I can understand. It’s interesting to note, however, that in North America, more and more women choose midwives over obstetricians, including in hospital settings. Sometimes it’s to avoid what they consider an unnecessary C-section (like in this case of a breech baby delivered safely in a home setting), and other times it’s to get more humane care (just read some of My OB said what? and you’ll see what I mean).

For various reasons, mostly having to do with being extra cautious, the Engineer and I both agree that the hospital is the best place for me to give birth. We do not have a Baby-Friendly-certified hospital in San Antonio, unfortunately, but we are lucky enough to have a good hospital near where we live. It was built several years ago and isn’t used to full capacity yet, so health care there is more one-on-one than in many places. All the rooms are private, which is a definite plus (along with the fact that the patient controls the lighting and thermostat in her room). Obviously, it’s not perfect: the rate of C-sections for first-time mothers is close to 40% (and is much higher for subsequent births, despite the latest studies on VBACs), although our OB’s rates are lower. Patients can’t eat or drink during labor, there are no birthing pools or hot tubs in which to labor, they don’t supply birthing balls, and as in most hospitals, medical intervention is encouraged even when not necessary. That being said, there are squat bars available for labor, there’s an anesthesiologist at all times so that you don’t have to wait too long for an epidural if you want one, they do have a policy of having the baby rooming in with the mother at all times unless he/she needs to be in the NICU down the hall, they support skin-to-skin contact after birth as well as breastfeeding (and have a lactation consultant on the premises 20 hours a week), and they minimize interventions in the hour following birth to let the parents bond with their baby. Plus, they do have pretty secure facilities, so there’s little risk of having too many unwanted spectators (seriously, some of the comments on this articleare pretty horrific). So even though I’m a little apprehensive about certain aspects, overall, I’d have to say I’m relatively satisfied with this hospital.

I did find out recently that, for certain medical reasons, I am not likely to be induced and quite a bit more likely than average to have a C-section instead of a vaginal birth, which does not thrill me. At all. However, while I am somewhat of a control-freak by nature and I was hoping for a natural childbirth experience, I understand and accept that I can’t control the birth; I just read all I could to set things up in my favor and I’ll make the best of my circumstances when the time comes. (Again, it’s not that I’m against C-sections at large, but I do think they tend to be overused these days. They are of course literally life-saving procedures in some situations, and even some elective C-sections are perfectly justified, as I’ve come to realize. I wouldn’t say that about a woman who, months in advance, schedules the date of her elective C-section before her due date just because it fits her schedule better. But then there’s a big grey area: you might be in a situation where your practitioner says he really doesn’t want you to go over 41 weeks because of the increased risks in your particular case, or he might say that it’s fine to go up to 42 weeks with proper monitoring, and you have to make up your mind based on the level of risk in your specific situation.)

On a side note, the Engineer found this page with a chart showing the probability of delivery resulting from spontaneous labor on every day of the pregnancy after 35 weeks. There’s an obvious peak at 40 weeks exactly, which was to be expected, but it’s interesting to note that there are also smaller peaks at 39 weeks and 41 weeks exactly – we’re theorizing that this is due to a psychosomatic effect. My odds of giving birth on the exact day I’d like are apparently 2.8% (although, now that I’ve made it this far into the pregnancy without signs of labor, I’m assuming that everything being at 0% before today for me means that all other probabilities after today increase accordingly).

Two more links that I like: this awesome video of a water birth, for those of you who’ve never seen one; and this video of labor pains simulated on a man (the post is in French, but the video is in English). There have been more recent simulations that I’ve seen circulating, but this one is the first I saw, so it’s the one I’m sharing. I’m not against epidurals per se, of course, I’m just opposed to having them done so routinely. That being said, I understand that other people have different opinions. When the Engineer and I took our birthing classes, the instructor presented slides with all the pros and cons of epidurals, which reaffirmed in my mind that the ideal choice for me would be to give birth without one, but prompted another couple to ask why they weren’t standard, because all the cons seemed perfectly acceptable to them. So, to each their own.

I’m also aware that the American health care system isn’t necessarily set up in my best interest post-partum. For example, in France, perineal re-education is standard, but here they often just tell you to do some Kegels and send you on your way. I mean, here’s the one time when I would actually want Republicans in my vagina (NSFW) – what a missed opportunity!

Wednesday, July 17, 2013

When life hands you a lemon...

… make vinaigrette. My Meyer lemon tree (bush, really) has decided to grow a second crop of lemons, even though the regular season for citrus is winter, not summer. But hey, who am I to complain? Anything I get from my garden is good news (especially since it doesn’t look like the tomato plants will be doing anything but hanging out in their pots this summer). So, a single Meyer lemon was turned into vinaigrette for a salade niçoise, the latter being a brilliant suggestion from the Engineer as I was wondering what to make for dinner last week. I ended up adapting this recipe, and then I made a few additional changes for myself. As I’ve said before, the Engineer has started taking charge of one meal a week (with leftovers, this often frees me from dinner responsibilities for two days, and it’s absolutely wonderful). That week, he made halibut – and look at that awesome presentation!


Since so we rarely eat fish, it didn’t even occur to me to factor that in until after the first serving of halibut (which, by the way, was actually pretty good for fish, and coming from me, that’s saying a lot). I couldn’t eat both the halibut and the canned tuna in the same week, so I made my salad without tuna; I also made it without olives, because I’ve never liked them. So I guess the Engineer had a niçoise salad and I had a salad? In any case, it was delicious, and I’ll have to keep that in mind when I feel uninspired again! The original recipe calls for tuna steak, which I’m sure tastes better, but canned tuna was just fine this time.

For the dressing
½ cup lemon juice (I had less, and adjusted the oil accordingly)
½ cup extra-virgin olive oil
1 medium shallot, minced
1 Tbsp. minced fresh thyme leaves
2 Tbsp. minced fresh basil leaves (this is the only herb I used this time)
2 tsp. minced fresh oregano leaves
1 tsp. Dijon mustard
salt and freshly ground black pepper

For the salad
2 (5-oz.) cans of tuna (or 2 tuna steaks, seared or otherwise cooked, cut into ½-inch thick slices)
6 hard-boiled eggs, peeled and either halved or quartered
10 small new red potatoes (each about 2 inches in diameter, about 1 ¼ lbs. total), each potato scrubbed and quartered (I used a bag of small potatoes and didn’t need to quarter them, but had way more than 10)
salt and freshly ground black pepper
1 head of Boston lettuce or butter lettuce, leaves washed, dried, and torn into bite-sized pieces
3 small ripe tomatoes, cored and cut into eighths (I used a container of cherry tomatoes)
1 small red onion, sliced very thin (I omitted that and found the shallot was enough)
8 oz. green beans, stem ends trimmed and each bean halved crosswise
¼ cup niçoise olives (or to taste, green olives are fine if that’s what you like)
2 Tbsp. capers, rinsed and/or several anchovies (optional)

Whisk lemon juice, oil, shallot, thyme, basil, oregano, and mustard in medium bowl; season to taste with salt and pepper and set aside.

Bring potatoes and 4 quarts cold water to boil in a large pot. Add 1 tablespoon salt and cook until potatoes are tender, 5 to 8 minutes. When the potatoes are a few minutes from being done, add the green beans to the pot. Drain and let potatoes and beans cool, then mix with a bit of dressing if desired.

Arrange bed of lettuce on a serving platter. Mound tuna in center of lettuce. Toss tomatoes, red onion, 3 tablespoons vinaigrette, and salt and pepper to taste in bowl; arrange tomato-onion mixture on the lettuce bed. Arrange reserved potatoes and green beans in a mound at edge of lettuce bed. (You are free to mix any component of the salad with dressing before plating it, or to plate everything plain and then drizzle dressing over it. Don’t overthink it, it’s salad.)

Arrange hard boiled eggs, olives, and anchovies (if using) in mounds on the lettuce bed. Drizzle eggs with remaining, sprinkle entire salad with capers (if using), and serve immediately.

Mobile et livres

Je vous avais dit que je ferais peut-être de quoi accrocher à un mobile pour la chambre de Bébé. Je pensais alors plus à coudre quelque chose, et j’avais plein d’idées sur Pinterest, mais j’ai fini par trouver deux billets sur Ce que j’ai dans le ventre qui m’ont inspirée. J’ai donc découpé des formes d’animaux volants dans du carton et je les ai recouvertes de joli papier (total de 4,89 $ pour le papier et de 7,59 $ pour le squelette du mobile; j’avais le carton et la colle dans mes affaires, en plus des trombones ronds et de la laine utilisée pour suspendre mes formes). Ce que j’aime surtout, c’est que les formes sont placées de manière à être bien vues par le bébé couché plutôt que par l’adulte qui regarde le bébé. De plus, avec un mobile fixé (solidement) au plafond, pas besoin de l’enlever dans quelques mois, comme ce serait le cas avec un mobile fixé directement sur le lit du bébé. Les ficelles de laine auxquelles sont suspendues les formes peuvent bien sûr être raccourcies, et elles le seront quand Bébé grandira un peu. Je suis bien contente du résultat!


Tant qu’à faire, je voulais aussi vous faire part de mes lectures de grossesse, si on peut dire, afin de vous donner les bons titres (mes deux meilleurs sont en français, en plus!). J’ai lu What to Expect When You’re Expecting : il s’agit de l’ouvrage de référence aux États-Unis pour le déroulement de la grossesse. Il est relativement complet, mais je lui trouve des défauts (certaines inexactitudes, des textes qui deviennent très répétitifs, beaucoup de recoupement avec le site web). Ce que j’ai aimé, par contre, c’est qu’il était adapté à ma situation dans le système médical américain (parce que j’ai lu d’autres livres aussi, mais même ceux en français étaient adaptés pour le système médical français, pas québécois, donc je les trouvais moins utiles). J’ai aussi lu le livre du gouvernement canadien, Mon bébé : je l’attends, je l’élève. Pratique pour beaucoup d’aspects, c’est sûr, mais je trouve que les photos font tellement vieillot! À en juger par le minuscule paragraphe sur les couches en tissu (avec un modèle datant des années 1980), le texte date également. Il serait temps de rafraîchir cet ouvrage…

Pour ce qui est d’un bon livre sur l’accouchement, je recommande fortement Une naissance heureuse, d’Isabelle Brabant (prenez la troisième édition, celle de 2013, plutôt que les autres, ça vaut la peine). C’est plus de 500 pages vraiment pleines de renseignements et de témoignages concernant la fin de la grossesse et toutes les phases de l’accouchement, ainsi que la période périnatale. De plus, si vous prévoyez un accouchement dit « naturel » (accouchement par voie vaginale avec un minimum d’intervention médicale), c’est vraiment le livre qu’il vous faut. Après l’avoir lu, je me sentais vraiment bien outillée pour affronter ça. Le défaut, par contre, et je m’en rends compte seulement maintenant, c’est que je ne me sens pas préparée pour subir une césarienne, car à cause de mon cas spécifique, il se peut que ce soit là la solution la plus sécuritaire pour mon bébé. J’ai l’impression de ne pas avoir de ressources pour faire mon deuil de l’accouchement désiré et je ne sais pas encore comment réagir si je dois « être accouchée » plutôt que « donner naissance ». La plupart des gens disent qu’il faut se concentrer sur le fait que le bébé est en santé, que c’est ça l’important, mais ça nie souvent les sentiments de la mère… En tout cas. J’ai aussi aimé 50 questions sur l’accouchement, de Sophie Rondeau, un condensé des questions les plus fréquentes qu’on peut se poser.

Pour s’occuper du bébé lui-même, je recommande Mode d'emploi de mon bébé : Conseils de dépannage et instructions de maintenance pour la 1e année d'utilisation. Ça a l’air d’un livre écrit pour blaguer, mais en fait, c’est plein de trucs utiles, écrits de manière très divertissante! Enfin, si vous prévoyez allaiter, lisez mon autre coup de cœur : Bien vivre l’allaitement, par Madeleine Allard et Annie Desrochers. Il s’agit de l’ouvrage le plus complet que j‘ai lu sur le sujet, écrit par des femmes qui ont allaité, et contenant à la fois des informations médicales et des conseils pratiques, en plus de témoignages autant de professionnels de la santé que de mères expérimentées. Je l’ai lu une fois et j’ai bien l’impression que je vais le consulter souvent au cours des prochains mois (il est d’ailleurs dans ma valise d’hôpital).

[Mise à jour : J’oubliais! J’ai aussi un livre de bébé vraiment génial, que j’avais à l’œil depuis quelques années et que j’ai fait venir du Canada pour l’occasion : La Bête, par Francis Léveillée et Ève Dumas, des Éditions La Pastèque. C’est un livre rigolo, pas kitsch du tout, et qui réussit à regrouper les moments importants tout en gardant un sens de l’humour. J’adore!]

Friday, July 12, 2013

Batch of links

- Because this made me laugh: 15 food blogger trends that need to go and 8 food blogger trends that need to stay (since this is subjective, there are some contradictions, but I agree with the bulk of each post).

- I’ve always been under the impression that spinach contained TONS of iron, but it turns out that’s been debunked as early as 1937 – it was a transcription mistake, where moving a decimal comma changed a value by a whole order of magnitude. And yet most people are unaware of this nearly 80 years later, because of how the information was spread in the first place!

- There’s a new gadget, Codlo, that promises to turn one of your existing appliances, like a slow cooker, into a sous-vide machine simply if you plug the latter into Codlo, and Codlo into the outlet. It overrides the slow cooker’s mechanism and sets the temperature precisely for sous-vide cooking. It should be on the market in the fall, and I can definitely see people buying it to try sous-vide cooking at home without buying a whole new appliance.

- Bad news for Christians who are gluten intolerant, gluten sensitive or allergic to wheat: the body of Christ cannot be gluten-free, so forget about those rice wafers. (Personally, I think the failure of the Church to get with the times, regarding so many topics, is the main reason it’s losing followers.)

- Looks like I spoke too soon, as the latest Texas abortion bill is expected to pass state legislature, maybe even today. Overturning the will of the people really didn’t take long. No more filibusters to interrupt voting! I even read an article this morning where Lieutenant Governor David Dewhurst basically says that this is a democracy and the process will not be interrupted by the people. (I understand what he meant to say, but hopefully you get my point as well.) Not only would this force the vast majority of the state’s abortion clinics to close (leaving a total of 5 clinics for what is essentially the largest of the contiguous states and second most populated in the country), but it would ban all abortions after 20 weeks of gestation. I don’t even know where to direct my anger first!

Women who get abortions after 20 weeks are most certainly not using this medical intervention as a form of birth control; abortions at that point are usually done for the health (both mental and physical) of the pregnant woman, and even that is restricted enough as it is. I mean, here’s just one example of why I think that a fetal heartbeat should not be the only criterion to decide whether or not an abortion is optional – “This is not science. It is the tyranny of a metaphor.” I know two women who have been in that situation in the second half of their pregnancy and had to terminate it, and believe me when I say that it certainly wasn’t a decision they took lightly. I’m happy for them that at least, they were in Quebec and got more humane health care than they would have in some American states.

Governor Rick Perry has actually been quoted as saying, “Until the day Roe v. Wade is nothing but a shameful footnote in our nation’s history books, we won’t give up the good fight.” I think he’s a misguided idiot. On the bright side, he won’t seek to get re-elected next year, but I just hope that means he wants to quietly retire instead of trying to be the presidential candidate again…

- In Ohio, Democratic Senator Nina Turner’s erectile dysfunction bill (SB307) is an attempt to fight back. “The bill is meant to inflict the same sort of humiliation and violation of privacy on men as mostly male legislators are inflicting upon women across the country, but is wisely being sold under the exact same disingenuous ‘concern’ as Republicans sell their attempts to control women’s wombs.” You should really go read the specifics; this bill is a thing of beauty, in light of recent events.

- Did you know there’s a small town right here in the US where cars have been banned since 1898? Now I really want to go there on vacation.

Batch of links - Interviews

- Kitchen tour with Karen Morgan, a gluten-free baker living in Austin. Her virtual store, Blackbird Bakery, is here, and it includes recipes!

- Not really an interview, but a discovery for me: Alex Thomopoulos, the down-to-earth host of a gluten-free cooking show. The current season focuses on comfort food, and those red velvet cupcakes are calling out to me…

- Joshua Weissman used to be overweight and was bullied in school. Then, just a teenager, he began cooking healthy for himself and his family, lost 100 pounds, and created a great food blog, Slim Palate. The cheerleaders at his school even come to him for nutritional advice now. This guy is awesome!

- Two interviews with Deb Perelman, of Smitten Kitchen: one with The Kitchn which includes a kitchen tour, one with The New York Times. I’m a fan of her blog, as you know, but I really like that this self-taught home-cook also has a best-selling cookbook!

- OK, so this is an article, not an interview, but it’s by and about Martha Rose Shulman, a health maven moonlighting as a pastry recipe tester.

Batch of links - Cooking Tips

- The secret to taller, flakier scones. I’ve made some pretty damn good scones in my life, but lately, they all seem to come out flat and tough. Maybe I should use that tip…

- How to get a domed muffin top every time – and it’s not about the leavening agents.

- How to cut a mango. My technique is slightly different, because I peel mine first.

- For perfect bacon, add water to the pan. Huh.

- A secret ingredient to prevent pie crusts from shrinking as they bake.

- How to make perfect crêpes - there’s a surprising secret ingredient, but technique is important, too.

- Help! My homemade bread is too dense! I almost always use white whole wheat flour, but it had never occurred to me to add vital wheat gluten to compensate…

- Three ways to freeze cupcake batter, if you don’t want to freeze the baked cupcakes.

- How to guestimate cacao percentage in chocolate, assuming you still have the packaging.

- 28 tips and tutorials about meat, which should have you covered!

- How to make creamy tomato soup without cream; I assume this would work with other kinds of soup, too.

- And finally, from the folks behind the wonderful blog Dinner – A Love Story: 100 rules of dinner. I only disagree with a few items, but most are right on.

Thursday, July 11, 2013

French Apple Cake


I know I’ve made apple cake on several occasions, but this one is different. It is absolutely nothing like the thick, heavy spiced apple cake I’ve mentioned, and it isn’t quite like Bubbie Gilda’s apple cake nor is it like apple tart cake. The batter is light, and there is almost less of it than there are apples, making the cake very moist. You also have to make sure to use the rum, which is essential to the taste here. I’ve had cake like this before, and the name “French apple cake” really seems like the perfect description. As it the case with many recipes meant for the home cook, it is a homely-looking dessert, but don’t let that deter you. The recipe is from David Lebovitz’s blog, and he adapted it from a Dorie Greenspan recipe. Since a mix of apples is recommended, I used 2 Granny Smith apples and 2 Jazz apples, and I give this cake 2 thumbs up.

¾ cup (110 g.) flour
¾ tsp. baking powder
pinch of salt
4 large apples (a mix of varieties; see note above)
2 large eggs, at room temperature
¾ cup (150 g.) sugar
3 Tbsp. dark rum
½ tsp. vanilla extract
8 Tbsp. (½ cup or 1 stick) butter or margarine, melted and cooled to room temperature

Preheat the oven to 350 °F and adjust the oven rack to the center of the oven. Heavily butter an 8- or 9-inch (20-23cm) springform pan and place it on a baking sheet. (I used a 9-inch pan.)

In a small bowl, whisk together the flour, baking powder, and salt.

Peel and core the apples, then dice them into 1-inch (3-cm) pieces.

In a large bowl, beat the eggs until foamy then whisk in the sugar, then rum and vanilla. Whisk in half of the flour mixture, then gently stir in half of the melted butter. Stir in the remaining flour mixture, then the rest of the butter.

Fold in the apple cubes until they’re well-coated with the batter and scrape them into the prepared cake pan and smooth the top a little with a spatula.

Bake the cake for 50 minute to 1 hour, or until a knife inserted into the center comes out clean. Let the cake cool for 5 minutes, then run a knife around the edge to loosen the cake from the pan and carefully remove the sides of the cake pan, making sure no apples are stuck to it.

Tuesday, July 09, 2013

No-Churn Raspberry-Peach Sorbet

I got this recipe in last month’s Real Simple and I just couldn’t wait to make it. It calls for a food processor, which I’m sure works, but this time I just had to use my new baby… a Vitamix 300. (It’s my new baby until the actual baby gets here, so for a very short time only.)

I made this sorbet with 24 oz. of frozen raspberries instead of 20 oz., so I increased the sugar to about ¾ cup, but next time I think that syrup (simple syrup or maple syrup) would be better. I LOVED how smooth the sorbet was with the Vitamix blender! It did get very hard after a day in the freezer, though, but letting it thaw on the counter for a bit before serving it fixes the issue. Plus, I love how intensely pink it is and how strong the flavor of raspberry is, too! This is a great summer dessert.

2 10-oz. bags frozen raspberries
1 cup frozen sliced peaches
½ cup sugar (I’d consider syrup)
Pinch of table salt

Place the raspberries, peaches, sugar and salt in a food processor and pulse until coarsely chopped. Continue to process until smooth, 6 to 8 minutes, scraping down sides as necessary. Transfer to an airtight container and freeze until firm, at least 1 hour.

Thursday, July 04, 2013

Almond Meal Cookies with Coconut and Cacao Nibs


I got this recipe from The Sprouted Kitchen cookbook. It happens to be gluten-free, and a recipe note says it can be made vegan by using 1 Tbsp. ground flaxseed + 3 Tbsp. water instead of the egg (you’d be giving up a bit of the leavening power, but this mixture would act as a binder). It was while reading this note that I noticed it mentioned not to use a silicone mat, because it would prevent the bottom of the cookies from getting crispy and they might fall apart. I must say that I did not encounter this problem, at least not after the cookies had cooled down, but I should still advise you to use just a baking sheet (perhaps you could still line it with parchment paper, just in case the cookies stick). The Engineer and I both liked these cookies; they tasted a little like macaroons, and since the recipe calls for cacao nibs instead of chocolate, they’re really not that sweet (although you could probably use mini chocolate chips instead if you wanted).

1 ¼ cups almond meal
¼ cups cacao nibs
½ cup unsweetened shredded coconut
½ tsp. baking powder
¼ tsp. sea salt
1/3 cup muscovado sugar
1 egg (see note above)
3 Tbsp. coconut oil, melted
½ tsp. pure vanilla extract

In a large mixing bowl, stir together the almond meal, cacao nibs, coconut, baking powder, salt and sugar.

In another bowl, beat the egg very well until it is a uniform color and doubles in volume. Whisk in the coconut oil and vanilla extract. Add the wet mixture to the dry ingredients and mix until just combined. Refrigerate bowl for at least 30 minutes and up to overnight.

Preheat the oven to 375 °F. Using your hands, roll the chilled dough into balls no larger than 1 inch in diameter. Place on baking sheet with 1 ½ inches between them, and give them a gentle press with the palm of your hand to flatten them slightly. Bake until edges just begin to brown, about 7-10 minutes. Remove from the oven and let cool before serving.