Tuesday, November 17, 2020

Tarte bleuets et chocolat


Parfois, il y a de ces recettes qui ont l’air toutes simples, mais dont le résultat est décevant (comme ce gâteau au chocolat et à l’huile d’olive). Et il y en a d’autres qui ont l’air compliquées (comme une tarte aux bleuets, au chocolat noir et au sarrasin, avec en plus une épice inattendue), mais qui, en fait, ne le sont pas tant que ça, et sont délicieuses de surcroît. 

C’est une recette qui vient du site Épices de cru. L’épice « inattendue » ici est la coriandre, qui se mariait à merveille avec les bleuets! Je ne pouvais pas vraiment la distinguer en goûtant la tarte, mais selon la recette d’origine, c’est son goût acidulé qui rehausse celui des fruits. Je me demande maintenant ce que ce serait avec de la cardamome… 

La croûte est faite de farine de sarrasin. J’ai utilisé la farine de sarrasin blanche de Bouchard Family Farms, mais j’aurais sans doute dû en prendre une plus foncée et plus goûteuse. Honnêtement, je n’ai pas trouvé mon bonheur avec cette croûte, car j’ai dû y ajouter 1 c. à soupe d’eau pour qu’elle tienne, mais la croûte a ensuite fondu au four. Peut-être qu’il aurait fallu la réfrigérer avant de la faire cuire? Je pense qu’une croûte chocolatée faire avec de la farine de blé conviendrait. Je réécris les instructions pour que ce soit un peu plus clair. 

Ai-je besoin de préciser que c’était absolument délicieux? 

Pour la croûte 
1 tasse de farine de sarrasin (voir note plus haut) 
¼ tasse de cacao, tamisé 
¼ c. à thé de sel 
½ tasse de beurre ou de margarine sans lactose, à la température de la pièce 
¾ tasse de cassonade 

Pour la ganache 
1 tasse (175 g / 6 oz) de chocolat noir haché 
1 tasse de crème sans lactose ou de lait de coco (je l’ai faite avec du lait de coco) 

Pour la garniture aux bleuets 
½ tasse de sucre 
3 c. à soupe de fécule de maïs 
jus de ½ citron 
2 c. à thé de coriandre moulue finement 
3 tasses de bleuets 

Pour la croûte 
Préchauffer le four à 375 °F et placer la grille au centre du four. Huiler légèrement un moule à tarte à fond amovible de 9 pouces. 

Dans un bol, mélanger ensemble tous les ingrédients secs. 

Dans un bol à part, crémer ensemble le beurre et la cassonade. Incorporer les ingrédients secs au beurre et à la cassonade afin de créer une pâte homogène. 

Presser la pâte dans le moule afin de former une croûte fine et uniforme d’environ 1 cm d’épaisseur. (La mienne était bien plus fine – je n’en aurais pas eu assez pour faire 1 cm d’épaisseur!) 

Cuire de 15 à 20 minutes, puis laisser refroidir sur une grille. Réserver. 

Pour la ganache 
Placer le chocolat dans un bol résistant à la chaleur. Réserver. 

Verser la crème dans une petite casserole et la porter à ébullition. Retirer immédiatement du feu. Verser la crème sur le chocolat et laisser reposer sans mélanger une ou deux minutes. 

Fouetter la ganache jusqu’à l’obtention d’une texture lisse et homogène. Verser la ganache encore tiède et malléable dans la croûte et réfrigérer jusqu’à ce qu’elle se solidifie (environ 1 heure). 

Pour la garniture aux bleuets 
Dans une casserole, mélanger le sucre, la fécule de maïs, la coriandre et le jus de citron. 

Ajouter les bleuets et cuire à feu vif en mélangeant sans arrêt (délicatement afin de ne pas écraser les bleuets) jusqu’à ce que la préparation épaississe et nappe le dos d’une cuillère. (On peut la couvrir et la réserver à la température de la pièce jusqu’à ce que la ganache soit prête.) 

Verser la garniture aux bleuets sur la tarte et l’étendre à l’aide d’une spatule. Réfrigérer la tarte environ 1 heure avant de servir, afin que la garniture ait le temps de se solidifier.


Sunday, November 15, 2020

Baked Gnocchi with Spinach and Sausage

This baked gnocchi dish is near perfect: simple to make, comforting, and a relatively easy sell with the kids, despite the spinach. The white beans actually blend in with the gnocchi pretty well, so there’s a chance your kids will eat some by mistake. You can even replace the sausage with a vegetarian version if you want. And you can use half a 10-oz. package of frozen spinach instead of fresh, but make sure it is thawed and squeeze out all excess water. This was really good! 

1 Tbsp. olive oil, plus more for coating the baking dish 
1 lb. uncooked sweet or hot Italian sausages 
1 medium yellow onion, diced 
4 cloves garlic, minced 
kosher salt 
freshly ground black pepper 
2 Tbsp. tomato paste 
1 (28-oz) can whole peeled tomatoes 
1 (14-oz) can tomato sauce 
8 oz lactose-free fresh mozzarella cheese 
¼ cup grated parmesan cheese 
2 (15.5-oz) cans white beans, drained and rinsed 
5 oz baby spinach (about 5 packed cups) 
1 lb. refrigerated, shelf stable, or frozen gnocchi 
 fresh basil leaves, for garnish 

Arrange a rack in the middle of the oven and heat the oven to 425 °F. Lightly coat a lasagna pan (a 9x13-inch pan that’s at least 3 inches deep) or 3-quart baking dish with olive oil. Alternatively, you can use a 9x13-inch baking dish that's 2 inches deep, but it will be very full. (That’s what I did, and it honestly wasn’t a problem.) 

Heat olive oil in a large heavy-bottomed pot or Dutch oven over medium heat until shimmering. Remove the casings from sausages, add to the pan, and cook, breaking up the meat into smaller pieces with a wooden spoon, until browned, beginning to crisp, and cooked through, 6 to 8 minutes. 

Add the onion, garlic, ½ teaspoon kosher salt, and several grinds black pepper to the pot and cook until the onion is softened, 6 to 8 minutes. Add tomato paste and cook, stirring, until well-incorporated and darkened slightly in color, 1 to 2 minutes. Add whole peeled tomatoes and their juices, breaking up the tomatoes with your hands as you add them to the pot, and tomato sauce. Taste and season with salt and pepper as needed. 

Bring the sauce to a simmer and cook until thickened slightly and the flavors have developed, about 15 minutes. Meanwhile, drain mozzarella cheese if needed, then grate on the large holes of a box grater. (Pro tip: Use non-stick spray on the grater to prevent the fresh mozzarella from sticking to it too much.) Also grate the parmesan if you haven’t done so already. 

Remove the pot from the heat. Add spinach to the sauce one handful at a time, stirring as you go. Stir in the white beans and gnocchi. Transfer the mixture to the prepared baking dish. Top with the mozzarella, followed by the parmesan cheese. 

Bake until the casserole is bubbling and the cheese is browned, 30 to 35 minutes. Let cool for at least 10 minutes. Top with fresh basil leaves just before serving.


Saturday, November 14, 2020

Gardener's Raw Vegetable Salad


I thought I’d write this post to share this easy barbecue chicken en papillote from Weelicious, which I made with the maple barbecue sauce from Keepers. It was a fine chicken recipe, though the sauce was just okay. But it was the side dish that really wowed me: this gardener’s raw salad from The Kitchn. I adapted it slightly, reducing the amount of oil and omitting the finely chopped red bell pepper in the dressing, since there’s already red bell pepper in the salad itself. The amounts below are mine. 

I really, really loved this, much more than I thought I would. I think I’ll make it every summer! Sadly, the rest of my family wasn’t keen on it, so I had lots and lots of leftovers. 

For the dressing 
¼ cup red wine vinegar 
1 clove garlic, sliced 
1 tsp. Dijon mustard 
½ tsp. sugar 
½ tsp. salt 
¼ cup olive oil 
additional salt and pepper, to taste 

For the salad 
yellow squash and zucchini, thinly sliced 
sugar snap peas, cut if big 
shelled edamame and/or field peas (I used edamame) 
red bell pepper, thinly sliced, cut if big 
fresh salad greens (I’m always partial to arugula) 

For the dressing, combine the red wine vinegar, garlic, Dijon, sugar, and salt in a blender (I did this with my immersion blender) and purée until the garlic is minced. With the blender running, very slowly add the oil in a thin stream and blend until creamy. Season with additional salt and pepper, to taste. 

For the salad, toss the vegetables (without the greens) in the dressing and marinate for about 15 minutes. Pile the vegetables onto the salad greens and serve. (The vegetables will keep well in the fridge with the dressing. You can also add only part of the dressing at first, depending on how many vegetables you are using.)


Friday, November 13, 2020

Double Chocolate Tahini Banana Muffins


I was trying to get more fiber into the Fox’s diet, so I made blueberry flax muffins and oatmeal blueberry flax muffins, neither of which were very good. I made apple applesauce muffins, only to realize that the kids eschewed the apple chunks. (I also tried another recipe for lactation cookies, omitting the brewers’ yeast, but those were a flop – my “regular” ones are better and were heartily consumed.) 

Then I decided to go in another direction and make chocolate muffins. But as it turns out, the recipe I picked, double chocolate tahini banana muffins, was relatively healthy and actually had flax seed and oats as well! It’s made using Soom Chocolate Sweet Tahini, of which I’ve been a big fan for years now (I first talked about it here). Note that the original instructions say that if you don’t have Soom Chocolate Sweet Tahini, you can replace it in this recipe with 1/3 cup + 2 Tbsp. tahini plus 2 Tbsp. maple syrup plus 2 Tbsp. cocoa powder, in addition to the ingredients already called for (meaning, still use the maple syrup and cocoa powder that are already written down below). 

These muffins were a hit with everyone! The exterior was slightly crisp, the crumb was fluffy, they all rose enough that the top cracked and made them look like they were wearing little top hats. They were delicious and will keep well at room temperature for a few days in an airtight container, though you could also keep them in the fridge or freeze them for later. 

3 medium-large overripe bananas 
1 large egg 
½ cup Soom Chocolate Sweet Tahini 
1/3 cup maple syrup 
½ cup unsweetened vanilla almond milk 
2 Tbsp. melted and cooled coconut oil 
2 tsp. vanilla extract 
2 cups rolled oats 
2/3 cup unsweetened natural cocoa powder 
2 Tbsp. flaxseed 
1 tsp. baking soda 
1 tsp. cinnamon 
½ tsp. salt 
¾ cup semi-sweet chocolate chips 

Preheat oven to 425 °F. Line a standard 12-cup muffin tin with liners and spray lightly with nonstick spray (I only greased a muffin tin instead of using liners, and got a total of 14 muffins). 

In a high-speed blender, combine bananas, egg, Soom Chocolate Sweet Tahini, maple syrup, unsweetened vanilla almond milk, coconut oil, vanilla extract, oats, cocoa powder, flaxseed, baking soda, cinnamon, and salt. Blend until smooth – about 30 seconds to 1 minute at the most (over-blending will make them tough). 

Add chocolate chips to the batter and stir to combine with a spoon. 

Fill muffin tins about ¾ of the way full. Sprinkle the tops with extra chocolate chips, if desired. 

Bake for 5 minutes, then lower heat to 350 °F (leaving the muffins in the oven). Bake for an additional 10-12 minutes or until muffins are set and spring back when you press on the tops. 

Let muffins cool in the tins for 10 minutes, then let cool for an additional 10 to 15 minutes on a cooling rack.


Tuesday, November 10, 2020

Hummus with Spiced Summer Squash and Ground Meat


This simple dish, created by Deb Perelman for Bon Appétit, was a surprise hit. I obviously thought I would like it (otherwise I wouldn’t have made it), but the fact that the Little Prince not only ate it heartily, but asked for seconds, was unexpected! It would have been even better with warm pita. 

For the hummus 
2 15-oz. cans chickpeas, rinsed and drained 
1 garlic clove, coarsely shopped 
½ cup tahini 
3 Tbsp. fresh lemon juice 
1 ¼ tsp. kosher salt 
½ cup warm water 

For the meat and assembly 
2 tsp. kosher salt 
1 ½ tsp. ground coriander 
1 ½ tsp. ground cumin 
¼ tsp. crushed red pepper flakes (optional) 
2 Tbsp. extra-virgin olive oil, divided, plus more for drizzling 
1 lb. ground lamb or beef (I used the latter) 
3 garlic cloves, thinly sliced, divided 
1 lb. summer squash or zucchini, cut into ¾” pieces (I peeled mine) 
¼ cup chopped parsley or cilantro 

For the hummus 
Process chickpeas in a food processor until powdery clumps form, about 30 seconds. Add garlic, tahini, lemon juice, and salt and process until smooth. With motor running, drizzle in water and process until hummus is very smooth, light, and creamy. Spoon onto a large plate. 

For the meat and assembly 
Mix together salt, coriander, cumin, and red pepper flakes (if using) in a small bowl. Heat 1 Tbsp. oil in a large skillet over medium-high. Add lamb and press into a large 1¼"-thick patty; sprinkle with half of spice mixture and half of garlic. Cook, without moving, until browned and crisp, about 5 minutes. Turn over in pieces and cook until other side is browned and crisp, about 3 minutes. Continue to cook, breaking up and stirring, until cooked through, about 2 minutes longer. Using a slotted spoon, scoop lamb over hummus. 

Pour out and discard fat and wipe out skillet. Heat 1 Tbsp. oil over high. Cook squash in a single layer, undisturbed, until browned, about 4 minutes. Sprinkle with remaining spice mixture and garlic and cook, stirring, until squash is coated and cooked through, about 3 minutes. Spoon squash over lamb. Drizzle with more oil and top with herbs. Serve with pita.

Sunday, November 08, 2020

Gluten-Free Carrot Cake

I recently picked up my copy of Gluten-Free Girl and the Chef and realized that I still had two dessert recipes I had flagged and not tried yet. The situation was easy to rectify: I made the peanut butter brownies, which were fine, and the carrot cake with ginger frosting, which was great! 

I think I had put off this recipe because the list of ingredients is long and, therefore, intimidating, but once I decided to just do it, it was pretty painless. I happened to have all the dry ingredients in my pantry, including all the rice flours. Note however that I couldn’t find carrot juice in the store that day, so I pulled out my juicer (which I seldom use at this point, but am reluctant to get rid off because, as you can see, it *was* useful!) and 2 pounds of carrots and made my own. I’ll totally understand if you wait until you can buy some, though! I measured all the flours by weight and think that you could replace the flours and gums with all-purpose wheat flour if gluten is not an issue for you, though I haven’t tried. 

Also, I halved the frosting because I’m assuming that “enough” here means enough to cover the top of the cake and leave the sides bare, as I did. I found the frosting too soft to cover the sides of the cake properly anyway, as is often the case with cream cheese frosting as opposed to a buttercream. The amounts below are mine, but feel free to double them if you want to try your luck. 

For the cake 
2 cups fresh carrot juice 
⅔ cup (75 g/2.6 oz.) almond flour 
½ cup (60 g/2 oz.) tapioca flour 
¼ cup (30 g/1 oz.) sweet rice flour 
¼ cup (30 g/1 oz.) superfine brown rice flour 
1 tsp. xanthan gum 
¾ tsp. guar gum 
¾ tsp. baking powder 
1 tsp. salt 
1 tsp. ground cinnamon 
½ tsp. ground nutmeg 
½ tsp. ground ginger 
¼ tsp. ground cloves 
1 cup (2 sticks) lactose-free butter, at room temperature 
½ cup granulated sugar 
½ cup dark brown sugar 
4 eggs + 2 separated eggs, divided 
grated zest of 1 orange 
1 tsp. vanilla extract 
1 cup peeled and grated carrots 
⅓ cup chopped walnuts (optional; the Engineer and I prefer our cake without them) 
⅓ cup golden raisins (optional; our kids vetoed them) 
1 pinch cream of tartar 

For the frosting 
4 oz. lactose-free cream cheese 
½ cup (1 stick) lactose-free butter, at room temperature 
1 ½ tsp. ground ginger (I used half that) 
1 pinch ground cardamom 
1 ½ to 2 cups powdered sugar, sifted 

For the cake 
In a small saucepan over medium heat, bring the carrot juice to a boil, then reduce the heat to low. Slowly reduce the juice, stirring occasionally, until it is reduced to ¼ cup and is darkened in color, about 20 minutes. Remove from heat and set aside to cool. 

Preheat the oven to 350 °F. Cut a circle of parchment paper to fit the base of a 9-inch cake pan. Grease both sides of the paper and place it in the pan. Set aside. 

Into a large bowl, sift together the almond flour, tapioca flour, sweet rice flour and brown rice flour. Sift in the xanthan gum, guar gum, baking powder, salt, cinnamon, nutmeg, ginger, and cloves. Stir together the flour-and-spice mixture to make sure the ingredients are evenly distributed and set aside. 

In the bowl of a stand mixer, or in a large bowl using a hand mixer, beat butter with the white and brown sugars until creamy and fluffy, 3 to 5 minutes. Add the 4 whole eggs and 2 egg yolks, one at a time, until fully incorporated. Beat in the orange zest and vanilla, then the reduced carrot juice. 

Slowly add the flour-and-spice mixture to the liquid until combined. Gently stir in the carrots, and walnuts and raisins (if using). The cake batter should be quite thick, but you should still be able to work a rubber spatula through it easily. 

In a clean, dry mixing bowl, beat the 2 remaining egg whites with the cream of tartar with the hand mixer until they form stiff peaks. Gently fold the stiff egg whites into the cake batter until they are entirely incorporated. 

Pour the batter into the prepared cake pan. Slide the pan into the oven and bake until a knife inserted into the center of the cake comes out clean and the top is golden brown, about 45 minutes. Transfer the pan to a wire rack and set aside for 15 minutes before removing it from the pan. Turn the cake out onto the rack, turn it right side up, and cool completely before frosting it. 

For the frosting 
In a mixing bowl, beat together the cream cheese, butter, ginger and cardamom with the hand mixer until smooth. Gently beat in 1 ½ cups powdered sugar, then beat in more if you prefer the frosting thicker and sweeter. Spread the frosting on the top of the cake before slicing and serving.


Friday, November 06, 2020

Bacon Corn Hash


This dish from Smitten Kitchen was a big hit! It took a while to prepare, but was entirely worth it. The Little Prince now likes potatoes, but only as long as they are prepared this way (my mother also sometimes made pan-roasted small-dice potatoes like these when I was a kid and I *loved* them, so I guess he does take after me sometimes). 

½ lb. thick-cut bacon, cut into small dice 
1 lb. red potatoes, scrubbed clean and diced into ¼- to ½-inch cubes (about 3 to 3 ¼ cups) 
salt and freshly ground black pepper 
4 medium-large ears corn, kernels cut from the cob (2 ½ to 3 cups) 
1 bundle scallions, thinly sliced
fried egg (optional)  

Toss bacon into a large skillet over medium heat; no need to heat the pan first. Let rest for a few minutes until it starts sizzling, then move the bits around so that they begin to brown evenly. Again, wait a couple minutes before shuffling the pieces around; you’re looking for them to get evenly golden and crisp. This should take about 10 minutes. Remove the bacon bits with a slotted spoon, leaving the drippings in the pan and transferring the bacon to paper towels to drain. 

Heat the pan to medium/medium-high, making sure the bacon fat is sizzling, then add your potatoes all at once in a single layer. Sprinkle them with ½ teaspoon table salt and several grinds of black pepper. Let them cook for a few minutes in one place and get a bit golden underneath before turning them over and moving them around. Repeat this process until the potatoes are browned on all sides; this takes about 20 minutes. (At this point, you can push aside the potatoes and pour or spoon off all but a small amount of the fat and reserve for the egg.) 

Bump up the heat a little and add the corn to the skillet. Sauté the potatoes and corn together until the corn gets a bit brown but stays fairly crisp, about 4 to 5 minutes. Add the drained bacon, and stir the mixture together until it’s evenly warm, about 1 more minute. Remove the skillet from the burner and sprinkle the scallions (reserving a few spoonfuls if you’d like to use them as garnish) over the hash. In 2 minutes, they should be warm and mellowed. Season with more salt or pepper to taste, if needed. 

If you choose to fry an egg or two, I recommend doing so in the bacon fat. Fry and season to your liking – I made mine still a bit runny in the middle, but both my kids prefer a solid yolk. Serve on top of a pile of bacon hash and garnish with reserved green onions.


Tuesday, November 03, 2020

Beignes au chocolat


Ça faisait longtemps que je voulais faire des beignes au four. C’est plus santé que les beignes frits, donc ça me permet d’en offrir plus souvent aux enfants, qui en réclament fréquemment! J’ai donc acheté des moules et j’ai ressorti la recette de beignes au chocolat de Coup de Pouce pour commencer. 

Tout d’abord, on va se le dire : les beignes au four, c’est un peu moins beau que les beignes frits. Du côté moins dodu, en tout cas! Je vous mets pour référence des photos de la pâte dans le moule avant cuisson et du résultat après cuisson ainsi qu’une comparaison du dessus et du dessous des beignes. C’est le dessous qui est le plus beau, même une fois décoré. J’ai glacé la plupart des beignes (mais pas tous, parce que le Renard était d’abord d’avis qu’il ne voulait pas de glaçage, même s’il a changé d’idée après quelques jours) et j’ai utilisé trois sortes de bonbons décoratifs parce que c’est ce que j’avais sous la main. 


Si jamais vous n’avez qu’un total de 12 ou même de 6 moules, pas de panique! Vous n’avez qu’à faire cuire les beignes en 2 ou 3 fois. 

Nous avons vraiment aimé ces beignes! Les enfants étaient aux anges, et nous aussi. J’ai essayé aussi leur recette de beignes à l’érable, mais je les ai trouvés moins bons – ils étaient un peu secs, et ce glaçage aurait été meilleur. 


Pour les beignes 
1 ¼ tasse de farine 
1/3 tasse de poudre de cacao 
½ c. à thé de bicarbonate de sodium 
½ c. à thé de poudre à pâte 
¼ c. à thé de sel 
1 œuf 
½ tasse de lait sans lactose 
½ tasse (1 bâton) de margarine ou de beurre sans lactose fondu(e) 
½ tasse de cassonade 
¼ tasse de sucre 
1 tasse de pépites de chocolat miniatures 

Pour la glace au chocolat 
4 oz de chocolat mi-amer haché 
¼ tasse de beurre sans lactose 
4 c. à thé de sirop de maïs 
bonbons décoratifs, au choix (facultatif) 

Préchauffer le four à 350 °F. Vaporiser 18 moules à beignes de 2 ½ po (6 cm) ou 8 moules à beignes de 3 ½ po (8 cm) de diamètre d'un enduit végétal antiadhésif (les miens font 3 ¼ po de diamètre, selon la description officielle, mais j’en ai eu besoin de 18; voyez sur les photos comme ils étaient remplis). Réserver.  

Dans un bol, mélanger la farine, le cacao, le bicarbonate de sodium, la poudre à pâte et le sel. 

Dans un autre bol, à l'aide d'un batteur électrique, bien mélanger l'œuf, le lait, le beurre, la cassonade et le sucre. Incorporer les ingrédients secs en battant à faible vitesse jusqu'à ce que la pâte soit homogène, sans plus. Ajouter les brisures de chocolat et mélanger à l'aide d'une cuillère. 

À l'aide d'une grosse cuillère, mettre la pâte à beignes dans une poche à douille munie d'un embout rond de ½ po (1 cm) de diamètre. Remplir les moules réservés aux deux tiers. Cuire pendant 12 minutes ou jusqu'à ce que les beignes soient légèrement dorés et que le dessus reprenne sa forme après une légère pression du doigt. (Je vais vous dire tout de suite que je n’aime pas cette description, parce que des beignes au chocolat, ce n’est pas doré! Mais le dessus avait l’air bien sec, voilà.) Retirer du four et laisser refroidir 5 minutes avant de démouler les beignes sur une grille. Laisser refroidir. 

Pendant ce temps, faire la glace au chocolat. Dans un bol à l’épreuve de la chaleur placé sur une casserole d’eau chaude, mais non bouillante, faire fondre le chocolat et le beurre avec le sirop de maïs, en brassant, jusqu’à ce que la préparation soit lisse. Retirer la casserole du feu (laisser le bol sur la casserole pour garder la glace chaude). 

Tremper les beignes refroidis dans la glace désirée, en laissant égoutter l'excédent, puis les déposer sur une grille déposée sur une plaque à biscuits tapissée de papier parchemin. Parsemer de bonbons décoratifs, si désiré. Laisser reposer jusqu'à ce que la glace ait pris. (Les beignes se conserveront quelques jours dans un contenant hermétique à la température ambiante ou jusqu'à 1 mois au congélateur.)


Monday, November 02, 2020

Snacks for school days

With the Little Prince back in school, I’m once again in search of inspiration for school lunches and snacks (although, to be honest, the kids need lunches and snacks even when they’re not in school!). So let me start by recommending This Saves Lives, the company that gives a packet of food to a child in need for every box of snacks they sell. I placed an order on their website for their Krispy Treats and some Kids Bars. We tried 3 flavors of each: for the Krispy Treats, we got Mammoth Marshmallow Krisp (plain marshmallow treat, basically), Unicorn Sprinkle Surprise (our favorite), and Dragon’s Dream Cookies N’ Cream (close second!); for the Kids Bars, it was S’Mores Blast, Chocolate Chip “Dino”mite, and Rockin’ Straw-Beary. 


Pros: these products are allergen-free and safe for school, and just like Made Good, they contain one serving of fruits and vegetables! The Krispy Treats were delicious, the Kids Bars were really good, and my kids loved all of them. Cons: they are pretty small, quite sweet, and not very filling. Also, the bottom of the bars is coated with chocolate, which can definitely be a pro but will make a mess on your kids’ hands. Overall, however, I like them so much that I placed a second order. HEB started carrying them, so I’ll have to see what I can get in person next time, but you get free delivery from the website with an order over $40. 

I bought Stealth Health – Lunches Kids Love last year because it was well-rated, but ended up resenting it because it looks like a vehicle the author uses to sell her Origami Wraps, which are essentially a sheet of fruit/vegetable leather used instead of nori or a tortilla. I caved and bought the carrot ginger flavor and, I mean, it’s not bad, the Little Prince actually liked it, but it seems like a big expense for lunches. Unless being low-carb and veg-full is that important to you. 


I also tried all 3 flavors of the new Dino Bars. They’re made with all healthful ingredients and wrapped in potato-starch-based edible paper so that kids’ hands don’t get sticky. Sounds great, but… we all pretty much hated them. I offloaded the leftovers (intact wrapped bars, of course) in the bowl we set out in our driveway for Halloween, along with candy, and they were taken off my hands.


Texas Caviar


This is a super easy recipe created by chef Mario Perez (the Little Prince brought a copy of it from school last year) and slightly adapted. I made it as a salad for lunch one day and thoroughly enjoyed it, though sadly neither kid was as enthusiastic. If you’re going to serve it as a dip, then I suggest chopping all the vegetables very small, roughly the same size as the beans, and you can always adapt the ingredients to your taste. I seasoned it with salt and pepper, but Chef Perez also suggested Fiesta fajita seasoning, and I imagine some might like Tajín seasoning

1 can of black beans, rinsed and drained 
1 can of red beans, rinsed and drained 
1 can of black-eyed peas, rinsed and drained 
1 can of corn, drained 
1 tomato (or as much as you want), diced 
½ red onion, finely diced (or as much/little as you want) 
1 yellow bell pepper, diced 
1 red bell pepper, diced 
1 bunch cilantro, leaves chopped 
salt and pepper, to taste (or seasonings of choice) 
1-2 avocados (or as much as you want), diced 
½ lemon, juiced 

Mix the beans, corn, tomato, onion, bell peppers, and seasonings. When ready to serve, cut the avocado and toss with lemon juice. Enjoy!

Thursday, October 29, 2020

Hummus au chocolat


J’ai fait des recettes que je pensais que les enfants aimeraient. Poulet et carottes avec confiture d’abricot de Parents, ça avait l’air vraiment vendeur, mais ils n’ont pas trippé. Pommes de terre et raisins rôtis au romarin de Coup de Pouce, vu que mes enfants adorent les raisins… et je me suis fait dire qu’ils n’aimaient pas du tout ceux-là. Bon. 

Alors j’ai décidé de faire de l’hummus au chocolat, parce que ça, je sais qu’ils aiment. (Soit dit en passant, la graphie « hummus » est acceptée par l’OQLF, tout comme « houmous », mais je préfère la première.) J’ai donc comparé les trois recettes que j’avais afin d’en garder les meilleurs éléments; voici la 1ère, la 2e et la 3e. La recette ci-dessous est ma version, qui est en fait adaptée du site A Couple Cooks. J’ai servi mon hummus avec des biscuits graham, mais bien sûr des fruits seraient tout aussi délicieux! 

15 oz (1 ½ tasse) de pois chiches, drainés et rincés 
¼ tasse de tahini 
6 c. à soupe de sirop d’érable, ou au goût 
½ tasse de cacao 
1 c. à thé de vanille 
¼ c. à thé de sel cachère 
2-4 c. à soupe d’eau chaude 

Dans un mélangeur (ou un robot culinaire), mettre les pois chiches, le tahini, le sirop d’érable, le cacao, la vanille, le sel et 2 c. à soupe d’eau chaude. Actionner pendant 30 secondes, puis râcler les parois. Goûter pour voir s’il faut ajouter du sirop d’érable. Ajouter 1 ou 2 c. à soupe d’eau, au besoin, et actionner de nouveau jusqu’à l’obtention d’une consistance crémeuse. 

Les restes se garderont au réfrigérateur pendant une semaine (mais je doute qu’il en reste si longtemps!).

Sunday, October 25, 2020

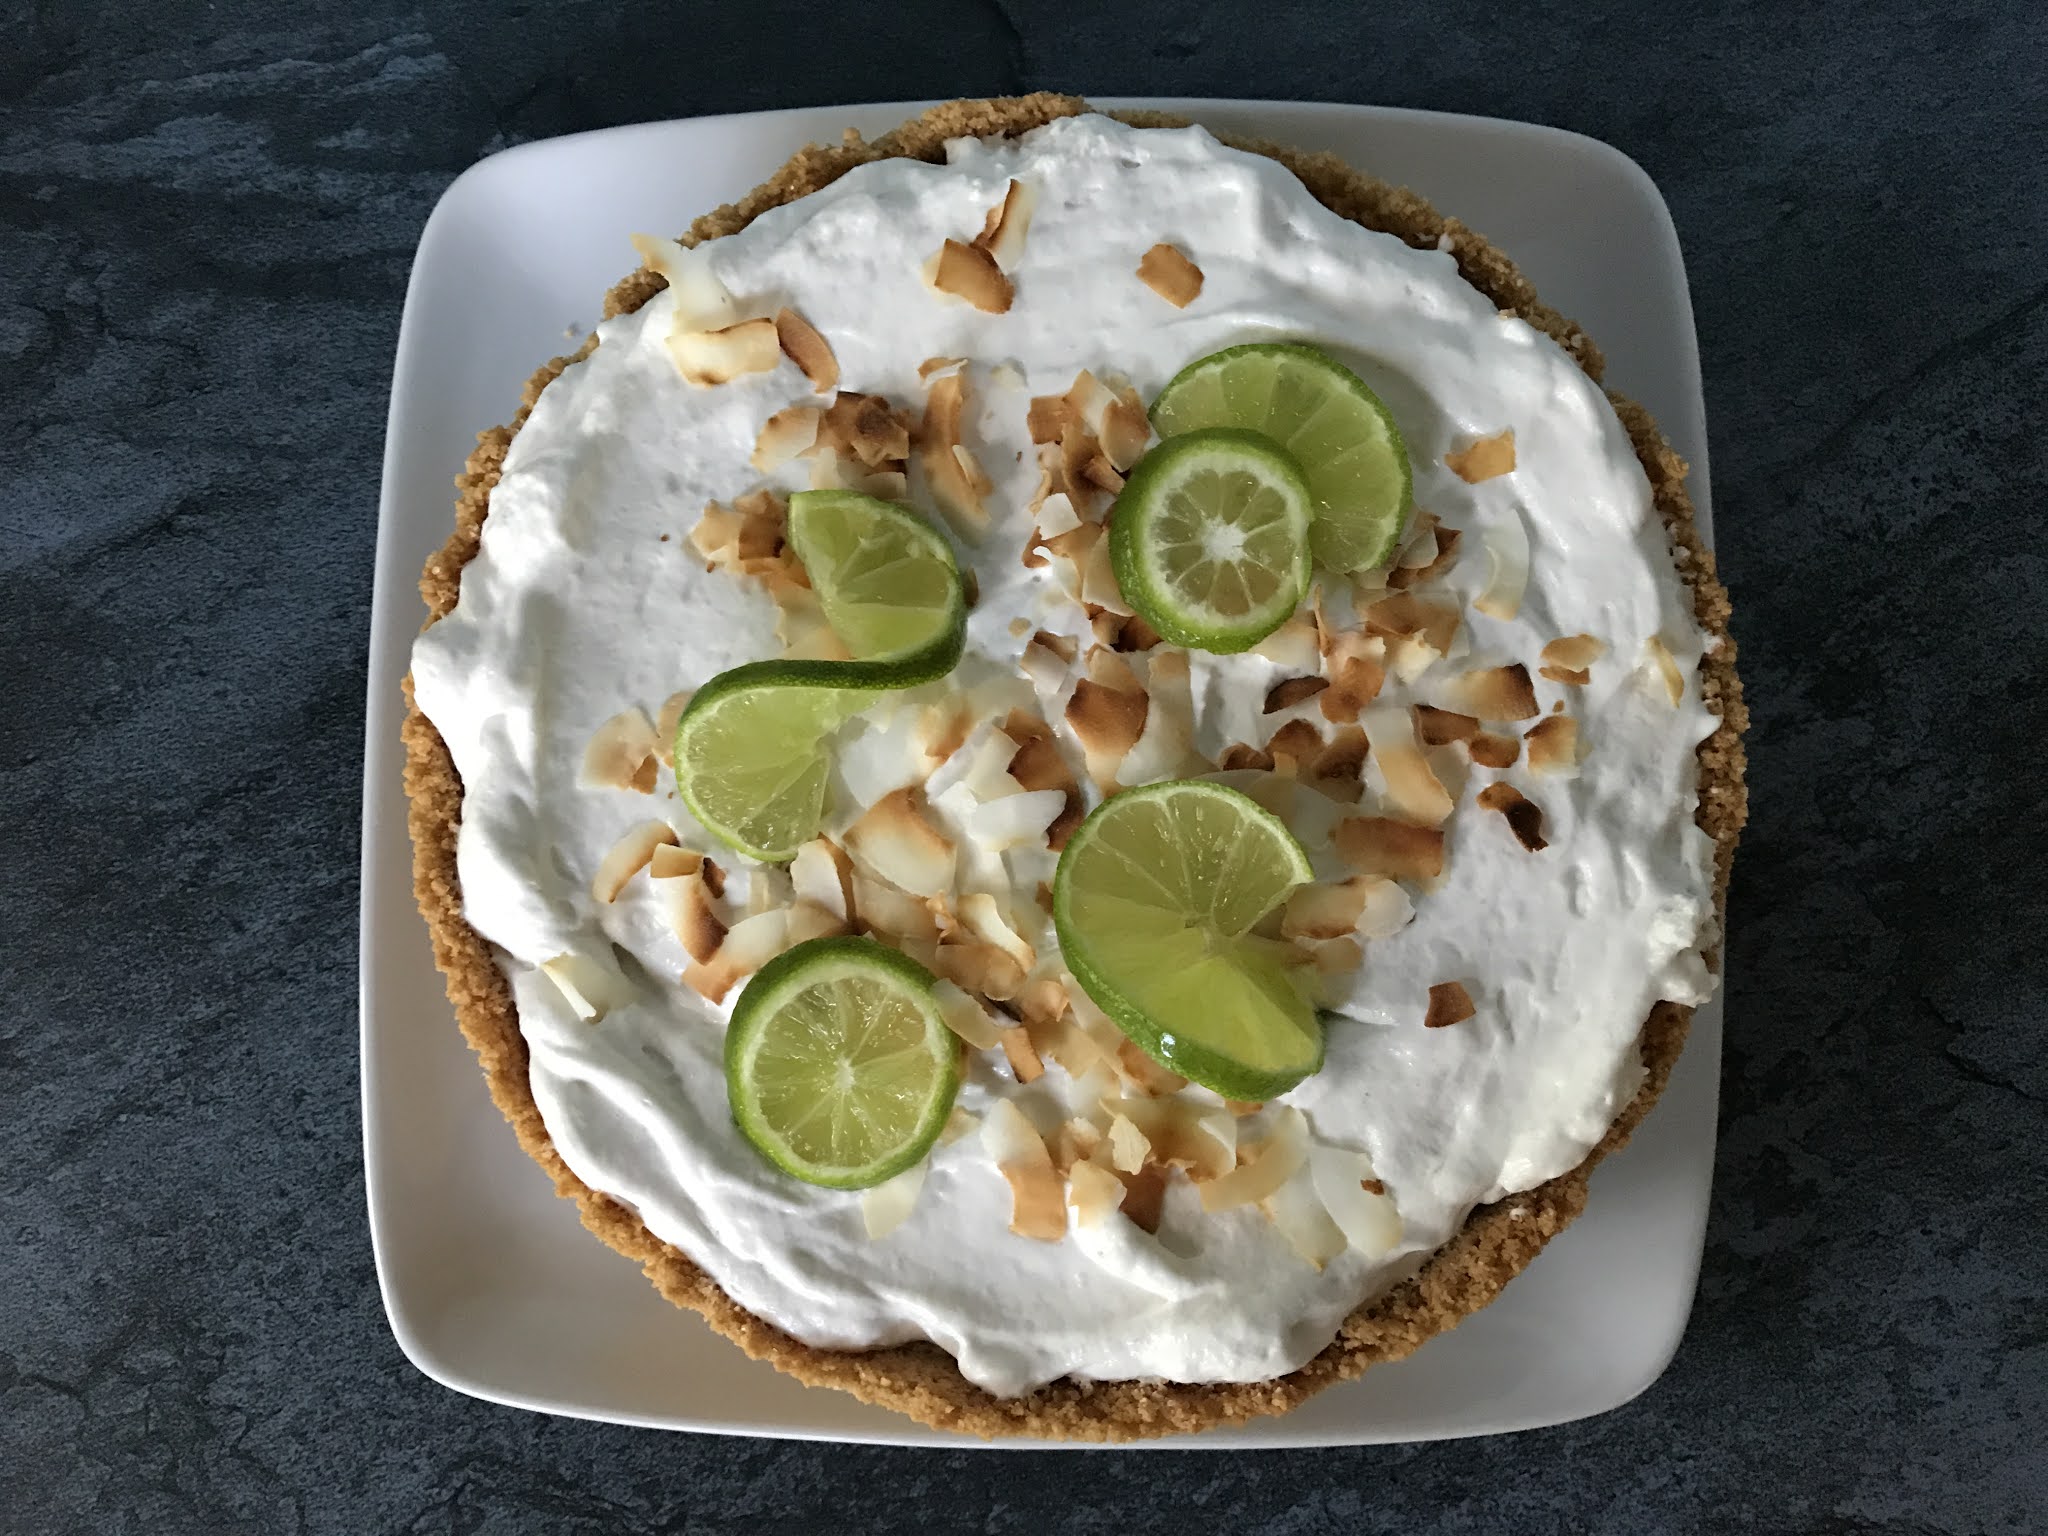
Toasted-Coconut Key Lime Pie


This coconut key lime pie from Real Simple was delicious, and gorgeous to boot! I love that it was conceived to be vegan (depending on what brand of cookies you use for the crust), so I didn’t even have to adapt it to be lactose-free! I used CocoWhip for the coconut topping, as usual. 

I’m pretty sure I misread the directions and actually refrigerated the pie instead of freezing it. This would explain why the filling was still too soft after 4 hours; that being said, it was much better the next day, after over 24 hours in the fridge. Also, the original recipe notes say that the pie can be frozen ahead of time – just garnish it when you’re ready to serve it. 

I haven’t looked into this too deeply, but it feels like I’ve been making coconut-lime desserts more often than usual these past several months. So when I saw the new Listerine flavor in the store, I almost burst out laughing under my mask! (I haven’t bought it, but I *am* curious.) 


1 12.3-oz. package coconut cookies, finely crushed 
¼ cup coconut oil, melted 
2 Tbsp. granulated sugar 
2 9-oz. containers thawed frozen coconut whipped topping, divided 
1 14-oz. can sweetened condensed almond milk 
1 Tbsp. lime zest + ½ cup fresh lime juice (from 4 limes or 12 key limes), plus slices for serving 
toasted coconut flakes, for serving 

Preheat oven to 350 °F. Stir cookie crumbs, oil, and sugar in a large bowl. Press crumb mixture firmly into bottom and 1 ½ inches up sides of a 9-inch springform pan or deep-dish pie plate. Bake until edges are golden, about 10 minutes. Let cool completely on a wire rack, about 20 minutes. 

Meanwhile, stir 1 container whipped topping, coconut milk, and lime zest and juice in a large bowl until blended. Pour mixture into cooled crust, cover with plastic wrap, and freeze until firm, at least 4 hours. 

Top with remaining container of whipped topping. Top with lime slices and toasted coconut.


Thursday, October 22, 2020

Oreo Frosting


The Engineer turned 40 recently and asked for a chocolate cake with Oreo frosting. I of course decided to make my definitive chocolate recipe (in hindsight, perhaps I should have added some active charcoal in there to make it darker!), then I set out looking for a frosting recipe. I settled on this one from House of Nash Eats and… it was mind-blowing. It pushed some of the same buttons that an Oreo shake does, though obviously sweeter and not as cold. It was so good that the Little Prince decided that’s what he wants on one of his next birthdays (he is so specific and orderly that he’s placed his orders for his next 2 birthday cakes already and won’t budge, but he’s got this one lined up for his 10th birthday). The problem is, though, that I don’t think I can wait that long to make it again! This is a really great frosting. 

You can also pipe some mounds of frosting and plop an Oreo down on each one to decorate, but only do so shortly before serving, because the Oreos will go soft quickly. Note also that while you could buy Oreo crumbs, I just put some in a food processor to crush them. You could also put them in a plastic bag and go over them with a rolling pin. 

1 cup lactose-free butter, at room temperature 
4 cups powdered sugar, sifted 
1 tsp. vanilla 
1 pinch of salt 
2-3 Tbsp. lactose-free cream or whole milk 
12-14 Oreos, finely crushed, or about 1 ¼ cups of cookie crumbs 

 In a large bowl, beat the butter using a stand or electric mixer until smooth, creamy, and light, about 4 minutes. 

Add the 2 cups of the powdered sugar, beating until combined. Beat in the remaining powdered sugar, vanilla, and salt, then add just enough cream or milk to get the frosting to a nice pipeable consistency. 

Stir in the Oreos, then use to frost a cake or cupcakes.

Pandemic ramblings

The Little Prince started in-person schooling again yesterday. We’re in the green zone, there haven’t been any cases of covid transmission on campus in the past 9 weeks, and his remote-learning teacher was the one who would transition to in-person for returning kids, so it seemed like a good time to make the switch. We’re not fully confident that this is the safest thing to do, but we’ve calculated it to be safe enough at the moment, and probably best for now (considering that a vaccine for the general population still seems to be at least a year away). I already feel more relaxed during the day with only the Fox around. This had me taking stock of the past 8 months or so, even though the pandemic is not over by any means. 

I realize that what I’m about to say is based on the fact that before and throughout this confinement, 1) I’ve been a stay-at-home mom (even though I started my own business, SAHM was definitely my primary occupation in terms of hours worked), and 2) I am privileged because my husband is classified as an essential worker, so he got to keep his job, and his salary is enough for us to live comfortably. But there are still things that make me feel out of step with many people, even though we’re all going through the same thing. 

It seems that everyone I see on social media, and even almost everyone I speak to personally, has “learned” from this experience that they had a lot of unnecessary activities in their day. They now realize they were overbooked, spending too much time commuting, had their kids signed up for too many activities, etc. But those are things I learned early on. I chose to be a freelancer, about 15 years ago, in large part because it left me more control over my schedule. My kids both had swimming lessons (they love swimming, and I think it’s an important life skill), and my oldest had just started drumming lessons (because he’s talented and also because he really, really likes drumming), and that’s it. We made it a conscious decision to have enough free time that we could relax and, ideally, not have commitments on weekends. We always have dinner as a family (except on maybe at most a dozen nights a year when work or an outing prevents one parent from making it). 

The main way that the Little Prince being out of school had eased up our schedule is that we no longer had to get up at 6:00 am on weekdays – but that wakeup time wasn’t by choice, it was because our public elementary school (4 minutes away by car) starts so early that we just have to get up at 6. I mean, to the extent that you have a say in your schedule… I just don’t understand why it would take a worldwide pandemic for you to realize how busy you are and to decide to drop a few things to be less busy? Or to spend more time as a family? 

People say they’ll save money, buy local, travel less. Well, I was already putting energy in the first two, and if anything, this makes me want to travel even more. I was already doing most of my shopping online (the big-box stores that took the worst hit over the past months were already in the red before 2020, mostly for that precise reason – they weren’t competing well enough with online retailers). I already thought that essential workers like teachers, waiters, nurses, mail carriers and waste collectors were underappreciated. I already thought that the minimum wage should be higher and that people should have free health care – I am from Canada, after all. But based on public discourse, it’s like a lot of people just now came to that conclusion. 

People who were child-free and still had a decent income suddenly had a lot more time to themselves, and many got to check major things off their to-do lists – catch up on all those movies and tv series, read all those books, learn new hobbies, complete projects that had long been set aside. So even if their viewpoints are the same, they may feel more evolved just because of how much they got done for themselves. But most of us with kids (definitely myself included) had way less free time than usual and got even less done than we would have otherwise. 

The Little Prince has to do MAP testing each year for school. MAP stands for Measure of Academic Progress; it’s not graded per se, but is meant to position him in relation to his peers in math and reading (there will be more subjects as he gets older). As the name implies, though, he has to progress in order to get a “good” score, meaning that even assuming he scores above his peers, if he didn’t progress much compared to the last time he took the test, he would score poorly. And I couldn’t help but think of this when I compare my viewpoints today with everyone else’s. Not that I’m “better” than anyone, of course, just that I feel like I’m standing still. 

So here I am, admittedly possibly on the verge of a midlife crisis (what with two months left in my thirties), feeling like I haven’t accomplished anything beyond day-to-day treading water and haven’t evolved mentally either. Is anyone else in the same boat?

Monday, October 19, 2020

Corn and Chickpea Bowl with Miso Tahini Dressing

I’m still into bowls for lunch, but it can be challenging to put in stuff that the kids will like. In this case, I had one kid who really liked the corn and another who really liked the avocados, while I ate the whole thing. I *loved* the dressing and might make it again to eat with salads or grilled chicken. 

This recipe is adapted from Bon Appétit; I made the dressing my way and didn’t use as much za’atar as they did. I also only warmed up the corn and chickpeas instead of getting them seared and crispy, but that’s up to you. 

Leftovers from this dish made a great salad as a side to quiche later on in the week. 

For the dressing 
¾-inch piece of ginger, peeled and grated 
1 small garlic clove, peeled and grated 
1 cup (packed) cilantro leaves with tender stems 
¼ cup fresh lime juice 
¼ cup tahini 
1 ½ Tbsp. miso 
kosher salt, to taste 
3 Tbsp. warm water 

For the bowl and assembly 
3 Tbsp. olive oil, divided, plus more for drizzling (optional) 
2 garlic cloves, lightly crushed 
1 14-oz can chickpeas, rinsed and drained 
3 ears of corn, shucked, kernels removed 
1 Tbsp. za’atar (or to taste; feel free to use another spice blend, like curry) 
kosher salt, to taste 
4 cups Little Gems or other small lettuce leaves, torn if large 
crumbled lactose-free feta, lime wedges, and cilantro, for serving (optional) 

Purée ginger, garlic, cilantro, lime juice, tahini, miso, and water in a blender until smooth (I used my immersion blender). Season with salt. 

Heat 2 Tbsp. oil in a large skillet over medium. Add garlic and cook, turning occasionally, until golden brown, about 4 minutes. Mash garlic with a spoon and stir into oil. Add chickpeas and increase heat to medium-high. Cook, undisturbed, until golden brown and beginning to crisp underneath, about 3 minutes. Toss and continue to cook, tossing occasionally, until golden brown all over, 2–3 minutes more. Add corn along with 1 Tbsp. oil and cook, tossing, until corn kernels are golden around the edges and tender, 5–7 minutes. Sprinkle za’atar over and toss to coat. Season with salt. 

Lightly drizzle lettuce with oil in a large bowl and toss to combine; season with salt. 

Divide tahini among bowls and top with lettuce and corn and chickpea mixture. Sprinkle with feta. Serve with lime wedges and cilantro alongside.


Sunday, October 18, 2020

Saucy Baked Ziti

This is another recipe from Jessica Fechtor’s excellent memoir Stir, which I talked about here. It’s a bit involved, what with two different sauces, but the result is well worth it! This dish was very well received. 


I’ve included a picture of the fresh mozzarella I used – notice how the label clearly says it contains 0 grams of sugar. This certainly isn’t the case for all brands of mozzarella, especially fresh, but it’s totally possible to find some. 


For the tomato sauce 
4 Tbsp. olive oil 
3 garlic cloves, minced 
1 tsp. crushed red pepper, plus more to taste (1 pinch is plenty for me!) 
2 x 28-oz. cans whole peeled tomatoes 
1 tsp. fine sea salt, plus more to taste 

For the béchamel 
2 Tbsp. unsalted butter 
2 Tbsp. plain flour 
2 cups lactose-free whole milk, warmed (but not boiled) 
½ tsp. fine sea salt, plus more to taste 
¼ tsp. ground nutmeg, plus more to taste 

For the rest of the dish 
16 oz. dry ziti or rigatoni (or even penne) 
8 oz. lactose-free fresh mozzarella cheese, cut into ½-inch cubes 
1 cup (50 g) freshly grated parmesan 
1 cup (50 g) panko bread crumbs 
1-2 pinches of nutmeg 
½ tsp. crushed red pepper (optional - I left it out) 
2 Tbsp. olive oil 
1 handful of fresh basil leaves, sliced or torn into small pieces 

Position a rack in the top third of the oven, preheat it to 375 °F, and brush a 9”x13” ceramic or glass baking dish with olive oil. 

Make the tomato sauce 
Pour the olive oil into a 3- or 4-quart saucepan and warm over medium-high heat. Stir in the garlic and crushed red pepper and cook for about 1 minute or so, until fragrant. Add the tomatoes, smooshing them up in your hands as you drop them in the pot along with all the juices. Stir in the salt, turn the heat up to high, and bring to a boil. Lower the heat and simmer for about 10 minutes, stirring occasionally, until slightly thickened. Taste and add more salt if you'd like. Remove the pot from the heat and set aside. 

Meanwhile, make the béchamel 
Melt butter in a clean 3- or 4-quart saucepan over medium heat. Add the flour and stir for a couple of minutes to form a pale brown paste. Very slowly add the warmed milk while whisking continuously. Bring the sauce to a boil and cook for about 5 minutes, whisking the whole time, until it thickens. Remove pot from the heat, stir in the salt and nutmeg, then taste to see if you need any more of either. Set aside. 

Make the pasta and assemble the dish 
Bring a large pot of salted water to a boil and add the pasta. Cook until it's 3 to 4 minutes short of being done (it will finish cooking in the oven). Drain and transfer to your largest bowl. 

Add the tomato sauce, béchamel, mozzarella and about three-quarters of the parmesan and mix well. Transfer mix into prepared baking dish and scatter the ziti with the remaining parmesan. 

In a small bowl, toss the bread crumbs with a pinch of nutmeg, some extra red pepper if you want a little extra heat (I did not), and 2 tablespoons of olive oil and sprinkle over the top. 

Bake until the ziti is bubbling and the top is brown, about 15 minutes. Remove from the oven and let rest for 10 minutes, then scatter the sliced basil over the top and serve.


Monday, October 12, 2020

Still knitting from the stash

I spent much of the spring knitting two sweaters for myself, which I have now decided to frog, so more on that later. Meanwhile, there was a fresh batch of babies due in late August-early September (5 in all, including a set of twins), so I took a break from my adult-size sweaters and knit some baby-sized ones, using some yarn from my stash. 


First, I made this Poppy hat, which I embellished with a button (also from my stash). It was a bit weird to knit, as it’s essentially knit from front to back, then you pick up stitches to make the band that brings it all together. The yarn I used was leftover from this robot sweater – I believe it’s Phildar Pronostic +, in Bois de Rose colorway. I had barely used any of the skein, and needed all of the remainder to make this hat for a little girl, so it was perfect. If I’d had any more, I might have knit a flower as an embellishment instead of a button, but it was not to be. I still like the result! It could easily be adapted to an adult size, too (actually, I think it’s included in the pattern). 


Then, I was looking for a baby sweater pattern that I could make with scrap yarn, so I went with Purl Soho’s Baby Fair Isle Cardigan. I didn’t have enough of any yarn to be the main color, so I bought 3 skeins of Cascade Heritage in Smoked Pearl at 100 grams each. To knit the 6-month-sized cardigan, I needed about 70 grams of it, so the 3 skeins gave me enough for 4 cardigans, with a bit left over (using up the yarn stash is a Sisyphean task, isn’t it?). I did get to finish off a few of my scrap yarns, but hardly made a dent in others, because you really only need a few yards of each color, if that. I got to practice my stranding on the back of the knit, and I am so pleased with how neat it is! 


So I ended up with one in warm shades and one in cool shades for twins who ended up being girls (I chose buttons that I thought were appropriate), one in shades of blue for a little boy, and then a fourth cardigan plus a hat in shades of red for a baby who ended up being a girl. 


The hat pattern is Giacomo’s Baby Hat, which I made with only yarn from my stash (but I didn’t have enough to make a pompom). The fair isle pattern was easy to follow; the only thing I changed in the pattern was to make the ribbed edge of the hat longer. I really loved this one! 

Finally, I learned a new skill: felting! I had received this black sheep felting kit from the Engineer, after putting it on my wish list last Christmas (it also comes in white). It’s from Bear Creek Felting, and they sell lots of other cute kits on their Etsy page. This was a great introduction to the how-to of felting, and the finished result is really great for a first attempt!