Sunday, March 04, 2012

My Warm Apple Cobbler with Miso


Normally, when the Engineer and I have dinner guests, that’s not the night I’ll be trying out a new recipe for the first time. There’s always the slight possibility it’ll fail, and then you’re left with a mess on your hands instead of dinner. Last winter, though, we invited one of the Engineer’s colleagues and his wife over for dinner, and I decided to make this apple cobbler from Bon Appétit, because it looked so warm and homey, yet had a “secret” ingredient: miso. I had never seen miso in a sweet recipe before, so I was intrigued. When I served the cobbler, though, I was disappointed, because the wedges of apples were undercooked, yet the topping was already a little too brown. That being said, I just loved the topping itself, as the miso gave it a discreet umami flavor, which was more of a je-ne-sais-quoi that anything one would pick out. So I decided to keep the recipe and tinker with it.


Then, Molly Wizenberg posted the recipe for Nigel Slater’s apple crumble on Orangette, titling it “This one does something interesting”. Indeed it does: the apples are cooked on the stovetop before being added to the baking dish, topped and put in the oven. So I decided to create a hybrid dessert, with Mr. Slater’s method for the apple filling and Bon Appétit’s miso topping, along with nutmeg instead of cinnamon for the apple filling, and a reduced baking time. It was much better, but I must admit that I never did achieve the beautiful golden, dough-y crust in the magazine photo. Interestingly, the Bon Appétit recipe does say it’s a streusel topping, which is technically what I got, but the picture makes it look almost like cake dough with a crispy top, like a cobbler. But really, the nice golden cobbler is what I wanted in the first place.

So then I fiddled with the topping ingredients for a while, adapting them from one recipe only to end up with a failure, and finally finding the right one: the basic recipe from À Bon Verre, Bonne Table for their spiced rhubarb cobbler (also delicious, btw). I added the interesting ingredients from the original recipe (ground ginger, cinnamon, and the white miso). Success! It was delicious, and the Engineer even had seconds.

So here we are: MY warm apple cobbler with miso topping, adapted and perfected from various sources. I scaled down the recipe to make a small cobbler in an 8-inch square baking dish; you can just double it and make it in a large oval or rectangular dish. For the apples, I recommend a mixture, ideally some that will hold their shape and some that will fall apart. The Bon Appétit recipe recommends Granny Smith and Fuji; I used four Braeburns the second time, and I even threw in a pear once, but last time (the final, winning batch), I used two Fuji apples and two Jonagold.

For the apple filling
4 medium apples, peeled, cored and cut into 1-inch chunks
juice and zest of a lemon
1/3 cup sugar (or ¼ cup, if your apples are sweet and you reduce the amount of lemon juice a bit)
1 tsp vanilla extract
¼ tsp nutmeg
2 Tbsp unsalted butter or margarine

Grease an 8-inch square baking dish.

Peel and core the apples, cut them into rough 1-inch chunks, and toss them with the juice and zest of the lemon, the sugar, the vanilla and the nutmeg.

Warm a skillet over medium-high heat. Add the butter, and when it stops foaming, dump in the apples and their juices. Nudge the apples around so that they lie in a single layer, and then leave them alone for a while. The juices will thicken to a syrup that coats the fruit, and the fruit should get golden in patches. Stir gently once or twice, cooking until the apples have a little color. (This may take longer than you’d expect.) They should smell sensational.

Turn the apples and any caramelly juices out of the skillet into the greased baking dish. If there are any sticky bits left in the skillet, add a squeeze of lemon juice and/or a splash of water, and stir until they dissolve. Add to the apples.

For the miso topping
1 cup all-purpose flour
½ cup sugar
1 ½ tsp baking powder
½ tsp salt
¼ tsp ground ginger
¼ tsp Ceylon cinnamon
1 ½ Tbsp sweet white miso
¼ cup unsalted butter or margarine, melted
1/3 cup lactose-free milk, at room temperature
1 egg, at room temperature

Preheat the oven to 350 °F.

Sift together the flour, sugar, baking powder, salt, ground ginger and cinnamon.

Combine melted butter, miso and milk. Whisk the egg into the milk mixture and pour on the flour mixture. Mix only until not streaks remain – the batter will look like thick pancake batter.

Pour spoonfuls of the batter on the apples, leaving small spaces between each spoonful for the batter to expand.

Bake for 30 to 35 minutes, until a toothpick inserted in the topping comes out clean. Serve warm.


Saturday, March 03, 2012

Vegetarian Carbonara with Sundried Tomatoes


I found this recipe on The Chubby Vegetarian; the pork is replaced with smoked sundried tomatoes (or plain sundried tomatoes, in my case). I have to say that it tasted remarkably close to the original! This recipe called for mixing the eggs with milk before incorporating them in the pasta, but next time, I will omit the milk entirely, because the eggs never quite coagulated like I wanted them to (whereas I never have a problem when I use eggs, instead of eggs and milk, in my regular carbonara). I rewrote the recipe below to reflect that. Perhaps I would also be more generous with the cheese and mix some into the pasta. The Engineer said he felt the dish was missing some kind of fresh herb to round it out, but I feel that if I add herbs, it will no longer be a pasta carbonara – not to say it wouldn’t be good.

3 eggs
2 Tbsp olive oil
¼ cup shallots, minced
a few sundried tomatoes (ideally smoked), minced
½ cup dry white wine
2 roma tomatoes, peeled (if you have the patience) and diced
Sea salt and cracked black pepper
A pinch of cane sugar
A dash of champagne vinegar
2 servings of dry spaghetti (or long pasta)
pecorino romano or parmesan, to taste

Place eggs in a bowl of warm water; this will raise the temperature of the eggs and is key to getting the creamy consistency associated with carbonara. Place a pot of salted water on to boil for the pasta.

In a large frying pan over medium-high heat, sauté shallots and sundried tomatoes in olive oil until shallots start to brown. Add the wine and reduce until most of the moisture has evaporated. Add the romas, salt, pepper, sugar and vinegar to the pan and stir.

Break the eggs and mix them in a bowl. Set aside.

Meanwhile, cook pasta according to package instructions. Place cooked pasta directly in the pan with the tomato mixture and immediately add egg mixture. Turn the heat off of the pan but keep it on the stove. Mix for a few minutes until sauce sticks to the noodles and is thick and creamy. Garnish with grated cheese; serve immediately.

Quinoa and Beet Pancakes

The title “Quinoa and Beet Pancakes” sounds descriptive in an objective kind of way. It doesn’t say how great they are. But titles like “Wonderful Quinoa and Beet Pancakes” or “Quinoa and Beet Pancakes To Die For” might not have their places in a serious cookbook… Kim Boyce’s Good to the Grain, by the way, is probably one of the best cookbooks I have. I don’t get to use my cookbooks nearly enough, but that’s another story.

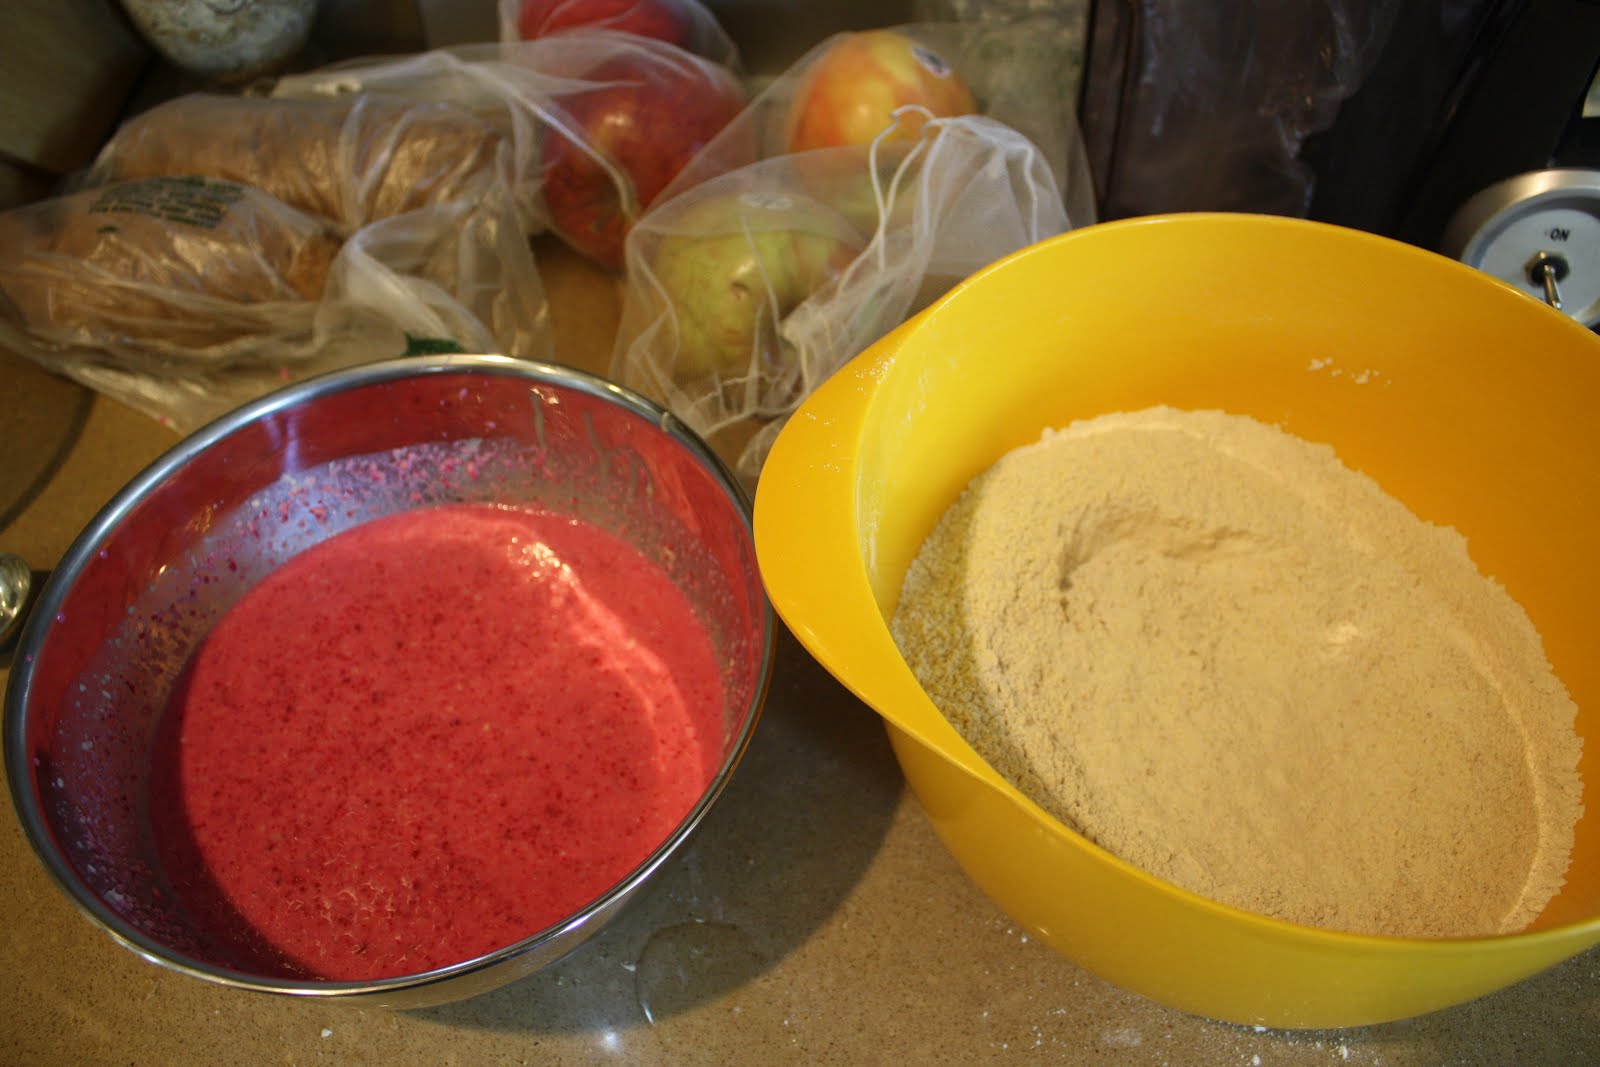
I was looking to use some of my quinoa flour, because it had been sitting in my pantry for a while. I spotted this recipe in Good to the Grain, and when I realized I already had some beet purée in the freezer, this was a sure thing. The original recipe also calls for ½ cup whole wheat flour and 1 cup all-purpose flour, but I used 1 ½ cups white whole wheat flour, with great results. Once the batter was made, I did add a little milk to get a better consistency, though this might depend on exactly how much beet purée you have. The result was a truly delicious, quite fluffy pink pancake. The quinoa and beet complement each other very well and are both somewhat earthy, though you have to know there’s beet in there to taste it (if you present these to your kids and call them pink pancakes, they’ll never know there’s a vegetable in them). I served them with maple syrup, and they were wonderful; we both really loved them. That being said, I think they were even better the next day! I froze the leftovers for a lazy morning.

3 medium-small red beets
½ cup quinoa flour
½ cup whole-wheat flour
1 cup all-purpose flour
3 Tbsp dark brown sugar
1 Tbsp baking powder
¾ tsp kosher salt
1 ½ cups lactose-free whole milk
1/3 cup lactose-free plain Greek yogurt
3 Tbsp unsalted butter or margarine, melted and cooled slightly
1 egg

Preheat the oven to 400 ˚F. Place the beets in a glass or metal baking dish with about ½ cup water in the bottom. Cover with aluminum foil and roast until very tender, about 1 hour. Cool, peel, and purée the beets in a food processor or blender until smooth. You will need ½ cup of beet purée (any remaining purée can be frozen for another time).

Sift the dry ingredients into a large bowl, pouring back into the bowl any bits of grain or other ingredients that may remain in the sifter.

In a medium bowl, whisk together the milk, yogurt, melted butter, egg, and ½ cup of beet purée until smooth. Using a spatula, add the wet ingredients to the dry ingredients and gently combine. The batter should be the consistency of lightly whipped cream and crimson in color. (Although the batter is best if used immediately, it can sit for up to 1 hour on the counter or overnight in the refrigerator. When you return to the batter, it will be very thick and should be thinned, 1 tablespoon at a time, with milk–take great care not to overmix.)

Heat a 10-inch cast-iron pan or griddle over medium heat until water sizzles when splashed onto the pan. Rub the pan generously with butter or oil. Working quickly, dollop ¼-cup mounds of batter onto the pan, 2 or 3 at a time. Once bubbles have begun to form on the top side of the pancakes, flip them over and cook until the bottom is dark golden-brown, about 5 minutes total. Wipe the pan with a cloth before griddling the next batch. Rub the pan with butter or oil and continue with the rest of the batter. If the pan is too hot or not hot enough, adjust the flame accordingly to keep results consistent.

Serve the pancakes hot, straight from the skillets, with a pitcher of warm maple syrup, encouraging your guests to pour as they please.


Monday, February 27, 2012

Bonnes choses de février

Je veux vous faire part de quelques bonnes choses qui ont marqué mon mois de février et que j’ai beaucoup aimées.

- La série télé 19-2. Mes parents l’ont offerte à l’Ingénieur pour Noël en espérant que ça lui/nous plairait, et ils sont très bien tombés! C’est une série excellente, avec des acteurs bourrés de talent, des personnages réalistes et attachants ainsi qu’un scénario très bien écrit en plus; c’est franchement captivant. Espérons une deuxième saison!

- Le livre The Pillars of the Earth, de Ken Follett (Les Piliers de la terre, en version française). Bon, je n’ai toujours pas terminé la lecture, mais c’est de loin le meilleur livre que j’ai lu récemment, et certainement dans mon top 10 à vie. Encore ici, l’intrigue est captivante, les personnages sont vivants, attachants et réalistes, les scènes de la vie médiévale et l’architecture sont fascinantes… Je lis chaque soir et ne pose le livre que quand mes paupières ne coopèrent plus. Dès que c’est terminé, je vais regarder la minisérie avec l’Ingénieur.

- La série Les Filles de Caleb, que l’Ingénieur m’a offerte pour la Saint-Valentin (parce que quand on se plaint de ne pas pouvoir regarder tou.tv depuis les États-Unis, ça ne tombe pas dans l’oreille d’un sourd). Il m’a dit que le coffret DVD n’a pas été facile à trouver, mais j'affirme que ça valait la peine. Juste la musique du générique m’a envoûtée de nouveau. Bon, j’ai insisté pour que l’Ingénieur regarde un épisode avec moi, même s’il était convaincu que ce n’était pas son style, et malheureusement, j’ai choisi le premier épisode. Avouons que ce n’est pas le meilleur. Tant pis pour lui, je pourrais donc regarder plus d’épisodes quand il sera au boulot!

- Le fait de mettre les pieds chez Sur la Table. C’est un paradis pour les gens qui aiment cuisiner! J’y ai dépensé un certificat cadeau qui m’avait été offert par Chère Sœur; j’ai acheté de superbes assiettes creuses pour les pâtes, deux assiettes creuses pour le plaisir, une tasse à mesurer en pyrex (j’ignore pourquoi c’est devenu si difficile à trouver, mais là, il y en avait) et des moules à tartelettes.

- Le rodéo de San Antonio, auquel on a assisté le soir du concert donné par Joan Jett and the Blackhearts (oui oui, elle chante toujours, et attention, il y a de la musique derrière ce dernier lien!). C’est vraiment génial, un rodéo! Et puis c’est dur de battre une performance de I Love Rock And Roll et Bad Reputation par les vrais de vrais, en plus de Cherry Bomb!

- Les oscars. Un dimanche soir à manger des trempettes pour souper devant la télé, en regardant la plus importante cérémonie dans le domaine du cinéma, avec Billy Crystal comme animateur en plus… Génial! Jessica Chastain, Natalie Portman et Michelle Williams (avec sa vieille amie Busy Philipps) étaient super belles, j’ai adoré surtout la robe de Penélope Cruz et je suis tellement contente que Meryl Streep ait gagné son oscar (qu’elle n’avait pas remporté depuis 1982)! Et puis, le petit monologue de Chris Brown était à se tordre de rire. Je crois par contre que le Cirque du Soleil était le clou du spectacle!

Sunday, February 26, 2012

Poulet aux arachides avec nouilles Udon


Cette recette est (légèrement) adaptée d’Obsessions gourmandes. J’ai utilisé du beurre d’arachides de marque Earth Balance, qui ne contient absolument aucun sucre, et je l’ai trouvé fade. Ce qui me montre à quel point je suis habituée d’avoir du beurre d’arachides au moins un peu sucré et salé, même si je fais attention à ne pas acheter de trucs qui font trop malbouffe à mon goût (mes deux marques préférées sont le Skippy Natural crémeux et le Smooth Operator de Peanut Butter & Co.). Donc finalement, je trouvais la sauce au beurre d’arachides un peu fade à mon goût et j’y ai rajouté une cuillérée de cassonade, mais même comme ça, ce n’était pas une sauce sucrée. Je n’ai pas trouvé de nouilles Udon, alors j’ai choisi les nouilles asiatiques avec la forme la plus rapprochée; j’ai aussi choisi de les mélanger directement dans le wok avec le poulet, avec la sauce, mais on peut bien sûr les cuire séparément et servir le poulet par-dessus, puis napper de sauce, pour que ce soit plus joli. L’Ingénieur a déclaré le plat « spectaculaire » et il m’en a déjà reparlé une fois depuis que je l’ai fait! Cette recette fait 4 portions pas trop grosses (comme vous le voyez sur la photo; ne regardez pas les traces de sauce). Si vous voulez la faire sans gluten, utilisez de la sauce tamari sans blé, faites votre propre sauce Hoisin et choisissez plutôt des nouilles de riz.

Pour la sauce aux arachides
½ tasse de bouillon de poulet
2 gousses d’ail pilées
1 c. à table de sauce soya
2 c. à soupe de vinaigre de riz
2 c. à soupe de sauce Hoisin
½ tasse de beurre d’arachides
1 c. à soupe de cassonade, ou au goût (facultatif)

Pour le sauté
des nouilles Udon pour 4 personnes
1 c. à soupe d’huile d’arachides ou de canola
1 poivron rouge en dés
1 poivron orange en dés
10 champignons café tranchés
2 poitrines de poulet en cubes
1 c. à soupe de graines de sésame
1 boîte de châtaignes d’eau tranchées
2 oignons verts émincés
1 poignée de coriandre fraîche


Pour la sauce aux arachides
Dans une petite casserole, amener le bouillon de poulet à ébullition. Ajouter l’ail, la sauce soya et le vinaigre de riz. Incorporer la sauce Hoisin.

Hors du feu, incorporer le beurre d’arachides en remuant vigoureusement (ajouter du beurre d’arachides si la sauce n’est pas assez épaisse). Au besoin seulement, remettre la sauce à feu très, très doux pour la faire réchauffer; sinon, la réserver jusqu’au service.

Pour le sauté
Plonger les nouilles Udon dans l’eau bouillante 3 minutes. Égoutter et réserver.

Dans un wok, faire sauter les poivrons et les champignons dans l’huile d’arachides bien chaude. Retirer du feu et réserver.

Baisser légèrement le feu et faire cuire le poulet de chaque côté.

Une fois la viande cuite, ajouter les graines de sésame, puis réintégrer les poivrons et les champignons ainsi que les châtaignes d’eau et les oignons verts, juste le temps de chauffer le tout (quelques secondes). Retirer du feu.

Servir le sauté sur un lit de nouilles Udon, napper de sauce aux arachides et parsemer de coriandre.


Poached Pears with Cardamom and Saffron

I found this recipe in the January issue of Bon Appétit. It had a mix of spices that appealed to me, and it was just the thing I needed between two of the Engineer’s chocolate cakes. I had always poached pears in red wine before, too, so the white wine seemed lighter and refreshing. I chose to halve the pears and core them, because I feel they’re easier to eat that way. I loved the result! I didn’t serve them with the recommended dollop of crème fraîche, obviously, though perhaps some plain yogurt would be nice. In hindsight, and looking at the original picture, I think that when you crack the cardamom pods open, you should not pry them open any further – I released the seeds and put those directly in the wine, but it’s somewhat unpleasant to bite into one. I think just putting the cracked pods in there would give you the same flavor, but they would be easier to avoid as you’re spooning your way through your pear.

½ Tbsp cardamom pods
2 cups dry white wine
¾ cup sugar
1 ½ Tbsp fresh lemon juice
¼ tsp saffron threads
pinch of kosher salt
4 firm pears, peeled, stems intact OR halved and cored

Gently crush cardamom with a rolling pin or the bottom of a skillet to slightly crack open pods without releasing seeds. Combine cardamom, wine, sugar, lemon juice, saffron, and salt in a medium saucepan over medium heat, stirring until sugar dissolves. Bring to a simmer. Add pears; add water if needed to completely submerge pears. Cover with lid slightly ajar and simmer, turning occasionally, until pears are tender but not mushy, about 30 minutes.

Using a slotted spoon, transfer pears to a plate. Increase heat and boil poaching liquid until reduced to 1 cup, 10–15 minutes. Put one or two pear halves (or one pear) per bowl and spoon some of the syrup over the fruit. I like it best served warm, but it can be served cold as well.


Friday, February 24, 2012

Sexy-Ugly Onion Tart


Let me begin by saying that I did not name this tart myself, but I feel the name is too awesome to dismiss. It’s a recipe from Big Girls Small Kitchen, found via The Kitchn. I used my own recipe for the crust, but you can use pretty much any recipe you want (including the one at the link). This sexy-ugly onion tart was different from my Alsatian onion tart in that it’s less rich and eggy, so it’s less quiche-like, and the onions simply rest on the cheese, as opposed to being mixed in with it. It’s a very simple tart to make and is a nice homely and homey meal.

I used this recipe as the perfect excuse to finally do something that had been intimidating me for a while: make cheese. Yes, that’s right: actually make my own cheese in my own kitchen, using cheesecloth for its original intended purpose. Ironically, I would have never bothered with it had I not been lactose-intolerant, because making cheese had always sounded like so much trouble when it’s so easy to go to the store. I used a recipe from Smitten Kitchen. It was much easier than I thought, too. And as a bonus, I got to eat lactose-free ricotta, which so far can only be obtained by making it yourself. It tastes better when it’s rich, so if you’re in Canada, I recommend that you use 1 cup of Natrel’s lactose-free cream and 3 cups of their lactose-free milk. Unfortunately, I don’t have lactose-free cream here, so I used 4 cups of lactose-free whole milk. The ricotta was delicious in the tart, though it might be too bland to use as a spread on crackers. Nonetheless, I consider this a complete success.

For the ricotta (makes about 1 generous cup)
3 cups lactose-free whole milk
1 cup lactose-free heavy cream (if unavailable, use 1 more cup lactose-free whole milk)
½ tsp coarse sea salt
3 Tbsp freshly squeezed lemon juice

Pour the milk, cream and salt into a 3-quart nonreactive saucepan. Attach a candy or deep-fry thermometer. Heat the milk to 190 °F, stirring it occasionally to keep it from scorching on the bottom. Remove from heat and add the lemon juice, then stir it once or twice, gently and slowly. Let the pot sit undisturbed for 5 minutes.

Line a colander with a few layers of cheesecloth and place it over a large bowl (to catch the whey). Pour the curds and whey into the colander and let the curds strain for at least an hour. At an hour, you’ll have a tender, spreadable ricotta. At two hours, it will be spreadable but a bit firmer, almost like cream cheese. (It will firm as it cools, so do not judge its final texture by what you have in your cheesecloth.) Discard the whey, or, if you’re one of those crafty people who use it for other things, of course, save it. Eat the ricotta right away or transfer it to an airtight container and refrigerate until ready to use.


For the onion tart
2 Tbsp unsalted butter or margarine
2 onions, halved and sliced into thin half-moons
1 tsp fresh thyme leaves (plus a little extra for garnish)
¼ tsp salt
1 cup whole-milk ricotta
1 egg yolk
pie dough for 1 pie crust

In a large cast-iron skillet or Dutch oven, melt the butter over low heat. Add the onions and cook, stirring occasionally, for about 45 minutes, until caramelized. The onions should be deep brown and sweet. Add the fresh thyme and the salt, and let cool off the heat. Whisk the ricotta and the egg yolk together in a small bowl. Set aside.

Make sure your work surface is clean and cool. Lightly flour the surface and roll out the dough until it is large enough to cover a 9-inch fluted tart pan with a removable bottom. Roll up the dough on your rolling pin and slowly unroll on top of the tart. Use your fingers to press the dough into the tart and a paring knife to trim off any excess. If the dough breaks, don’t worry—just pull it together and patch it. Try to make the walls a bit thicker than the bottom. Chill the tart shell in the fridge for 10 minutes so that the dough remains cold.

Meanwhile, preheat the oven to 400 °F.

Remove the tart from the fridge, and use a spatula to spread the ricotta mixture evenly across the surface with a spatula. Arrange the onions on top. Bake for 25 to 30 minutes, until the ricotta filling is firm and the crust is beautifully golden. Let the tart cool in the pan. Garnish it with thyme leaves.


Tuesday, February 21, 2012

Pumpkin and Peanut Butter Dog Treats

Our dog, Darwin, just turned two. To celebrate, I baked him some dog treats, which has become a tradition. (And I just now realize this means I completely forgot about this blog’s third anniversary – oh, well.) This year’s recipe is actually from a food blog I like, Dessert First. The treats have four ingredients and are simple as can be. They’re also edible by humans (really, they’re not that bad), and were a big hit with Darwin.

2 ½ cups whole wheat flour (I used white whole wheat)
2 large eggs
2/3 cup puréed pumpkin, either canned or fresh
3 Tbsp peanut butter (or more)

Preheat oven to 350 °F. Line a baking sheet with a silicone baking mat or parchment paper.

Combine all ingredients in a stand mixer bowl. Mix on medium speed until the dough comes together.

Turn out dough onto a lightly floured surface and roll out to ¼" inch thick. Add a little water if the dough is very stiff, or a little flour if it is too soft and sticky. Use a cookie cutter to cut out desired shapes. Place on prepared baking sheet.

Bake for about 15-20 minutes until the cookies are dry to the touch. You can bake them longer if you want them to be completely dry and hard, but I prefer them to be slightly soft and chewy.

Let cool on wire rack before serving to doggies.


Escarole with Bacon, Dates, Walnuts and Warm Vinaigrette

I made this recipe to use up the last few slices in the package of bacon that were left after the (glorious) chicken Caesar skewers. It was good timing, too, as escarole is in season. I didn’t have walnut oil, so I used a mixture of avocado and olive oils. This salad was wonderful, and reminded me how much I enjoy dates.

1 7- to 8-oz head of escarole, coarsely torn (but don’t be afraid to chop too small)
6 Medjool dates, halved, pitted, diced (or more)
½ cup walnut pieces, toasted
5 bacon slices, cut crosswise into strips
¼ cup walnut oil or extra-virgin olive oil
1 large shallot, chopped
2 Tbsp red wine vinegar
fine sea salt

Combine escarole, dates, and walnuts in large bowl. Cook bacon in medium skillet over medium-high heat until brown and crisp. Using slotted spoon, transfer bacon to paper towels to drain. Add bacon to bowl with salad.

Discard drippings from skillet; add walnut oil. Place over low heat. Add shallot; sauté until soft, about 3 minutes. Remove skillet from heat; add vinegar and whisk to blend. Season vinaigrette with sea salt and black pepper. Gradually add warm dressing to salad, tossing to coat. Divide among plates.


Cranberry Quinoa Breakfast Cookies

This recipe is also from Bon Appétit. I didn’t use the almonds, because I don’t really like nuts in cookies, but I did use the almond extract, which was quite present in the final flavor along with the quinoa – yum! These cookies were absolutely delicious, fluffy on the inside and lightly crispy on the outside, especially when they were still warm. I used an ice cream scoop to portion out the dough evenly, but next time I would flatten them out a little, as they really don’t spread out. You could use dried cherries instead of cranberries, as they go really well with the almond extract.

1 ½ cups white whole wheat flour
1 tsp kosher salt
½ tsp baking powder
½ tsp baking soda
½ cup (1 stick) unsalted margarine
¼ cup sugar
¼ cup (packed) light brown sugar
¼ cup honey
2 large eggs
1 tsp vanilla extract
½ tsp almond extract
1 cup cooked quinoa, cooled
1 cup old-fashioned oats
1 cup dried cranberries

Preheat oven to 375 °F. Line 2 baking sheets with parchment paper. Whisk flour, salt, baking powder, and baking soda in a medium bowl. Using an electric mixer, beat margarine, both sugars, and honey in a large bowl until light and fluffy, about 3 minutes. Add eggs and extracts; beat until pale and fluffy, about 2 minutes. Beat in flour mixture, ½ cup at a time. Stir in quinoa, oats, cranberries, and almonds. Spoon dough in 2-tablespoon portions onto prepared sheets, spacing 1” apart.

Bake cookies until golden, 12–15 minutes. Transfer cookies to a wire rack and let cool.


Black-Eyed Peas with Celery Leaf Salad


This recipe is adapted from Bon Appétit. It originally calls for Sea Island red peas, but I couldn’t find those here, so I used black-eyed peas. I’m pretty sure you could just use whatever heirloom peas you want and adjust the cooking time accordingly. I had premade bouquets garnis (with oregano, thyme, savory, and bay leaves) in the pantry, so I used one of those and put it in the pot with the beans as they were cooking. I feel this gives the peas more flavor than if I add it in later, so that’s what I recommend. I used ground coriander instead of whole coriander, since I had to grind it anyway and I wanted to save a bit of time. I also used an orange bell pepper instead of red, margarine instead of butter, and avocado oil instead of olive oil. I also never really measure out my chopped vegetables – I mean, it’s a salad, after all! Just use what you want. This was a major win. The Engineer and I both loved it. When I had the leftovers for lunch a few days later, I threw in some cooked quinoa, and it was really awesome. This salad makes about 6 servings.

2 cups dried black-eyed peas (or heirloom peas)
1 tsp kosher salt plus more
2 garlic cloves
6 sprigs thyme
1 fresh bay leaf
¼ cup extra-virgin olive oil, plus more for drizzling
½ cup finely chopped celery plus ½ cup celery leaves from inner stalks
½ cup finely chopped onion
½ cup finely chopped red bell pepper
1 Tbsp unsalted butter or margarine
1 tsp coriander seeds
2 Tbsp thinly sliced chives
2 tsp finely grated lemon zest
freshly cracked black peppercorns

Place peas in a medium pot; cover with 6 cups water; let soak overnight.

Bring water with peas to a boil (this is where I threw in my bouquet garni of dried herbs); boil for 15 minutes. Reduce heat to medium; gently simmer, adding water by 1/2-cupfuls as needed to keep peas covered, until peas are tender but still hold their shape, 50 to 60 minutes. Remove from heat and stir in 1 tsp salt.

Place garlic on a cutting board. Sprinkle with salt and chop, occasionally smearing with the back of a knife, until a coarse paste forms. Tie thyme and bay leaf with kitchen twine to form a bundle for bouquet garni (if you are only using it now).

Heat ¼ cup oil in a medium pot over medium heat; add garlic paste, bouquet garni, celery, onion, and bell pepper; cook until vegetables are tender, about 15 minutes. Add peas with their cooking liquid; bring to a simmer. Cook until flavors meld and sauce is thickened, 10–15 minutes. (At this point, I drained the pot, because there was still too much liquid for my taste.) Remove from heat; stir in butter. Set aside.

Toast coriander seeds in a small dry skillet over medium heat, shaking pan often, until fragrant and slightly darker in color, 2–3 minutes. Let cool. Coarsely grind in a spice mill, or place in a resealable plastic bag and crush with a rolling pin or the bottom of a heavy skillet. Combine celery leaves, parsley, chives, lemon zest, and crushed coriander seeds in a small bowl; drizzle with oil and toss to coat. Season to taste with salt and cracked pepper. Divide peas among plates or transfer to a serving bowl; garnish with salad (or toss everything together).


Saturday, February 18, 2012

Brochettes de poulet César


L’Ingénieur et moi avons fait ces brochettes pour un souper de fin de semaine. J’ai oublié de faire mariner le poulet d’avance, alors je l’ai badigeonné de la sauce en début et en fin de cuisson. Les croûtons étaient absolument délicieux, la sauce était réellement savoureuse, et le plat assemblé était à s’en rouler par terre; on n’en revenait pas tellement c’était bon. Tout goûtait l’ail et l’umami, grâce au parmesan et peut-être à la pâte d’anchois… Franchement, un grand succès! La recette est tirée de Coup de Pouce. Les quantités ci-dessous servent 6 personnes, mais nous avons réduit le tout pour nos besoins. Je vous recommande fortement d’essayer ça, vous allez vous régaler!

Pour les croûtons à l’ail maison
4 tasses de cubes de pain baguette ou de pain italien
3 c. à soupe d’huile d’olive
½ c. à thé d’origan séché
1 gousse d’ail pressée (ou hachée finement)
sel et poivre noir

Préchauffer le four à 350 °F. Dans un bol, mélanger le pain, l’huile, l’origan et l’ail. Saler et poivrer. Étendre les cubes de pain sur une plaque de cuisson et faire cuire pendant environ 10 minutes ou jusqu’à ce qu’ils soient dorés. Laisser refroidir. (Vous pouvez préparer les croûtons à l’avance et les mettre dans un contenant hermétique. Ils se conserveront jusqu’à 2 semaines à la température ambiante, dans un endroit sec.)

Pour les brochettes et la salade
3 c. à soupe de mayonnaise
4 c. à thé de jus de citron
2 c. à soupe de moutarde à l’ancienne
1 c. à thé de pâte d’anchois
2 gousses d’ail pressées (ou hachées finement)
2 c. à soupe de feuilles de thym frais
½ c. à thé de poivre noir
2/3 tasse d’huile d’olive
1 ½ lb de poitrines de poulet désossées, la peau et le gras enlevés
18 tranches de bacon coupées en deux sur la largeur
2 oignons rouges coupés en 12 quartiers chacun
2 poivrons rouges coupés en 12 morceaux chacun
8 tasses de laitue romaine déchiquetée
croûtons à l’ail maison
copeaux de parmesan

Dans un bol, à l'aide d'un fouet, mélanger la mayonnaise, le jus de citron, la moutarde, la pâte d'anchois, l'ail, le thym et le poivre. Ajouter l'huile en fouettant.

À l'aide d'un couteau bien aiguisé, couper les poitrines de poulet en cubes de 1 po (2,5 cm) (vous devriez obtenir 36 cubes). Mettre les cubes de poulet dans un autre bol, verser la moitié de la sauce César et mélanger pour bien les enrober. Couvrir et laisser mariner 30 minutes. (Vous pouvez préparer le poulet jusqu'à cette étape et le couvrir. Il se conservera jusqu'au lendemain au réfrigérateur. Couvrir le reste de la sauce César. Elle se conservera jusqu'à 1 semaine au réfrigérateur.)

Entourer chaque cube de poulet mariné d'un morceau de bacon. Sur 12 brochettes en métal ou en bois préalablement trempées dans l'eau, enfiler les cubes de poulet en alternant avec les quartiers d'oignons et les morceaux de poivrons.

Régler le barbecue au gaz à puissance moyenne. Mettre les brochettes sur la grille huilée du barbecue, fermer le couvercle et cuire pendant environ 12 minutes ou jusqu'à ce que le bacon soit croustillant et que le poulet ait perdu sa teinte rosée à l'intérieur (retourner les brochettes trois fois en cours de cuisson).

Au moment de servir, répartir la laitue et les croûtons dans six assiettes. Garnir chaque portion de deux brochettes. Arroser du reste de la sauce César et parsemer de copeaux de parmesan.


Thursday, February 16, 2012

Wheat Berry Salad with Figs and Red Onion

This is supposed to be a wheat berry salad, but my grocery store didn’t have wheat berries, so I made it with faro instead. I’m pretty sure you could also use barley as a grain, but you do want something heartier than couscous. I’m not sure what the deal is with red onions, though. Are people getting milder onions than I am? Or do I need to build up my tolerance? It seems like no matter how small I chop them, they always end up being too strong for my taste. I suggest soaking the onion before using it (its bite is less of a problem if the salad is coming straight from the fridge). I really liked this salad; it was hearty, fruity and crunchy, while remaining quite seasonal. You could use dates or apricots in this salad, too.

1 ½ cups wheat berries
¼ cup rice vinegar
1/3 cup fresh orange juice
2 tablespoons honey (or maple syrup or agave nectar, for a vegan version)
½ cup golden raisins
½ cup dried figs, chopped finely
½ medium red onion, soaked in water for a few hours
3 large stalks celery
¼ cup good-quality olive oil
1 Tbsp lemon zest (from 2 lemons)
1 cup roasted almonds, roughly chopped
1 handful fresh parsley or mint, finely chopped
1 tsp flaky sea salt
freshly-ground black pepper, to taste

Put the wheat berries in a saucepan and cover with water. Bring to a boil over medium heat, then turn the heat down to low and partially cover the pot. Cook for 45 minutes, or until the wheat berries are soft yet still chewy.

While the wheat berries are cooking, whisk the rice vinegar, orange juice, and honey together in a small saucepan. Bring to a boil and add the raisins and chopped figs. Turn off the heat and let the fruit steep in the juice and vinegar mixture.

Finely dice the red onion; you will end up with between 1 and 1 ½ cups. Finely dice the celery as well; you will have between 1 ½ and 2 cups. Mix them in a large bowl.

When the wheat berries are tender enough to be chewed easily, drain them, then pour them into the large bowl with the red onion and celery. Toss with the olive oil and lemon zest. Add the vinegar and juice mixture, and all the fruit, and mix. Toss with the almonds, chopped parsley or mint, and with the salt. Add pepper to taste.

Let the salad stand at room temperature for at least one hour before serving, to allow the flavors mix and soak into the grain. Serve warm or at room temperature. The salad can also be refrigerated for up to three days.


Spiced Pork Chops with Peach Salsa

Another recipe adapted from Redbook! (Last one, I promise.) The original called for either 2 tsp canned chipotle chili peppers, minced, or 2 tsp smoky barbecue sauce. I didn’t want it too spicy, and I wasn’t going to buy a whole jar of barbecue sauce to use only 2 tsp! So I improvised and used ½ tsp of Korean pepper and I liked the result. You can of course adapt it to suit your taste and the contents of your pantry. I used small pork chops with the bone removed, so as not to overdo it on the meat, but use whatever size you want.

2 tsp smoky barbecue sauce, ½ tsp Korean pepper or whatever you want
2 Tbsp light brown sugar
1 tsp + 1 Tbsp lime juice
¾ tsp salt, divided
4 6-oz pork chops (or to taste)
2 cups chopped peaches
3 scallions, minced
1 jalapeño, seeded and minced (optional, according to me)
1 Tbsp chopped cilantro

Heat grill to high. Combine Korean pepper, sugar and 1 tsp of the lime juice in a small bowl; set aside.

Sprinkle chops with ½ tsp of the salt and grill, turning once, until well browned but still slightly pink in the center, 8 minutes, basting with sugar mixture during last minute of cooking.

Combine remaining lime juice and salt with the peaches, scallions, jalapeño and cilantro in a bowl; serve peach salsa with grilled chops.


Teriyaki Turkey Burgers with Grilled Pineapple

This recipe is adapted from an old issue of Redbook magazine (June 2002, to be exact), but it isn’t archived on their website. The Engineer and I made these on our grill recently, and we both really liked them. We omitted the red onion slices and decided to make the pineapple slices ¼-inch thick next time, so that they’re easier to bite through. I’m a big proponent of using fresh pineapple, though, because I used to think I didn’t really like pineapple when all I was eating was canned – now I love the fresh stuff. You can definitely “cheat” and buy a fresh one that’s been peeled and cored for you, especially if that’s all your store carries. Incidentally, slices of fresh pineapple basted with vanilla bean paste and grilled are an excellent dessert!

3 oz Tofutti cream cheese
½ cup coarsely chopped scallions
6 Tbsp teriyaki sauce (such as Kikkoman brand)
1 ½ lb ground turkey breast
1 egg white
1/3 cup plain breadcrumbs
4 ¼-inch slices peeled, cored fresh pineapple
4 kaiser rolls
slices of red onion

Heat grill to high. Process cream cheese, scallions and 4 Tbsp of the teriyaki sauce in a food processor until smooth; transfer cream cheese mixture to a large bowl. Add turkey, egg white, and breadcrumbs and stir to mix well. Form into 4 patties; grill until cooked through, 10 minutes.

Meanwhile, place pineapple slices on grill and brush them with remaining teriyaki sauce; grill, turning occasionally, until well browned, 10 minutes. Grill rolls, cut side down, until toasted, 1 minute. Serve burgers on rolls with grilled pineapple slices and red onion slices.


Wednesday, February 15, 2012

Spiced Coconut Pancakes with Tropical Fruit


I made these pancakes from Bon Appétit the weekend before last. The preparation wasn’t as tedious as it looks, but the first batch came out way too thick. I ended up adding water to the batter, and in the end I suggest using a total of 14 ounces instead of 10, and adjusting from there. I’m using 14 ounces as a reference because it’s easy to just fill the empty can of coconut milk with water. I wonder if my batter reacted that way because I used finely shredded coconut, which perhaps had more of the properties of coconut flour than regular shredded coconut (i.e., absorbing a lot of moisture). I still couldn’t get my pancakes to look as nice as those in the magazine, so that was disappointing, but I really liked the tropical fruit salad. I used a fresh, peeled and cored pineapple to save time, and the salad kept well in the fridge for a day, even though there are bananas in it. I didn’t use the pistachios, becaue I felit like they didn’t’ have their place here, but next time, I would add lime zest and/or chopped mint, because I feel like it was missing something. These coconut pancakes are delicious with maple syrup or ginger syrup.

For the tropical fruit
1 cup diced peeled pitted mango
1 cup diced peeled cored pineapple
1 cup diced peeled banana
2 Tbsp pure maple syrup
lime zest and chopped fresh mint, to garnish

Mix all ingredients in medium bowl. (Can be made up to 2 hours ahead. Cover and refrigerate.)

For the spiced coconut pancakes
2 ½ cups whole wheat flour
1 cup unsweetened shredded coconut
2 tsp baking powder
¾ tsp ground nutmeg
¾ tsp ground allspice
¾ tsp salt
¼ tsp baking soda
1 14-oz can light unsweetened coconut milk (about 1 2/3 cups)
2 Tbsp pure maple syrup
1 Tbsp vanilla extract
vegetable oil
additional pure maple syrup or ginger syrup
chopped natural unsalted pistachios (optional; for garnish)

Preheat oven to 250 °F. Whisk first 7 ingredients in large bowl.

Whisk coconut milk, maple syrup, and vanilla in medium bowl. Fill the empty coconut milk can with warm water, add it to the bowl and whisk again. Whisk coconut milk mixture into dry ingredients until batter is pourable.

Heat griddle or skillet over medium-high heat; brush with vegetable oil. Working in batches, add batter by ¼-cupfuls. Working quickly and using back of spoon, spread each pancake to about 4-inch round. Cook until small bubbles appear on surface and bottoms of pancakes are golden, reducing heat if browning too quickly, 2 to 3 minutes. Turn over; cook until golden, 1 to 2 minutes. Transfer to baking sheet and keep warm in oven.

Place 2 to 3 pancakes on each plate. Top with tropical fruit salad, maple or ginger syrup, and chopped pistachios, if using.


Sunday, February 12, 2012

Easy Popovers


These popovers, from Real Simple, are almost cheater popovers. They really only require 5 minutes of active time, then they’re in the oven for 30 minutes and that’s it. That being said, they didn’t have the light, hole-ridden structure I was expecting. They were remarkably bouncy and spongy, nothing like “real” popovers. Then again, the Engineer said that if he owned a restaurant, he would serve those instead of bread rolls, so clearly they made an impression! I really liked them as well, and considering how fast and easy they were, I’ll make them again gladly. I served them with a mango black bean salad, but they were great the next morning with a little jam for breakfast.

3 Tbsp unsalted butter or margarine, melted, plus more for the pan
1 ½ cups all-purpose flour (I made sure to use white flour), spooned and leveled
1 ½ cups whole milk
4 large eggs
½ tsp kosher salt

Heat oven to 400 °F. Brush the cups of a 12-cup nonstick muffin tin with butter.

In a large bowl, whisk together the flour, milk, eggs, butter, and salt until only a few lumps remain (do not overmix).

Divide the batter among the prepared muffin cups and bake until puffed and a deep golden brown, 30 to 35 minutes. (Do not open oven door before 30 minutes or the popovers will collapse. Remove 1 popover to check that the underside is browned.) Serve immediately.


Mango Black Bean Salad


I really enjoyed The Nate Show. Sure, as the series progressed, the shows were less about interior design and more about fashion and cooking (ironic, since Nate can’t cook), but I figured that was due to budget constraints – you can’t make over several rooms and give lavish gift certificates to guests for each episode of a daily series without going into the red. I was starting to get the feeling that the producers were getting desperate when they kept booking the same guests all the time, though. Now, the show’s been cancelled (although for some reason, it seems to still be airing a spring season on some stations, but not in San Antonio). I could spend time mourning for the show, but I’m trying to look at the bright side here: I’m no longer being held hostage by daytime television. Yay!

I did bookmark several recipes from the show, and I’ll try to make them before they are taken offline. This healthy salad was presented by Maria Menounos. I changed it a bit by using a yellow pepper instead of a green pepper – it would have looked better with green, but I don’t like green peppers as much as the more colorful ones. I used two shallots instead of ½ cup red onion, and two mangoes instead of one, as they were small (there was a sale and they were two for $1). The original recipe also calls for ½ cup Italian dressing, but I usually don’t have any store-bought dressing on hand, so I made one with 4 Tbsp red wine vinegar and 4 Tbsp avocado oil (but olive oil would be great, too); you could even reduce that a bit if you want. The Engineer and I both loved this colorful salad, and I’ll be sure to make it again. It’s pretty easy to make, too, as long as you can be zen and take your time chopping properly. You could also use dried beans and cook them ahead of time, but canned beans are that much faster. The salad keeps well even with the dressing, and you have enough for 4 servings. I served the salad with some popovers.

1 ripe mango, peeled, pitted and diced (or 2 small mangoes)
½ cup Italian dressing (4 Tbsp olive oil + 4 Tbsp red wine vinegar, for example)
2 15-oz cans of black beans, drained and rinsed
½ cup chopped red onion (or 2 shallots, chopped)
1 red bell pepper, seeded and chopped
1 green (or color of your choice) bell pepper, seeded and chopped
salt and pepper, to taste

In a food processor or blender, purée ¼ cup of the mango with the Italian dressing until smooth.

In a large bowl, combine the remaining mango with the rest of the ingredients. Add the mango purée and toss. Serve immediately or chilled.