Tuesday, December 03, 2019

Almond Cardamon Tea Cake


This almond cardamom tea cake is from Samin Nosrat’s Salt, Fat, Acid, Heat (from the “Fat” chapter). It was easy to make, and the flavors were both simple and complementary. This cake was truly excellent! The Engineer gave it 5 stars, and both kids ate it with gusto (the Fox almost swiped it while I was taking a photo the next day, as you’ll see below). I loved it too!

For the almond topping
4 Tbsp. (2 oz.) lactose-free butter or margarine
3 Tbsp. sugar
1 scant cup (3 oz.) sliced almonds
1 pinch of flaky sea salt

For the cake
1 cup (5 ¼ oz.) cake flour
1 tsp. baking powder
1 tsp. kosher salt OR ½ tsp. fine sea salt
1 tsp. vanilla
2 ½ tsp. ground cardamom
4 large eggs, at room temperature
1 cup (9 ½ oz.) almond paste, at room temperature
1 cup (7 oz.) sugar
2 sticks (1 cup or 8 oz.) lactose-free butter or margarine

Preheat the oven to 350 °F. Set a rack in the upper third of the oven. Grease a 9 by 2-inch round cake pan (I used a springform pan), line it with parchment paper, then grease it again and dust it with flour.

To make the almond topping, in a small saucepan set over medium-high heat, cook the butter and sugar for about 3 minutes, until the sugar has dissolved and the liquid bubbles. Remove from heat and stir in the almonds and salt. Pour the mixture into the prepared cake pan and use a rubber spatula to distribute it evenly across the bottom of the pan.

For the cake, whisk together the flour, baking powder, and salt. Set aside.

In a small bowl, thoroughly whisk together the vanilla, cardamom, and eggs. Set aside.

Place the almond paste in the bowl of a food processor and pulse a few times to break it up. Add sugar and process for 90 seconds, or until the mixture is as fine as sand. Add the butter and continue processing until the mixture is very light and fluffy, at least 2 minutes. Stop and scrape down the sides of the bowl to ensure that everything is being combined evenly.

With the machine running, slowly start to add the egg mixture, spoonful by spoonful, as if making a mayonnaise (this is an emulsion!). Let each addition of egg be absorbed so that the mixture regains its smooth, silky look before adding more eggs. When all the eggs have been added, stop and scrape the sides with a rubber spatula, then continue to mix until well combined.

Scrape the batter into a large bowl. Gently fold in the flour in three additions until just incorporated. Avoid overmixing. Pour the cake batter into the prepared pan.

Bake the cake for 50-60 minutes (the original recipe said 55-60, but I think I should have pulled mine out at 50 minutes), or until a toothpick inserted in the middle comes out clean. The cake will just pull away from the sides of the pan. Let the cake cool on a wire rack before running a knife around the edge and then inverting onto a plate. (If you have trouble, you could warm the bottom of the pan directly on the stovetop briefly, but mine came out fine.) Remove the parchment paper and then set onto a cake stand until ready to serve.

Monday, December 02, 2019

Boulettes de porc de Ricardo, de deux manières

L’été dernier, dans le magazine Ricardo, j’ai vu cette recette de boulettes de porc. Il s’agissait d’une recette de base que l’on pouvait ensuite apprêter de deux manières différentes : à la courge et à la crème ou bien à la sauce barbecue et aux poivrons. Selon le magazine, il suffisait de la moitié des boulettes pour chaque version, mais avec notre appétit (deux adultes et deux jeunes enfants), je recommande d’utiliser toutes les boulettes dans l’un ou l’autre des cas, afin d’avoir des restes pour un deuxième souper.

Pour les boulettes à la courge, j’ai remplacé la crème par du lait de coco; la sauce n’a pas épaissi, mais elle était délicieuse! Nous avons trouvé le repas un peu chenu, mais en y repensant, ça aurait été absolument parfait avec du couscous ou du quinoa, pour absorber la sauce. Je garde ça en tête pour la prochaine fois.

Pour les boulettes aux poivrons, j’ai suivi les recommandations dans les commentaires et j’ai doublé la quantité de sauce – c’est en effet ce que je recommanderais, donc si on utilisait toutes les boulettes, il faudrait quadrupler les quantités. C’est ce que je vous ai écrit ci-dessous. J’ai servi le plat avec du riz, cette fois-là, et c’était excellent! Les enfants n’ont pas aimé les poivrons, mais ils ont trippé sur la sauce barbecue, alors ça compensait.

L’ingrédient « magique » des boulettes, c’est les Rice Krispies au lieu de la mie de pain, qui leur donnent une texture moelleuse tout en étant rapides à utiliser. Le désavantage, c’est qu’on dirait que mon épicerie ne vend que des boîtes géantes (18 onces) de Rice Krispies! J’ai donc fait du granola, des biscuits (recette à venir), puis j’ai refait la recette de boulettes deux fois pour les mettre au congélateur. J’ai mangé des Rice Krispies pour déjeuner. Et il me reste encore des céréales. J’ai depuis vu un format plus petit, soit une portion dite individuelle de 1,3 onces (comme ça mais dans un autre magasin), et si jamais vous pouvez mettre la main là-dessus, c’est ça que je vous recommande (à moins que vous ne mangiez régulièrement des Rice Krispies, bien sûr).

Dans tous les cas, j’ai utilisé ma cuillère de 3 onces pour former les boulettes, et j’en ai obtenu 28 chacune des trois fois que j’ai fait la recette de boulettes. On peut bien sûr utiliser ces boulettes dans d’autres préparations, mais j’ai tellement aimé celles suggérées que je les partage ici toutes les deux, avec mes modifications (celles élaborées plus haut ainsi qu’une réduction de sauce forte).


Pour une recette de boulettes
2 œufs
1 tasse de lait sans lactose
2 tasses de céréales de riz croquant (de type Rice Krispies)
2,25 lb. (1 kg.) de porc haché maigre
½ tasse de fromage parmesan râpé finement
3 c. à soupe de moutarde Dijon
½ c. à thé de sauce sriracha
1 c. à thé de sel
poivre, au goût
¼ c. à thé du muscade moulue
1 pincée de clou de girofle moulu

Placer la grille au centre du four. Préchauffer le four à 425 °F. Tapisser une plaque de cuisson de papier parchemin ou de papier aluminium huilé.

Dans un grand bol, mélanger les œufs, le lait et les céréales de riz. Laisser imbiber 5 minutes. Ajouter le reste des ingrédients et bien mélanger avec une fourchette. Le mélange sera tendre.

Avec les mains légèrement huilées, façonner chaque boulette avec environ ¼ tasse du mélange de viande (moi, j’ai pris ma cuillère de 3 onces). Déposer délicatement les boulettes sur la plaque.

Cuire au four 30 minutes ou jusqu’à ce que la viande soit bien cuite.


Pour l’accompagnement à la courge et à la crème
1 courge butternut d’environ 3 lb., pelée, épépinée et coupée en cubes
1 oignon, haché finement (j’ai pris un oignon rouge, c’était plus joli)
1 c. à soupe d’huile végétale
1 c. à soupe de fécule de maïs
10 oz. de bouillon de poulet concentré
¼ tasse de crème sans lactose (ou de lait de coco)
2 c. à soupe de feuilles de persil plat
3 c. à soupe de fromage parmesan frais râpé

Placer la grille dans le bas du four. Préchauffer le four à 425 °F.

Dans un plat de cuisson de 9"x13", mélanger la courge, l’oignon et l’huile. Saler et poivrer. Cuire au four 40 minutes.

Entre-temps, dans un bol, délayer la fécule dans le bouillon et la crème.

Répartir (toutes) les boulettes sur la courge. Verser le mélange de bouillon sur les boulettes et les légumes chauds. Poursuivre la cuisson au four 10 minutes ou jusqu’à ce que la sauce épaississe (ce n’est pas arrivé même après 15 minutes pour moi, et je ne voulais pas faire brûler mes boulettes). Rectifier l’assaisonnement au besoin. Parsemer du persil et du parmesan pour servir.

Servir avec du couscous.


Pour l’accompagnement aux poivrons et à la sauce barbecue
4 poivrons (idéalement de couleurs différentes), épépinés et coupés en cubes
2 gousses d’ail, émincées
1 oignon, émincé
1 c. à soupe d’huile végétale
1 tasse de ketchup
¼ tasse de sirop d’érable
1 c. à thé de paprika fumé (ou plus, au goût) ou de piment coréen
feuilles de basilic, pour le service (je les ai oubliées dans le frigo)

Placer la grille dans le bas du four. Préchauffer le four à 425 °F.

Dans un plat de cuisson de 9"x13", mélanger les poivrons, l’ail, l’oignon et l’huile. Saler et poivrer. Cuire au four 30 minutes, en remuant à mi-cuisson.

Entre-temps, dans un bol, mélanger le ketchup, le sirop d’érable et le paprika. Saler et poivrer.

Badigeonner (toutes) les boulettes de la sauce afin de les enrober. Les répartir sur les poivrons. Poursuivre la cuisson au four 10 minutes ou jusqu’à ce que la viande soit laquée. Garnie de feuilles de basilic.

Servir avec du riz.

Wednesday, November 27, 2019

Batch of links

- Which pumpkin pie should you make for Thanksgiving? A blogger reviewed 12 recipes and ranked them so I didn’t have to. From my blog, though, I’d recommend pumpkin chiffon pie and this traditional-style pumpkin pie.

- Bon Appétit had a cool article in the Thanksgiving issue: it’s an interview with three Indigenous chefs about what Thanksgiving means to them.

- A very interesting article on what cookbook authors get paid. Some publishing houses now aren’t even offering advances, which is outrageous when you consider how expensive and time-consuming it is to create recipes!

- I’m often pleasantly surprised by Parents magazine. Recently, they had an article abut essential oils, and before I could shake my scientific fist at them, they stated that while they had started the article with the intention of creating a guide explaining which oil to use for which ailment, as they were doing research, they actually realized that a) most essential oils are not proven to cure anything, and b) essential oils can actually be quite dangerous. So the article turned into a warning instead.

- Parents also had this article with the results of the latest scientific studies in 8 areas of interest (like whether probiotics can help with colic or the benefits of the HPV vaccine).

- The Little Prince and I used an app that let us move throughout the International Space Station. Here’s what they have in the kitchen area.


- Weeknight dinners around the world. Including Texas!

Thursday, November 21, 2019

Cauliflower Rice Bowl

I’m still a big fan of Buddha bowls. I try to branch out once in a while, like with this avocado BLT with basil mayonnaise or this succotash with bacon and croutons, though neither was popular with the Fox. I also really liked this tuna salad that is made with yogurt instead of mayonnaise – I served it once with apples, cucumbers, and hard-boiled eggs, and another time as part of a salade niçoise composée, so there was usually something there that my toddler might appreciate.

Then I had leftover riced cauliflower in the freezer and didn’t really know what to do with it, so when I came across this cauliflower rice bowl recipe, I decided to go for it. It turned out I had less than called for, but you don’t have to be so finicky about amounts with bowls, so it worked out. I had crumbled feta on hand, and the pieces seemed too small to go in the oven without making a mess, so I served it cold with the warm vegetables (sweet potato, in my case). For me, the pepitas were what really made this dish, and they were SO delicious roasted! That being said, I think I really took them to the edge by roasting them for 7 minutes (whereas the cauliflower rice should have gotten at least 10 minutes in the oven), and they don’t keep as well stored with the other ingredients in the fridge, so I’d consider roasting them separately, in a dry pan on the stovetop. The amounts below should make 4 servings.

1 ½ lb. root vegetables (such as sweet potatoes, butternut squash, carrots, or a combination), peeled and cut into 1-inch cubes
4 Tbsp. olive oil, divided, plus more for serving
1 ½ tsp. kosher salt, divided
freshly ground black pepper
4 oz. lactose-free feta cheese, drained
¼ cup pumpkin seeds
3 cups fresh or frozen cauliflower rice (I had less)
½ tsp. ground turmeric
1 (15.5-oz.) can chickpeas, drained and rinsed
½ cup coarsely chopped fresh cilantro leaves and tender stems
finely grated zest of 2 medium limes
juice of 2 medium limes, plus more wedges for serving
1 medium avocado, pitted and quartered (I used 2 total)

Arrange 2 racks to divide the oven into thirds and heat to 425 °F. Place the sweet potatoes on a rimmed baking sheet. Drizzle with 2 tablespoons of the oil, then season with ½ teaspoon of the salt and several grinds of black pepper. Toss to combine, then arrange into an even layer. Roast on the lower rack until beginning to brown, about 20 minutes.

Flip the sweet potatoes and push them to one side. Add the pumpkin seeds to the now-empty portion of the baking sheet and crumble the feta into large pieces over the sweet potatoes (see note above). Place the cauliflower rice (if using frozen, break up any clumps first), turmeric, 1 tablespoon of the olive oil, ½ teaspoon of the salt, and several grinds of black pepper on a second rimmed baking sheet and toss until evenly combined. Spread into an even layer.

Place the sweet potatoes on the upper rack and the cauliflower rice on the lower rack. Roast until the pumpkin seeds are toasted, the sweet potatoes are golden-brown, and the feta is warmed through, 7 to 10 minutes more. Meanwhile, place the chickpeas, cilantro, lime zest, lime juice, remaining 1 tablespoon oil, remaining ½ teaspoon salt, and several grinds of black pepper in a medium bowl and toss until evenly coated; set aside.

For each serving, transfer ¼ of the rice, ¼ of the sweet potato and feta mixture, and ¼ of the chickpea mixture into a bowl. Sprinkle with ¼ of the pepitas and top with a piece of the avocado. Drizzle with more olive oil and season with salt and pepper as needed. Serve with a lime wedge.

Sunday, November 17, 2019

Pumpkin Fluff

Fellow parents, you too can be a snack time hero!

I never thought I’d get around to making this recipe, but then I decided that it was the perfect, seasonal thing to serve as a treat at snack time. I used graham crackers as a vehicle for this dip (gingersnaps would be good, too), and the snack was EXTREMELY well received.

If you were to run out of pumpkin fluff while you still have a lot of graham crackers, I’ve got two words to make you a hero again: chocolate hummus. You’re welcome.

1 (15-oz.) can of pumpkin purée
1 (9-oz.) container of Coco Whip, thawed overnight in the fridge
1 box of instant vanilla pudding (just the powder; make sure it’s lactose-free)
pumpkin pie spice, to taste (I omitted it)

Whisk everything together and serve with crackers for dipping. Refrigerate leftovers.

Friday, November 15, 2019

Maple Bacon Sugar Cookies


I’d been hanging on to this recipe for at least a few years, and then when I was desperately trying to figure out what dessert to make, and happened to have half a container of lactose-free sour cream to use up, I thought, “Why not?” You don’t need a special occasion for these – treat yo’self.

The recipe makes double the dough you need. Because there’s only 1 egg, it would be complicated to halve (maybe using a flax egg?), so I made the recipe as is and froze half the dough. It’s not something I’m used to keeping on hand, and I’m pretty sure Future Me will clean out the freezer one day and be surprised that there’s sugar cookie dough in there. But hopefully she’ll be grateful, because the cookies were so good! They’re a great base for any frosting, obviously, you don’t *have* to use bacon. I changed the order of the steps to make it easier to follow. I also reduced the amount of sugar in the frosting (less maple syrup and no milk, which made the frosting a bit stiffer and therefore reduced the need for powdered sugar as well); the version below is mine. I got 23 cookies.

For the cookies (see note above)
4 cups flour + more for rolling out the dough (I used a 50-50 mix of white and white whole wheat flour)
1 tsp. baking powder
½ tsp. baking soda
½ tsp. salt
½ tsp. nutmeg
1 cup (2 sticks) lactose-free butter or margarine, softened
1 ½ cups sugar
1 egg
1 tsp. vanilla
½ cup lactose-free sour cream

For the maple frosting
¼ cup lactose-free butter or margarine
1 pinch kosher salt
¼ cup maple syrup
2 tsp. pure vanilla extract
2 cups powdered sugar, sifted
crumbled crispy bacon, for topping (about 8 oz., or to taste)

For the cookies
Whisk together the flour, baking powder, baking soda, salt, and nutmeg. Set aside.

In a large stand mixer fitted with a paddle attachment, cream the butter and sugar. Add the egg and vanilla; mix thoroughly. Add the sour cream; mix thoroughly. Add the dry ingredients in two parts, mixing thoroughly after each addition.

Divide the dough into two parts and wrap each in wax paper. Refrigerate at least 1 hour. For the amount of frosting in this recipe, you will only use half of the dough – you can freeze the second batch of dough for another use, or just double the frosting recipe.

Preheat oven to 400 °F. Line a baking sheet with a silpat or parchment paper.

On a clean, floured surface, roll out the dough with a rolling pin. Roll the dough so it’s about ¼” to ½” thick and use your favorite cookie cutters to cut out shapes of the dough. (I just made round ones because I thought the bacon gave them enough pizzazz.) Use a spatula to move them to the prepared baking sheet with minimal damage.

Bake the cookies 6-8 minutes (the original recipe said 8-12, but in my oven, 8 was already a bit too much. Admittedly, this depends not just on the oven, but on the thickness and size of the cookies). You never want them to get too browned around the edges, or they’ll be too crunchy. Let cool completely before frosting.

For the maple frosting
Combine butter, salt, syrup, vanilla, and 1 cup of the sugar. Add remaining sugar and mix until smooth and creamy.

Frost the cooled cookies with the maple frosting, and sprinkle bacon bits on top. Cookies keep well in the fridge for a up to a week, or a few days at room temperature. Enjoy!

Thursday, November 14, 2019

Pizza Balls

I’m always trying to find new recipes for the Little Prince’s lunchbox. Sweet potato and parmesan muffins were poorly received (I tasted them too and they certainly weren’t my favorite). Then one day, he came home from school with a recipe printed on a piece of paper and asked me to make it for him. I gathered that the company that takes care of the food at his cafeteria held a pop-up (which they call “Discovery Kitchen”, according to the hand-out) and tried to get students interested in new foods. So I tried this recipe for curried chicken pasta salad (I can’t find it online), and the Little Prince didn’t touch his lunch that day, saying he didn’t like it. So I sent him to school with another lunch the next day, and served the pasta salad for our own lunch at home. And, readers – it was FOUL! The Fox and I absolutely hated it, and I forced myself to eat some because that’s what was for lunch and everything, but I threw the rest away, I’m never making it again, and I suspect that this recipe might turn off kids in our school district from curry, chicken, and pasta salad in general.

So back to a safe bet: I got pizza sauce out of the freezer and made another recipe from the Weelicious Lunches cookbook: pizza balls (the recipe seems to be gone from the Weelicious website, but it’s here. This was VERY well received; I got to eat one pizza ball myself, and gave one to the Engineer as well, and we all agree we love them.

For the filling: obviously, use something your kids (or you) will like. I knew broccoli florets wouldn’t fly, so I went with pepperoni, but if your child will eat finely chopped vegetables here, go for it. For the cheese, I used lactose-free shredded mozzarella (look for something that has 0 grams of sugar on the nutrition label). And for the dough, I used 1 pound of homemade dough I had in the freezer and 1 pound of storebought dough, hence the different appearance of my balls (ahem).

2 1-lb. packages white or whole wheat pizza dough (homemade or storebought)
¾ cup broccoli florets, cooked & chopped (or filling of choice, see note above)
1 cup lactose-free mozzarella cheese, shredded
½ cup pizza sauce (again, homemade or storebought)
olive oil
parmesan cheese, grated

Preheat oven to 425 °F. Grease a 9” pie plate or cake pan.

Bring pizza dough to room temperature and divide into 16 even pieces.

In a bowl, combine the broccoli (or whatever addition you choose), mozzarella and pizza sauce.

Roll out each piece of dough into a round, about 3 inches wide, and place 1 tablespoon of the cheese mixture in the center. Take the edges of the dough and bring them to the center, pinching along the edges to make sure they stick together, then roll into a ball.

Place the ball, sealed side down, in the pie plate and repeat these steps making the rest of the balls. Brush each ball with olive oil and sprinkle with parmesan cheese. Bake for 25 minutes or until golden.

Sunday, November 10, 2019

Poulet épicé aux abricots

À la fin de l’été et an automne (la saison est longue au Texas!), j’ai essayé quelques nouvelles recettes avec des fruits à noyaux, mais sans trop de succès. J’ai fait un tagine de poulet avec des abricots et des pistaches, mais je n’ai pas été trop impressionnée. Puis ce filet de porc et nectarines à l’orange un peu décevant. Jamais deux sans trois, n’est-ce pas? Alors j’ai aussi essayé ce poulet épicé aux abricots, mais avec de petites pêches au lieu des abricots. Je savais que je prenais un risque, avec un plat qui a des goûts si prononcés, mais en fin de compte, tout le monde a aimé! Même que le Petit Prince m’a demandé d’en refaire, et il a adoré la sauce! C’était vraiment gagnant, comme recette. J’ai servi ça avec du riz.

Pour le mélange d’épices
1 c. à thé de gingembre moulu
1 c. à thé de curcuma moulu
1 c. à thé de cannelle moulue
1 c. à thé de graines de coriandre broyées
1 c. à thé de fleur de sel
½ c. à thé de poivre moulu
½ c. à thé de piment de la Jamaïque moulu

Pour le poulet
1 ½ lb. hauts de cuisses de poulet désossées
¾ tasse de confiture d’abricots
¼ tasse de vinaigre de vin blanc
¼ tasse d’eau
1 c. à soupe de moutarde de Dijon
1 c. à soupe de graines de moutarde
1 gousse d’ail, hachée finement
4 abricots, coupés en deux (j’ai pris de petites pêches)
1 gros oignon rouge, coupé en quartiers
½ tasse de pistaches grillées, hachées grossièrement
¼ tasse de menthe fraîche, hachée

Parsemer le poulet de 2 c. à thé du mélange d’épices et frotter pour faire pénétrer. Laisser reposer 15 minutes.

Entre-temps, dans une petite casserole, mélanger la confiture d’abricots, le vinaigre, l’eau, la moutarde, les graines de moutarde, l’ail et le reste du mélange d’épices. Porter à ébullition en brassant de temps à autre. Réduire le feu et laisser mijoter 5 minutes. Réserver.

(Les instructions du paragraphe suivant sont celles de la recette d’origine; ma démarche est entre parenthèses à la fin.) Régler le grill à puissance moyenne. Mettre le poulet sur la grille huilée et fermer le couvercle. Cuire 5 minutes. Retourner le poulet et le badigeonner de ¼ tasse de la sauce réservée. Mettre les abricots et l’oignon rouge sur la grille. Fermer le couvercle et poursuivre la cuisson de 5 à 7 minutes ou jusqu’à ce que le poulet ait perdu sa teinte rosée à l’intérieur et que les abricots et l’oignon soient marqués (retourner les morceaux et badigeonner le poulet de ¼ tasse du reste de la sauce à la mi-cuisson). (Dans mon cas, j’ai décidé de ne pas me servir du grill et d’utiliser plutôt le four. J’ai fait cuire le poulet à 425 °F pendant 20 minutes; idéalement, il faudrait mettre l’oignon à cuire avec, et faire cuire les abricots pendant les 5-10 dernières minutes.)

Mettre le poulet sur une planche à découper. Couper les hauts de cuisses en 2 ou 3 morceaux, puis les mettre dans une assiette de service. Parsemer des pistaches et de la menthe. Servir le poulet avec les abricots et les oignons grillés. Accompagner du reste de la sauce.

Saturday, November 02, 2019

Plaque de pommes de terre à la grecque


Pour lutter contre le temps froid, j’ai essayé une recette de pâté chinois aux lentilles et aux patates douces, dont la garniture était faite avec du sans-viande et des lentilles, et la purée était un mélange de pommes de terre et de patates douces. En fin de compte, ça n’a pas été un succès auprès de ma famille, et même moi je trouvais que ça laissait un peu à désirer. Et le succès, de façon inattendue, est venu sur une plaque avec du chou frisé. Il s’agit d’une recette de Coup de Pouce, facile à préparer tout en impressionnant par sa présentation.

Le Petit Prince ne trouvait pas le plat à son goût au départ, alors nous avons suivi notre philosophie habituelle, soit ne pas le forcer à manger, mais lui demander de rester à table avec nous. Et pendant que l’Ingénieur et moi parlions, le Petit Prince a mangé une feuille de chou frisé. On n’a rien dit, pour ne pas briser le charme, mais on était bien contents! En fait, le Petit Prince est dans une phase géniale (selon moi) où il goûte à presque tout avant de décider s’il aime ou pas. Et il y a encore plein de choses qu’il n’aime pas, mais au moins il est prêt à essayer, alors je ne peux pas lui en demander plus.

Un truc, pour couper les pommes de terre en éventail : utilisez une paire de baguettes chinoises jetables, une de chaque côté de la pomme de terre, avant de la couper. Comme ça, le couteau n’ira pas jusqu’à la planche, et vous conserverez donc un morceau de chair intact pour que la pomme de terre se tienne ensemble. Ce n’est pas infaillible comme truc, mais ça aide! Aussi, la recette recommande des pommes de terre à chair ferme, comme les Chieftains. Bon, si j’avais pu passer une commande à la ferme de mon cousin germain éloigné au 1er degré, ça aurait été idéal, mais j’ai pris les Russets qu’il y avait à mon épicerie et c’était très bien comme ça.

6 pommes de terres, lavées et brossées (environ 1 ½ lb.)
4 c. à soupe d’huile d’olive
1 c. à thé d’origan séché
½ tasse de fromage à la crème sans lactose
½ tasse de féta sans lactose émietté
1 botte de chou frisé (« kale »), lavé, les tiges enlevés et coupé en morceaux
½ petit oignon rouge, tranché finement
12 tomates raisins (j’ai pris tout le casseau)
sel et poivre, au goût

Préchauffer le four à 400 °F; placer la grille à la position du centre.

Couper les pommes de terre en fines tranches d’environ 1/8 po (3 mm), en arrêtant avant la base pour que les tranches restent attachées entre elles.

Déposer les pommes de terre sur une plaque de cuisson tapissée de papier parchemin. Arroser de la moitié de l’huile et saupoudrer de l'origan. Saler et poivrer. Cuire 1 heure.

Retirer la plaque du four. Couvrir les pommes de terre du fromage à la crème et du féta, puis disposer le chou frisé, l’oignon et les tomates tout autour. Arroser du reste de l’huile. Remettre la plaque au four et poursuivre la cuisson 15 minutes ou jusqu’à ce que les pommes de terre soient tendres.

Thursday, October 24, 2019

Barbara's squash soup


A woman who had been very dear to me passed away a week ago today. Her husband had been dear as well, and he passed less than a year ago, but I didn’t find out until months later. It’s times like these when I feel very far from Montreal. I don’t usually share last names on this blog, for privacy and all, so I’ll just call this woman Barbara. And I want to share Barbara’s recipe for butternut squash soup with ginger and lime. It’s a great seasonal dish I’m sure you’ll love.

The first time the Engineer’s family invited me for Rosh Hashanah dinner, Barbara had made this soup, and I liked so much that I just had to get the recipe. I highly doubt it was the first squash soup I ate, but it really stood out from the rest because of the unexpected bright notes, thanks to the lime juice and the warm ginger. It was absolutely delicious! The recipe is below.

Note that 6 cups of butternut squash cubes is about one large squash, or two small ones. Barbara liked to microwave the squash first so it was easier to cut, though I never tried it that way. This recipe yields a lot, but the soup freezes well. Barbara usually served it plain, like in the first photo, but I also like it topped with plain yogurt and pepitas, or you could use a good olive oil or maybe even cilantro.


½ onion, chopped (about ½ cup)
1 ½ Tbsp. fresh gingerroot, peeled and minced
2 cloves garlic, minced
3 Tbsp. butter or margarine
6 cups butternut squash, peeled, seeded, and chopped
6 cups chicken stock
2 Tbsp. fresh lime juice
salt and pepper, to taste

In a large saucepan, sauté the onion, garlic, and gingerroot in butter until onion is soft.

Add the chicken stock and squash. Simmer, covered, for 15-30 minutes or until the squash is tender.

Purée the solids (I do this with an immersion blender now, but a food processor or blender work too). At this point, you can add extra stock if you want a thinner consistency, but I rarely do – I think it’s because I usually serve it as a lunch or a light dinner with some bread, but if it’s an appetizer, you could thin it out a bit.

Add lime juice, salt, and pepper, and serve warm.

Sunday, October 20, 2019

Strawberry Mini-Muffins


I found this recipe in Parents magazine. You can easily vary the flavor, using small blueberries instead of strawberries for example, or making a piña colada version by replacing them with finely chopped pineapple and shredded coconut and swapping lemon for lime. I ended up adding strawberry powder in the batter, to make it pinker (strawberry powder is really finely crushed freeze-dried strawberries); I mixed it in with the dry ingredients. The muffins were delicious, with or without frosting, but the Little Prince said he didn’t like the strawberries in them. While I initially thought that defeated the purpose of strawberry muffins, I think that he may have a point here – the small pockets of fruit in a miniature muffin aren’t that pleasant, and there was already strawberry flavor and color from the strawberry powder. I’ll consider just making “pink muffins” next time. Without icing, they are GREAT in a lunchbox! That being said, once the icing has dried up (say, a whole day later), that would work too.

Note that for the flour, I just used 1 ½ cups of white whole wheat flour.

For the mini-muffins
¾ cup whole wheat flour
¾ cup all-purpose flour
1 tsp. baking powder
½ tsp. baking soda
1 pinch of salt
¾ cup lactose-free milk
2 eggs
1/3 cup honey
¼ cup lactose-free butter or margarine, melted
1 tsp. vanilla extract
1 cup finely chopped strawberries, fresh or frozen (see note above)
¼ cup freeze-dried strawberries (optional; I used strawberry powder, see note above)

For the icing
1/3 cup plain, full-fat, lactose-free Greek yogurt
¼ cup powdered sugar
1 Tbsp. fresh lemon juice

Preheat oven to 400 °F. Grease a 24-tin mini-muffin pan.

In a small bowl, whisk together the flours, baking powder, baking soda, and salt. Set aside.

In a medium bowl, whisk together milk, eggs, honey, butter, and vanilla. Gently fold in dry ingredients, followed by strawberries and freeze-dried strawberries.

Divide batter among mini-muffin cups, filling to the edge. Bake for 10-12 minutes or until a toothpick inserted into a muffin comes out clean. Cool in pan for 10 minutes, then transfer muffins to wire rack to cool completely (I tend to let them cool longer in the pan).

Just before serving, make the icing by mixing together the yogurt, powdered sugar and lemon juice. Drizzle icing over muffins and top with freeze-dried strawberries, if desired (I again used strawberry powder here).

Tuesday, October 15, 2019

Double Chocolate Granola


I used to make granola all the time, and then my teeth started bothering me enough that I no longer wanted to eat it. This was a particular bummer when I was trying to empty the pantry, because I could no longer make kitchen-sink granola! I ended up enjoying make-ahead frozen oatmeal, though. In a nutshell, you make oatmeal, pour it in a greased muffin tin, top with nuts and/or dried fruit, then freeze until solid and transfer the frozen pucks to a freezer bag. To serve, just put a few pucks in a bowl and microwave; top with milk and/or maple syrup, as desired.


Three crowns and a root canal later, plus like three years of healing, and I felt ready for granola again. I made this nut-free double-chocolate granola, and it was delish! I baked it at a lower temperature and saved half of the chocolate chips to be added after baking; the instructions below are mine. The blackstrap molasses may seem like an unusual ingredient here, but apparently they help show off the deep chocolate flavor and they make the granola clump nicely. It wasn’t too sweet, but I still enjoyed it on top of plain Greek yogurt (or on top of vanilla yogurt once for dessert). Even the Little Prince liked it, which surprised me because I’m not sure he’s ever liked any of the granolas I’ve made when he can get perfectly good chocolate chip granola from a box. This is a win!

2 cups (190 g.) old fashioned rolled oats
¼ cup (30 g.) unsweetened cocoa powder
¼ (45 g.) cup unsalted sunflower kernels
¼ tsp. fine sea salt
¼ cup (50 g.) mini chocolate chips, divided
¼ cup creamy sunbutter (or almond butter if allergies aren’t an issue)
¼ cup + 2 Tbsp. maple syrup
½ Tbsp. blackstrap molasses

Preheat oven to 300 °F and line a sheet pan with parchment paper.

In a large bowl, mix the oats, cocoa powder, sunflower kernels, salt and half of the chocolate chips. Then warm up the sunbutter to a smooth consistency if it's really thick or cold. Stir in the syrup and molasses. Add to the dry ingredients and stir until it all comes together and is very sticky.

Spread out evenly flat onto the pan. Bake in the lowest third of the oven for 15 minutes; remove and stir the granola thoroughly so it will cook evenly. Place back in the oven on the low rack and bake another 8 minutes. Watch closely so the edges don't burn. Let cool 10 minutes while it crisps up. Once it has cooled down, add the remaining chocolate chips and mix thoroughly. Store in an airtight container.

Thursday, October 10, 2019

Purple Sweet Potato Pie

I sometimes see purple sweet potatoes at the grocery store, but they’re not always there, so I never really plan to buy them. But I knew I wanted to try this recipe for vegan purple sweet potato pie with almond coconut crust, so I made sure to have all my non-perishables on hand, including CocoWhip for the topping. I figured that since sweet potatoes are a root vegetable, it was a safe bet to expect them to make an appearance in the fall. So when I saw the purple sweet potatoes again, I bought some and made the pie!

I didn’t like the almond coconut crust of the original recipe. I mean, I liked the ingredients individually, so it sounded good, but I found that it fell apart and got soft after a while and thus did not fulfill its basic function as a crust. I think that even assuming you want a vegan/paleo/gluten-free/keto/whatever crust, there are other options. I don’t have those food restrictions, so I recommend a graham cracker crust. Parbake it if you make your own, or follow the instructions on the package if you buy it premade.

As for the purple sweet potatoes, I used this variety, but any sweet potato should do, including regular orange ones. I added nutmeg and a bit of sugar to the filling (the ingredients below are mine), and it was great! As a matter of fact, the filling was so good that I might make it my default sweet potato pie. The purple sweet potatoes obviously make the pie stand out, though, so buy them if you can find them.


2 lb. purple sweet potatoes, peeled and cut into 1-inch rounds (about 4 cups)
¼ cup sugar
¾ cup canned coconut milk
½ cup maple syrup (see notes)
1 ½ Tbsp. tapioca starch
1 Tbsp. fresh lime juice
2 tsp. ground cinnamon
1 tsp. sea salt
1 tsp. ground ginger
½ tsp. allspice
¼ tsp. nutmeg
¼ tsp. cayenne pepper (I used 1 pinch of Korean pepper)
¼ tsp. ground cloves
1 graham cracker crust (see note above)
CocoWhip or equivalent, for topping

Bring a medium-sized pot of water to a boil. Add the purple yams and boil for 10 minutes, or until the yams can be pierced with a fork. Drain the yams then put them in a high-powered blender or food processor.

Add the rest of the pie filling ingredients and blend on high until everything is smooth and creamy.

Pour the pie filling into the baked pie shell and smooth out the top. Bake in the preheated oven for 45 minutes, or until the pie has set but still has some jiggle in the middle. Remove the pie from the oven and let it cool completely before serving it. Top with CocoWhip if desired.

Monday, October 07, 2019

Guide francophone du Texas


J’ai entendu parler de ce guide en lisant cet article où il en était question (partagé par un Français sur un groupe Facebook, si ma mémoire est bonne). Il s’agit d’un guide autopublié en 2017 par Sophie Auzerau, une Française qui a habité à Dallas pendant cinq ans. Comme elle le dit, « En arrivant, je craignais de m’ennuyer et de ne rien avoir à découvrir. Cinq ans après, je m’inquiète de ne pas avoir tout vu ! »

Bon, commençons par les défauts. Ce qui m'a sauté aux yeux, en tant que réviseure-traductrice, ce sont les coquilles (ou la mauvaise mise en page) et les anglicismes. Pour ce dernier cas, il s’agit surtout de mots non traduits, comme « poison ivy » laissé tel quel dans le texte. J’ai l’impression que les Européens oublient toujours de regarder ailleurs dans la Francophonie pour trouver l’équivalent d’un mot d’une langue étrangère si le concept n’existe pas dans leur pays… Au Canada, on en a, de l’herbe à puce! Sans compter la sempiternelle « Thanksgiving » pas traduite par Action de grâce… Il y a aussi des mots carrément laissés en anglais même si l’équivalent est évident, comme « park » au lieu de parc.

Aussi, il s’est glissé quelques erreurs dans le guide (par exemple, le lac Caddo n’est pas le seul lac naturel du Texas, bien qu’il soit le plus connu; les dunes du White Sands National Monument au Nouveau-Mexique sont faites de gypse et non pas de sable). De plus, San Antonio est présentée seulement pour l’Alamo (plus les lieux classés au patrimoine mondial de l’UNESCO) et la River Walk, mais on a aussi tant d’autres attraits! La cathédrale San Fernando, Market Square, les musées, les parcs, le jardin botanique, la Pearl Brewery… Sans compter tous les restaurants que l’auteure aurait pu inclure dans le chapitre sur ce sujet! San Antonio est pourtant la 7e plus grosse ville aux États-Unis (plus peuplée que Dallas!), c’est donc à la fois étonnant et dommage qu’elle soit laissée-pour-compte par une locale dans un guide touristique. Rien sur El Paso non plus, tiens.

Quand même, ce guide a de nombreux bons points. Je trouve ça *génial* d’avoir un guide non seulement en français mais surtout écrit par quelqu’un comme moi, c’est-à-dire local mais sans être natif. J’aime aussi que le guide parle des attraits de chacune des régions géographiques du Texas, qui est quand même grand! Hill Country, Piney Woods, Upper Gulf Coast, Big Bend, Panhandle, South Texas Plains et Prairies and Lakes, chacune y est. J’y ai trouvé des idées pour d’éventuels voyages ainsi que pour Houston, que nous n’avons toujours pas visitée. Je vais laisser le guide dans la chambre d’amis, avec les dépliants touristiques locaux!

Vous pouvez vous procurer le guide en version papier ici; pour la version numérique, vous avez le choix entre PDF et Kindle.

Sunday, October 06, 2019

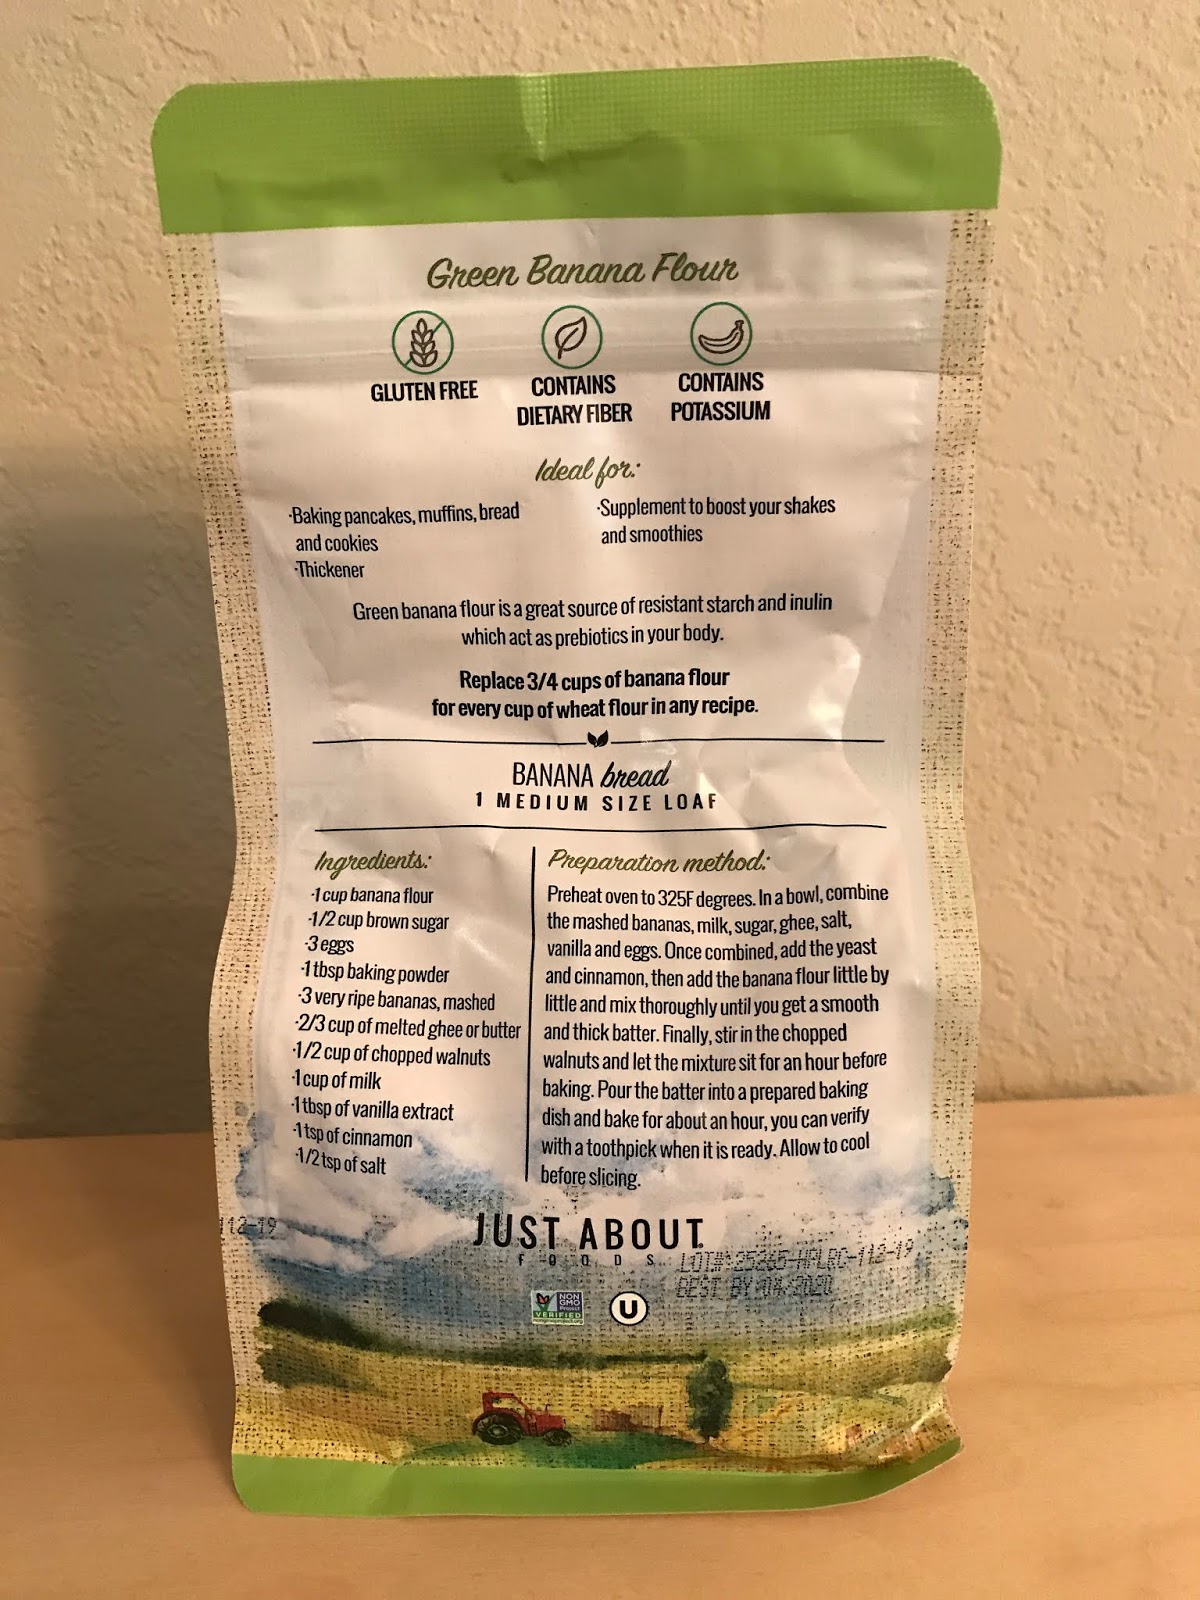
Banana flour


I’d been curious about banana flour for a while, so when I saw a smallish bag of it at my grocery store, I decided to try it. It’s a good source of fiber and potassium, in addition to being gluten-free, obviously. Based on the recipes I found, it seems that you have to let the batter rest for a while so that the flour can hydrate properly before being baked; that being said, it doesn’t absorb moisture nearly to the same extent that coconut flour does.

I couldn’t resist making the banana bread recipe on the back of the package (Just About Foods brand). The banana bread recipe was a hot mess as written, so my version is clarified (but still calls for the same ingredients). I found it a bit too moist for my liking, even when fully baked, but it improved when I had a slice of it toasted and buttered the next day.


I also tried banana flour pancakes – the recipe gave me 8 beautifully golden pancakes, but I much prefer my regular recipe.


Banana flour is made with green bananas, and doesn’t actually taste like bananas at all (or at least, not like those we are used to eating); I think “unripe” would be the best way to describe it. Sadly, I’ve decided that I’m not fond of banana flour. I’m glad I tried it, but won’t buy it again. That being said, some of you might be curious, so here’s the recipe!

1 cup (160 g.) banana flour
1 Tbsp. baking powder
½ tsp. salt
1 tsp. cinnamon
3 very ripe bananas
½ cup brown sugar
1 cup lactose-free milk
2/3 cup melted ghee or lactose-free butter
3 eggs
1 Tbsp. vanilla extract

In a small bowl, whisk together the banana flour, baking powder, salt, and cinnamon. Set aside.

In a bowl, combine mashed bananas, brown sugar, milk, ghee, eggs, and vanilla. Once combined, add the banana flour mixture little by little and mix thoroughly until you get a smooth and thick batter. Let the mixture sit for 1 hour before baking.

Preheat oven to 325 °F. Grease a 9”x5” loaf pan.

Pour the batter into the prepared baking pan and bake for 1 hour, or until a toothpick inserted in the middle comes out clean. Let cool before slicing.