Tuesday, August 14, 2012

Vegan Lasagna

I made a vegan lasagna, and it was the best I’ve ever made. Granted, it was only my second, and I’ll be making a lasagna Bolognese soon, but still. It was fantastic. And it was easier than the first one I made, because the dry pasta went right into the dish without being precooked. I used a recipe I found on The Kitchn when they reviewed a vegetarian cookbook, and I adapted it for my kitchen. Its only flaw is that the consistency is a bit soft and it doesn’t hold together quite like I’d want. But it’s really good, and even better on the second day. The Engineer and I both agree that it does taste, and feel, like it has dairy and perhaps even meat in it, so you omnivores out there won’t be missing out. I think it’s the nutritional yeast that helps give it a cheese-like flavor here, and the two kinds of tofu end up feeling like ricotta.

I used store-bought tomato sauce, because I didn’t really have the time to make my own; I recommend something with a bit of flavor, like garlic and herbs, instead of plain tomato. I used 5 oz. of spinach instead of the full 10 oz., but given how much it wilts when it’s heated, 10 oz. would be fine, too. I also used homemade pesto instead of fresh basil, for more flavor. My pesto had garlic and parmesan (so I realized only too late that my dish wasn’t actually vegan – oops!), but plain pesto would be fine too. I was also pleased to see that there’s another brand besides Tofutti in the dairy-free cream cheese niche; I used Follow Your Heart this time (and I used mozzarella-style vegan cheese by Galaxy Nutritional). I suspect that the dish I used is slightly smaller than what the recipe calls for, because I ran out of room and had to improvise the last layer. Don’t let this stop you, as there’s room for some interpretation here.

I served it with a green salad and a dressing made with ½ cup lactose-free sour cream, 2 Tbsp. lemon juice, 2 Tbsp. Dijon mustard, 3 Tbsp. maple syrup, 2 Tbsp. chives, salt and pepper. It was good, but I’d reduce the amount of maple syrup next time, and perhaps make less of the dressing altogether. You can also use your favorite vegan dressing.

For the filling
2 tsp. olive oil
2 medium onions, chopped (2 cups)
3 cloves garlic, minced (1 Tbsp.)
1 10-oz. bag fresh baby spinach (or a bit less if you want)
2 12-oz. packages firm tofu, drained
1 8-oz. package vegan cream cheese
½ cup pesto (or chopped fresh basil)
¼ cup nutritional yeast

For the lasagna
5 ½ cups tomato sauce (with something like garlic, herbs or mushrooms, ideally)
12 uncooked whole-wheat lasagna noodles
12 oz. vegan Italian sausage links, cut into thin rounds, or vegan sausage crumbles, broken apart
1 cup shredded vegan mozzarella cheese (3 oz.)

Preheat oven to 375 °F.

Heat oil in skillet over medium-high heat. Sauté onions and garlic in oil 4 to 5 minutes, or until golden. Add spinach, and cook 2 to 3 minutes, or until wilted. Transfer to bowl of food processor. Add tofu, cream cheese, basil, and nutritional yeast, and blend until smooth. Season with salt and pepper.

Spread one-quarter of tomato sauce on bottom of 13x9-inch baking dish. Cover with 4 or 5 noodles, then half of filling, and ladle on another one-quarter of sauce. Repeat layer of noodles and remaining filling. Spread sausage evenly over top, and top with one-quarter of sauce. Finish with final layer of noodles and remaining sauce. Sprinkle with mozzarella. Cover with foil, and bake 30 minutes. Uncover, and bake 15 to 20 minutes more, or until noodles are tender and topping is melted. Let stand 10 minutes before serving.


Sunday, August 12, 2012

Beer-Brined Chicken Breasts


I had a bottle of beer that had been sitting around the fridge (sealed!), since the chili with chocolate, so I decided it was about time I used it up in something. I ended up making a recipe inspired by these blackened beer-brined chicken breasts. They looked wonderful, but I didn’t blacken mine, because it’s just too hot out to go stand over the grill. I halved the recipe and used skinless, boneless chicken breasts and baked them in the oven instead. I thought the result was quite good, but too salty for my taste, though the Engineer really liked the salt just as it was. I served the dish with orzo tossed with homemade pesto.

2 cups apple cider
½ cup brown sugar
½ cup kosher salt (I would use less, but the Engineer wouldn’t change this amount)
1 cinnamon stick
1 bay leaf
1 Tbsp. whole peppercorns
1 tsp. whole cloves
4 bone-in, skin-on chicken breasts
2 12-oz. bottles dark or amber beer
2 Tbsp. butter
2 tsp. chili powder (I used Korean pepper)
1 tsp. cayenne (optional)

Combine the cider, sugar, salt, cinnamon, bay leaf, peppercorns, and cloves in a sauce pan over medium heat. Stir just until sugar and salt are dissolved. Remove from heat and let to cool to room temperature.
Lay the chicken breasts, skin-side down, in a shallow glass or ceramic (not metal) baking dish. Stir the beer into the cider mixture, then pour over the chicken. Cover and refrigerate the chicken for 4 to 8 hours.

When ready to grill, heat a gas or charcoal grill to to high heat (about 450 °F). Meanwhile, transfer the chicken from the brine to a clean plate and let it rest, covered, for 15 to 20 minutes to take the chill off. Melt butter and stir in chili powder and cayenne.

Brush half the chili butter over the skin on each chicken breast and lay the breasts skin-side down on the grill. Cover and let cook undisturbed for 15 minutes. Flip the chicken breasts, taking care not to tear the skin, and brush with the remaining chili butter.

Cover and cook for another 10 minutes. Check the chicken for doneness, and if necessary, continue cooking in 5 minute increments until it has finished cooking. The chicken is done when the interior reaches 165 °F, its juices run clear, and the inside is no longer pink.

Tend the chicken breasts with aluminum foil and let them rest 10 minutes before carving. The bones should pull away cleanly from the underside of the breasts with a little pressure. Slice the breasts into thin pieces and serve.

(Again, you can choose to cook the chicken in the oven instead; I used boneless, skinless chicken breasts that I baked at 350 °F for 40 minutes, brushing them with the butter mixture once before putting them in the oven and again after 20 minutes.)


Sandwichs à la tartinade aux petits pois et à l'ail rôti


Excusez ma courte absence, j’ai été quelque peu occupée cette semaine. J’ai quand même pris le temps de faire un dîner végétalien pour sortir de ma routine un peu, soit ce sandwich tiré de Coup de Pouce. J’ai adapté la recette un peu, car j’ai trouvé la tartinade un peu trop liquide telle que faite à l’origine. J’ai aussi omis le fromage, mais on pourrait utiliser du fromage sans lactose pour un dîner végétarien. J’ai fait une demi-recette et, pour mon deuxième sandwich, j’ai fait griller le pain, ce qui était une bonne idée. La recette ci-dessous donne 4 portions.

2 grosses gousses d’ail, non pelées
1 c. à thé d’huile d’olive
12 oz de petits pois ou de haricots de soja (edamame) surgelés
2 à 4 c. à soupe de jus de citron
½ c. à thé de sel
½ c. à thé de cumin
1/3 tasse de persil italien haché
8 tranches de pain multigrain
1 tomate mûre coupée en tranches
4 tranches de cheddar ou de suisse sans lactose (facultatif)
germes de luzerne ou autres pousses (facultatif, mais recommandé)

Préchauffer le four à 425 °F. Mettre les gousses d'ail sur une feuille de papier aluminium et arroser de l'huile. Fermer le papier d’aluminium de manière à former un paquet. Cuire pendant 15 minutes ou jusqu'à ce que l'ail soit tendre. Laisser refroidir.

Entre-temps, dans une petite casserole d'eau bouillante salée, cuire les petits pois pendant environ 3 minutes ou jusqu'à ce qu'ils soient tendres. Égoutter et passer sous l'eau froide. Ouvrir et presser les gousses d'ail rôti au-dessus du récipient du robot culinaire. Ajouter les petits pois, 2 c. à soupe du jus de citron, le sel et le cumin et mélanger jusqu'à ce que la garniture soit lisse. Ajouter le reste du jus de citron si la texture n’est pas assez lisse. Mettre la garniture dans un petit bol, ajouter le persil et mélanger. (Vous pouvez préparer la garniture à l'avance et la mettre dans un contenant hermétique. Elle se conservera jusqu'à 2 jours au réfrigérateur.)

Au moment de servir, étendre la garniture aux haricots de soja sur la moitié des tranches de pain. Garnir de la tomate, du fromage et de germes de luzerne, si désiré. Couvrir du reste des tranches de pain.

Friday, August 10, 2012

Batch of links - School lunches

When I was in elementary school, my mother made my lunches, so I ate well. I did have friends who ate at the cafeteria, though, and I remember a lot of meals like hamburgers, pizza, hot dogs and spaghetti, with ice cream for dessert. After elementary, my schools didn’t even have cafeterias, though one did have a food truck that only sold burgers, corn dogs and the like. Not what you’d call healthy or balanced! Recently, though, there’s been a public backlash against the poor quality of many school lunches.

I can’t talk about the subject without immediately bringing up Jamie Oliver, who famously pioneered a return to nutritious meals in British schools, starting with his show Jamie’s School Dinners in 2005. This eventually led to the nation-wide Feed Me Better movement. It was a hard road, and there is still a lot of progress to be made, but he has managed to get the government to spend more money on school lunches and to ban, or at least reduce, the junk food available in schools. Kids’ test scores even improved after a year! In 2010, he took the concept across the pond with Jamie’s Food Revolution. I remember seeing an episode and being appalled at how few students could correctly identify fruits and vegetables or tell you where butter comes from. The States have shown even more resistance to healthy changes than Britain, unfortunately, despite parallel movements by the likes of Michelle Obama and her Let’s Move campaign with its healthy school lunch component.

The first time I saw actual pictures, though, was on an anonymous teacher’s blog, where she posted the day’s school lunch along with her comments (gallery of images here, cleverly titled Fed Up With Lunch). Those are really unappetizing, and I can’t imagine having to eat that every day! There is in fact a vegetable quota to maintain, but since lobbyists have made pizza a vegetable because of a schmear of tomato paste, one can legitimately wonder how many actual vegetables are in school lunches. (For the record, tomatoes are technically fruits. Moreover, while it is possible to make a healthy pizza, for example one with a thin whole-grain crust, lots of veggies and a little cheese, this is a far cry from what is being served in school cafeterias. A serving of vegetables is widely regarded as being half a cup.)

There’s also Martha Payne, who started her blog when she was nine years old to document her school lunches and offer her comments – which, in all fairness, were constructive criticism. She got media attention, including Jamie Oliver’s endorsement, which got her over a million hits in a single day! Her school council asked her to stop blogging, because it was reflecting badly on them, but had to backpedal and allow her to continue given the overwhelming amount of public support in her favor. There has been some improvement in her school lunches, too, so she now focuses on readers’ submissions of lunches from schools in other places, as well as support of charities that provide school lunches in impoverished countries.

Other individuals have had success, albeit on a smaller scale. For example, there’s Roxanne Klein, a raw vegan chef, who has successfully changed the lunch menu at her daughters’ schools. Sometimes, it was a matter of cooking dishes herself, convincing parents to pay an extra dollar a day to go organic as well as finding a vegetarian caterer who could make meals approved by kids, staff and parents alike. Other times, it was as simple as taking the kids to her garden and teaching them the difference between a fat white grocery store strawberry and a small red local strawberry in season to ensure not only that they would never go back, but also that they would willingly eat healthy food.

This is in part a matter of budget, of course, but I think the budget itself reflects the values of a given society. In Sweden, for example, school lunches are much more generous (photo gallery here – there’s a lot of gravy, but overall, lunches are more appetizing and contain more vegetables than in the United States).
France seems to have the issue under control, as you can see in this CBS video. Paris schools have a budget of $5-6 dollars a day per child; it’s about half that in a small town further south, but even then the meals are balanced and, in some cases, better than what the students get at home.

Let’s forget one moment about the pleasure and social aspects of eating. When one realizes that not only are students performing better at school when they have nutritious lunches, but that it also protects their long-term health and that of their family, with repercussions well into adulthood, I have trouble understanding why leaders aren’t just cutting the bullshit and getting together to do what’s best for the society at large. Put your money where your mouth is, quite literally.

Friday, August 03, 2012

Panzanella


I’d been meaning to make panzanella (which is basically an Italian bread salad with tomatoes and herbs) for a while, but especially recently, after tasting the great panzanella at Nora Gray. Tomatoes are in season, too, so it’s the perfect time for this dish. I already had one recipe bookmarked, but it was a tomato-squash panzanella, and I really didn’t feel like squash right then. So I made this version by America’s Test Kitchen. I was surprised that there was no garlic, but the panzanella was really good! If you do want garlic, I’d recommend rubbing a clove on the cubed bread before baking it, or pehaps grating a clove into the oil when you toss it with the bread. This recipe serves 4, but it should be served immediately; it can easily be halved.

6 cups rustic Italian or French bread , cut or torn into 1-inch pieces (½ to 1 lb.)
½ cup high-quality extra-virgin olive oil
salt and pepper
1 ½ lbs. tomatoes , cored, seeded, and cut into 1-inch pieces (make sure they are in season)
3 Tbsp. red wine vinegar
1 cucumber , peeled, halved lengthwise, seeded, and sliced thin
1 shallot , sliced thin
¼ cup chopped fresh basil

Adjust oven rack to middle position and heat oven to 400 °F. Toss bread pieces with 2 Tbsp. oil and ¼ tsp. salt; arrange bread in single layer on rimmed baking sheet. Toast bread pieces until just starting to turn light golden, 15 to 20 minutes (10 minutes was enough for me), stirring halfway through. Set aside to cool to room temperature.

Gently toss tomatoes and ½ tsp. salt in large bowl. Transfer to colander and set over bowl; set aside to drain for 15 minutes, tossing occasionally.

Whisk remaining 6 Tbsp. oil, vinegar, and ¼ tsp. pepper into reserved tomato juices. Add bread pieces, toss to coat, and let stand for 10 minutes, tossing occasionally.

Add tomatoes, cucumber, shallot, and basil to bowl with bread pieces and toss to coat. Season with salt and pepper to taste, and serve immediately.


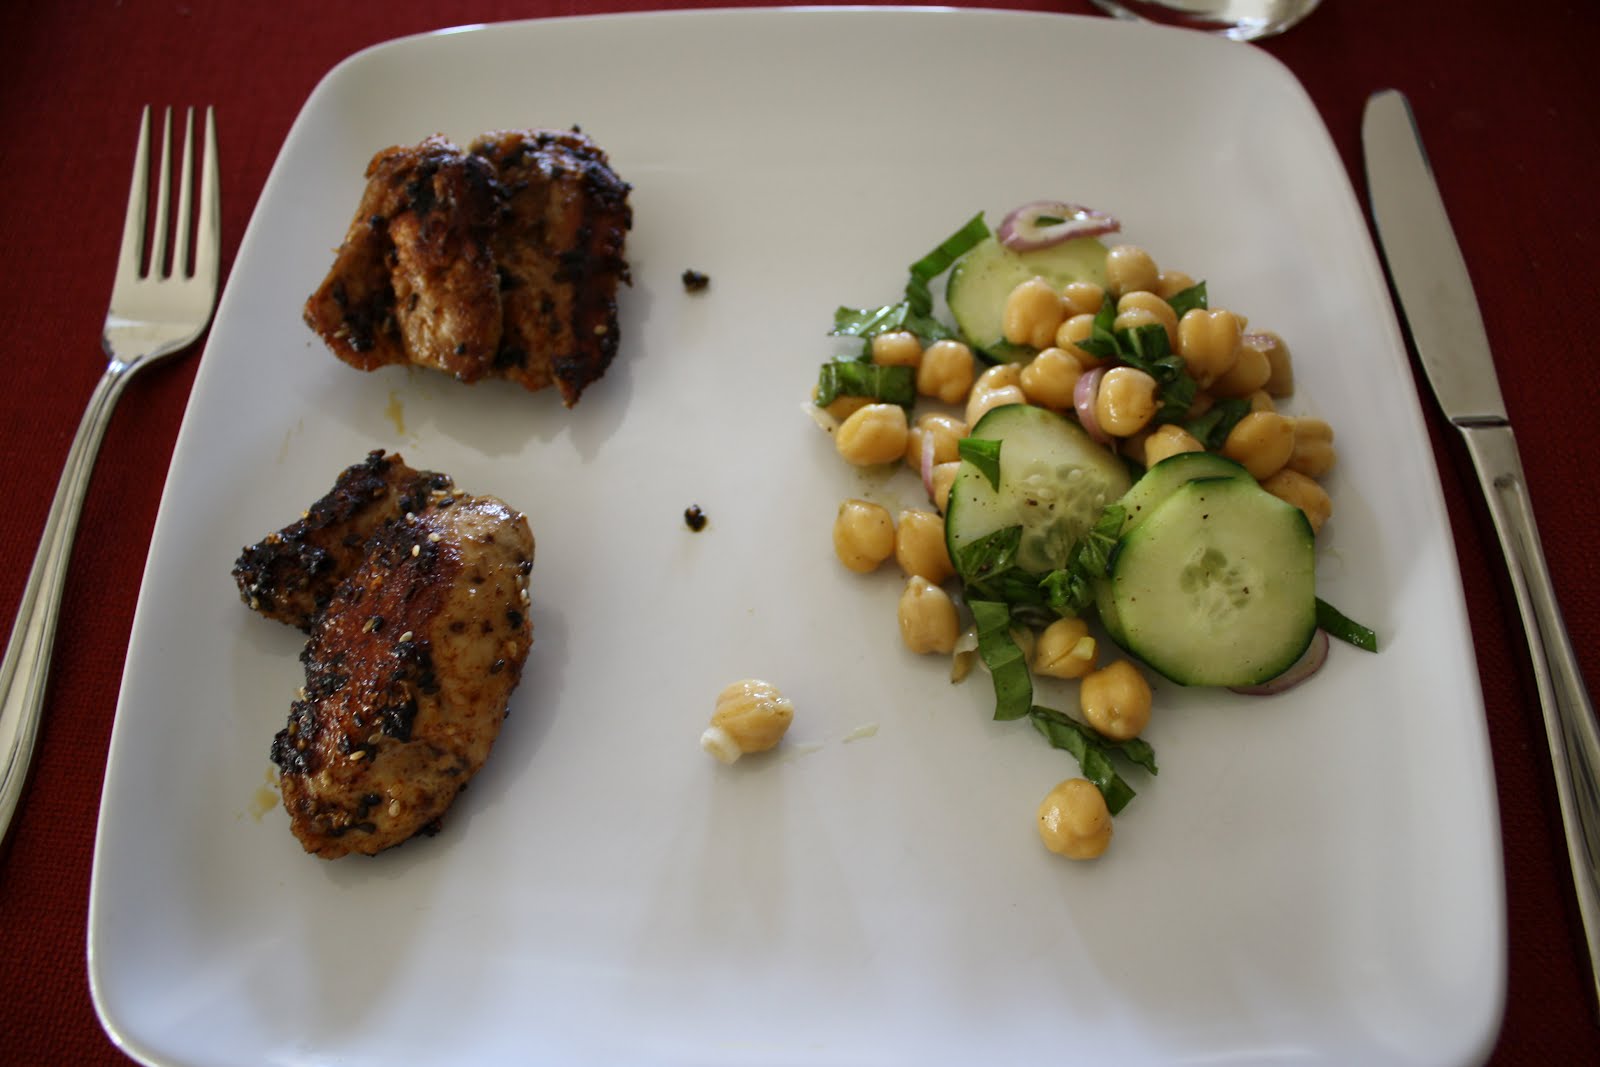
Spiced Chicken with Chickpea and Cucumber Salad


This one is something to write home about. It’s a super easy meal to assemble and is definitely quick enough to be put together on a weeknight. The salad was very tasty, and the spice mix on the chicken made it more than the sum of its parts. Altogether, this meal was absolutely fabulous, and both the Engineer and I give it two solid thumbs up. Note that I used boneless, skinless upper chicken thighs and cooked them in a pan, as it was more convenient for me, but you can adapt this to your taste and your grilling abilities. This recipe makes 4 servings, as always, though I’d consider making more of the salad.

1 15-oz. can chickpeas, rinsed
½ English cucumber, thinly sliced
½ cup torn basil leaves
1 small shallot, thinly sliced
2 Tbsp. olive oil
2 tsp. sherry vinegar or red wine vinegar
kosher salt and black pepper
2 Tbsp. sesame seeds (I used a mix of white and black)
2 tsp. paprika
8 bone-in, skin-on chicken thighs (about 2 ½ lbs.)

In a medium bowl, toss the chickpeas, cucumber, basil, and shallot with the oil, vinegar, and ¼ teaspoon each salt and pepper.

Heat grill to medium. In a small bowl, combine the sesame seeds, paprika, ½ teaspoon salt, and ¼ teaspoon pepper.

Remove the skin from the chicken and discard. Sprinkle the chicken with the sesame seed mixture, pressing gently to help it adhere. Grill, covered, until cooked through, 9 to 10 minutes per side. Serve with the chickpea salad.


Batch of links

- For those of you who would like some ideas for quick and easy 3-ingredient recipes that are perfect for summer: here are 53 of them over at Real Simple, from appetizers to desserts. (Readers also submit theirs here.)

- There’s a relatively new movement to get restaurants (or chefs or recipes) SPE-certified. SPE stands for sanitas per escam – health through food. This certification/consultant service is designed to “enhance the nutritional quality of the meals, without compromising the taste”. This means that not only are meals created to have less fat and fewer calories than many of their traditional counterparts, but also that they have conceived to maximize the nutrition you get out of them – like adding vitamin C to help you get more iron out of plant-based foods, such as in a salad of spinach with strawberries. It’s the food equivalent of LEED-certified buildings, basically.

- Five ways to tell if your knives are sharp enough. (Hint: they probably aren’t. I should learn how to sharpen mine properly!)

- Jamie Oliver will be collaborating with Montreal chef Derek Dammann to open a new restaurant, Maison Publique. This makes me much happier than Gordon Ramsay’s ill-fated adventure on Laurier, though I was saddened to learn in the same article that DNA had closed its doors. DNA was a molecular restaurant where I had hoped to go someday, but I guess chef Dammann decided it was time to move on. According to several posts on Chowhound, people who had reservations there were surprised to get a simple phone call or email saying they wouldn’t be honored.

- Excellent article on Steve Ells, founder of Chipotle, in Time magazine (unfortunately, you have to be a subscriber to read the full content). I talked about Chipotle before, calling it ethical fast food – and relatively healthy, to boot. Not to mention delicious! I was most surprised to learn in this article that only about 30% of the chain’s customers know about the ethical side of it, whereas for me, that’s what’s most remarkable about it and that’s the reason I went there in the first place.

- Unfortunately, I don’t have a link to share here, because the LCBO doesn’t have its Food & Drink articles on its website for whatever reason… But the Summer 2012 issue had a really interesting article on citrus. Did you know that there are only three kinds of citrus in the wild? They are citron, pomelo and mandarin (pomelo is apparently so rare that my word processor thinks it’s a typo). I learned that “crossing a pomelo with a mandarin creates an orange. That orange crossed with a citron becomes a lemon. Cross that lemon with a citron, and voilà – a lime.” I always thought that oranges and lemons could grow in the wild, and somehow assumed that the huge pomelo must be a cross. Shows how wrong I was!

- Scientists have isolated a molecule that kills the bacteria that causes tooth decay and cavities; it’s been dubbed Keep 32. They plan to add this molecule to mouthwash and have it on the market in 14 to 18 months. I’ll be first in line to buy it!

- It’s now a proven scientific fact: Pop music really is louder and really does all sound the same, compared to several decades ago. It’s nice to have actual data to support what many have complained about.

- Have you ever wondered how much it would cost to be a superhero? Well, some people actually sat down and did the research. It turns out that it would cost almost $683 million dollars to be Batman (as per the Christopher Nolan films), and a whopping $1,613 billion dollars to be Iron Man (again, as per the movies)! No wonder Bruce Wayne and Tony Stark are multi-millionaires. It would appear that this, along with being an orphan, is a prerequisite to become a superhero (assuming you don’t have any superpowers).

Thursday, August 02, 2012

Shirley Temple Cupcakes


We got new neighbors recently, so I decided to make cupcakes to welcome them. The next on my list were these Shirley Temple cupcakes. My father used to make us Shirley Temples as a treat on weekends when Dear Sister and I were growing up, and it used to be one of my favorite drinks (to be honest, I’m still really partial to it). But since I’ve tried to reduce my sugar intake in general, I had Stirrings’ real grenadine, as opposed to the thick artificial HFCS stuff, and some dry Izze Esque lemon-lime soda as opposed to Sprite (it was too dry for my taste, really). And no maraschino cherries, even though I’d like to get a jar of the real stuff. So in the end, my cupcakes did not taste like Shirley Temples, and I was disappointed. But it’s my fault. I decided not to tell the Engineer what flavor they were, just that it was a new cupcake recipe. Since he didn’t have my expectations, he just enjoyed them for what they were and proclaimed them to be some of the best I’ve ever made!

Note that these cupcakes happen to be vegan (I hadn’t even planned on that when I was making them), and I used my vegan cream cheese frosting instead of the recipe suggested. For the frosting, I tried a new brand of food coloring, Sauer’s, because I have a lot of it on hand after buying it in bulk after the last shortage. It was liquid, but the color was really intense! That being said, what I would actually recommend for frosting is gel food coloring. My friend Jen says that Americolor is her favorite brand, as Wilton tastes horrible. And if you make these cupcakes to get the Shirley Temple flavor, I’m actually going to recommend that you get the artificial grenadine and soda (unless you can find something like a Sprite Throwback or cane-sweetened Sierra Mist instead of HFCS soda, then use that). Also, this recipe makes 15 cupcakes, and I found the ingredients inconvenient to scale down; if you want, you could make 12 cupcakes and one big ramekin cake baked longer.

For the cupcakes
1 1/3 cup flour (I always use white whole wheat flour)
¾ tsp. baking soda
½ tsp. baking powder
½ tsp. salt
½ cup lemon-lime soda
½ cup grenadine
1 tsp. vinegar (cider, white wine, or white will all work)
¾ cup sugar
1/3 cup canola oil

For the frosting
½ cup Tofutti Better Than Cream Cheese, softened
½ cup vegan margarine, softened
1 tsp. vanilla extract
1 tsp. lemon juice (lime would be great here too)
3 ½ to 4 cups confectioners’ sugar (the 1 lb package, basically), sifted
a few drops of red food coloring (optional)
15 maraschino cherries with stems

Preheat oven to 350 °F. Line muffin pan with cupcake liners (15 in all).

In a medium bowl, sift together flour, baking soda, baking powder, and salt, and stir to combine.

In a large bowl, whisk together soda, grenadine, and vinegar. Let stand for a few minutes, then add sugar and canola oil and whisk until frothy.

Add flour mixture to liquid. Stir together just to combine fully; do not overmix. Spoon batter into cupcake liners, filling half way (they will rise a lot). Bake for 17 minutes. Let cool completely.

In a medium bowl, beat cream cheese and margarine until smooth. Add vanilla and lemon juice and beat to combine. Add powdered sugar 1 cup at a time, beating to incorporate fully. Continue adding powdered sugar until taste and consistency are as desired – you may need more or less 3 cups of sugar, and you may need to add more lemon juice to achieve the desired flavor. Add a few drops of red food coloring, if using, to get the desired hue.

Frost the cooled cupcakes. Top with a maraschino cherry. Cupcakes can be refrigerated, but they survived well at room temperature here.


Saturday, July 28, 2012

I'm featured on New Dress A Day!

I’m pinching myself right now. Do any of you remember the post I wrote last year, where I talked about how Marisa Lynch inspired me to upcycle a Salvation Army paisley dress into a shirt? Well, today she’s featured me on New Dress A Day! I’m practically famous! :)

So hello to everyone who’s clicked on the link from her website! I have continued sewing since I made that paisley shirt (see here). I haven’t had the chance to go thrift-store shopping lately, so I haven’t really remade anything wearable (unless you count the time I turned a tank top into a dress by sewing a skirt, or the one I made two tunics out of a bed sheet); the rest I’ve made from scratch. I also knit and I’ve just recently started knitting things for myself. Most of the time, though, I talk about food. I’m lactose-intolerant, so just about all the recipes you’ll see here are lactose-free; there are also tags in the right-hand column if you want to search for recipes that are nut-free (including peanut-free), gluten-free, vegetarian or vegan.

I live in San Antonio, Texas, but I used to live in Montreal, Quebec, and I still visit every year. You’ll find restaurant reviews from both cities, and sometimes a gem or two I found on the road. That’s about it, so I hope you enjoy the site! Thanks for visiting!

Friday, July 27, 2012

Batch of links

- What is your mealtime environment? Statistics have shown that eating as a primary activity has declined over the past decades, while eating as a secondary activity has increased – this means that today, people are more likely to eat while focusing their attention on something else. Photographer Miho Aikawa took a series of pictures of fellow New Yorkers eating dinner, which makes me feel like a voyeur intruding on others’ dinnertime habits. What struck me most was the number of people who are watching television while they eat, or who routinely settle for very uncomfortable positions (like eating at a coffee table instead of a dining room table). I know that a typical New York apartment doesn’t allow much space for a dining room, and I realize that some people work really long hours, but most of these pictures made me feel really badly for the people eating. How do you eat?

- Can the food movement save the environmental movement? Time had a good article on the subject that I neglected to share before. In it, Bryan Walsh posits that the green movement has failed to create enough changes, but foodies are causing those changes for other reasons: a return to sustainable, small-scale, local, organic agriculture focused on fruits and vegetables. Unlike changes made for environmental reasons, foodie-driven changes are done in many small mobilizations, as opposed to politics or laws affecting the whole country. These changes are brought on not by a sense of responsibility or optimism, but for reasons of health and pleasure. Here’s to hoping the food movement will be the right vehicle for achieving lasting environmental changes!

- While on the topic, here’s a good article on NPR about the rising demand for antibiotic-free, pasture-raised animals.

- It seems that there’s been a recent increase in the number of incidents involving people ingesting metal bristles from a barbecue brush along with their food. I first read about it on The Kitchn, but shortly thereafter it happened again. I’m wondering how big those bristles are, and whether this could be avoided not only by replacing worn brushes with scrubbing pads and such, but also by cutting smaller bites of food and chewing them properly before swallowing…

- Why don’t we consume dairy products from animals that aren’t cows? This Slate article points out that while there are 6,000 mammal species on Earth, Americans get 97% of their dairy from cows. I’ve occasionally seen goat’s milk at the grocery store, and we also have cheeses made from sheep milk or buffalo milk, and I’ve even heard about a fancy Middle-Eastern chocolate that had camel milk as an ingredient. But the options at the store are quite limited! It’s due mostly to historical habits and industrial convenience (cows are easy to raise and produce a lot of milk), but cow’s milk also has the advantage of being relatively bland, of having a fat percentage that we find acceptable in a drink and of being easy to transform into products like butter and cream.

- And finally, to end on a good note, 40 of the most powerful photographs ever taken: “A moving collection of iconic photographs from the past 100 years that demonstrate the heartbreak of loss, the tremendous power of loyalty, and the triumph of the human spirit.”

Thursday, July 26, 2012

Stuffed Sweet Potatoes with Goat Cheese, Honey and Roasted Red Grapes

Hi everyone! Sorry about the lack of activity here this past week; I was on the road coming back home and took a few days to decompress. I don’t have much to report as far as eating on the road goes, as I didn’t try any new places with healthy options. I did, however, discover Buddy Fruits: these pouches contain fruit purée and nothing else (no sugar, no preservatives). Each pouch can be kept at room temperature until it is opened and each contains one serving of fruits. They come in flavors like Multifruit (apple, banana, passion fruit, mango and strawberry) or Strawberry (apple, strawberry, blackcurrant). I found these to be wonderful on mornings when the hotel didn’t have a good fruit selection (red apples are pretty much always a given, but sometimes that’s all there is, or you might have canned fruit salad in syrup – not very inspiring). Plus, they’d make a great healthy snack for kids. I really like this product!

So, one last recipe I made in Montreal was these stuffed sweet potatoes, where the flesh is mixed with lactose-free goat cheese and honey, and served with roasted red grapes (I found the recipe via Pinterest). I served it with turkey breast cooked in a white wine and rosemary jelly, which was the party favor at Dear Sister’s wedding (so even though the poultry looks really bland below, it wasn’t; it’s just that the jelly was hard to see). I had some trouble getting the potato skins not to tear as I was emptying them and later stuffing them, so next time I might cut them into a boat-shape rather than just slit the skin and I would leave some flesh in there to make it more solid, or perhaps I’d just make smaller servings and serve the flesh in ramekins. Overall, I would have enjoyed a more solid texture, but this was a really good combination of flavors! I love roasted red grapes any day, and the honey and goat cheese here made the whole thing come together. This dish is even Engineer-approved; he didn’t think he would enjoy sweet potatoes this much, and they were like candy!

4 sweet potatoes
2 cups red, seedless grapes
1 tsp. grapeseed oil (or another high-heat oil)
¼ tsp. salt
¼ tsp. pepper
4 oz. lactose-free goat cheese (I’d use even more)
2 Tbsp. honey + additional for drizzling
1 pinch each of cinnamon and nutmeg

Preheat oven to 350 °F. Poke holes in sweet potato with a fork, then wrap each tightly in aluminum foil. Bake for 45-60 minutes, or until potatoes and tender to the touch. Unwrap foil and cut a slit down the middle of each sweet potato. Let sit until cool enough to handle.

Increase oven temperature to 450 °F. Lay grapes on a nonstick baking sheet and drizzle with grapeseed oil and a pinch each of salt and pepper, then toss to coat. Roast for 20-25 minutes, or until grapes begin to burst. Remove from the oven and let cool.

Once sweet potatoes are somewhat cool, gently remove the flesh with a spoon, trying to keep the potato intact. Add the sweet potato to a large bowl, then mash with 3 ounces of goat cheese, cinnamon, nutmeg, salt, pepper and honey. Taste and adjust seasonings if desired, then scoop flash back into the potato skins. At this point you can re-warm the potatoes (if you let them cool completely) in the oven, then top with remaining goat cheese. Add grapes on top and serve with additional drizzled honey.


Tuesday, July 17, 2012

Weekly tidbits

Before going back to Texas, I got to try a few more restaurants in Montreal.

- First, Kitchenette, which is a family-owned restaurant where the manager is French Canadian, her chef husband is Texas, and her mother makes the desserts. The décor is modern but classic at the same time, and feels cozy. We were sitting near a beautiful blown-up picture of the manager and chef’s little girls, wearing Texas gear in their Montreal backyard, and our four-top had leather armchairs instead of regular chairs. It seemed odd at first, but we were extremely comfortable even though (or because?) we were reclining somewhat. I liked it so much that I’m toying with the idea of getting two armchairs for our dining room at home! The waitress was friendly and knowledgeable, and all the other staff was courteous. As for the food, I started with the Japanese taco (pulled beef teriyaki, green goddess sauce and daikon slaw), which was fantastic! The Engineer had Maryland-style crab cakes with ranch dressing, which he proclaimed to be the best crab cakes he’d *ever* had. My father also had the taco, and my mother also had the crab cakes. I then ordered the flat iron steak with fries and green salad: the steak was cooked just like I wanted it, and well-seasoned to boot; the fries were perfect, thin and dark, neither too crispy nor too limp, and piping hot; the salad was really good, with Bibb lettuce, and the dressing was unusual and delicious (it may have been a buttermilk dressing, with seeds and fresh herbs). The Engineer had the halibut Pontchartrain, saying it was succulent, with an excellent side of potatoes and mixed veggies. My father had the chipotle-miso black cod (with celery-root purée, braised bok choy and crispy shiitakes), which “smelled like Japan” and was delicious. My mother ordered the lazy cioppino (a fish and seafood stew), a gargantuan serving that she loved but was unable to finish. (I’d also like to point out that Kitchenette does not serve any endangered fish or seafood, which is an effort I truly appreciate these days.) Finally, we shared Mississippi mud pie and strawberry shortcake for dessert. All in all, it was a really great restaurant that we all enjoyed, and I’ll be keeping it on my list of places to visit again.

- We also ate at Nora Gray, the new Italian restaurant in the Joe Beef family. The décor is reminiscent of the latter restaurant, though it progressively got so noisy that the people at each end of the six-top table could not hear each other – definitely a downer. I also felt like it took forever to get our food. That being said, the food was delicious! I started with the fried squash blossoms with pork and ricotta, which were really good, but after tasting the Engineer’s plate of panzanella, I think he had the best appetizer (both require Lactaid anyway). He then had the potato and lentil lasagna, while I had the guinea hen farfalle, which was the best. Dish. EVER. Fabulous! Dessert was less of a hit, because the Engineer’s chocolate bread pudding was dry and burnt, while my cherry sorbet could have used more sugar and perhaps spices to jazz it up. So it was a restaurant that we enjoyed, and the company was wonderful, but for the same price point I’d rather go to Kitchenette next time.

- I later ate at Le Canard libéré, which was right up my alley, given how much I like duck. I hadn’t realized that Brome Lake Ducks had been in business for 100 years! Every duck product under the sun was in that store. Unfortunately, I didn’t buy anything to take home, given that I have to cross the border soon, but the meal was nice! I got the Asian wrap trio (duck confit, mango, bell pepper, carrot, lettuce, cilantro, served with fries fried in duck fat and an apple juice), and it was perfect for an unpretentious lunch – though I should have shared the fries, as it was a generous serving.


- I also had sorbet at a place that opened up this year, Goosto. It’s a small restaurant that seems to serve mostly soups, sandwiches and salads, but with health in mind. I like this even more because the location used to house a McDonald’s and is across the street from an A&W as well as down the block from a Dairy Queen! They also advertise lactose-free and gluten-free sorbets, so that’s what I went for. I had two flavors, the lime-ginger-coconut (original, interesting and refreshing, though a little grainy) and strawberry (not as original, but executed wonderfully, and it ended up being my favorite). I recommend it if you’re in the area; there isn’t as much choice as at Le Bilboquet or Havre aux Glaces, but the location on the corner of Parc and Mont-Royal makes it quite convenient.

- As for my burger tasting in Montreal: I tried two places this summer. One was Burger de ville, which looked promising because Zagat rated them as #1 in town this year. However, I was disappointed; I thought those burgers were nothing special, the addition of condiments was sloppy, and the soda was completely flat. But then I went to L’Anecdote (a diner at 801 Rachel East), which was everything Burger de ville failed to be. The price point is the same, pretty low (between $5 and $10 for a burger, fries sold separately), but the beef was really tasty, perfectly cooked, the condiments were properly applied, and the burger was absolutely delicious. I had the Hambourgeois (lettuce, tomato, caramlelized onions, mustard, mayonnaise, no relish), shared fries with my friend La Maman des Zigotos, and then we split a really good piece of chocolate cake. I liked it so much that it hereby knocks Le Gourmet Burger out of my Top 5 in Montreal (the other 4 being, in no particular order, m:brgr, L’Avenue, Meat Market, and La Paryse). Note that L’Anecdote may not be allergen-friendly, as I believe the buns contain egg and the potatoes are fried in peanut oil.

- As for outside of Montreal, I got to spend a day at Bleu Lavande, located in Fitch Bay (Eastern Townships). I had wanted to go there for a long time, because I love lavender, and this company is well-known (I talked about it here, though it is no longer the only lavender producer in the province; see Passion Lavande or La Maison Lavande if you want to stick closer to Montreal). In Quebec, we don’t have the same climate than in Provence, for example, so the fields aren’t as big or odorant, but it was still absolutely beautiful. We took a guided tour and walked around the fields and distillery, and while I totally recommend a visit, the reason I’m talking about this here is food. Not the food served at the lavender farm itself, because I had a sandwich so bad I couldn’t even finish it, but the food presented as a demonstration by Simon Beaupré, the owner and chef of La Maison de ville in Magog. He made some crêpes with a little duck fat and a few drops of lavender oil, topped them with a thin layer of cream cheese (only enough to get the filling to stick to the crêpe), duck confit, watercress and a dressing of Dijon mustard, olive oil, lavender honey and a few crushed lavender flowers. The crêpes were rolled, stabbed with toothpicks, and sliced, so they were a great hors d’oeuvre, though left whole they would make a wonderful main dish. The lavender flavor was actually much more subtle than I expected, as the goal is to make people wonder what the extra little something is (instead of using so much lavender that it tastes like soap). I’m keeping this idea in mind! So far, I’ve only used lavender flowers in my dishes (or to make lavender lemonade, which is fantastic, or lavender salt), but a touch of lavender oil seems like a great addition.


Salade de haricots blancs à la saucisse

Pour faire un souper rapide par un soir de canicule, j’ai opté pour cette recette de Coup de Pouce, qui a été déclarée un franc succès par mes parents, l’Ingénieur et moi. J’ai utilisé deux échalotes au lieu de l’oignon rouge, mais j’ai quand même trouvé ça un peu fort. Les proportions sont bien sûr faciles à ajuster selon vos goûts et votre faim. Vous pourriez aussi choisir d’autres légumineuses, mais j’aime beaucoup les haricots blancs.

¼ tasse d’huile d’olive (1 c. à soupe + 3 c. à soupe)
4 saucisses fraîches de poulet ou de veau
1 grosse boîte (28 oz) de haricots blancs, égouttés et rincés
¼ tasse d’oignon rouge, haché finement
1 tasse de persil italien haché
zeste et jus de ½ citron
1 gousse d’ail, hachée finement
sel et poivre du moulin

Dans un poêlon à surface antiadhésive, chauffer 1 c. à soupe d’huile à feu moyen. Ajouter les saucisses et cuire de 7 à 10 minutes ou jusqu’à ce qu’elles soient dorées et aient perdu leur teinte rosée à l’intérieur. Couper les saucisses en rondelles et les mettre dans un grand bol. Ajouter les haricots blancs, l’oignon rouge et la moitié du persil.

Dans un petit bol, à l’aide d’un fouet, mélanger le reste de l’huile, le zeste et le jus de citron et l’ail. Arroser la salade de haricots de la vinaigrette. Saler, poivrer et mélanger délicatement pour bien enrober les ingrédients. Au moment de servir, parsemer du reste de persil, au goût.


Sticky Orange Cake

I tried to make a few things with rhubarb this summer, because I didn’t want to miss the season entirely. I made another strawberry rhubarb pie, but it wasn’t as good as my old one. I liked the idea of using the egg wash and sugar on the bottom crust before putting in the filling, as well as on the top crust, but the filling was much too liquid for my taste, and the pie wasn’t anything special. I also tried vanilla roasted rhubarb and strawberries from Bon Appétit, and I think it would have worked well with fresh rhubarb, but despite the cooking time here, using rhubarb that was previously frozen is a bad idea.

The good dessert I made turned out to be a vegan sticky orange cake (as I’ve said before, vegan cakes are often easy to make when you find yourself without a mixer). It’s made with orange marmalade; the Engineer originally didn’t like the idea of biting down on the orange peel, but it dissolves on the stovetop, so there’s really no need to strain the marmalade. This cake was delicious, both for breakfast or dessert, and a single slice made me feel really full!

For the cake
3 cups all-purpose flour
1 ½ cups white sugar
½ cup dark brown sugar, lightly packed
2 tsp. baking soda
1 tsp. salt
1 orange, zested
2 cups orange juice
2/3 cup vegetable oil
2 Tbsp. apple cider vinegar
1 tsp. vanilla

For the glaze
¼ cup orange marmalade
1 Tbsp. rum or vodka (or water)

Preheat oven to 350 °F. Lightly grease two 9-inch round cake pans. Line the bottoms with parchment paper and lightly grease the paper.

In a large mixing bowl, whisk together the flour, sugars, baking soda, salt, and orange zest. Whisk until thoroughly combined, crumbling the brown sugar with the tips of your fingers if necessary.

In a separate bowl or large measuring cup, whisk together the orange juice, vegetable oil, vinegar, and vanilla. Quickly mix the wet ingredients into the dry mix and whisk thoroughly. Pour the batter into the prepared cake pans and bake for 30 to 35 minutes.

Let the cakes cool for about 20 minutes in the cake pans, then run a knife around the inside of the pan to release each layer. Turn the cake layers out onto cooling racks. Glaze while the cakes are still warm, but not hot.

To make the glaze, mix the marmalade and rum or vodka in a small saucepan. Warm over medium-high heat for about 5 minutes, until the glaze is bubbling and hot. Turn off the heat and immediately glaze the cake.

Place one cake layer on a cake plate. Pierce the top with a toothpick a few times. Using a slotted spoon, lift out the solid bits of the marmalade and set them aside in a small bowl. Pour about half the liquid in the saucepan over the first cake layer. Place the second layer on top of the first, and repeat. Spoon the solid bits of marmalade peel on top of the cake. (I didn’t bother using a slotted spoon, so I had bits of peel in between the layers as well. I’d consider adding more orange zest to the top of the cake next time, as it’s a nice decorative element.)


Friday, July 13, 2012

Salted Caramel Brownies

I’m not always a big fan of caramel. There’s good caramel and bad caramel, I guess, plus all the caramel that has lactose in it. But in Canada, with Natrel’s lactose-free cream, I was able to make lactose-free salted caramel – the mix of sweet and salty made it fantastic! Even the Engineer, who says he doesn’t like caramel, really liked this one. I had some drizzled over fresh strawberries, then on top of a pancake. And the reason I made salted caramel was for the Brown-Eyed Baker’s recipe of salted caramel brownies, found on one of my friend Jen’s Pinterest boards, to celebrate her birthday. These brownies were really not that hard to make (I did make the caramel a few days early, though), and they were fabulous. Extremely sweet, of course, but just so, so good! They’re moist, rich and chocolaty, but with the extra depth the salty caramel adds to the mix. It’s a good idea to make these to share! I made them in an 8-inch square pan, which to me, always yields 9 servings exactly (some recipes will say 8, 12 or 16, but that’s just not how I cut my brownies). You’ll have to excuse the poor quality of the picture; I was on vacation in Cape Cod at the time and my senses were overwhelmed by salty caramel chocolaty goodness, so I couldn’t think straight enough to pose them in daylight.

For the salted caramel sauce
1 cup granulated sugar
6 Tbsp. unsalted butter, at room temperature (or vegan margarine if you want)
1 tsp. fine sea salt
2/3 cup lactose-free heavy cream, at room temperature

In a 3-quart saucepan, heat the sugar over medium-high heat, whisking as the sugar begins to melt. Some of the sugar will harden into clumps, but that’s okay – it will melt eventually – just keep whisking. Continue to cook the sugar until it reaches a dark amber color. At that point, whisk in the salt, and then add the butter all at once and whisk until it is completely incorporated into the sugar. Remove the pan from the heat and pour in the heavy cream (it will foam up when first added). Continue to whisk until it forms a smooth sauce.

Allow to cool for 10-15 minutes before using in the brownies. The leftover sauce can be stored, covered, in the refrigerator for up to 2 weeks. (You’ll probably need to warm it up a bit straight from the refrigerator.) You can also leave it at room temperature for a few days, as the sugar will keep it from spoiling.

For the brownies
5 oz. semisweet or bittersweet chocolate, chopped
2 oz. unsweetened chocolate, chopped
8 Tbsp. (1 stick) unsalted butter, cut into quarters (or vegan margarine)
3 Tbsp. cocoa powder
3 eggs
1¼ cups granulated sugar
2 tsp. vanilla extract
½ tsp. salt
1 cup all-purpose flour
salted caramel sauce (see above)
fine sea salt

Adjust an oven rack to the lower-middle position and heat the oven to 350 °F. Spray an 8-inch square baking pan with nonstick cooking spray. Line the pan with overlapping pieces of foil and spray the foil.

In a medium heatproof bowl set over a pan of almost-simmering water, melt the chocolates and butter, stirring occasionally until smooth. (Or, melt in the microwave on 50% power for 30-second increments, stirring after each, until melted and smooth.) Whisk in the cocoa until smooth. Set aside to cool.

Whisk together the eggs, sugar, vanilla, and salt in a medium bowl until combined, about 15 seconds. Whisk the warm chocolate mixture into the egg mixture; then stir in the flour until just combined.

Pour about half of the brownie mixture into the prepared pan and spread into the corners. Spoon 9 dollops of salted caramel sauce on top of the brownie batter. Top with the remaining brownie mixture, spread into the corners and level the surface with a spatula. Again, spoon 9 dollops of the salted caramel sauce on top of the brownie batter. With a dull butter knife, gently run it through the batter to swirl the batter just a bit (don’t do it too much or it will all mix together). Sprinkle a bit of sea salt on top.

Bake until slightly puffed and a toothpick inserted in the center comes out with a small amount of sticky crumbs, 35 to 40 minutes. Cool on a wire rack to room temperature, about 2 hours. Remove the brownies from the pan using the foil handles and transfer to a cutting board. Cut into squares. Brownies can be stored in an airtight container at room temperature.


Friday, July 06, 2012

Batch of links

- Have you ever wondered how blind people cook? Here’s a good article by the BBC tackling the subject. There’s more to it than relying on taste and smell!

- Did you know there’s a way to fix fishy-smelling fish and seafood?

- Now that people are barbecuing more for the summer, I really want a spiral-cut hot dog!

- I’d always thought it was somewhat odd that the 12-step program, the one most commonly used to treat addiction, is somewhat based on religion, or at least monotheistic spirituality, which isn’t everyone’s cup of tea. But what’s more disturbing is the fact that addiction treatment in America isn’t even based on scientific facts. If it were any other disease, there’s no way this treatment would be accepted as mainstream, so why is addiction any different in this day and age?

- Why kids with known food allergies are still at risk: This Time article gives a lot of interesting statistics, like the fact that of kids with known food allergies who have a reaction in a given year, 11% of those reactions were caused on purpose by parents who wanted to see if the allergy had disappeared. The article goes on to state that parents were only responsible for about half of reactions (accidental or not), which suggests that other caregivers like grand-parents or babysitters are responsible for the rest and need to be better educated about food allergies. While I agree that’s true, it still means that parents cause half of reactions, so they need to be better educated as well! Especially those who think it’s safe to just give their child a known allergen to see what happens. There also needs to be better education about the symptoms of anaphylaxis, since an Epipen was administered by parents or caregivers to only 30% of children experiencing it!

- Stately Sandwiches: The author looks up food trends in each state before coming up with an “official” sandwich and photographing it. Only a dozen states are up so far, but the work is ongoing. Texas’ sandwich? Brisket, of course!

- Cherry production is down 70% this year… I may have to wait to bake all those cherry recipes.

- And we finally have the first global standards for salmon farming.

Thursday, July 05, 2012

Batch of links - Interviews

Today, I’m giving you links to interviews of people I admire in the food industry. Some of these give great behind-the-scenes looks and photo tours of kitchens, bakeries and processing plants (or old photos of famous chefs with embarrassing hairstyles). Others are links to blogs, books or non-interview articles. I hope you find a few people who like in there, and maybe discover a few as well!

- Washington Post interview with Bob Moore, the founder of Bob’s Red Mill products (which I love). “His mission is to offer whole grains at a reasonable price, no matter where you live.”

- The Kitchn interview with Kim Boyce, author of Good to the Grain, which is one of my favorite cookbooks. I’ve made several of her recipes, notably the quinoa and beet pancakes as well as the whole wheat chocolate chip cookies. Bonus: Tour of her bakery, BakeShop, in Portland, Oregon.

- The Kitchn interview with Tori Avey, creator of the kosher food blog The Shiksa in the Kitchen. She’s a culinary anthropologist, so she takes pleasure in telling the story behind the recipe (which is also one of the things I really like about The Book of Jewish Food by Claudia Roden). I really enjoyed the photo gallery of her beautiful kitchen!

- The Gazette interview with Aran Goyoaga, focusing on the photography workshop she taught in Montreal last month (I wasn’t lucky enough to get in, it really did sell out in less than 2 minutes). She writes the blog Cannelle et Vanille, has a cookbook coming out, and is probably mt favorite food stylist and photographer! The workshop was organized by Mayssam Samaha, the Montrealer who writes Will Travel for Food.

- The Kitchn interview with Tim McDiarmid (contains some typos in geographical location names). Tim McDiarmid, also known as Tim the Girl, was born and raised in Canada and now works as a caterer and personal chef in San Antonio. I’ve never eaten her food (which she describes as “upscale urban hippie food”), but I’ve heard about her through various publications and like her style.

- The Kitchn interview with Ashley Rodriguez, who writes the wonderful Not Without Salt. I love how she nurtures her marriage with her (almost) weekly date nights at home with her husband, once the kids are in bed. I was also very surprised to find out that she has a small kitchen, but that just goes to show that making beautiful, delicious food isn’t about how big or how fancy your kitchen is.

- The Kitchn interview with David Lebovitz, who I’ve mentioned before (say, here). And because that’s a really short interview, here’s an older one.

- The Kitchn interview with Judith Jones. I just love her kitchen, especially the open pantry! And the pegboard of pots and pans. And the magnet knife rack. And… You can see it’s a very functional space. And here’s a MacLean’s interview where she discusses her cookbook The Pleasures of Cooking for One. And for those who are interested, here’s her blog.

- And not exactly an interview, but a great article in Bon Appétit written by Anthony Bourdain about his father.

Œufs pochés sur tartes fines à l'oignon

Je continue à profiter allègrement de la crème sans lactose de Natrel! J’ai trouvé cette recette dans le numéro d’avril 2012 de Décormag (je ne trouve pas les recettes sur leur site web, malheureusement). Je me suis empressée de la faire, avant de rentrer au Texas! J’ai eu de la misère à faire cuire le dessous des tartes comme il faut, même en mettant la plaque sur la grille la plus basse du four. Je me demande en fait si les oignons ont fait trop d’eau dans le four, car la recette d’origine ne permettait pas de les caraméliser suffisamment. J’ai donc fait cuire mes tartes plus longtemps qu’il le fallait, et le transfert dans l’assiette a demandé un certain doigté. Les tartes étaient tellement bonnes! Je recommande de servir cela avec une salade verte.

¼ tasse d’huile végétale (comme de l’huile de carthame)
2 gros oignons blancs (environ 1 lb. / 500 g.), finement hachés
2/3 tasse de crème 35 % sans lactose de Natrel
4 brindilles de thym frais (garniture), plus les feuilles d’une brindille
poivre concassé et sel
350 g. (12 oz.) de pâte feuilletée du commerce
un peu de farine pour abaisser la pâte
4 œufs, pochés

Dans une casserole à fond épais, mettre l’huile à chauffer à feu doux. Ajouter les oignons et laisser cuire à feu doux pendant 45 minutes tout en remuant toutes les 10 minutes. Verser alors la crème, puis les feuilles de thym, et laisser mijoter une vingtaine de minutes. Assaisonner au goût en se let en poivre et réserver à température ambiante.

Pendant ce temps, préchauffer le four à 325 °F. Sur une surface de travail légèrement farinée, abaisser la pâte feuilletée à une épaisseur d’environ 3 mm (1/8 po.). Découper à l’emporte-pièce uni de 12 cm (4 po.) de diamètre quatre ronds, et les disposer sur une plaque à pâtisserie recouverte de papier parchemin. (J’ai utilisé un bol en guise d’emporte-pièce.) Réserver au réfrigérateur une vingtaine de minutes. Avec la pointe d’une fourchette, piquer 4 ou 5 fois chaque rond de pâte. Répartir les oignons sur ces ronds et les étaler de façon régulière. Enfourner sur le grille la plus basse et laisser cuire pendant 25 à 30 minutes, ou jusqu’à ce que la pâte en dessous des tartes soit bien suite et croustillante.

Dans un bol, verser délicatement de l’eau bouillante et y mettre les œufs pochés à chauffer une minute. (J’ai plutôt fait pocher mes œufs juste en sortant la plaque du four.) Égoutter et placer un œuf au centre de chaque tarte fine à l’oignon. Poser une brindille de thym sur chaque œuf et servir sur des assiettes individuelles bien chaudes.


Wednesday, July 04, 2012

Moist Beet and Chocolate Cake with Crème Fraîche

If you’ve been reading this blog for a while, the idea of beets in a chocolate cake is nothing new to you. Beets keep a cake moist, and give it an earthy flavor that goes really well with the crème fraîche in this recipe. When I started seeing Nigel Slater’s recipe popping up online, I bookmarked it, but sat on it until I could have access to lactose-free crème fraîche. Since I finally had the opportunity to make some in Quebec, I got around to making recipes that called for it (the honey-roasted onion tart, a white salad that was good but not great, and this cake).

As a reminder, to make lactose-free crème fraîche, all you need is lactose-free cream that hasn’t been ultra-pasteurized (Natrel makes some) and lactose-free plain yogurt, the kind with active cultures. Put 1 cup of the cream in a jar, add 1 Tbsp. of the yogurt, mix it well, screw the lid on and leave it on the countertop, at room temperature, for 8 to 24 hours, until the mixture thickens. Then you mix it once more and put it in the fridge for 24 hours, so it can thicken some more. It keeps in the fridge for up to 2 weeks.

I first saw this recipe on CakeSpy, then David Lebovitz posted it while discussing what makes a good recipe, or good collection of recipes, in his opinion. I used both posts to get the correct amounts for ingredients, because there were some typos in the first and I needed a little help converting units. The recipe calls for the beets to be boiled, with the skin on, which took longer than the recipe said. I think you could also roast the beets, if that’s your preferred method (about 1 hour at 400 °F should get your beets tender). Since I don’t have a food processor here, I mashed the beets with a potato masher, and it worked fine. I also don’t have a springform pan, so I used two 9-inch round cake pans lined with greased wax paper and baked the cakes 30 minutes instead of 40 – they were cooked all the way through, which I like, but with a springform pan you can afford to let the center a bit molten.

This cake isn’t too sweet, and some might say it’s more of a snack than a dessert – though it’s delicious for either occasion. The Engineer liked the cake, but not the crème fraîche; I, however, liked the crème fraîche, loved the cake, and was delighted at how the trio of beets, crème fraîche and poppy seeds complement each other!

8 oz. (240 g) beets, unpeeled, rinsed and scrubbed free of dirt (about 2-3 beets)
7 oz. (200 g) bittersweet or semisweet chocolate (70% cacao solids), chopped
¼ cup hot espresso (or water, at worse)
7 oz. (200 g) butter, at room temperature, cubed (I used cold margarine; this is ¾ cup + 2 Tbsp., OR 1 whole stick plus ¾ stick, OR 14 Tbsp., depending on how you like measuring your margarine or butter)
1 cup (135 g) flour
3 Tbsp. unsweetened cocoa powder (the darkest you can find, natural or Dutch-processed)
1 ¼ tsp. baking powder
5 large eggs, separated, at room temperature
pinch of salt
1 cup (200 g) superfine sugar (white granulated sugar worked fine)

Grease an 8- or 8 ½-inch (20 cm) springform pan and line the bottom with parchment paper; grease the paper. (I used two 9-inch round cake pans; you can also use a bundt pan, provided you line it with paper as well.)

Boil the beets in water with the lid askew until they’re very tender when you stick a knife in them, about 45 minutes (this took much longer for me). Drain, then rinse the beets with cold water. When cool enough to handle, slip off the peels, cut the beets into chunks, and grind them in a food processor until you get a coarse, yet cohesive, purée. (If you don’t have a food processor, use a cheese grater or a potato masher.)

Preheat the oven to 350 °F.

In a large bowl set over a pan of barely simmering water, melt the chocolate, stirring as little as possible. Once it’s nearly all melted, turn off the heat and remove the bowl. Immediately put the coffee in the hot water (if you haven’t made the espresso already) and stir. Measure out 4 Tbsp., put them in the bowl with the melted chocolate and stir the mixture once. Put the bowl back on top of the pan, then add the butter/margarine. Press the butter pieces into the chocolate and allow them to soften without stirring.

Sift together the flour, cocoa powder, and baking powder in a separate bowl.

Remove the bowl of chocolate from the heat and stir until the butter is melted. Let sit for a few minutes to cool, then stir the egg yolks together and briskly stir them into the melted chocolate mixture. Fold in the beets.

In a stand mixer, with electric beaters, or by hand, whip the egg whites until stiff. Gradually fold the sugar into the whipped egg whites with a spatula (I added the sugar gradually as I was whipping the whites), then fold them into the melted chocolate mixture, being careful not to overmix.

Gently fold in the flour mixture.

Scrape the batter into the prepared cake pan, put the cake in the oven and immediately reduce the heat to 325 °F; and bake the cake for 40 minutes, or until the sides are just set but the center is still is just a bit wobbly. Do not overbake. (If using two 9-inch round cake pans, 30 minutes will do it.)
Let cake cool completely, then remove it from the pan.

This cake tastes better the second day; spread with crème fraîche and sprinkle with poppy seeds shortly before serving. Or serve them alongside. If crème fraîche is absolutely out of the question, you could try sour cream (though it might be too tangy), lactose-free vanilla ice cream, or sprinkle the cake with powdered sugar; that being said, I really do recommend the crème fraîche.


Tuesday, July 03, 2012

Honey-Roasted Onion Tart

I’ve been continuing to treat myself with Damafro’s lactose-free goat cheese (I do wish they would export to the States, or that someone over there would have the good sense to start making it!). I made delicious toasted half-baguettes topped with goat cheese, strawberries, fresh pepper and basil (recipe from Coup de Pouce), which were great for lunch. I also tried a potato, squash and goat cheese gratin that, sadly, fell short of my expectations.

The other thing that we don’t have in the States yet (and I say “yet” because it only seems logical that Lactaid will start making it at some point in the not-too-distant future) is lactose-free cream. You can use it in any recipe that calls for cream, of course, but you can also use it as a base to make crème fraîche. So I took the opportunity to make my own lactose-free crème fraîche, which is actually super easy. I first looked at the recipe on The Wednesday Chef, which calls for cream and buttermilk, then looked around online to make sure I understood the reaction going on, and used yogurt instead of buttermilk. You need to make sure your cream isn’t ultra-pasteurized (which, if you’re making it lactose-free, shouldn’t be a problem because Natrel’s cream worked just fine), and you need something with active cultures: I used lactose-free plain yogurt, but real buttermilk or sour cream apparently work as well (I don’t have access to either of those lactose-free here, so yogurt it is). All you do is pour 1 cup of cream into a jar and add 1 Tbsp. of plain yogurt, mix, screw the lid on the jar and leave it at room temperature 8 to 24 hours, until the mixture thickens (I left mine on the counter overnight). Then you mix again (or shake the jar) and refrigerate 24 hours, which thickens the cream further, and you’re good to go! The crème fraîche keeps for about 2 weeks in the fridge (assuming your cream wasn’t about to expire, of course).

So I finally got to make this honey-roasted onion tart from Bon Appétit; I’d kept the recipe all this time because it looked really good, but I had to be in Canada to make it lactose-free (and also be motivated enough to make the crème fraîche in the first place, though that turned out to be so easy that I literally made it in my sleep). While I didn’t quite follow the recipe (I was on automatic pilot and caramelized onions on the stove instead of mixing the raw onions with dressing and roasting them in the oven, which I rectified by mixing some seasonings with the caramelized onions before putting them on the tart), I found this tart fabulous. It’s hard to go wrong with any recipe that calls for bacon, caramelized onions and puff pastry, but throw in crème fraîche and it’s just heavenly! It’s great for an appetizer, of serve it for dinner with a green salad.

1 sheet frozen puff pastry (half of 17.3-oz. package), thawed
3 bacon slices, cut crosswise into ½-inch pieces (or 5-6 slices, if you wish)
¼ cup honey
¼ cup dry white wine
2 large sweet yellow onions (about 1 ½ lbs.), cut into ¼-inch-thick rounds (I sliced mine in half-moons)
¾ cup lactose-free crème fraîche (see above)
½ tsp. fine sea salt
¼ tsp. fresh black pepper
1/8 tsp. freshly grated nutmeg
1 tsp. fresh thyme leaves (optional; I realized at the last minute that I was out, so I used basil)

Position rack in top third of oven and preheat to 375 °F. Using lightly floured rolling pin, roll out puff pastry on lightly floured surface to 14x10-inch rectangle. Fold ½ inch of pastry edges in toward center on all sides, forming 13x9-inch rectangle. Transfer pastry to large rimmed baking sheet. Press firmly on pastry edges with fork to form rim. Chill crust.

Cook bacon in small skillet over medium heat until brown and crisp. Transfer to paper towels to drain. Reserve 1 Tbsp. bacon drippings from skillet. Whisk honey, wine, and reserved 1 Tbsp. bacon drippings in large bowl. Add onions; toss to coat. Coat another large rimmed baking sheet with nonstick spray. Spread onion mixture in even layer on sheet. Roast 30 minutes. Turn onions over, allowing rings to separate. Roast until onions are caramelized, turning often for even browning, 30 to 45 minutes. Remove from oven; cool onions slightly. (Alternatively, you can caramelize the onions on the stovetop, mix the bacon drippings with the honey and wine in a bowl, then mix it all together if you find that easier.)

Increase oven temperature to 400 °F. Mix crème fraîche, sea salt, pepper, and nutmeg in small bowl. Using offset spatula, spread crème fraîche over crust to folded edge. Arrange onions atop crème fraîche. Sprinkle with bacon (at this point, since I hadn’t used all the dressing with my onions, I drizzled a bit more honey on top of the tart). Bake tart until crust is light golden brown and topping is bubbling, 20 to 25 minutes. Sprinkle with thyme and serve.