Wednesday, December 30, 2009

Soufflés renversés au fromage de chèvre


Je vais essayer de mettre en ligne plusieurs recettes aujourd’hui, ça s’est accumulé depuis la mi-décembre et je n’ai pas eu le temps de mettre mon blogue à jour. Je commence par une recette de petits soufflés au fromage de chèvre, tirée d’un dépliant publicitaire livré avec mon Coup de Pouce. Ils étaient simples à faire et très bons. Ce n’est pas une recette de soufflés typique, car ils ne sont pas servis directement à leur sortie du four et retombent donc avant qu’on les mange (ils sont aussi un peu plus pâteux que soufflés). Aussi, j’utilise toujours maintenant le fromage de chèvre Damafro sans lactose.

En fait, au départ, la recette indiquait 3 jaunes d’œufs et 5 blancs d’œufs. L’Ingénieur avait, par inadvertance, acheté de gros œufs à double jaune; ils sont très amusants, mais pour les proportions, ce n’est pas génial! Je vais quand même changer la recette et dire qu’il faut 5 œufs, séparés. C’est que moi, j’adore le fromage de chèvre, et j’ai trouvé les soufflés un peu fades. Par contre, l’Ingénieur ne raffole pas de ce fromage, et les soufflés étaient juste à son goût. À défaut de rajouter du fromage de chèvre dans les soufflés, je pense donc qu’il faut rajouter un peu de jaunes d’œufs pour leur donner du goût. De plus, les noix hachées aidaient à donner du goût, mais on pourrait sans doute les remplacer par du parmesan râpé si on veut éviter les noix.

1/3 tasse de noix de Grenoble, rôties et hachées finement
¼ tasse de farine
3 c. à soupe de beurre
2/3 tasse de lait (avec ou sans lactose)
125 g de fromage de chèvre (avec ou sans lactose)
5 œufs, séparés
sel et poivre, au goût

Préchauffer le four à 350 °F.

Dans un petit bol, mélanger les noix et 2 c. à thé de farine. Beurrer généreusement 6 ramequins. Répartir le mélange noix-farine dans les ramequins et les faire pivoter pour que le mélange colle aux parois et au fond des moules. Jeter l’excédent.


Dans une petite casserole, faire fondre le beurre et y ajouter le reste de la farine. Cuire 3 minutes è feu moyen et ajouter le lait. Porter à ébullition en remuant constamment, cuire 2 minutes, retirer du feu et laisser tiédir dans la casserole.

Ajouter le fromage de chèvre, les jaunes d’œufs et les assaisonnements et bien mélanger. Réserver.


Dans un bol, monter les blancs d’œufs en neige jusqu’à ce qu’ils forment des pics presque fermes. Plier délicatement en trois additions dans le premier mélange.


Répartir le mélange dans les 6 ramequins. Cuire au bain-marie au centre du four environ 25 minutes. Retirer du four et laisser les ramequins dans le bain-marie 15 minutes. À l’aide d’un couteau, démouler délicatement (à ce stade, on peut les mettre au réfrigérateur, puis les réchauffer au four avant de les servir). Servir un ou deux soufflés par personne, avec une salade verte et une vinaigrette maison.


A parte : Pour ceux et celles qui se demandent comment sortir un petit ramequin d’un bain-marie brûlant sans mouiller ses mitaines, je recommande fortement les mitaines de silicone!

Monday, December 14, 2009

Montreal Cupcakes

I realize that compared to most other North American cities, Montreal has been a little late to jump on the bandwagon of the cupcake trend. I decided to talk about five of its cupcake shops in this post (as far as I know, they are the only so-called cupcake shops, as opposed to bakeries that happen to sell some cupcakes). In all cases, regular-sized cupcakes are $3.00 plus taxes, so the only real difference is in the taste. I could elaborate on the fact that all these stores somehow chose pink and brown as their colors, but I won’t.


The first one I’ll point out is Itsi Bitsi, in gentrified Little Burgundy. This place also sells gifts and tea. In addition to regular standby cupcake flavours, there are two featured flavours each day. Presentation is great, and the number of cupcakes is small enough to ensure freshness. I found the service somewhat curt, though, as if the cashier wanted me out of there quickly, even though I was the only customer in the store on a Thursday morning. I tried the Bet Velvet with white chocolate frosting, a riff on Red Velvet. As you might know, the original red velvet cakes were coloured with beets instead of food coloring (and take it from me: when you put beets in a cake, you really can’t taste them). This cupcake, though, did not have any cocoa powder in it, so it was very pink. It was moist and delicious; I would definitely buy this cupcake again. A nice bonus is the perfectly shaped box for a cupcake to go.


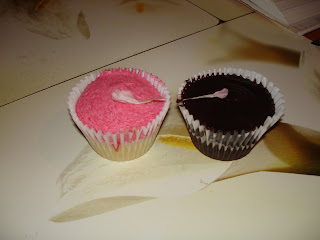
There is also Cho’cola, on Monkland (there are two websites: this one, which is hardly functional and hasn’t been updated in a long time, and that one, which is not even online yet, but is advertised on their business cards). This place has a cute but modern interior. It serves meals like salads and sandwiches, and you can also buy alcohol there. The terrasse is great, day or night. And what this place has going for it is that it is entirely nut-free – a definite plus. There is a wide selection of cupcakes, but.... I think there are too many cupcakes for the inventory to clear quickly. The first time I went was a weekday evening, and I had a vanilla-raspberry cupcake (which unexpectedly contained chocolate chips). It was a little dry, and not worth the $3.33 I paid for it. However, I did try their cupcakes a second time on a Saturday afternoon (pictured here). The Oreo cupcake was quite good, with a very thick swirl of sweet icing, vanilla cake strewn with chocolate cookie crumbs (probably containing sour cream or buttermilk), and topped with half an Oreo cookie. The vanilla cupcake and the chocolate cupcake (the latter tasting of baking soda), with their mile-high butter frosting, were not impressive. I’m told that Cho’Cola is more known for its cakes than its cupcakes, though.


I tried Les Glaceurs, on St-Sulpice. They sell cupcakes, as well as ice cream and sorbet from Le Bilboquet. I had heard good things about their red velvet cupcake, and you know what a sucker I am for red velvet, so when I happened to walk by on a summer pilgrimage to the Old Port, I just had to try it. I really was not disappointed! They gave me a cute little plastic container to carry the cupcake home, and it was small enough to fit into my purse. The cupcake itself had a definite taste of good cocoa, though not overwhelming, and was pleasantly moist. The flavour was really wonderful. The icing was cream cheese and vanilla, which was maybe a bit much, but it was still good. The tiny dark pink dot you see on top was actually marzipan – I love it, but stay away from that place if you have a nut allergy!


I couldn’t resist popping into Petits Gâteaux, on Mont-Royal. This place gets bonus points for actually using the proper term for “cupcake” in French. They also had what were probably the most beautifully presented cupcakes so far. There was a wide selection, but not so wide that one would automatically be suspicious of freshness. I tried three of the mini-cupcakes (at $1.25 + tx each, not so easy on the wallet... but oh so easy in the mouth). The citrus (agrumes) cupcake was good in and of itself, and it was topped with orange frosting that tasted like an orange creamsicle, along with lemon and orange zest. Refreshing and sweet. Next, the raspberry-sour cream cupcake: absolutely delicious. Filled with fresh raspberries and topped with a dollop of white chocolate mousse and bits of dried raspberries. Superb! Third, the chocolate cupcake. The cake was slightly dry, but the chocolate mousse topping (dusted with cocoa) more than made up for it. It was dark chocolate, rich and not too sweet. So, lovely cakes at Petits Gâteaux.


Finally, my favourite place: Cocoa Locale, on Du Parc. In my opinion, this little shop has the best cupcakes AND the friendliest service. I also found this video on YouTube, which I just had to share. Reema, the baker, is ALWAYS in a good mood. Now, Cocoa Locale doesn’t serve cupcakes exclusively; there are also bigger “cupcakes for two”, little cakes (about 4 servings) and regular cakes. The cupcakes have more of a glaze than a frosting, but this results in the perfect cake/topping ratio in a single bite for my taste. The vanilla cupcake was perfect, very flavourful and moist, topped with pink glaze and a carnation petal. The famous chocolate-chai cupcake (made with Valrhona chocolate, mind you, along with cardamom, ginger and cinnamon) was divine. The gooey icing made for a messy treat, sure, but the cake was moist, fragrant and delicious; it was my favourite cupcake so far. Apparently, Reema’s red velvet cakes are very good, too, but I haven’t been fortunate enough to try one. (The downside with this bakery is that you don’t know ahead of time what flavours will be available, whereas Itsi Bitsi has a set schedule posted online.) On another occasion, I also tried the vanilla-raspberry-rose cake, which was absolutely delicious (even the Engineer, who doesn’t normally like raspberries, really liked this one). I just love Reema’s cakes, and her inspiration to decorate them with flowers.



Chocolate of the moment

I recently tried a Valrhona Grand Cru, the Guanaja (“bittersweet and elegant” dark chocolate with 70% cocoa). It’s really good! Not as sweet as my last pick, and completely different from my other current favourite, Callebaut finest dark chocolate natural vanilla. I would say it is more refined than those; definitely more bitter, but not in a bad way, it’s just that you really taste the cocoa (which is the point). It melts in the mouth beautifully and has a nuanced taste; I haven’t compared it to the other Grands Crus, though, but I would love to. The only downside is that it gives you “bad chocolate breath” (the one that’s almost like coffee breath).


I love that the bar itself has somewhat of a whimsical design, not the lines at right angles with which to break into squares. I also like the design of the box, because it not only looks fancy but is also quite practical, with a flap to close it between tastings (if you last that long). I love that the bar itself has somewhat of a whimsical design, not the lines at right angles with which to break into squares. I also like the design of the box, because it not only looks fancy but is also quite practical, with a flap to close it between tastings (if you last that long). It’s a nice treat, though not necessarily for every day.

Dutch-processed cocoa

People sometimes wonder what the difference is between “regular” cocoa and Dutch-processed cocoa. Well, according to Wikipedia, Dutch-processed cocoa “is less acidic, darker and more mellow in flavor than what is generally available in most of the world. Regular (non-alkalized) cocoa is acidic.” So if you substitute one for another, there might be a difference in the pH of your baked goods, resulting in a difference in rising, for example. When a recipe specifies one type or the other, this has already been taken into consideration. However, I must admit that I usually only keep one type on hand at any given moment, and I don’t bother compensating – no one complains.


For reference, in the picture above, the cocoa on the left is Fry’s cocoa, a regular-type cocoa that seems to be the most widely available in supermarkets. On the right is Van Houtten, a Dutch-processed cocoa – notice how much richer the color is!

Lemon Olive Oil Cake


This cake recipe is based on an Epicurious recipe. It was a simple cake, light but still tasty (and it disappeared quite quickly). Use the best quality olive oil you can get your hands on!

3/4 cup extra-virgin olive oil
1 large lemon, zested and juiced
1 cup flour
5 large eggs, separated
½ tsp salt
¾ cup sugar

Put oven rack in middle position and preheat oven to 350 °F. Grease a 9-inch springform pan with some oil, then line the bottom with a round of paper. Oil the paper.

Beat together egg yolks and ½ cup sugar in a large bowl with an electric mixer at high speed until thick and pale, about 3 minutes.


Reduce speed to medium and add olive oil, lemon zest and lemon juice, beating until just combined (mixture may appear separated).


Using a wooden spoon, stir in flour mixture (do not beat) until just combined.


Beat egg whites with salt in another large bowl with cleaned beaters at medium-high speed until foamy, then add ¼ cup sugar a little at a time, beating, and continue to beat until egg whites just hold soft peaks, about 3 minutes.


Gently fold one third of whites into yolk mixture to lighten, then fold in the remaining whites gently but thoroughly.


Transfer batter to springform pan and gently rap against work surface once or twice to release any air bubbles. Bake until puffed and golden and a wooden pick or skewer inserted in center of cake comes out clean, about 45 minutes.


Cool cake in pan on a rack 10 minutes, then run a thin knife around edge of pan and remove side of pan. Cool cake to room temperature, about 1 ¼ hours. Remove bottom of pan and peel off parchment, then transfer cake to a serving plate. Sprinkle with powdered sugar if you wish.

Green Beans with Caramelized Onions and Almonds


I stumbled upon this recipe on a blog called Deliciously Gluten-Free. It is the second time I find a way to enjoy green beans (the first one being the roasted green beans). I changed the recipe just a tad to suit me taste, and it was a complete success. You can omit the almonds if you wish (I did the second time I ate the beans, just because I forgot), but they were a great addition. It’s pictured here served with roasted sausages with red grapes.

1 lb green beans, cut into inch-long pieces
2 Tbsp olive oil
1 Tbsp brown sugar
1 white onion, coarsely chopped
3 gloves garlic, minced
¼ cup slivered almonds

In a heavy pan or skillet, pour in olive oil, sugar, onion and garlic. Turn heat on to medium and sauté until onions are translucent and browned.


Add the greens beans and raise the temperature to high. Cover and cook, stirring occasionally, for about 5-10 minutes.


Turn off heat and serve topped with almonds.

Roasted Sausages with Red Grapes


This recipe is from the blog Orangette (I think that so far, 95% of the recipes I tried from there have been excellent – you should really check it out). I doubled the quantities so that we would have leftovers for a second dinner, but you can use the original quantities if you wish, of course. This was absolutely divine, and perfect for the winter that’s finally here. I served them with green beans with caramelized onions and almonds, but they would be great with mashed potatoes too.

4-5 mild chicken or pork sausages
1 lb seedless red grapes
3-4 Tbsp olive oil
1 Tbsp balsamic vinegar, or to taste
salt

Preheat the oven to 475 °F.

Heat a heavy skillet over moderate heat until hot but not smoking. Lay the sausages in the skillet, and cook them, turning once, until nicely browned, about 8 minutes total.


While the sausages are cooking, remove the grapes from their stems, rinse them under cool water, drain them, and place them in a bowl. Add the olive oil, and toss.


When the sausages are browned, place them in an 8-inch square baking dish, and dump the grapes on top of and around them. Slide the dish into the oven, and bake for 25 minutes, turning the sausages once after about 15 minutes.


Remove the pan from the oven, and move the sausages to a platter or individual plates. Pour the grapes and their juices into a small saucepan, season with a pinch of salt, and place the saucepan over medium-high heat, stirring, until the grapes bubble and sizzle and their juices are syrupy. Remove the pan from the heat, stir in the vinegar, and pour the grapes over the sausages. Serve.

Saturday, December 12, 2009

The Engineer's Pie Crust

As you may know, the Engineer is in the process of making every recipe in Baking Illustrated, IN ORDER. (It’s a labour of love... and OCD.) That was fine for the bread section, but now that he’s baking pies, it’s a little more complicated. You see, pie fillings are not always in season.


For the strawberry and rhubarb pie, he used my stash of frozen rhubarb from last summer and store-bought frozen strawberries.


For the blueberry pie, it was store-bought frozen blueberries.

Then came the peach pie. Peaches in November, in Montreal? Tough luck, buddy. Three weeks went by without our weekly pie, because the Engineer didn’t want to skip ahead to the next recipe. But wouldn’t you know it, we finally found some peaches in a little Middle Eastern store outside Jean Talon market! Did we care that they were $5/kg, shipped in from God knows where and still a bit hard? No. It was the best peach pie we could have hoped for.


By now, I have become convinced that while I may have the easiest pie crust recipe, the Engineer has the best one. It calls for both butter (for taste) and shortening (for flakiness). And here it is: the Baking Illustrated pie crust!

2 ½ cups (12.5 oz) unbleached all-purpose flour, plus more for dusting the work surface
1 tsp salt
2 Tbsp sugar
½ cup vegetable shortening, chilled
12 Tbsp (1 ½ sticks) cold unsalted butter, cut into ¼-inch pieces
6-8 Tbsp ice water

Process the flour, salt and sugar in a food processor until combined. Add the shortening and process until the mixture has the texture of coarse sand, about 10 seconds. Scatter the butter pieces over the flour mixture; cut the butter into the flour until the mixture is pale yellow and resembles coarse crumbs, with butter bits no larger than small peas, about ten 1-second pulses. Turn the mixture into a medium bowl.

Sprinkle 6 Tbsp of ice water over the mixture. With a rubber spatula, use a folding motion to mix. Press down on the dough with the broad side of the spatula until the dough sticks together, adding up to 2 Tbsp more ice water if the dough will not come together. Divide the dough into 2 balls and flatten each into a 4-inch disk. Wrap each in plastic and refrigerate at least 1 hour, or up to 2 days, before rolling.

Marinade aux agrumes

Je vous donne une recette toute simple, basée sur celle de ma mère, pour une marinade aux agrumes pour un filet de porc.

¼ tasse de marmelade de citron ou d’orange
2 c. à soupe de gingembre haché fin
2 gousses d’ail hachées
2 c. à thé de sauce soya
2 c. à thé d’huile de sésame
2 c. à soupe de sherry (facultatif)

Mélanger le tout et en badigeonner le filet de porc.


Laisser mariner de 4 à 24 heures. Faire cuire au four à 350 °F pendant environ 40 minutes, jusqu’à ce que le porc soit cuit.


Laisser reposer 10 min et trancher.

Voilà, c’est simple comme tout!