Monday, May 10, 2021

Brioches jambon-fromage


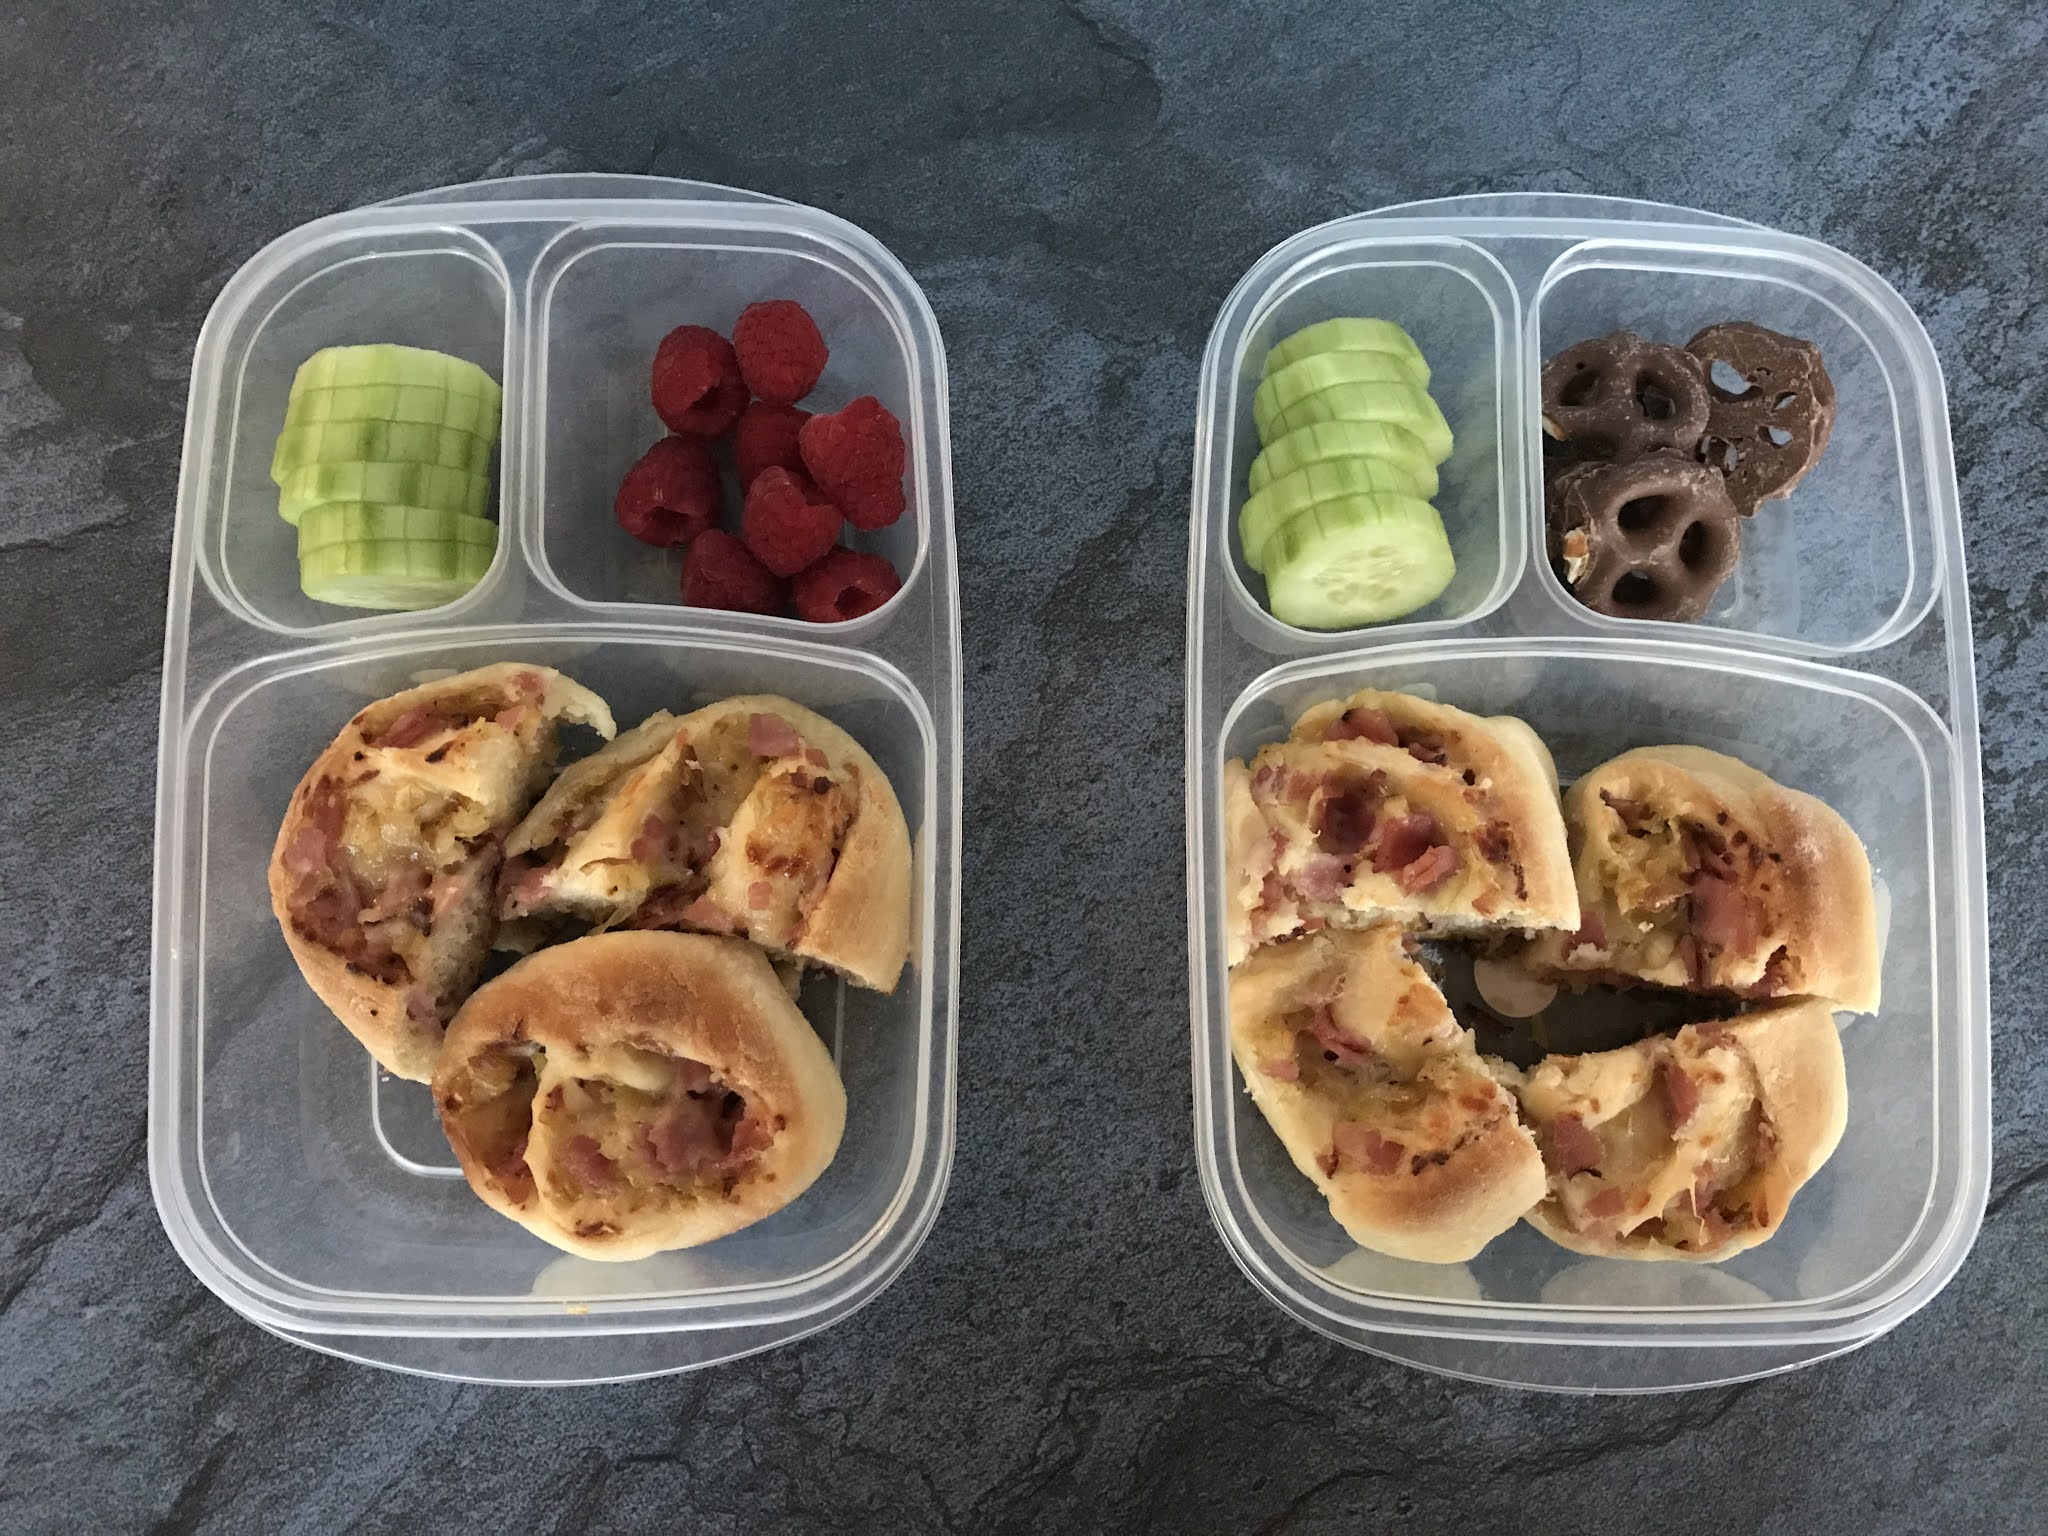
On arrive à la fin de l’année scolaire, et si vous êtes comme moi, vous aimeriez un peu d’inspiration pour les lunchs d’école (et même si votre enfant est encore à la maison, on commence tous à être essoufflé, là). Alors je partage ces brioches jambon-fromage que j’ai vues sur le fil Instagram de 3 fois par jour. Je n’ai pas badigeonné les brioches de beurre (pour limiter le gras) ni utilisé de ciboulette (j’avais peur que mon fils n’aime pas). 

Quand je suis allée chercher le Petit Prince à sa sortie de l’école ce jour-là, dès qu’il est monté dans l’auto, il m’a tout de suite parlé des brioches, pour me dire qu’il adorait ça! Il en a eu dans son lunch lundi, mardi et mercredi. Vendredi soir, il m’a demandé pourquoi ça faisait longtemps que je n’avais pas fait son dîner préféré. Confuse, je lui ai demandé c’était quoi, déjà, son dîner préféré. Et c’était ces brioches! Ça faisait DEUX JOURS qu’il n’en avait pas mangé et il se plaignait! À refaire, donc. Je pense doubler la recette la prochaine fois et en mettre au congélateur. 


Pour la garniture 
2 c. à soupe de beurre sans lactose 
1 poireau, haché en demi-rondelles (les parties blanche et vert pâle seulement) 
1 gousse d’ail, hachée finement 
2 c. à soupe de farine tout-usage 
¼ tasse de bouillon de poulet (ou de vin blanc) 
1 tasse de jambon coupé en petits morceaux 
1 tasse de fromage suisse sans lactose râpé 
sel et poivre, au goût 

Pour la pâte 
½ tasse de lait sans lactose 
1 sachet ou 2 ¼ c. à thé de levure instantannée 
1 ¾ tasse de farine tout-usage 
¼ tasse de sucre 
½ c. à thé de sel 
1 œuf 
2 c. à soupe de beurre sans lactose, fondu 

Pour la garniture 
Dans une poêle, à feu moyen, faire fondre le beurre, puis faire revenir le poireau et l’ail 3 ou 4 minutes. Saupoudrer la farine et poursuivre la cuisson pendant 1 minute. 

Ajouter le bouillon de poulet, puis cuire pendant environ 1 minute, ou jusqu’à ce que le liquide soit évaporé. Transférer ce mélange dans un bol de taille moyenne, puis ajouter le jambon et le fromage. Assaisonner, bien mélanger, puis réserver au réfrigérateur. 

Pour la pâte 
Faire chauffer le lait au four à micro-ondes afin qu’il soit tiède. Ajouter la levure, puis laisser reposer pendant 10 minutes. 

Dans le bol d’un batteur sur socle, mélanger la farine, le sucre et le sel. Ajouter l’œuf et le beurre fondu, puis mélanger de nouveau. Ajouter le mélange de lait et de levure, puis pétrir la pâte avec le crochet de 5 7 minutes, ou jusqu’à ce qu’elle ne soit plus collante. (On peut ajouter un peu de farine au besoin.) 

Former une boule avec la pâte, puis la déposer dans un bol huilé couvert d’un linge humide ou d’une pellicule plastique. Laisser lever la pâte pendant environ 2 heures à température ambiante (je la mets toujours dans le micro-onde, la porte ouverte), ou jusqu’à ce qu’elle ait doublé de volume. 

Graisser un grand plat allant au four de 9"x13", puis réserver. 

Sur un plan de travail légèrement fariné, abaisser la pâte de manière à créer un grand rectangle. Étaler la garniture froide sur la surface de la pâte en laissant une bande de 1" tout le tour. Rouler la pâte de manière à former un rouleau serré, puis couper 9 brioches. Placer les brioches côte à côte dans le plat graissé. Couvrir d’un linge humide ou d’une pellicule plastique, puis laisser lever de 1 heure à 1 heure 30 minutes. 

Préchauffer le four à 375 °F et placer la grille au centre. 

Cuire au four de 20 à 23 minutes afin que les brioches soient dorées. Servir tiède (délicieux!) ou froid (comme dans la boîte à lunch de mon fils).




Friday, May 07, 2021

Chocolate Pudding Pretzel Pie


The other new dish that I made for Easter was chocolate pudding pretzel pie, which was a hit! The version below is vegan; it can be gluten-free if you use gluten-free pretzels and nut-free if you use another type of vegan milk. If you have some chocolate pretzels on hand, they would be great to decorate! 

The original recipe had you place the pretzels into a plastic bag and crush them into small pieces with a rolling pin, the goal being that you could still visibly see that you were eating pretzels. However, I found that to make for an unwieldy crust, and the texture was both slightly unpleasant and impractical. I therefore recommend turning the pretzels into crumbs, the same as you would with graham crackers, for example. They may no longer be obviously pretzels, but the salty taste will still be there. I’m also increasing the amount of chocolate in the ganache to 4 ounces, as I found the previous version a bit scant. 


For the crust 
5 ½ oz pretzels (roughly 3 ½ cups if crushed slightly; see note above) 
¼ cup brown sugar 
6 Tbsp. vegan butter, melted 

For the chocolate pudding 
¼ cup unsweetened cocoa powder 
¼ cup cornstarch or arrowroot powder 
½ cup cane sugar 
1 pinch of salt 
1 can (13.5 oz) coconut milk 
1 cup unsweetened almond milk 
2/3 cup chocolate chips (dairy-free if making it vegan) 
1 tsp. vanilla extract 
1-2 Tbsp. vegan butter (optional) 

For the ganache 
4 oz. semisweet or bittersweet chocolate (or ½ cup chocolate chips; dairy-free if you wish) 
2 tsp. coconut oil 

For topping 
1 container So Delicious CocoWhip (or equivalent) 
chocolate curls or cocoa powder, for garnish 


For the crust 
Preheat oven to 350 °F. Lightly grease a 9” pie pan. 

Place the pretzels in the food processor and blitz into crumbs (I think this will work better than crushing them into small pieces). Add the brown sugar and butter and process until combined. 

Pour into the prepared pan and press into an even layer. Bake for 10-12 minutes until toasted. Let cool for 15-20 minutes before filling. 

For the chocolate pudding 
In a heavy-bottomed saucepan, whisk together the cocoa powder, cornstarch, cane sugar and salt. Over medium heat, while whisking, add the coconut milk and almond milk. Whisk until totally smooth. 

Continue to whisk until the mixture comes to a gentle boil. Once the mixture bubbles, continue to whisk and cook for another 2 minutes, until thickened. Remove from the heat and stir in chocolate chips, vanilla, and vegan butter (if using). Pour into a bowl and let cool to just about room temperature, stirring often. 

For the ganache 
Melt the chocolate and coconut oil together in the microwave at 50% power for 30-45 seconds, stopping to stir every 15 seconds (I prefer doing this in a double boiler). Stir until totally smooth. Pour and spread over the bottom of the prepared crust. Let set slightly before adding the pudding. 

Pour the pudding into the crust. Smooth, then refrigerate until set, about 2 hours or up to 12 hours. 

For the topping, place the CocoWhip in a bowl and use a hand mixer to whip until smooth, about 10-20 seconds (I did not bother). Spread over the pie and garnish with chocolate curls. Serve and enjoy!


Thursday, May 06, 2021

Bacon and Chive Deviled Eggs


This Easter, I tried my hand at deviled eggs again. I had messed them up two years ago (by following the instructions, mind you), and I couldn’t make them last year because eggs were too scarce in the early part of the pandemic. This time, I decided to take a shortcut and use store-bought hard-boiled eggs as an ingredient. It saved me a lot of time and effort and made the process not-at-all overwhelming! We all really liked them, but I think the Engineer liked them most of all, and he had to use self-restraint not to polish them off in one sitting. The Little Prince was also a big fan! 

 The recipe is from Cook’s Illustrated, though I doubled the amounts and reduced the vinegar slightly; you could also add sage and shallots in the fall. The recipe below calls for 12 eggs, which means 24 egg halves. I piped the filling in the eggs because I thought it was prettier than spooning it in; you can use either a plain tip or star tip. 

4 slices bacon, chopped 
12 hard-boiled eggs (homemade or store-bought) 
4 Tbsp. mayonnaise 
2 tsp. Dijon mustard 
2 tsp. distilled white vinegar 
¼ tsp. salt 
1 pinch cayenne pepper (I feel like paprika would be more classic here) 
2 Tbsp. minced fresh chives 

Cook bacon in 10-inch skillet over medium heat until crispy, 5 to 7 minutes. Using slotted spoon, transfer bacon to paper towel–lined plate. Reserve 2 tablespoons fat in the pan. (Once the bacon has cooled, you can crumble it more finely.) 

Slice each egg in half lengthwise with a paring knife (to do this, sweep the blade cleanly down the center, and wipe the knife after each egg). Transfer yolks to bowl; arrange whites on serving platter. 

Mash yolks with fork until no large lumps remain. Add mayonnaise and mustard and use rubber spatula to smear mixture against side of bowl until thick, smooth paste forms, 1 to 2 minutes. Add reserved bacon fat, vinegar, salt, and cayenne and mix until fully incorporated. Stir in three-quarters of bacon and chives. 

Transfer yolk mixture to small, heavy-duty plastic bag (I used a large star piping tip). Press mixture into 1 corner and twist top of bag. Using scissors, snip ½ inch off filled corner. Squeezing bag, distribute yolk mixture evenly among egg white halves. Sprinkle each egg half with remaining bacon and chives and serve.


Wednesday, May 05, 2021

Lemon Ginger Scones


I made these dried cherry scones a while back and was on the fence about them. I got fewer than the recipe said I would, and they came out so much darker than in the photo that I thought they were ruined. But, BUT, they were actually delicious! 


Then I happened to listen to Spilled Milk’s episode about scones and was again inspired. I made Molly Wizenberg’s apricot scones, which I thought were delicious, but my family thought they were just okay, and the Little Prince tasted them but preferred having toast for breakfast. 


Soon after, I made the lemon-ginger scones in her first book, A Homemade Life. I was a little afraid that the boys (and husband) wouldn’t like the heat of the ginger, but it turns out that they *loved* these! This recipe is definitely a keeper. Bonus: I typically have everything I need to make these on hand already. 

2 cups all-purpose flour 
2 tsp. baking powder 
½ tsp. salt 
4 Tbsp. lactose-free butter, cut into ½” cubes 
3 Tbsp. sugar 
2 tsp. grated lemon zest 
¼ cup chopped crystallized ginger 
½ cup lactose-free half-and-half (I mixed lactose-free milk and coconut milk), plus more for glazing 
1 large egg 

Preheat oven to 425 °F. 

Whisk the flour, baking powder, and salt in a large bowl. Rub the butter into the flour mixture, squeezing and pinching with your fingertips until the mixture resembles a coarse meal and there are no butter lumps bigger than a pea. (I like doing this in a food processor, though I now transfer to a to add the wet ingredients.) Add the sugar, lemon zest, and crystallized ginger and whisk to incorporate. 

Pour ½ cup of half-and-half into a small bowl or measuring cup and add the egg. Beat with a fork to mix well. 

Pour the wet ingredients into the flour mixture and stir gently to just combine. The dough will look dry and shaggy, and there may be some unincorporated flour at the bottom of the bowl – don’t worry about it. Using your hands, squeeze and press the dough into a rough mass. Turn the dough, and any excess flour, out onto a board or countertop, and press and gather and knead it until it just comes together (do not overwork it). 

Pat it into a rough circle about 1 inch thick. Cut the circle into 8 wedges. Place the wedges on a baking sheet lined with parchment paper. 

Pour a splash of half and half into a small bowl. Using a pastry brush, gently brush the tops of the scones with a thin coat to glaze (I think I didn’t bother this time; if you do, you could also sprinkle some coarse sugar on top). Bake 10 to 14 minutes, or until pale golden. Transfer scones to a wire rack to cool slightly, and serve warm. (If you are going to eat them within a day or two, they will keep in an airtight container at room temperature. Longer than that and you should freeze them.)


Monday, May 03, 2021

Chocolate Truffle Pie with Strawberries


The Engineer and I decided to have a seder this year for the first time, and it went really well. To me, this meal is particularly fun because it’s not just about traditional foods, there are a whole lot of traditional activities as well (examples here for newbies); we also took some liberties with the Haggadah, mostly adapting (and greatly shortening) from this one, though I was partial to this 10-minute virtual version as well. 

Making a meal that is Kosher for Passover can be intimidating if it’s your first time, but I knew which dessert I wanted to make. I had torn out this chocolate truffle pie recipe from Bon Appétit what I thought was 4 or 5 years ago, but it turned out to be exactly 10 years ago. Well. I had to make it for dessert now that we wanted an “official” Passover meal! 

(We haven’t nailed down our go-to menu yet. The Engineer made a plate of smoked salmon and crudités as well as chicken schnitzel crusted with matzo meal. I made a simple apple cinnamon charoset, and we had the mandatory matzo. But it feels like there should be a matzo ball soup in there somewhere! I might reread this for inspiration next year. We served white grape juice – juice because I like it better than wine and we have kids; white because I’m the one laundering linens and children’s clothing in this house.) 

The original recipe was also served with orange-champagne sabayon, but I didn’t bother making it. I mean, if the truffle pie had called for a bunch of whipped egg whites, thereby leaving me stuck with a bunch of egg yolks, I would totally have gone for it, but that just wasn’t the case. Strawberries were plenty as an accompaniment. I’m not sure that “pie” is the right term for this dessert; even though it’s baked in a pie dish, it’s more like a cake to me. And despite what the original recipe said, serve this at room temperature, not chilled! 

While this was very good, I think that nobody truly loved it. Maybe next year I’ll make my poppy seed cake or my flourless chocolate cake, both of which are pareve as well. There are more dessert ideas here. Puddings are also typically a good choice for Passover, like this peanut butter pudding

For the truffle pie 
¼ cup almond meal (or very finely ground almonds) 
¼ cup matzo cake meal 
¼ tsp. salt 
1 lb. + 1 oz bittersweet chocolate (do not exceed 61% cacao), chopped 
6 Tbsp. (¾ stick) + 1 Tbsp. pareve stick margarine 
3 large eggs 
¾ cup sugar 
1 Tbsp. vanilla extract 
1 Tbsp. finely grated orange zest 
sliced almonds, lightly toasted 

For the strawberries 
¼ lb. strawberries, hulled, sliced 
2 Tbsp. sugar 
1 tsp. finely grated orange zest 

For the truffle pie 
Preheat oven to 350 °F. Grease a 9-inch glass pie dish with margarine (I think mine is 10 inches). 

Whisk first 3 ingredients in small bowl. Combine 1 pound chocolate and 6 tablespoons margarine in large microwave-safe bowl. Microwave in 20- to 30-second intervals until smooth, stirring often. Set aside to cool. (I did this in a double boiler.) 

Beat eggs in large bowl 1 minute. Add sugar and vanilla. Beat until thick and pale yellow, 3 to 4 minutes. Beat in orange peel, then chocolate mixture. Reduce speed to low; beat in dry ingredients. Transfer batter to pie dish; place on rimmed baking sheet. 

Place baking sheet with pie in oven. Bake pie until cracked on top and tester inserted into center comes out with moist crumbs attached, 45 to 50 minutes (mine was more like 37-40 minutes). Cool to room temperature (center will fall). 

Combine 1 ounce chopped chocolate and 1 tablespoon margarine in microwave- safe bowl. Microwave in 15-second intervals until glaze is smooth, stirring often. 

Drizzle glaze over pie. Sprinkle with almonds. 

For the strawberries 
Toss berries, sugar, and orange peel in medium bowl to blend. Chill until ready to serve, up to 4 hours. 

Cut pie into wedges; place on plates. Serve with strawberries.


Friday, April 30, 2021

Batch of links

- How 1971 changed the way we eat forever – Bon Appétit really found a lot of things that started that year! 


- I enjoyed this newsletter about trusting your child to eat (and navigating food allergies within a family). 

- Waffles + Mochi is out! I really like this kids’ show produced by Michelle Obama, about where our food comes from. It’s a little advanced for the attention span of the Fox, but hopefully we can get back to it next year. 

- Someone made garum at home. Garum is basically the ancient Roman recipe for fish sauce, and it reminded me of this episode of Spilled Milk

- I found The Ghosts of Brooks Brothers both interesting and disheartening. It’s about how small service providers are left dealing with the consequences of large corporations filing for bankruptcy. 

- My last link is a personal recommendation: I bought a butterfly garden with live caterpillars from Insect Lore last month. We got a little cup containing five tiny caterpillars, along with a pop-up mesh “cage” and detailed (but simple) instructions. We watched the caterpillars grow over the course of a week and a half, then they turned into chrysalises. We waited patiently, and one morning, we had painted lady butterflies! We observed them for a few days, then released them outdoors. It was a really fun experience, and not just for the kids! The caterpillars ship to the continental U.S., and Insect Lore also has ladybug larvae.


Wednesday, April 28, 2021

Sweet Potato Oatmeal Mini-Muffins


These sweet potato oatmeal mini-muffins are hearty and delicious! I love making mini-muffins because I can stash them in the freezer, then periodically add a few in the Little Prince’s lunchbox – they’ll thaw by lunchtime. The recipe makes 30 mini-muffins, and since my pan only holds 24, I have to make these in two batches. By my calculations, you could also make 10 standard muffins with the same recipe; just increase the baking time accordingly. For breakfast, I’d prefer standard-size muffins, but the mini ones are great for a snack or as a sweet treat after lunch! 

For the sweet potato purée, I always just prick sweet potatoes with a fork, wrap them in foil, put them on a baking sheet and put them in a 425-°F oven for 1 hour. Once they’re cool enough to handle, I slice them open, scoop out the flesh, and put it in the food processor to make a smooth purée. Any leftovers can be frozen. 

1 cup all-purpose flour (I used white whole wheat) 
1 cup old fashioned oats (I used instant oats) 
1/3 cup brown sugar 
1 tsp. baking powder 
½ tsp. baking soda 
½ tsp. kosher or fine sea salt 
1 tsp. ground cinnamon 
2 large eggs, whisked 
1 cup sweet potato purée 
½ cup lactose-free milk (vegan works too) 
¼ cup vegetable oil 
1 tsp. vanilla extract 

Preheat oven to 350 °F. Grease a mini-muffin tin. 

Place the first 7 (dry) ingredients in a bowl and whisk to combine. 

In a separate bowl, whisk the remaining (wet) ingredients. 

Slowly combine the dry ingredients with the wet ingredients just until they are combined (be careful not to overmix the batter). 

Place 1 tablespoon of batter in each cup of the mini-muffin tin and bake for 15 minutes.


Thursday, April 22, 2021

Passover Pancakes


We finally had a special Passover dinner in our own home this year – we had been saying for a long time that we should celebrate, and I guess it just took the second year of a worldwide pandemic to do it? Well, on the morning of the first day of Passover, I made these pancakes that I had bookmarked forever ago. (I also made a shredded apple kugel a few weeks later, but it was only okay. Kugels can be noodle-based or potato-based, and for Passover, this is obviously the latter.) 

I couldn’t find matzo cake meal anywhere, but since I needed it for another recipe I wanted to make this year, I decided to buy it online. Apparently, you can use 1 cup + 2 Tbsp. of matzo meal, blitzed in the food processor, instead of 1 cup of matzo cake meal. That being said, the consistency of matzo cake meal felt so fine and uniform to me that I’m glad I bought the container! I’m not sure what to make with the rest of it, though – there’s a recipe printed on the back for brownies, but it calls for 2 ½ cups of sugar and 1 ¼ cups of oil, so that’s not happening. I’ll probably just make more pancakes! 

As for the tapioca starch, that’s what makes the pancakes so chewy and, in my opinion, they would be different without it. However, the original recipe does say you can use potato starch instead. You can also use more milk to thin out the batter for crêpes. 

I made a double batch (the salt amount below is mine) and got 13 small pancakes (so the amounts below would probably yield only 6 small pancakes). I never bother keeping them warm in the oven, though! 

2/3 cup matzo cake meal 
1/3 cup tapioca starch 
1 Tbsp. sugar 
1 tsp. kosher for Passover baking powder 
1/8 tsp. salt 
1 ¼ cups lactose-free milk 
2 large eggs (lightly beaten) 
2 Tbsp. lactose-free butter, melted 
1 tsp. pure vanilla extract 

Preheat the oven to 200 °F. Have an ovenproof serving platter or baking dish ready so you'll be able to keep the prepared pancakes warm in the oven. 

In a large bowl, whisk together the matzo cake meal, tapioca starch, sugar, and baking powder. 

Make a well in the center of the dry ingredients, and add the milk, eggs, melted butter, and vanilla. Whisk well until the ingredients are well-combined and the batter is smooth. 

Place a large skillet over medium-high heat. Grease the skillet with a little oil or butter. Drop the batter by spoonfuls (about 2 to 3 tablespoons each) into the skillet (mine were bigger). Depending on the size of your skillet, you should be able to make 3 or 4 pancakes at a time. 

Allow the pancakes to cook for 1 to 2 minutes, or until the edges are set and you begin to see bubbles on the surface. Use a wide, thin spatula to carefully flip the pancakes, and continue cooking for 1 to 2 minutes more, or until golden brown on both sides. 

Transfer the cooked pancakes to the platter, tent with foil, and keep warm in the oven while you make the rest of the pancakes. Serve warm with jam, cinnamon and sugar, or pure maple syrup.


Friday, April 16, 2021

Barbecue Sauce

I saw this recipe on Smitten Kitchen, where Deb Perelman explains that she adapted it slightly from Ina Garten’s recipe. What I like so much about it is that it mixes a lot of “types” of barbecue sauce into one neat package – if you’re an Eastern / Southern / Asian purist, then this is not for you, but for the rest of us, this might just be the perfect homemade sauce! 

I don’t like things spicy, so I didn’t use the chili powder or red pepper flakes (though the heat of those two can vary from batch to batch as well). I did use a pinch of Korean pepper instead. This is very adaptable to your taste, and also to what you have on hand (I didn’t have quite enough Worcestershire sauce or hoisin sauce and it was still great). I halved the recipe and got two jars (Bonne Maman size), one of which is currently in the freezer. I’m writing down those amounts below (slightly adapted for the size of cans) because I can’t imagine needing more at any given time. 

¾ cup minced yellow onion (from 1 small onion) 
1-2 garlic cloves, minced 
3 Tbsp. vegetable oil 
6 oz.-can of tomato paste (about ½ cup) 
½ cup apple cider vinegar 
½ cup (165 g) honey 
¼ cup Worcestershire sauce (I only had 2 Tbsp.) 
½ cup (120 g) smooth Dijon mustard 
¼ cup soy sauce 
½ cup (165 g) hoisin sauce (I only had ¼ cup) 
1 ½ tsp. ground cumin 
1 generous pinch of Korean pepper 
(mild chili powder and/or red pepper flakes, to taste) 

In a large saucepan on low heat, cook the onions and garlic in oil for 10 to 15 minutes, until the onions are translucent and soft, but not browned. Add the rest of the ingredients. Simmer uncovered, stirring occasionally, for 30 minutes. Use immediately or store in the fridge for up to a month (longer in the freezer).


Monday, April 12, 2021

Turkey Zucchini Burgers


I saw this recipe on Weelicious and decided to make it. I doubled the amounts to have leftovers (though I left the amounts of yogurt sumac sauce as is and had too much sauce even then). I did have some trouble making it, though: the Weelicious recipe called for a large zucchini and no bread crumbs, but when I made it, I realized that it was much too wet with one large zucchini (I didn’t even add the second one) and I had to add 1 cup of breadcrumbs to compensate. After some digging, I found that the original recipe was by Yotam Ottolenghi, who had made it into meatballs. His version specifies a weight of zucchini (200 g), so I’d go with that next time. That being said, the burgers were really good!

For the burgers (4) 
1 lb. ground turkey, light or dark meat 
1 large zucchini, coarsely grated (see note above) 
3 scallions, thinly sliced 
1 large egg 
2 Tbsp. chopped mint 
2 Tbsp. chopped cilantro 
2 garlic cloves, minced 
1 tsp. ground cumin 
1 tsp. kosher salt 
4 hamburger buns 

For the yogurt sauce (consider halving this) 
1 cup lactose-free Greek yogurt 
1 tsp. grated lemon zest 
1 Tbsp. lemon juice 
1 garlic clove, minced 
1 Tbsp. olive oil 
2 tsp. sumac 
½ tsp. kosher salt 

In a large bowl, combine first 9 ingredients. Mix well. With dampened hands, form the mixture into burgers about 1 inch thick. 

In a large sauté pan or stove top grill over medium, add 1-2 tablespoons olive oil and add the burger patties. Cook burgers 5-6 minutes on each side. 

Place all the sauce ingredients in a small bowl and stir to combine. 

Place the burgers on buns and top with the yogurt-sumac sauce. (I added a few extra cilantro leaves.)


Friday, April 09, 2021

Marbled Hamantaschen


These vanilla-chocolate hamantaschen are absolutely not traditional. For one thing, they’re dairy instead of pareve, and for another, well, chocolate. But the recipe is from Smitten Kitchen, and I felt like Deb Perelman couldn’t steer me wrong, so I made them. 

The result was delicious! The Engineer was actually on the fence before tasting these, then he ate one, and a second, and was pensive for a while before declaring, “Two things are true. One: these are not hamantaschen. Two: they are fantastic.” I didn’t grow up with hamantaschen, so I don’t care that these aren’t traditional, and I’ll make them again. It just would have felt disingenuous to simply call them triangle cookies, though, so I kept the name. Honestly, what’s not to love? The dough is buttery, not unlike shortbread, and the whole confection is not overly sweet, but still has some contrast with two flavors. 

Note that I found the cheesecake filling to be very runny as I was assembling them, even with (lactose-free, dairy) cream cheese that was cold instead of at room temperature. I’m not sure how big a deal that is, or whether it would be worth exploring ways to thicken it (starch? flour? powdered sugar instead of granulated?) – I will try next time. Maybe I’d also halve the amounts (and either keep the egg yolk whole or omit it entirely), since there’s definitely too much of it. Also note that if you’re making the dough in a food processor (like me) or even a stand mixer, you can use cold butter, but with a hand mixer, you’re better off with butter at room temperature. 

I got 24 hamantaschen from this recipe. 

For the filling (see note above) 
1 cup (8 oz) lactose-free cream cheese, ideally at room temperature 
1/3 cup (65 g) granulated sugar 
2 pinches of fine sea salt 
1 tsp. vanilla extract 
1 tsp. lemon juice 
1 large egg yolk 

For the dough 
1/3 cup (40 g.) powdered sugar 
1/3 cup (65 g) granulated sugar 
½ tsp. fine sea salt or table salt 
2 cups (265 g) all-purpose flour 
12 Tbsp. (1 ½ sticks = 6 oz = 170 g) lactose-free butter, cut into cubes 
1 large egg 
½ tsp. vanilla extract 
1/3 cup (45 g) additional all-purpose flour 
1/3 cup (30 g) cocoa powder 

Preheat the oven to 350 °F. 

For the filling 
In a small-medium bowl, mash cream cheese and sugar with a fork (this will be easy if the cream cheese is at room temperature and will take a couple minutes longer if it’s cold, but will work either way). Add salt, vanilla, lemon juice, and egg yolk and continue to mash and blend until smooth. Transfer to refrigerator until needed. 

For the dough 
Combine the sugars, salt, and 2 cups of the flour in the work bowl of a food processor. Add butter and mix or pulse until it disappears, then keep running the machine until it just begins to clump. Add egg and vanilla and beat until combined into one big or a few smaller masses, scraping down the bowl as needed for even blending, then keep running the machine until the dough is smooth and easily forms one big blob. This might take up to a full minute longer. (If you are using a stand mixer or a hand mixer, beat the sugars with the butter and salt until creamy, a few minutes. Add egg and vanilla and beat until combined. Add 2 cups of the flour and beat until it disappears, then keep mixing until the dough is smooth and forms one big ball.) 

Scoop half the dough into a separate bowl. You can eyeball it, or, if you have a digital scale, Deb Perelman’s dough halves weighed 308 grams each. Add remaining 1/3 cup flour to one half of the dough, and 1/3 cup cocoa powder to the second half, mixing until blended. Once again, run the mixer or machine until the dough is no longer crumbly and is in one big mound; this can take 30 to 60 seconds longer. (It makes more sense to me to blend the flour half first, then reuse the bowl for the chocolate half – fewer dishes to wash that way.) 

To marble the dough, place a large piece of parchment paper on your counter. Spoon little dollops of chocolate and vanilla doughs all over, alternating dollops a little but no need to be very checkerboarded about it. (My dollops were too big – I would use smaller spoonfuls next time.) Use an offset spatula, bench scraper, or even a spoon to smoosh and mush some of the pieces together, creating areas that are more blended and leaving some unblended. 

Cover with a second sheet of parchment paper and roll doughs out into an even 1/8”-thick slab. (I would make them thicker – the ones that broke in my case were too thin. Of course, you’ll get fewer that way.) If you started with cold butter, the dough will probably be solid enough right now to skip it. If it feels very mushy/warm, however, slide the onto the back of a large baking sheet and pop into the freezer for 3 minutes. We do not want the dough to be hard, just somewhat firmed up but still very bendy. 

Return the dough slab to your counter. Carefully peel the parchment sheet off the top and replace it. (This loosens it.) Flip slab over onto the loosened side and remove the top parchment sheet entirely. Use this to line a large baking sheet (or use a silpat). 

Cut dough into 3-inch rounds. Place a measured 1-teaspoon dollop of cream cheese filling in the center of each. Fold up the edges in 3 sections and pinch the corners closed; continue to pinch/”zip up” the cookie, pinching it closed, until only a marble-to-quarter-sized opening remains. Don’t worry if the center looks underfilled; the cream cheese expands in the oven. Transfer each to the parchment-lined baking sheet. These do not spread, so you can fit them fairly close together on the tray (about 1-2 inches apart). 

To reroll scraps, pile them in the center of the piece of parchment paper and place a second sheet on top again. Repeat the process of rolling the dough thin, briefly cooling it, loosening the back, and cutting it into circles until all the dough is used. (In my case, I preferred the appearance of the marbling in the second batch, but in the third batch the pale parts of the dough were getting too indistinct.) 

Bake hamantaschen for 20 to 25 minutes, until pale parts of dough are golden brown. Transfer to cooling rack. Store in an airtight container in the fridge for up to 1 week.


Wednesday, April 07, 2021

Orzo with Vegetables and Chicken

I found this recipe on Annabel Karmel’s site, though interestingly, the version in her video was different from the one written out underneath it. I decided to include the video ingredients, because it all looked better to me, then mixed both versions, and that is what’s written out below. This was delicious! My only change would be to increase the amount of chicken from 2 breasts to 4, to make more servings. The original recipe just said to cook them and slice them, but I seasoned them with garlic powder, onion powder, paprika, turmeric, salt, and pepper, and I cooked them for 20 minutes at 425 °F – they were great! This dish gets 3 thumbs up (the Fox is still unsure about food in general, unless it’s pizza). 


1 red onion, in small cubes 
1 red bell pepper, in small cubes 
1 zucchini (75 g), in small cubes 
1 carrot (50 g), in small cubes 
2 cloves garlic, minced 
1 tsp. sweet smoked paprika 
1 tsp. brown sugar 
1 tsp. balsamic vinegar 
1 cup orzo (125 g) 
2 cups stock (chicken or vegetable), hot 
1 cup passata (strained tomatoes) 
1 tsp. dried thyme 
10 cherry tomatoes (I used way more), halved 
2 to 4 cooked chicken breasts (see note above), sliced 

Heat 1 tablespoon of olive oil in a deep skillet. Add the onion, bell pepper, zucchini, and carrot and fry for a few minutes, until starting to get tender. 

Add the garlic, paprika, brown sugar, balsamic vinegar, and orzo. Stir to coat orzo in the mixture. Add the stock and passata. Bring to a boil, then cover and simmer about 15-20 minutes, or until most of the liquid has been absorbed and the orzo is cooked. 

Add the thyme and tomatoes and stir until the tomatoes have softened slightly (I left them raw). Add the chicken (warm it up right in the pan if necessary) and serve.


Monday, April 05, 2021

Apple Cake


Today is a happy day. You see, there’s this apple cake recipe that the Engineer’s mother makes, and it’s his absolute favorite. His Bubbie made it too. The recipe is in Second Helpings, Please!, and I had both his Bubbie’s annotations and his mother’s tips. But it just wasn’t working! When I had made it the first time (back when we lived in Montreal), I had used 5 apples and had been told that it was too few (when I got my hands on Bubbie’s notes later, she did circle “6” in the “6-8 apples” called for). It was supposed to be made in a 9” square glass dish, but that’s not a standard size and I couldn’t find a pan that size. Last fall, I tried a 9” springform pan (which has a comparable volume) and used 5 apples again, which I weighed (roughly 250 g on average), but it was definitely too *many*. 

Eventually, my mother-in-law admitted that she uses fewer apples and was now using a different kind of pan anyway. So I tried again, still with my 9” springform, this time with 1 ½ (large) Envy apples. AND IT WORKED! I finally have the cake I want from this recipe, and the Engineer has approved my version. So here is our apple cake, heavily adapted from Second Helpings, Please! by three generations. I’m simply writing down a weight of apples below and you can adjust the number depending on their size. 

1 ½ cups (180 g) all-purpose flour 
2 tsp. baking powder 
½ tsp. baking soda 
¼ tsp. salt 
550 g apples (see note above), pared and thinly sliced 
½ cup brown sugar 
2 tsp. cinnamon 
2 eggs 
1 cup granulated sugar 
1 tsp. vanilla 
½ cup vegetable oil 
3 Tbsp. water 

Preheat the oven to 350 °F. Grease a 9” springform pan. 

In a small bowl, whisk together the flour, baking powder, baking soda, and salt. Set aside. 

In another bowl, stir together the apples with the brown sugar and the cinnamon. Set aside. 

Beat eggs, granulated sugar, and vanilla until fluffy. Beat in oil. Add half of dry ingredients, then water, then the rest of the liquid ingredients, beating after each addition until just smooth. 

Spoon half of batter into the prepared pan. Gently top with the apples, spreading them evenly, then top with the rest of the batter. 

Bake for 50-60 minutes, until nicely browned and a toothpick inserted in the middle comes out free of batter.