Tuesday, September 06, 2022

Housekeeping, Part 1

It’s been silent on here for a while. We drove back to Texas a month ago, and ever since, I feel like I’ve just been taking care of one loose end after another. Not quite the same as putting out metaphorical fires, but still, there’s been a steady stream of things requiring my attention, and it might let up next week. 

We opted to see several things along the way on our drive back, but never stopping more than a few hours in each spot. First up were St. Raphael’s Ruins in Glengarry, Ontario. The church was destroyed in a fire in 1970, but the ruins were solidified in 1974 and are now a beautiful National Historic Site. 


We had dinner at Jack Astor’s and, PSA: they have a vegan chocolate peanut butter tart with coconut whipped cream! I mean, you had me at hello, there was no way I could turn this down, and turned out to be fantastic! 


The next day, we crossed the border in what seemed like downtown Detroit, Michigan, right among the skyscrapers, then headed for Belle Isle Park. There was a long line of cars on the bridge getting there; it’s $10 for entrance, but most things after that are free to visit. We went to see the Conservatory, which is full of plants, then went to the waterside. It’s a really beautiful place! I also found the buildings in Detroit beautiful, especially the old houses in the area. (Of course, the neighborhoods themselves are probably not where I’d want to hang out after dark.) 


We eventually made a pit stop in Vandalia, Illinois, to see the Kaskaskia dragon, which actually breathes fire if you feed it a token (and tokens are free at the hardware store across the street). It was fun, and not just for the kids! 


From there, we drove a few hours south to Meramec Caverns in Stanton, Missouri. Not only are the caverns very interesting from a natural and geological point of view, they also have historic significance. Jesse James hid out here for a few days before escaping via one of the many exits, and in more recent history, there used to be dance parties in the summer – there’s a disco ball in the huge main “room”, along with a theater in one of the back rooms. I think one of the big draws is that the caverns are cool year-round, so before air-conditioning, this was a great place to spend a summer evening! The are many wonderful rock formations throughout, including the Wine Table – it is a freestanding formation on three legs, that vaguely looks like a table with wine glasses on it. (There is only one other similar formation in the world, in Italy, and I think that one has two legs.) 


Our last hotel stay was the Great Wolf Lodge in Grapevine. It was our first time there, and officially we billed it as a treat for the kids, but really, we had fun too! For those of you who haven’t heard of the chain, it’s a hotel that contains an indoor water park (there are also arcades and “dry” activities). There were plenty of things for the Fox to do even though he wasn’t tall enough for the biggest slides – in addition to the play structures, there was a lazy river (I made sure to ride with him) and a wave pool (we stuck to the shallow end). I ended up riding most of the slides with the Little Prince and had more fun than I thought I would! The trick was to go as soon as the place opened in the morning, before check out, so as to avoid the long lines. There’s only the biggest slide that scared him too much, so we didn’t go, but hopefully we’ll stay there again and get another chance! The hotel restaurant is a buffet, and the kids were super happy with all the choices. 


The last leg of the trip had a nice surprise: we randomly stopped for lunch in Hico and ended up at the restaurant inside the historic Midland Hotel. The place was beautiful, the service was perfect, and it was probably the nicest meal we had on our trip. I had a fried green tomato BLT and house fries, and it was great! We then went to nearby Wiseman House Chocolates, which had beautiful and, it turns out, delicious options! They have a small selection online, so I’ll consider placing an order once the weather cools down – their chocolate was really delicious!


Tuesday, August 02, 2022

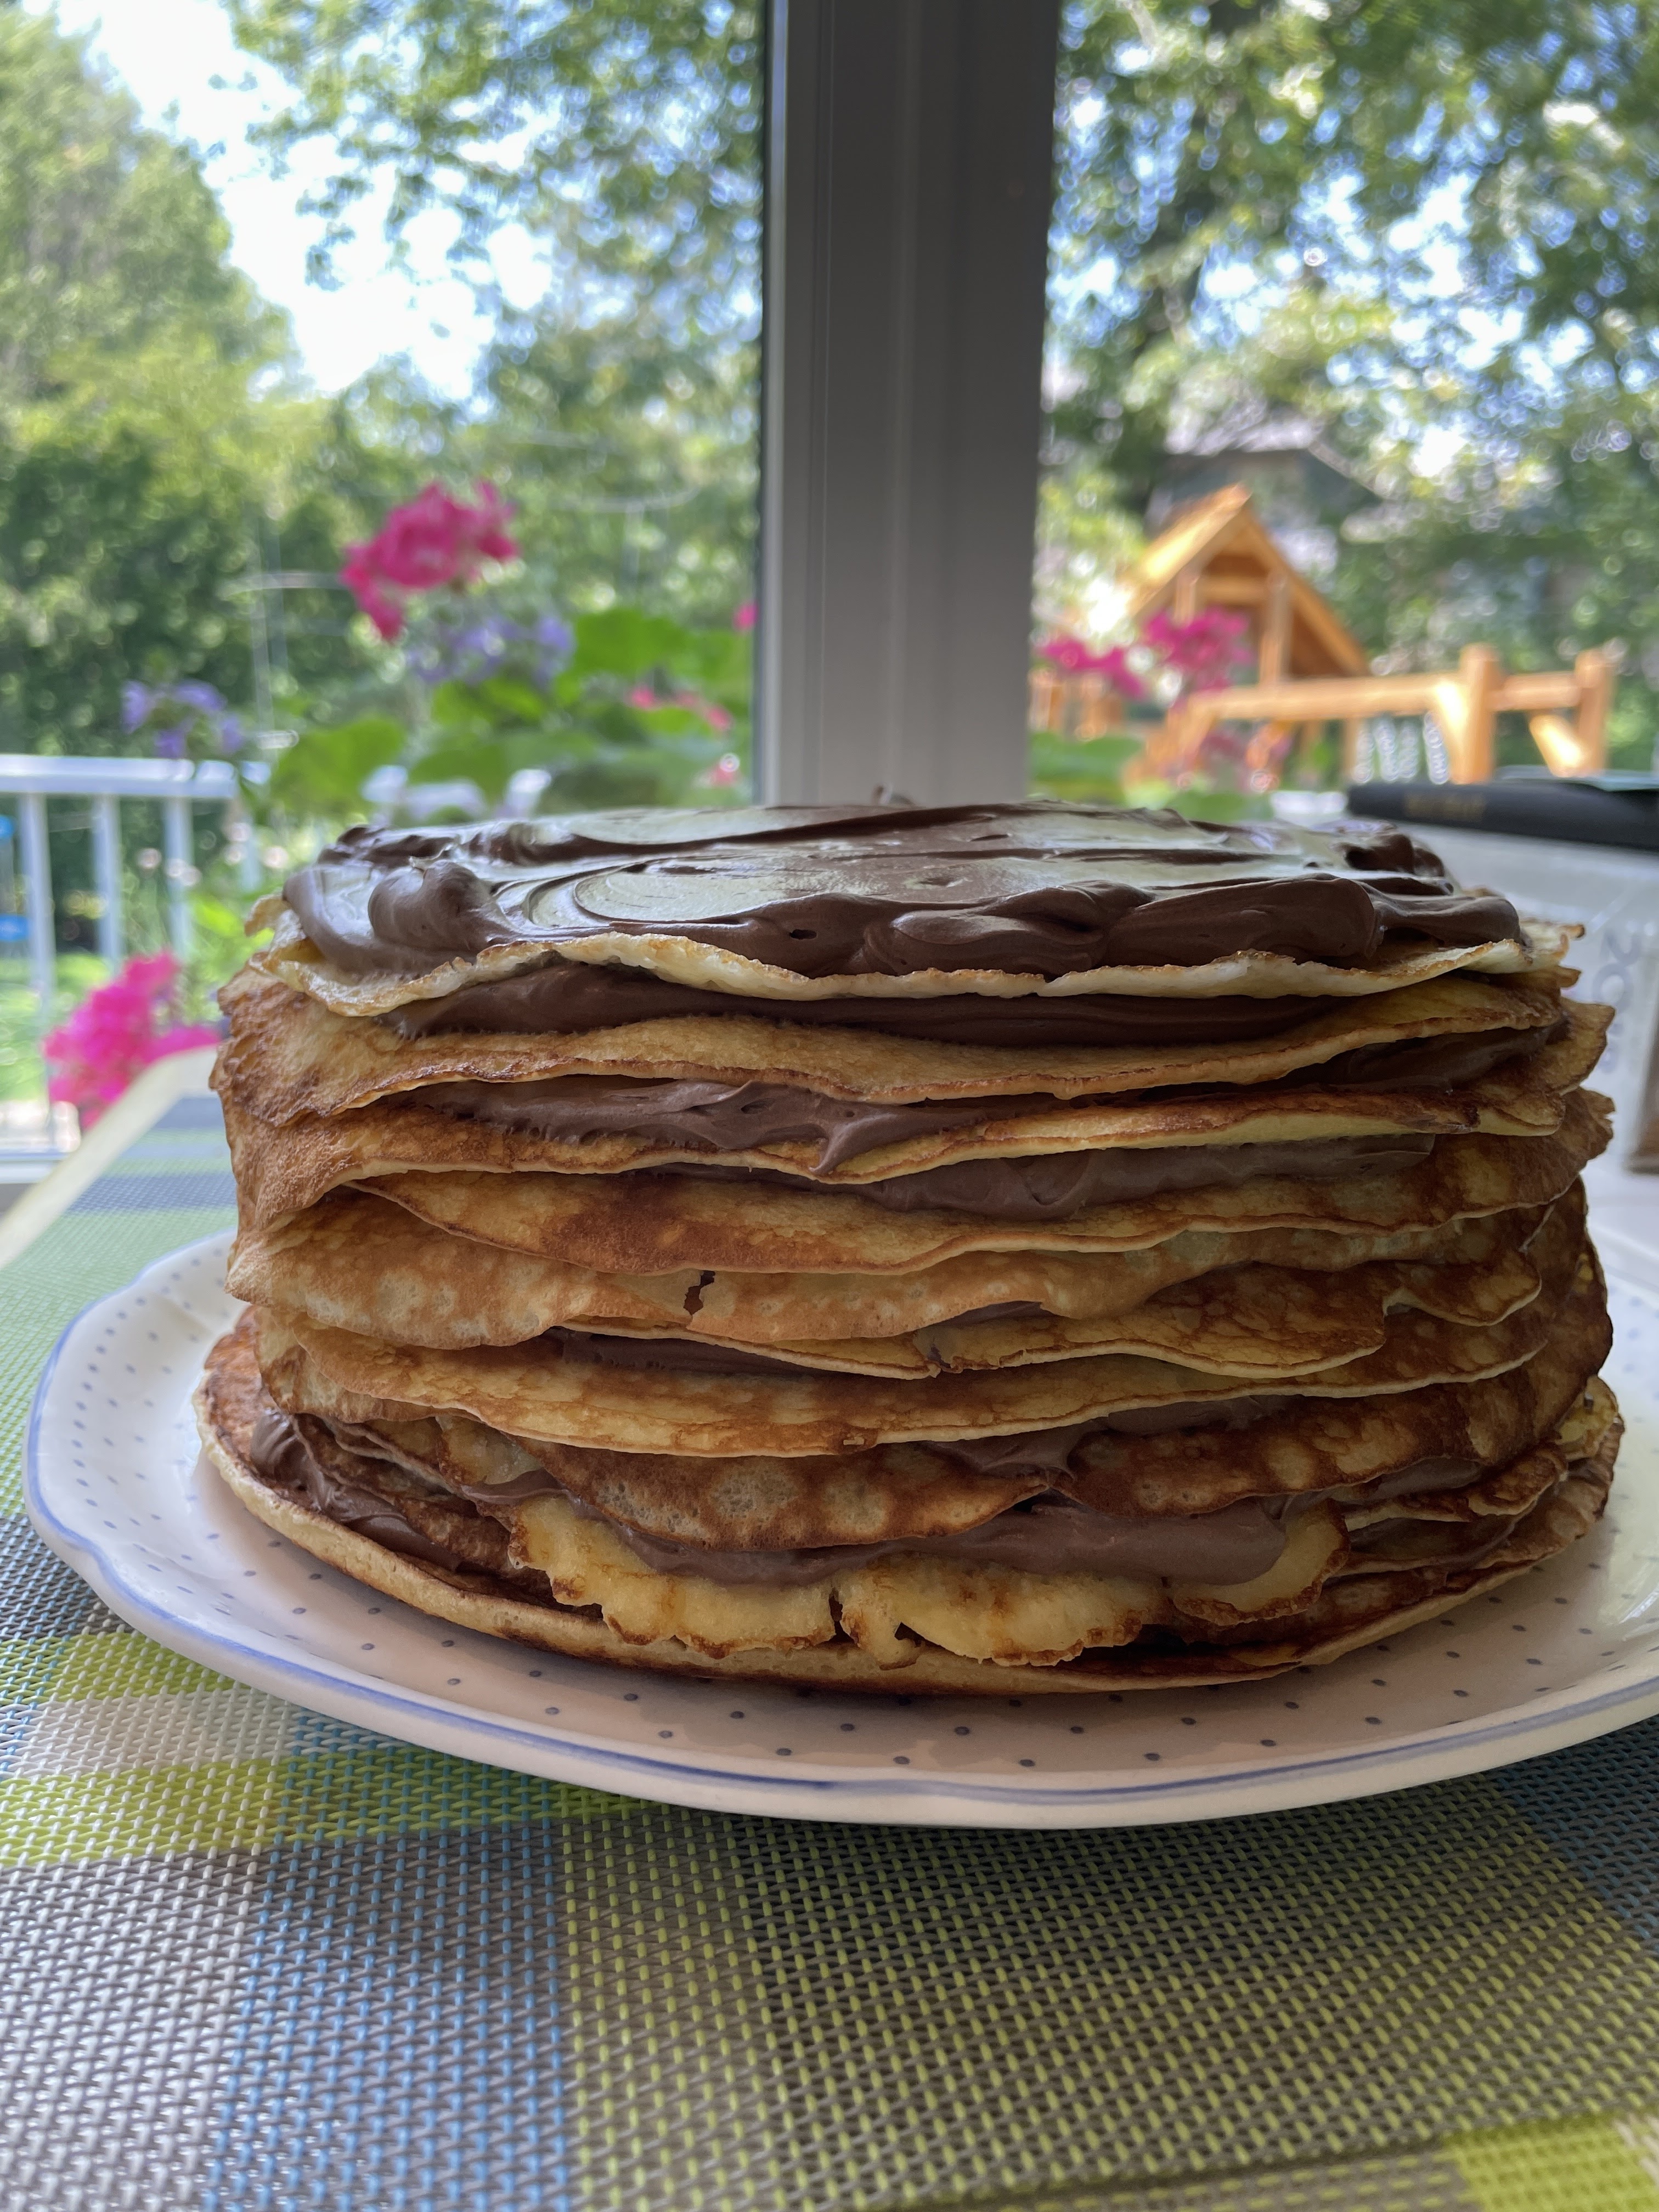
"Nutella" Crêpe Cake


Since my last two crêpe cakes were poorly received by the kids, I set out to adapt this Nutella crêpe cake to reconcile them with the dish. In my recollection, however, the filling was something like chocolate spread folded into whipped cream, but in reality, it was much closer to buttercream frosting. It wasn’t what I wanted to eat, but I decided to make it as is anyway, because I didn’t have it in me to look up another recipe to make a lighter filling. 

I did make some changes, such as using 600 grams of dairy-free Laura Secord dark chocolate spread instead of 13 ounces of Nutella. I didn’t use parchment paper at all, without any problems, and am modifying the recipe below to reflect that (the original recipe had you use about a forest’s worth of paper). What was not clear to me before starting the recipe is that it would really be best made a day ahead. You see, the crêpes needed a lot of time to cool, even once I had put them in the fridge – they were still a bit warm when I was assembling the cake, so my tower of crêpes was leaning like the tower of Pisa at one point! It was better once the cake had been stored in the fridge for a while. 

This was very rich, and we got enough servings to feed an army because we had to keep them small. It was much more like a dessert cake than a dish for brunch, which is to say it was actually too sweet for me. The Little Prince loved it, though, and the Fox ate the crêpes after scraping off the frosting. Honestly though, even though I’ve used that crêpe recipe once since, I would prefer a lighter filling. 

For the crêpes 
3 1/3 cups all-purpose flour 
3 Tbsp. granulated sugar 
1 ¼ tsp. salt 
3 ¾ cups lactose-free cream or half-and-half, plus up to ½ cup more as needed (I used mostly milk the second time I made this) 
8 large eggs, beaten 
2 tsp. vanilla extract 
4 Tbsp. (½ stick) lactose-free butter, melted and at room temperature 
neutral oil, such as canola or safflower 

For the “Nutella” filling (makes about 4 2/3 cups) 
1 pound lactose-free butter, at room temperature 
2 cups powdered sugar, sifted 
1 tsp. vanilla extract 
1 (13-ounce) jar lactose-free chocolate spread (about 2 1/3 cups) 
1/2 cup lactose-free cream, at room temperature 
powdered sugar, for dusting (optional) 
½ cup dark or semisweet chocolate curls or shavings (optional) 


For the crêpes 
Sift the flour, sugar, and salt into the bowl of a food processor fitted with the blade attachment or blender. (You can also use an electric hand mixer, immersion blender, or whisk and a large bowl.) Add the cream and eggs. Process or blend until thoroughly combined into a batter that is smooth, lump-free, and a bit frothy and bubbly on top, 20 to 25 seconds (or mix with a handheld tool for about 1 minute). If there are any lumps, pour the batter through a fine-mesh strainer into another bowl and discard the lumps. 

Add the butter and mix until fully incorporated. 

Cover with plastic wrap, or if using a food processor or blender, transfer the mixture into a bowl and then cover. Refrigerate for at least 1 hour and up to 24 hours. 

Position a cooling rack near the stove. Heat a 7- or 8-inch nonstick crêpe pan or 9- to 10-inch nonstick skillet over medium-high heat. Brush the pan lightly with oil, just enough to coat the bottom. Heat until very hot, about 1 minute, and then place the pan on an unheated burner for a moment. 

Using a ¼-cup measuring cup or ladle, pour the batter into one spot on a bottom edge (but not side) of the pan. Immediately pick up the pan, tilt it, and swirl the batter around the entire perimeter and then across the whole bottom to completely coat it in as even and thin a layer as possible. Pour any excess batter back into the bowl. Place the pan back on the heat. Cook until the edges are lightly browned and the bottom has become a pale golden-brown, 45 seconds to 1 minute (peek by lifting an edge slightly with a spatula). Gently work the spatula under the crêpe and carefully flip it over, helping it with your fingertips if necessary. Cook the second side until it has a few brown speckles and there is no raw batter visible, 45 to 50 seconds. Pick up the pan and slide the crêpe onto a plate. (At this point, if you are going to refrigerate the crêpes before assembling the cake, it would be wise to put a sheet of parchment or wax paper between each, but I didn’t wait as long and therefore didn’t need it.) 

Repeat the process with the remaining batter, stacking about 15 crêpes per plate. If the batter thickens beyond the consistency of heavy cream as you cook, add a little more cream or half-and-half, 1 tablespoon at a time, and stir to combine before making more crêpes. Brush the pan with oil after 8 to 10 crêpes are made to ensure that they will be easy to turn and slide neatly out of the pan. You should have about 30 crêpes when finished. 

Wrap the stacks, still on the plates, in plastic wrap and refrigerate for 30 to 45 minutes before assembling the cake. Meanwhile, prepare the filling. 

For the filling 
Place the butter in the bowl of a stand mixer fitted with a paddle attachment. (Alternatively, use an electric hand mixer and large bowl.) Beat on medium speed until soft and fluffy, about 2 minutes. Add the powdered sugar and beat on medium speed, scraping the bottom and sides of the bowl, until fully incorporated, about 2 minutes. 

Add the vanilla and beat on medium speed until combined. Add the Nutella-equivalent and continue to beat on medium speed until fully combined and there are no streaks of Nutella or the butter-sugar mixture. 

Add the cream and beat until the filling is lighter in color, very fluffy, and easy to spread, about 3 minutes. 

Remove the crêpes from the refrigerator and remove the plastic wrap. Take 1 crêpe from the pile (the original recipe said to always keep the top crêpe covered with parchment as you assemble so that it doesn't dry out, but in my experience crêpes aren’t that finicky) and use kitchen shears to trim any untidy strands or uneven edges if needed (I didn’t take it that far). Place the trimmed crêpe on a serving platter or plate. Using an offset spatula, gently spread 2 generous tablespoons of the filling (I used more) evenly over the crêpe, leaving about a ½-inch border uncovered. 

Trim another crêpe as needed. Place it on top of the first and repeat with spreading on the filling. Repeat with 12 more crêpes. As the crêpes are stacked and each layer gets filled, the weight of them will gently push the filling out to the edges. 

Stack and fill 10 more crêpes, leaving a ¼-inch border uncovered on each one. 

Stack and fill 5 more crêpes, spreading the filling all the way to the edges. Place the last pretty crêpe on top, but do not cover it with filling. Wrap plastic wrap around the cake and under the serving plate to cover the entire thing. Refrigerate until firm and chilled, at least 45 minutes and up to 1 day. 

Unwrap and garnish the top with powdered sugar and chocolate curls or shavings if desired. The cake is best sliced cold: warm a long heavy knife by running the blade under hot water and then drying it with a paper towel before cutting. The warm blade cuts through far better and gives very clean cuts with fewer smudges and drags. Warm and dry the blade between cuts.


Friday, July 29, 2022

Crispy Sheetpan Gnocchi with Mushrooms, Sausage, and Butternut Squash


This recipe is from The Kitchn. It had been in my bookmarks for a while, and since the Fox actually likes mushrooms, I finally made it last May. I used less oil than called for, but then I should have sprayed the pan with oil, so I’ll keep it in mind next time. And there will be a next time, because this was GREAT! Admittedly, it would look prettier in a shallow bowl than a plate, too. (If you’re not inspired by this mixture of vegetables, but you’re into pickled vegetables, check out this sheet pan gnocchi with meatballs and giardiniera instead.) The quantities below yield about 4 servings, but I’ve been known to make 2 pans at once and skip the broiling step. 

Update: I made it again more recently with a bit of oil in the pan and sweet potatoes instead of the squash to make my immediate family happy. This worked really well! The photo is below, plated in a shallow bowl. 

8 oz. cremini mushrooms 
½ medium red onion 
2 Tbsp. finely chopped fresh rosemary leaves 
1 lb. pre-cut butternut squash cubes (about 4 cups of roughly ½” cubes) 
1 lb. fresh, shelf-stable, or frozen potato gnocchi 
¼ cup olive oil (I used less, but should have sprayed the sheetpan with oil) 
½ tsp. kosher salt 
¼ tsp. freshly ground black pepper 
8 oz. uncooked sweet or hot Italian sausage 
grated parmesan cheese, for serving (optional) 

Arrange 2 racks to divide the oven into thirds and heat the oven to 450 °F. (I also covered my sheetpan with aluminum foil and, since I used much less oil, should have sprayed the pan with oil first.) 

Quarter cremini mushrooms and place them on a rimmed baking sheet. Cut red onion into 1-inch chunks and place on the baking sheet. Sprinkle rosemary over the vegetables. 

Add cubed butternut squash (trim any large pieces to desired size) and gnocchi to the baking sheet. Drizzle everything with ¼ cup olive oil (see note above), then sprinkle with kosher salt and black pepper. Toss to coat and spread the mixture into an even layer. 

Remove the casings from sausages if needed. Drop bite-sized pieces of the sausage all over the top of the gnocchi mixture. 

Place the baking sheet on the lower rack. Roast, stirring halfway through, until the gnocchi are plump, the sausage is browned and cooked through, and the vegetables are tender, about 25 minutes total. 

Move the baking sheet to the upper rack and turn on the broiler. Broil until the gnocchi are lightly browned and crisp, 3 to 5 minutes. Serve garnished with grated parmesan cheese, if desired.


Thursday, July 28, 2022

Clafoutis à la rhubarbe


Dans le Coup de Pouce de juin, il y avait cette recette de clafoutis à la rhubarbe à faire cuire sur le barbecue – mais heureusement pour moi, il y avait aussi des instructions pour le faire cuire au four! Puisqu’il y avait de la rhubarbe à mon arrivée à Montréal (je n’en avais pas vu au Texas), je l’ai fait; je vous donne les instructions pour le four ci-dessous. Les enfants n’ont pas beaucoup aimé, mais les gens qui apprécient la rhubarbe ont adoré! C’était moins sucré et moins gras que le clafoutis à la rhubarbe et à la noix de coco, qui est également délicieux.

J’ai coupé ma rhubarbe en plus petits morceaux que la recette l’exigeait. De plus, la recette d’origine recommandait de servir le clafoutis avec de la crème glacée à la pistache, le tout parsemé de pistaches hachées; bien que ça avait l’air délicieux, je l’ai servi tel quel. 

3 tasses de rhubarbe parée et coupée en tronçons de ¾ po (2 cm), soit environ 3 tiges 
2 c. à table de sucre granulé 
2 gros œufs 
¼ tasse de sucre d’érable 
2 tasses de lait entier sans lactose 
1 tasse de farine non blanchie 
¼ tasse de beurre sans lactose fondu 
1 c. à thé d’extrait de vanille 

Préchauffer le four à 400°F. Graisser un moule à tarte profond de 10 po (25 cm) ou un poêlon en fonte. 

Dans un bol, mélanger la rhubarbe et le sucre granulé. Réserver à la température ambiante. 

Dans un grand bol, à l’aide d’un fouet, battre les œufs et le sucre d’érable jusqu’à ce que le sucre soit dissous. Incorporer le lait, en alternant avec la farine. Ajouter le beurre et la vanille, et mélanger jusqu’à ce que la pâte soit lisse. 

Répartir la rhubarbe dans le moule préparé et verser la pâte par-dessus. Cuire au four préchauffé pendant 30 à 40 minutes ou jusqu’à ce que le clafoutis soit pris et doré. Laisser reposer 5 minutes avant de servir.


Saturday, July 23, 2022

Tarte frangipane aux figues


Je ne fais pas ça souvent, mais je vais vous parler d’un plat que ce n’est pas moi qui ai fait! On avait des figues fraîches en bonne quantité, alors ma mère a eu la bonne idée de faire cette tarte frangipane aux figues de Ricardo. C’était absolument délicieux! On pense que ce serait vraiment excellent aussi avec des prunes ou des pêches, ou encore avec des poires l’automne. 

Pour la croûte 
½ tasse de beurre sans lactose, ramolli 
1/3 tasse de sucre 
1 œuf 
1 ½ tasse de farine tout usage non blanchie 
¼ c. à thé de sel 

Pour la frangipane
½ tasse de beurre sans lactose, ramolli 
½ tasse de sucre 
2 c. à thé d'extrait de vanille 
2 œufs 
1 ¼ tasse d'amandes en poudre 
3 c. à soupe de farine tout usage non blanchie 

Pour la garniture 
4 figues fraîches coupées en deux (selon la grosseur) 
1 figue entière 
3 c. à soupe de miel chaud 


Pour la croûte 
Dans un bol, crémer le beurre avec le sucre au batteur électrique. Ajouter l'œuf et battre jusqu'à ce que le mélange soit homogène. À basse vitesse, incorporer les ingrédients secs. Le résultat sera granuleux. Du bout des doigts, presser la pâte dans un moule à tarte à fond amovible de 27 cm (10 1/2 po) de diamètre sur 2,5 cm (1 po) de hauteur. Réfrigérer 30 minutes. 

Placer la grille dans le bas du four. Préchauffer le four à 350 °F. 

Pour la frangipane 
Dans un bol, crémer le beurre avec le sucre et la vanille au batteur électrique. Ajouter les œufs, un à la fois, et battre jusqu'à ce que le mélange soit homogène. À basse vitesse, incorporer les ingrédients secs. Verser la frangipane dans l'abaisse. 

Pour la garniture 
Placer la figue entière au centre et y disposer les figues tout autour, côté coupé vers le haut, en laissant un espace entre chacune. 

Cuire au four environ 50 minutes, jusqu'à ce que la frangipane soit bien dorée et qu'un cure-dent inséré au centre en ressorte propre. 

À la sortie du four, badigeonner délicatement les figues de miel. 

Laisser tiédir. Servir tiède, à la température de la pièce ou froid.


Monday, July 11, 2022

Chocolate Buckwheat Cake


This chocolate buckwheat cake was adapted by David Lebovitz, from Aran Goyoaga’s Small Plates and Sweet Treats. I made one little mistake, because the ingredient list did not specify that the sugar was to be divided – I used it all with the yolks, but it all came out fine in the end. I made it clear in the recipe below. This cake was a success! 

6 oz. (170 g) bittersweet or semisweet chocolate, chopped 
½ cup (115 g) lactose-free butter, cubed 
4 large eggs, separated 
½ cup (100 g) unrefined or granulated sugar, divided 
1/3 cup lactose-free plain whole-milk yogurt 
1 tsp. vanilla extract 
½ tsp. salt 
¾ cup (75 g) almond or hazelnut flour 
¼ cup (35 g) buckwheat flour 

Preheat the oven to 350 °F. Butter an 8-inch (20cm) cake pan and line the bottom with a round of parchment paper. 

In a large, heatproof bowl set over a pan of simmering water, melt the chocolate and butter until smooth, then remove from the heat and let cool slightly. 

In a medium bowl, whisk together the egg yolks, ¼ cup of the sugar, yogurt, vanilla, and salt, the whisk them into the melted chocolate. Stir in the almond or hazelnut flour, and the buckwheat flour. 

In the bowl of a stand mixer, or by hand, whip the egg whites until they form soft peaks. Gradually whip in the other ¼ cup of the sugar until the whites are in firm peaks. Fold one-third of the whipped egg whites into the chocolate mixture to lighten it, then fold in the remaining chocolate mixture just until it’s completely combined. 

Scrape the batter into the pan, level the top, then bake for 25 to 30 minutes; the cake will feel relatively set, but the center of the cake should still be soft. Let cool for 10 minutes, then remove from the cake pan and let cool completely.


Sunday, July 10, 2022

Sweet Potato Black Bean Enchiladas


Here’s a very good vegetarian recipe from Weelicious: sweet potato and black bean enchiladas. The sweet potatoes are mashed, so they help keep the beans in place. I thought the Little Prince would like this if I simply omitted the cheese topping on his enchilada, but it turns out that he didn’t like the cheese inside it either, so this was not for him – but I really liked them. 

2 large baked sweet potatoes, cooked and mashed 
½ tsp. garlic powder 
1 tsp. onion powder 
½ tsp. ground cumin 
½ tsp. kosher salt 
1 15-oz. can black beans, drained and rinsed 
1 ½ cups shredded mexican blend cheese (make sure it’s lactose-free) 
1 12-oz. can enchilada sauce (I used this recipe instead) 
6 large flour tortillas, or 12 corn tortillas 
avocado, pico de gallo, cilantro, or toppings of choice 

Preheat the oven to 400 °F. 

Poke the sweet potatoes all over with a fork and place on a foil lined baking sheet in the oven until fork tender, about 1 hour. 

Remove from the oven, allow to cool slightly, then slice down the middle and scoop out all the pulp into a bowl. Turn the oven down to 350 °F.  

To the sweet potato pulp, add the garlic powder, onion powder, cumin, salt, black beans, and 1 cup of cheese. Stir to thoroughly combine. 

Pour half of the enchilada sauce into a 9x11 baking dish. Place about ½ cup mixture into the middle of each tortilla and roll up. 

Place the enchiladas, seam side down, into the baking dish. Pour the remaining enchilada sauce on top. 

Cover with foil and bake for 15 minutes. 

Remove foil and sprinkle with cheese and bake uncovered for an additional 15 minutes until cheese is melted and browned slightly. 

Top as desired and serve.


Friday, June 24, 2022

Atlanta

We spent a day in Atlanta on our way north this summer. I’d been meaning to visit for a long time, and I’m glad I had my family with me! 

Our first stop was the Georgia Aquarium. We were blown away! In addition to all the exhibits, we caught the sea lion show and the 4D movie (4D means that there are 3D glasses as well as physical interventions like bubbles, wind, and sprays of water, to make the experience more immersive). We also saw the dolphins and belugas and sea dragons and more fish that I could possibly name or count. Many of the tanks have special viewing stations for kids built right in – we’re talking tunnels and acrylic domes leading right into the tank! 

The absolute best part for me was the huge tank with whale sharks. It starts with a tunnel into a tank that has huge rays, sea turtles, sharks and other fish, and every once in a while, you can see a whale shark in the distance. These are the biggest fish in the world! I remember seeing them in National Geographic magazines when I was a kid, but I never thought I’d get to see a real live one! I felt like the paleontologists from Jurassic Park when they first see the live dinosaurs! Eventually, you make your way around to a huge acrylic wall, at least two stories high, and then you can observe the pair of whale sharks in all their glory (along with a hundred other fish). It was absolutely stunning! I think if I lived in Atlanta, I’d get an annual pass and come here first thing in the morning once in a while, before the crowds. 


There was another tank with white-tipped sharks and hammerhead sharks swimming alongside a school of fish, and that was also very impressive (pardon the ambient noise). 


Then, we went to the World of Coca-Cola, which is right next door. I used to have a collection of Coca-Cola items (I technically still do, but it’s been whittled down a lot) and I had been meaning to visit this place for years and years, so I couldn’t miss it. That being said, if you are not in that situation, I have to admit that the visit might not be worth it for you. In a nutshell, there are some Coca-Cola artefacts, exhibits about the history and fabrication, more interactive exhibits about the art and honing your sense of smell… The highlight is that tasting room at the end of the tour: there are several soda fountain stations, each with ten or so drinks that Coca-Cola makes in various countries, and you get to walk around and taste as many as you want! I really enjoyed the red punch from Korea (the blackberry soda from Malawi deserves a special mention too), but was less keen on the apple soda from Germany and the Beverly soda from Italy. 


I also walked around a bit in Centennial Olympic Park, which was beautiful, albeit not peaceful like Discovery Green. It was mid- to late-afternoon by then, and there were a *lot* of people carrying clipboards and asking for donations for various organizations, with such insistence that it felt a bit aggressive. So I’m aware that I only saw a very small sliver of Atlanta, but overall, I loved it!


Thursday, June 23, 2022

Dark Chocolate Swirl Banana Tahini Muffins


I got this recipe from Soom and made it when we had half a jar of their (delicious!) dark chocolate tahini with sea salt to use up, and we were trying to get rid of the last of the frozen bananas as well. I really like banana muffins, tahini, and chocolate, so obviously this was up my alley! 

If you can’t get your hands on Soom Dark Chocolate Tahini with Sea Salt, you can replace it with your chocolate spread of choice, and fine sea salt to taste. 

1 ½ cups oat flour 
¼ cup instant oats 
1 tsp. baking soda 
1 tsp. cinnamon sea salt, to taste 
3 large overripe bananas, mashed 
1 large egg 
½ cup tahini 
¼ cup maple syrup 
¼ cup melted lactose-free butter (vegan if needed) 
½ cup Soom Dark Chocolate Tahini with Sea Salt, to swirl 

Preheat oven to 350 °F; line a muffin tin with 12 liners. 

In a small bowl, which together the oat flour, instant oats, baking soda, cinnamon, and sea salt. Set aside. 

Place bananas, egg, tahini, maple syrup, and melted butter in a large bowl. Using a hand blender, blend the wet ingredients until smooth. Using a large spoon, mix in dry ingredients until a batter forms. 

Scoop the batter evenly into muffin tins. Then, take a small spoonful of dark chocolate tahini and place it on top of each muffin. Swirl the chocolate into the batter using a butter knife to create a marbled look. 

Bake the muffins for 22-25 minutes until a knife comes out clean. Be careful not to overbake! Allow the muffins to cool for 5 minutes before placing on a cooling rack. Enjoy with extra Dark Chocolate Tahini with Sea Salt if you wish!


Friday, June 17, 2022

Houston

On our way up this year (our first time driving back to Canada since the onset of the pandemic), we made a first stop in Houston. I’ve always wanted to visit, but it still hadn’t happened after over 10 years in Texas! I kept thinking that we could just go on a long weekend, but this year I was forced to admit that the Engineer’s long weekends somehow never coincided with the kids’ long weekends, so if we wanted to visit, we had to make it happen in the summer. 

Our first stop, immediately following a nice lunch at nearby London Cafe, was Seismique, an immersive experience with light and sound. (To be honest, we also considered Candytopia, but decided that only one of the two was in our budget. Luckily, the Engineer had the brilliant idea to look up detailed YouTube videos of both visits, and Seismique was more up our alley.) Let’s get the downsides out of the way: first, it’s expensive. Second, it isn’t built with a logical path in mind, meaning that in order to see the whole thing, you’ll have to pay attention, double back, and follow along on a map. Except they don’t give you a map, they instead rely on you to download their app and use their cartoon map – the app is also necessary to interact with some displays, but others can be activated physically. Third, no backpacks or large bags are allowed, so plan accordingly. 

That being said, we really enjoyed our visit! The kids AND grownups enjoyed interacting with the lights and various exhibits. We loved the huge crocheted play structure, even though only the kids could use its full potential (and the Fox predictably got stuck at the top at some point, but we managed to coax him down). Really, apart from a few exhibits that were either hard to operate or not working well, everything was fun! 


We then ended the day by walking around Discovery Green, a large park downtown. There are green spaces, a pond, a playground, a splash pad, small cafés, sculptures, etc. It was a really pleasant way to unwind! Note that if budget had allowed, we would have booked a room at the adjacent Mariott Marquis Houston, which has a rooftop lazy river shaped like Texas! We then had dinner at nearby The Rustic. The openness and fans made us comfortable, and given that we had reached our noise quota for the day, we were glad there were no live performances that night. The food was good, albeit spicy. 


We started off the next day killing some time at the McGovern Centennial Gardens, which were really beautiful, especially the knoll with the spiral path! We then walked to the Children’s Museum Houston when it opened. The Engineer had suggested it the day before, so it wasn’t part of our original plan, but it’s a really nice museum, and I’m glad we went! We also had lunch there before walking back to the car. There were many other museums in the area that looked interesting and inviting! 


We then made a pit stop at the Rothko Chapel, a non-denominational place of worship and contemplation. The grounds are beautiful, and the inside of the chapel was more like a room in a modern art museum than any church I’ve been to. There is a skylight, and benches are arranged in concentric circles in an octagonal room. The white walls are decorated with what, at first glance, look like large rectangular canvasses painted black, but when you look more closely, you realize that one of them is actually purplish and has lighter brushstrokes, one is actually a burgundy rectangle on a dark grey background, etc. We walked around outside, but sadly, the adjacent Menil Collection was closed that day. 


Finally, we drove to the main event: the Space Center. I’m not a NASA buff, more of a casual fan, but this was really interesting to me. You can visit Space Shuttle Independence, a high-fidelity replica of shuttles used by NASA in previous programs. You’ll learn a lot about previous missions as well as current conditions on the International Space Station, about space and the NASA in general… You can even touch a rock from the Moon! We didn’t take the tours of the grounds because by then, we were all tired (especially the kids), so we went back to the hotel for a swim before dinner. I really liked Houston!


Thursday, June 16, 2022

Pizza with Cheddar, Caramelized Onions, and Eggs


This recipe is from The Weekday Vegetarians, Jenny Rosenstrach’s latest cookbook. It’s an easy recipe, though it should be said that even though it’s vegetarian, it doesn’t really have any vegetables. (I mean, technically there’s onion, but from a nutritional standpoint, does it really count?) It would be a good idea to pair it with a green salad. I really liked the addition of garlic powder to the crust edges, and the combination of flavors was really doing it for me. Both the Engineer and I liked this, but sadly, the kids did not. 

I did not stretch out the dough as required – I only had 13 ounces instead of 16, but even then, I don’t see a pound of dough stretched out that thinly! I used a smaller baking sheet and stretched the dough as much as I could. Finally, I had some trouble with the baking times. The eggs weren’t nearly done after 5 minutes! I tried baking the dough and cheese 5 minutes, adding the eggs and baking for 8 minutes and then leaving the pizza in the oven (turned off) for another 10 minutes, but that didn’t quite do it. For the second batch, I tried just putting them on the pizza right from the beginning and baking it 12 minutes total, but even then, the crust was too dark while the egg whites were not quite done. I guess the recipe still needs some tweaking. 

5 Tbsp. extra-virgin olive oil, divided 
3 large yellow onions, roughly chopped 
1 lb. pizza dough (storebought is fine), at room temperature 
¼ tsp. garlic powder 
6 oz. lactose-free sharp cheddar, grated (about 1 ½ cups) 
4 large eggs 
kosher salt and freshly ground black pepper, to taste 
chopped flat-leaf parsley, for garnish 

Preheat oven to 450 °F. Arrange an oven rack in the middle position. 

As the oven heats, combine 3 tablespoons of the olive oil and the onions in a large skillet set over medium-low heat. Stir every few minutes, making sure they are getting soft and golden but not blackened or burned, until caramel colored and slightly jammy, 20 to 25 minutes (I’m more of a realist and will tell you that it takes longer to caramelize onions). 

While the onions are cooking, brush an 18x13-inch sheet pan (see note above) with 1 tablespoon of the olive oil. Drop the dough in the center of the pan and, using your fingers, press and stretch out the dough to the sides and into corners of the pan. The goal is to get the crust as thin as possible. Mix together the garlic powder and the remaining tablespoon of olive oil and brush the perimeter of the dough. 

Top the dough with an even layer of the cheddar, leaving a 1-inch cheese-free border, and bake for 8 minutes (see note above). Remove from the oven and top with the caramelized onions, shaping them into 4 little “nests” for the eggs (one in each corner). Carefully crack 1 egg in each nest. Bake until the whites are cooked, the yolks are still slightly runny, and the crust is golden, about 5 minutes. Top with salt, pepper, and parsley.