Saturday, August 23, 2014

Pouding Chômeur

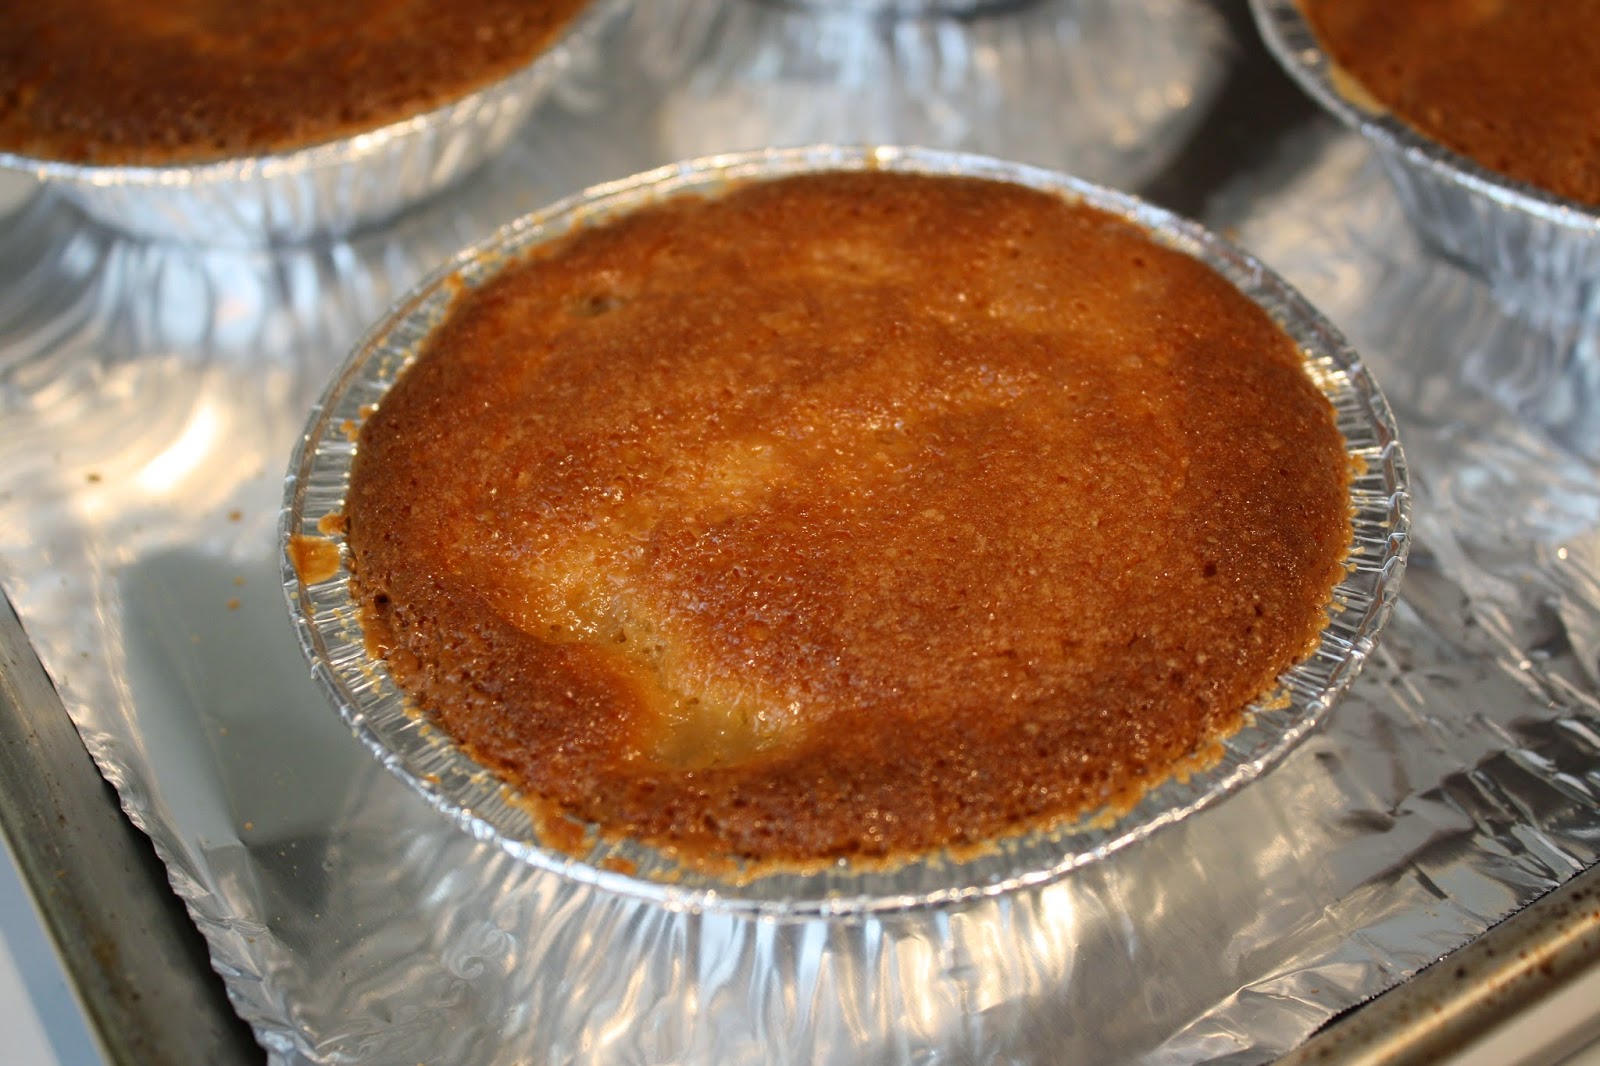
I’m writing this post with much delay, but I’m almost done rounding up recipes I made while I was in Montreal, so bear with me! Pouding chômeur is a typical French Canadian dessert invented during the Great Depression; the name means “pudding of the unemployed” or “poor man’s pudding”, because it’s usually made with inexpensive ingredients fitting of the times: a simple cake batter covered with caramel before being baked. The result is a moist white cake with syrupy, gooey goodness. This particular version, though, is from the restaurant Au Pied de Cochon, where they make the caramel with maple syrup and cream. Obviously, maple syrup is cheaper in Quebec than in the southern United States, but it’s still not the most economical version of the dish! When I had tried it at the restaurant, though, it had been so fantastic that I really wanted to make it myself. For some reason, the francophone blogs I had bookmarked for the recipe all disappeared, but luckily, Lottie and Doof has a great post up, so I was in business. And it was worth every last calorie!

One note: I did not have the correct size of ramekins – actually, I didn’t have any ramekins. I used makeshift individual tins, but they were too small, so my puddings weren’t as saucy as they should have been (I didn’t use all the sauce during baking, or even most of it, because I could see that it was way too much for those tins). On two occasions, however, I remedied that by transferring a serving of cake into a bowl and topping it with some warm sauce, and it was heavenly. For future reference, I would guess that you need 6 ramekins of a little more than 1-cup capacity each (or maybe 8 ramekins of 1-cup capacity). It’s okay if *some* of the sauce spills out, because that happens at the Pied de Cochon too, and it’s part of the charm! Just line your baking sheet with foil before putting the ramekins on it.

6 oz. butter, at room temperature (you could use cold margarine here)
1 cup granulated sugar
2 large eggs
1 ¾ cups all-purpose flour
1 tsp. baking powder
2 cups maple syrup
2 cups lactose-free cream

Combine the butter and sugar in stand mixer until smooth. Add the eggs and beat at medium speed until completely incorporated. Add the flour and baking powder and stir until the flour is completely incorporated. Refrigerate dough for at least 24 hours.

Preheat oven to 450 °F. Bring the maple syrup and heavy cream to a boil in a saucepan. Turn off heat, add a pinch of salt and set aside to cool. Divide the dough among 6 ramekins or oven-safe bowls and set them on a large rimmed baking sheet (which I suggest lining with foil). Fill each ramekin just over half full with ¾ cup of the maple cream mixture. Bake for 20-25 minutes or until the puddings are golden brown and a tester inserted into the center of each cake comes out clean. Let cool for 5 minutes, serve warm.

Mini-tartelettes au chocolat et à la crème

J’avais décidé de ne pas bloguer cette recette de Coup de Pouce, pour la simple raison que je n’ai pas de bonnes photos. J’en ai pris le soir, en me disant que je referais ça à la lumière du jour, et puis le lendemain, j’ai oublié. Bête de même. Mais l’Ingénieur l’a tellement aimée que je me dois de la partager! Il a dit : « Ce sont des pochettes de délice. Elles sont texturellement escitantes; j’aime le contraste de la croûte croustillante et de l’intérieur moelleux et fondant. Ça me permet aussi de vivre mon fantasme de manger le pouding ainsi que son contenant. » Alors voilà, vous comprendrez qu’il fallait mettre ça ici. J’ai adapté pour utiliser de la crème sans lactose; pour faire ça aux États-Unis, j’aurais plutôt utilisé du Kineret, en réduisant le sucre dans la recette.

Pour obtenir les mini-coupes phyllo maison, la recette d’origine recommande d’étendre une feuille de pâte phyllo sur une surface de travail et de la badigeonner de beurre, puis de répéter l’opération jusqu’à avoir 3 feuilles de pâte phyllo en tout. Il faut ensuite couper les feuilles en 4 sur la longueur et en 6 sur la largeur, de manière à obtenir 24 carrés. Ensuite, on presse chaque carré dans un mini-moule à muffin et on fait cuire environ 5 minutes à 400 °F, jusqu’à ce que la pâte soit dorée. À noter que vous pouvez remplacer les coupes en pâte phyllo par de petites croûtes de pâte feuilletée (puisque celles du commerce sont plus grosses que dans la recette, vous en obtiendrez environ une douzaine).

En passant, savez-vous comment fouetter de la crème sans faire de bruit avec le batteur électrique (pour ne pas réveiller votre bébé qui dort de l’autre côté du mur) et sans trop s’user le bras non plus? Il suffit de la mettre dans un pot Masson (idéalement froid; je mets le mien au congélateur 15 minutes d’avance) et de brasser le pot vigoureusement pendant environ 1 minute. Voilà, de la crème fouettée!

3 c. à soupe + 1 c. à soupe de poudre de cacao non sucrée
1/3 tasse + 1 c. à soupe de sucre
4 c. à thé de fécule de maïs
1 ¼ tasse + ½ tasse de crème sans lactose (voir note plus haut)
2 jaunes d'œufs
2 oz de chocolat mi-amer haché finement
¼ tasse de beurre non salé (ou de margarine) coupé en dés
½ c. à thé + ½ c. à thé de vanille
24 mini-coupes en pâte phyllo maison OU 2 boîtes de petites coquilles feuilletées en pâte phyllo (voir note plus haut)
mini-copeaux de chocolat, pour décorer

Dans une casserole à fond épais, à l'aide d'un fouet, mélanger 3 c. à soupe du cacao, 1/3 tasse du sucre, la fécule, 1 ¼ tasse de la crème et les jaunes d'œufs. Cuire à feu moyen, en fouettant, de 5 à 6 minutes ou jusqu'à ce que la préparation commence à bouillonner. Retirer la casserole du feu. Ajouter le chocolat et le beurre en fouettant sans arrêt jusqu'à ce que la préparation soit lisse. Incorporer ½ c. à thé de la vanille. Verser la garniture au chocolat dans un grand bol et couvrir directement la surface d'une pellicule de plastique. Réfrigérer pendant 3 heures ou jusqu'à ce que la garniture soit froide.

Entre-temps, dans un bol, à l'aide d'un batteur électrique, battre le reste de la crème avec le reste du sucre et le reste de la vanille jusqu'à ce que le mélange forme des pics fermes.

Au moment de servir, à l'aide d'une cuillère, répartir la garniture au chocolat refroidie dans les mini-coupes. Garnir de la crème fouettée et des mini-copeaux de chocolat. Saupoudrer du reste du cacao.

Monday, August 18, 2014

Tarte aux mûres et au basilic


La recette suivante est tirée du magazine À bon verre, bonne table. Il me fallait de la crème sans lactose pour la faire, alors elle traînait dans ma pile de recettes à essayer depuis deux ans… Je suis bien contente d’avoir pu y goûter, en fin de compte! Le problème a été que ma crème pâtissière était trop liquide, même après réfrigération, mais comme le suggère l’Ingénieur, il suffirait d’y ajouter de la fécule de maïs. J’ai fini par mettre la tarte au congélateur – la crème pâtissière était alors trop dure, mais après être repassée au frigo quelques heures, la garniture tenait! Voilà donc une autre solution si vous avez le même problème… Le morceau dans les photos ci-dessous sortait direct du congélateur. (À noter que vous pouvez tout à fait utiliser une croûte à pâte du commerce, comme je l’ai fait, mais c’est alors plus difficile de décorer le rebord, sans retailles de pâte… À la limite, si vous achetez une boîte de deux croûtes, vous pouvez entailler la deuxième pour faire les décorations, ou laisser tomber, tout simplement.)

Pour la croûte (voir note plus haut)
1½ tasse de farine
¼ c. à thé de sel
10 c. à soupe de beurre froid, coupé en cubes
3 c. à soupe d’eau glacée
½ c. à thé de vinaigre blanc
1 œuf légèrement battu avec 1 c. à soupe d’eau
sucre blanc décoratif

Pour la crème pâtissière
1½ tasse de mûres
4 œufs plus 2 jaunes d’œufs
½ tasse de sucre
½ tasse de crème sans lactose
1 c. à soupe de jus de citron

Pour la garniture
¼ tasse de sucre
¼ tasse de feuilles de basilic tassées, et quelques-unes de plus comme décoration
1 bâton de cannelle d’environ 8 cm (3 po)
1 tasse de crème sans lactose
1 tasse de mûres

Pour la croûte
Combiner dans un robot culinaire la farine et le sel au mode impulsions. Toujours au mode impulsions, incorporer le beurre jusqu’à ce qu’il ait la consistance d’une semoule grossière. Asperger le mélange d’eau et de vinaigre. Combiner les ingrédients au mode impulsions jusqu’à ce que le mélange commence à former des grumeaux. (Si la pâte semble s’émietter et ne se tient pas lorsqu’elle est pressée entre les doigts, ajouter jusqu’à 2 c. à soupe d’eau, 1 c. à soupe à la fois.)

Mettre la pâte sur une surface légèrement farinée et former un disque. Bien l’enrober dans de la pellicule plastique et la réfrigérer au moins 1 heure.

Mettre la pâte réfrigérée sur une surface légèrement farinée et l’abaisser pour lui donner une épaisseur d’environ 5 mm (¼ po). Enrouler délicatement la pâte sur le rouleau à pâtisserie et la dérouler dans un moule à tarte de23 cm (9 po). Lui faire épouser la forme du moule et couper l’excédent de pâte, en laissant pendre du moule une bordure de 2,5 cm (1 po). Replier cette bordure sur elle-même pour qu’elle épouse le pourtour du moule. Au choix, pincer cette bordure.

(Pour créer une croûte décorative losangée, couvrez le moule à tarte de pâte et taillez-en la bordure en suivant le contour du moule. Réunissez la pâte excédentaire et abaissez-la pour lui donner une épaisseur de 5 mm (¼ po). Avec une règle, coupez la pâte en bandes de 1 cm (½ po) de large. Coupez ces bandes en carrés de 1 cm (½ po). Avec le mélange d’œuf, badigeonnez la bordure de la pâte placée dans le moule. Un à un, placez les carrés de pâte le long de la bordure, en faisant pointer un des coins vers le centre de la tarte et en les superposant un peu. Appuyez légèrement sur chaque carré pour qu’il reste en place. Badigeonnez la pâte avec le reste du mélange d’œuf, saupoudrez-la de sucre et cuisez-la au four en suivant la recette.)

Avec une fourchette, piquer la pâte sur toute sa surface dans le fond du moule et la réfrigérer 30 minutes.

Préchauffer le four à 375 °F.

Recouvrir d’un cercle de papier parchemin toute la surface de la pâte, jusqu’au rebord du moule, et remplir le fond de tarte de haricots secs ou de poids à tarte. Badigeonner la bordure avec le mélange d’œuf et d’eau et la saupoudrer de sucre à gros cristaux. Cuire la pâte au four jusqu’à ce que la bordure soit dorée, environ 15 minutes. Retirer soigneusement les haricots et le papier sulfurisé et poursuivre la cuisson de la pâte jusqu’à ce que le fond soit croustillant et doré, de 15 à 20 minutes de plus. Laisser la pâte refroidir complètement sur une grille.

Pour la crème pâtissière
Réduire les mûres en purée dans un mélangeur. Avec une spatule, presser la purée dans une passoire fine placée au-dessus d’un bol de taille moyenne résistant à la chaleur. Jeter les graines. Ajouter les œufs, les jaunes d’œufs, le sucre, la crème et le jus de citron dans le bol. Au fouet, combiner les ingrédients.

Placer le bol au-dessus d’une casserole d’eau frémissante et en faire cuire le contenu en le fouettant constamment, jusqu’à ce que le mélange épaississe, de 8 à 10 minutes. (Ajouter de la fécule de maïs délayée dans de l’eau au besoin.) Beurrer une feuille de papier sulfurisé et la poser directement à la surface de la crème pâtissière; laisser la crème refroidir jusqu’à la température ambiante. Avec une spatule, transférer la crème pâtissière dans la pâte cuite, en lisser la surface et refroidir la tarte au réfrigérateur, environ1 heure.

Pour la garniture
Pendant que la tarte refroidit, préparer la garniture en dissolvant le sucre dans une petite casserole contenant ¼ tasse d’eau. Porter le liquide à ébullition à feu mi-vif. Le retirer du feu et y ajouter le basilic et le bâton de cannelle. Laisser infuser 15 minutes. Passer le sirop et jeter les ingrédients solides. Le laisser refroidir jusqu’à la température ambiante. Fouetter la crème jusqu’à la formation de pointes fermes et y incorporer délicatement 2 c. à soupe du sirop. Dans un petit bol, combiner le reste du sirop et les mûres. Avec une fourchette, écraser 3 ou 4 mûres pour colorer le sirop.

À la cuillère, couvrir la crème pâtissière refroidie de crème fouettée. Tout juste avant de servir, verser les mûres et le sirop sur la crème fouettée à la cuiller et décorer le tout des feuilles de basilic restantes.

Sunday, August 17, 2014

Rosemary Garlic Chicken Skillet

I apologize for the delay since my last post. These past weeks, my time and energy have been consumed with our dog recovering from emergency surgery (thankfully, he should be fine, but this cost so much that we’ve put next year’s vacation plans on hold); driving back to Texas with a car packed to the gills; unpacking and cleaning and weeding and settling in; and a now-mobile baby exploring the house he hadn’t seen in two months. I am coming to you with a great recipe, though, so hopefully that makes up for it.

I got this recipe from my friend Jen, who served it as a Shabbat dinner two years ago. It’s a one-pot meal that ends up being more than the sum of its parts. As a matter of fact, it was fabulous. I was afraid it wouldn’t be as good as I remembered, but seriously, it was still fabulous! The reason it took me so long to make it myself is that Jen recommends (rightly) that you use kosher chicken, as it is moister than regular chicken and that is important in this dish. I don’t have easy access to kosher chicken in San Antonio, so I made it over the summer in Montreal. I think that if you wanted to use bone-in, skin-on chicken, you could risk the non-kosher variety, but since I decided to go with skinless, boneless breasts, kosher chicken was a must. Also note that I made this in a (stainless steel?) pot, not a cast-iron skillet, and everything turned out fine.

¾ lb. small red-skinned potatoes, halved, or quartered if large
kosher salt
2 sprigs fresh rosemary, plus 1 ½ Tbsp. leaves
2 cloves garlic, smashed
pinch of red pepper flakes
juice of 2 lemons, squeezed halves reserved
2 Tbsp. extra-virgin olive oil
4-6 skin-on, bone-in kosher chicken thighs (6 to 8 oz. each; see note above)
10 oz. cremini mushrooms, halved

Preheat the oven to 450 °F. Cover the potatoes with cold water in a saucepan and salt the water. Bring to a boil over medium-high heat and cook until tender, about 8 minutes; drain and set aside.

Pile the rosemary leaves, garlic, 2 tsp. salt and the red pepper flakes on a cutting board, then mince and mash into a paste using a large knife. Transfer the paste to a bowl. Stir in the juice of 1 lemon and the olive oil. Add the chicken and turn to coat.

Heat a large cast-iron skillet over medium-high heat. Add the chicken, skin-side down, cover and cook until the skin browns, about 5 minutes. Remove chicken from pan; add the mushrooms and potatoes to the skillet, place chicken over mushrooms and potatoes and drizzle with any marinade remaining in the bowl and the juice of the remaining lemon.

Add the rosemary sprigs and the squeezed lemon halves to the skillet; transfer to the oven and roast, uncovered, until the chicken is cooked through and the skin is crisp, 20 to 25 minutes.

Monday, August 04, 2014

Double Chocolate Carrot Cake with Mocha Frosting

This LCBO recipe concludes the carrot cake saga (the first installments were in French: here, here, and here). I was saving this particular recipe for Montreal because it calls for cream and mascarpone, the latter of which I had to make myself – so really, a lot of cream, but all lactose-free thanks to the options we’ve got in Quebec.

To make mascarpone cheese, I used this post on Purple Foodie. In a nutshell, a liter of cream and about 2 tablespoons of lime or lemon juice will yield 2 cups of mascarpone cheese. It’s a lot like making ricotta, really. I have to say I found the mascarpone bland, but then again, it wasn’t meant to be eaten on its own. You can add more citrus juice if you feel like it’s not curdling enough. (I used 1 ½ cups of mascarpone for this recipe, and the rest went into a pumpkin cream pie with maple whipped cream. Let’s just say I’m happy that I’m not getting my cholesterol levels tested in the near future.)

For the lactose-free mascarpone
1 liter (4 cups) lactose-free cream
1 ½ limes, juiced (about 2 Tbsp. juice; or more, see note above)

Heat the cream to 190 °F over a double boiler, stirring it every little while. It took about 15 minutes to reach this temperature.

Squeeze in the lime juice and stir so that it is mixed evenly. The mixture will curdle. Keep mixing until the cream starts to thicken, then take off the heat and let sit about 20 minutes to cool.

Pour the mixture into a sieve lined with cheesecloth set over a bowl, to drain off the whey. Let it sit on the counter until it is at room temperature, then refrigerate for at least 24 hours, or ideally 36 hours. This will yield about 600 grams (about 2 cups).


Then I got started on the cake. The unexpected combination of chocolate, coffee and carrots really works, thanks to the warm spices traditionally associated with carrot cake. I found the frosting a bit too liquid, but it might be because I made my own mascarpone cheese, because I overmixed it or because I didn’t refrigerate it long enough. In any event, the cake was delicious! It earned the Engineer’s seal of approval, too.

For the cake
5 cups grated carrots
2¼ cups all-purpose flour
2 tsp. baking powder
1 tsp. baking soda
1 tsp. salt
1 tsp. cinnamon
¼ cup cocoa
4 oz. (125 g) semi-sweet chocolate
¼ cup lactose-free milk
¾ cup vegetable oil
1¼ cups granulated sugar
4 eggs
2 tsp. vanilla

For the frosting
1½ cups mascarpone cheese
1 cup cold lactose-free cream
2 Tbsp. instant coffee granules
1 tsp. vanilla
2 cups sifted icing sugar

Preheat oven to 325 °F. Spray or lightly oil two 8- or 9-inch (2- or 2.5-L) square cake pans.

Place flour in a large bowl. Sprinkle with baking powder, soda, salt, cinnamon and cocoa. Stir until blended, then make a well in the center. Separately, coarsely chop chocolate and place in a small microwave bowl or saucepan. Add milk.

Combine oil, sugar, eggs and vanilla in a medium bowl. Using an electric mixer, beat on medium speed for 3 minutes. Microwave chocolate and milk combo on medium for 1½ minutes. Stir, then heat on medium for 1 more minute. Stir until smooth. Or on stovetop, stir over low heat until chocolate is melted. Pour into cake batter while beating on low speed. Scrape into well in flour mixture and stir with a spoon or spatula until even in color. Stir in carrots. Batter will be thick.

Divide batter between pans, adding about 3 cups to each. To remove air pockets, bang pans on counter 5 to 6 times. Bake until centers seem set when lightly tapped and cakes start to come away from sides of pans, 35 to 38 minutes. Remove pans to a baking rack to cool. After about 15 minutes, turn cakes out of pans and finish cooling on racks. It’s best to bake cakes a day ahead of icing and leave at room temperature overnight.

Place mascarpone in a bowl. Microwave ¼ cup cream in another small bowl or heat in a small saucepan until bubbles appear around edge. Stir in coffee until dissolved. Then, beating mascarpone on low, gradually add hot coffee-cream. As soon as no lumps remain, beat in cold cream and vanilla. Gradually beat in icing sugar. Beat about 30 seconds. Beating too much will cause thinning. Refrigerate until frosting has a good spreading consistency, about a half-hour, before icing cake.

To assemble, place 1 cake, flat-side up on a platter. Generously spread with icing, leaving a narrow border of cake around the edge. Top with the second cake, flat-side down and gently press down. Smoothly spread icing over the sides of the cake, then the top. Garnish top of cake with shaved chocolate, if desired. It’s best to refrigerate several hours or overnight before serving.

Monday, July 28, 2014

Sweet Potato, Kale and Sausage Bake with White Cheese Sauce

This recipe is perfect for a cold, rainy day like today. I originally made it with some frozen kale, but I’ve since decided to boycott bags of pre-chopped kale altogether. You see, for some reasons, the kale in those bags is always chopped with the stem, so I have to spend extra time picking out the tough bits from my food, which is actually longer than washing and chopping my own kale. Plus, fresh kale tastes better anyway, so that’s what I’d recommend. I cut my sweet potatoes a little too big to my taste, too; I’d do even smaller cubes next time, maybe ½”. I actually didn’t find the sauce cheesy enough, and I had to use a cornstarch slurry to thicken it. I’m therefore changing the measurements of broth from 2 cups to 1 ½ cups below, to counteract that problem (this will also make a more realistic amount of sauce for the dish). I’m also adding salt and pepper to the ingredients, because I thought it was a little bland. In the end, this was a comforting dish, and while it took a little time to grow on me, it eventually did; the Engineer gave it his seal of approval.

2 tsp. olive oil
2 medium sweet potatoes, peeled and cubed (3-4 cups; I’d go with ½” cubes)
16 oz. Italian pork or chicken sausage, cut into small rounds
salt and pepper, to taste
1 ½ cups low sodium chicken broth
¾ cup lactose-free milk, divided
¼ cup flour
¾ cup shredded lactose-free Gruyère cheese, divided
2 cups finely chopped kale (see note above)

Heat the olive oil in a large pan over high heat. Add the sweet potatoes, Italian sausage, salt and pepper. Shake to coat in oil, let sit for a few minutes to brown, and shake the pan gently again to move everything around. Repeat until the sweet potatoes and sausage both have golden brown exteriors. Toss with the kale and transfer to a greased 9”-square baking dish.

Meanwhile, preheat the oven to 350 °F. Bring the broth and ½ cup milk to a low boil, then turn the heat to keep it at a low simmer. Whisk the flour and remaining ¼ cup milk to form a thick paste. Add this to the broth, whisking to keep the sauce smooth. Add ¼ cup Gruyère and stir until melted.

Pour the sauce over the sweet potatoes, kale, and sausage in the baking dish. Top with remaining ½ cup cheese and bake for 10 minutes or until the sauce is bubbly and the cheese is melted.

Biscuits-sandwichs rouge velours


Cette recette est tirée de Coup de Pouce, et j’ai profité de la crème sans lactose au Québec pour goûter à ça… Il s’agit en gros de whoopie pies à saveur red velvet. J’ai dû utiliser du yogourt grec sans lactose au lieu de la crème sure, et j’ai ajouté le sucre en poudre directement dans la crème au lieu de le saupoudrer sur les biscuits. Le défaut de la recette est qu’il y a beaucoup trop de crème pour remplir les biscuits et que je trouvais celle-ci un peu trop liquide à mon goût. Elle était fade au début, mais une fois les sandwichs faits, c’était très bon, surtout après une journée au frigo! Les biscuits rouge velours étaient moelleux et excellents avec ou sans crème, soit dit en passant. J’ai eu un rendement de 24 biscuits-sandwichs.

2 tasses de farine
2 c. à soupe de poudre de cacao non sucrée
½ c. à thé de bicarbonate de sodium
1/8 c. à thé de sel
½ tasse de beurre ramolli (ou de margarine froide)
2/3 tasse) de cassonade tassée
1 œuf
1 bouteille de colorant alimentaire rouge (1 oz/30 ml)
1 c. à thé de vanille
½ tasse de babeurre (lait sans lactose avec 1 ½ c. à thé de vinaigre)
1 tasse de crème sans lactose fouettée
¼ tasse de crème sure sans lactose ou de yogourt grec sans lactose
2 c. à thé de sucre glace

Préchauffer le four à 375 °F. Tapisser deux plaques à biscuits de papier parchemin.

Dans un bol, mélanger la farine, le cacao, le bicarbonate de sodium et le sel. Réserver.

Dans un grand bol, à l'aide d'un batteur électrique, battre le beurre et la cassonade jusqu'à ce que le mélange soit léger et gonflé. Incorporer l'œuf, le colorant rouge et la vanille. En battant à faible vitesse, incorporer les ingrédients secs réservés, en alternant avec le babeurre, jusqu'à ce que la pâte soit homogène, sans plus.

Laisser tomber la pâte, 1 c. à thé comble à la fois, sur les plaques, en espaçant les biscuits d'environ 1 po (2,5 cm). Déposer une plaque sur la grille supérieure du four et une autre sur la grille inférieure. Cuire de 5 à 7 minutes ou jusqu'à ce que le dessus des biscuits soit ferme au toucher (intervertir et tourner les plaques à la mi-cuisson). Déposer les plaques sur une grille et laisser refroidir pendant 1 minute.

Déposer les biscuits sur la grille et laisser refroidir complètement. (Vous pouvez préparer les biscuits jusqu'à cette étape, les laisser refroidir et les mettre dans un contenant hermétique, en séparant chaque étage d'une feuille de papier ciré. Ils se conserveront jusqu'à 2 jours à la température ambiante ou jusqu'à 2 mois au congélateur.)

Dans un petit bol, mélanger ¼ tasse de la crème fouettée et la crème sure avec le sucre glace. Incorporer le reste de la crème fouettée en soulevant délicatement la masse. Étendre la garniture à la crème fouettée sur le côté plat de la moitié des biscuits refroidis. Couvrir du reste des biscuits, le côté plat dessous. (Vous pouvez préparer les biscuits-sandwichs à l'avance et les mettre dans un contenant hermétique, en séparant chaque étage d'une feuille de papier ciré. Ils se conserveront jusqu'à 1 semaine au réfrigérateur.)

Spinach Salad with Chicken, Avocado and Goat Cheese

It’s probably a sign that I’m spending a good summer if I can’t find the time to write here. Granted, I’ve spent a certain amount of time without the internet, and then there was this year’s edition of SummerFest, with internet but without time or motivation to blog (more on that vacation later). My vacation time is running out, though, so I’d like to catch up on that backlog of recipes… This one’s easy, but I found it incredibly satisfying. I made this salad with spinach, though my favorite is usually arugula, and I imagine it would be great with finely chopped kale, too. The addition of tomatoes, corn and toasted pine nuts was divine! I served the Engineer’s plate without goat cheese, since he doesn’t like it, but if I’d had feta on hand I would have given him that instead. The following makes 4 small servings.


For the salad
8 cups chopped spinach (1 bag)
1 cup halved cherry tomatoes
½ cup corn (frozen, canned, or cut off the cob)
1 ½ cups chopped cooked chicken (I used 2 breasts, but would add more next time)
1 large avocado, sliced (I used 2)
1/3 cup lactose-free goat cheese, or more (to taste)
¼ cup toasted pine nuts

For the dressing
3 Tbsp. white wine vinegar
2 Tbsp. extra-virgin olive oil
1 Tbsp. Dijon mustard (or a bit less, to taste)
salt and freshly ground black pepper, to taste

Place spinach in a large salad bowl. Add remaining salad ingredients (though I always recommend slicing and adding the avocado only when serving).

In a small bowl, whisk together the dressing ingredients. Pour over each serving as needed.

I served this with dark and *very* chocolaty cupcakes for dessert. I topped one of them with red honey-roasted peanuts, for color, though they are nut-free.

Saturday, July 12, 2014

Product reviews

- I tried a new-to-me chocolate company called Madécasse. It’s the only company I know of that not only sources its cocoa beans in Africa, but actually makes the chocolate over there, too (Madagascar, to be precise). This is even better for local communities than fair trade! The bar I tried was Sea Salt and Nibs, which I thoroughly enjoyed. I usually have reservations with chocolate bars that contain solid bits, but this worked really well! And it was delicious to boot. It also won “Best in show” at the Paris Salon du Chocolat, apparently.


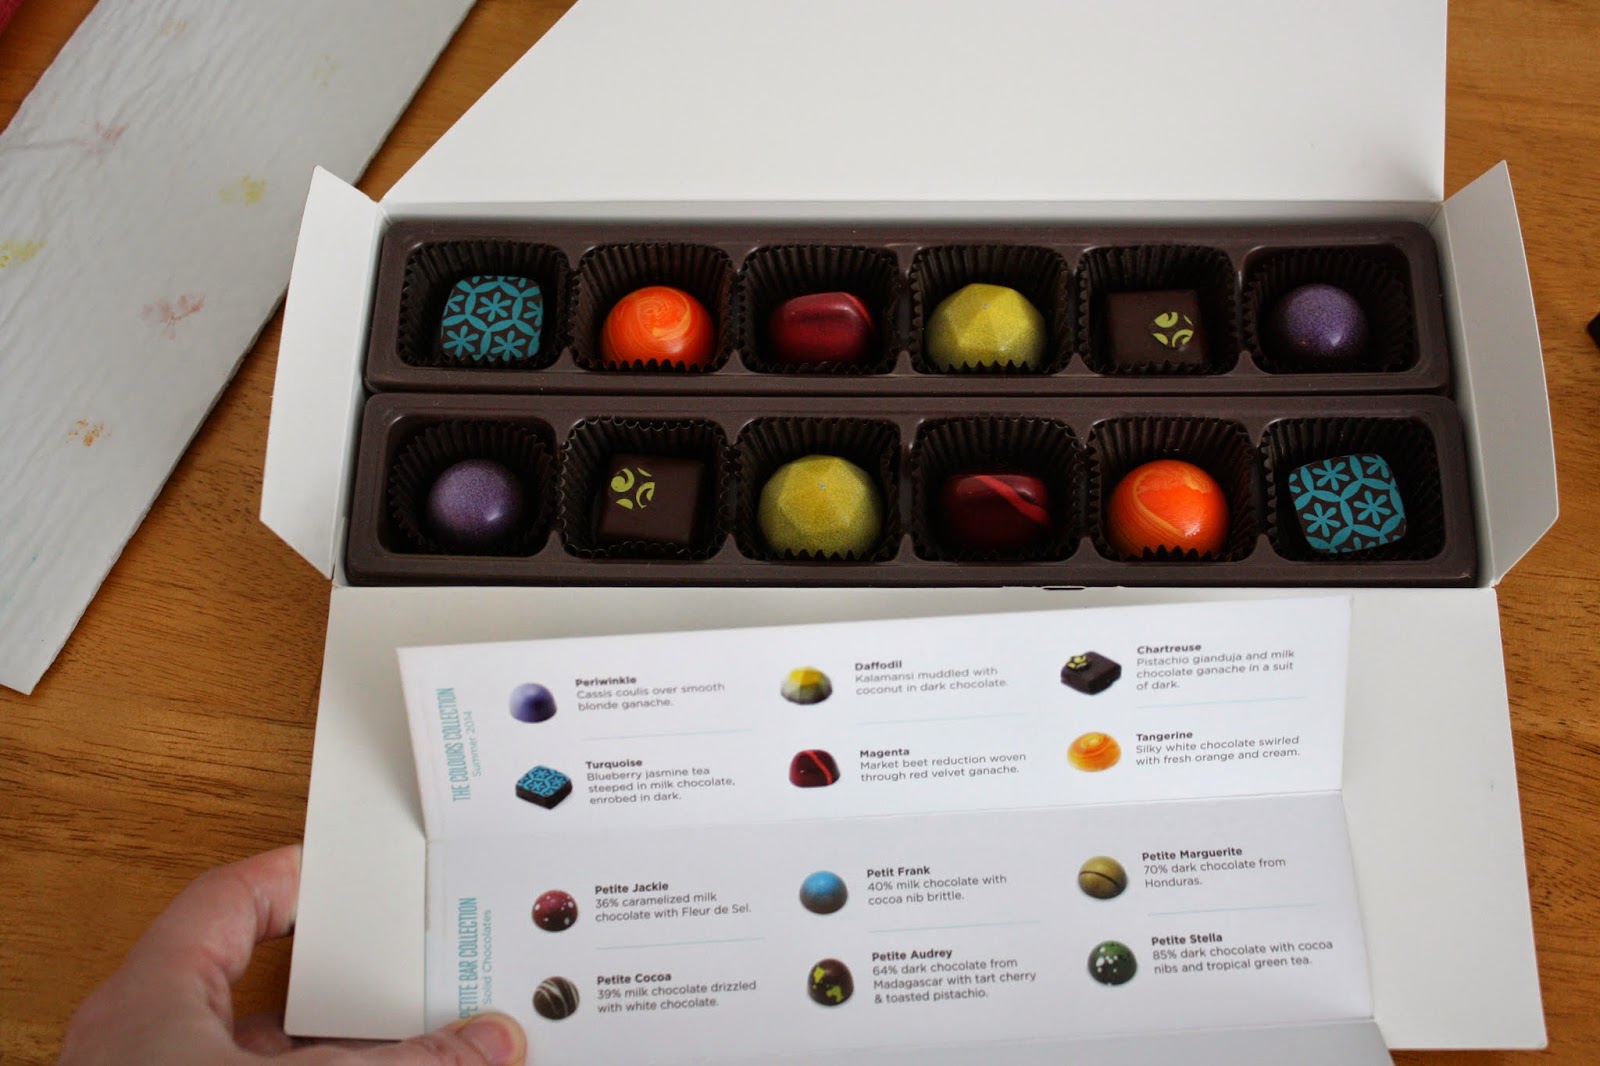
- I finally got to try chocolates from Jacek Chocolate Couture this summer. I’d heard about them a few years ago, when they were declared among the top 10 chocolatiers in North America – pretty good for what was then essentially a mom working out of her basement! Jacqueline Jacek creates collections of chocolates throughout the year, using fresh ingredients (which means that the chocolates don’t keep very long). I love the flavor combinations that she comes up with! That being said, the availability of those collections is what tripped me up at first: I could only order them when I was in Canada (you wouldn’t want to ship these across the border in the summer heat!), but the collection available at whatever time I was there didn’t always suit me (for example, one Christmas it contained mint, and I hate the combination of chocolate and mint, so I didn’t order any). And I have seen collections that I would have loved (I remember one involving saffron), but it was in the middle of a Texan heat wave, so that would have been a bad idea. This summer, though, it worked out perfectly: I got truffles from the colours collection, which suited my tastes perfectly! I ordered them during a week of cooler, rainy summer weather, so it was perfect (I was surprised not to see an option for insulated packaging on the website, I have to say).

First, a word about allergens: they are all over the place. Tree nuts, soy, gluten, egg and dairy. The truffles actually contain lactose, too, but because I only had one or two a day to make them last longer, it was fine for me. I’ll present a succinct description of each with a picture. And let me just say that I LOVE this collection!

The Daffodil (kalamansi muddled with coconut in dark chocolate) gave me an immediate burst of strong citrusy taste. For those who haven’t heard of kalamansi – and up until two weeks ago, I was one of them – it is in fact a citrus also called calamondin. It’s great!


Chartreuse (pistachio gianduja and milk chocolate ganache in a suit of dark) was smooth, with just the right amount of sweetness.


Tangerine (silky white chocolate swirled with fresh orange and cream) was way better than I thought! I was expecting an orange creamsicle flavor, which I’m not usually fond of, but this one is smooth, with a real citrus flavor, and is among the best white chocolate I’ve ever had.


Periwinkle (cassis coulis over smooth blonde ganache) was both smooth and sharp and made me exclaim, “Wow!”


Turquoise (blueberry jasmine tea steeped in milk chocolate, enrobed in dark) had real blueberry flavor and was so good! It was my favorite of the bunch.


Magenta (market beet reduction woven through red velvet ganache) tasted a bit less like either of the flavors I would have expected; the red velvet was almost ethereal, and the beet was very subtle. It was great nonetheless.


- I also want to give a quick shout-out to Hot Cakes’ vegan caramel sauce, made with coconut and hemp milks instead of dairy. It was really, really good. It’s great for people who enjoy caramel sauce as a condiment, though I would have to say that it doesn’t always adequately replace caramel in recipes (like these salted caramel brownies, which were better when following the recipe than when using pre-made sauce).


- I tried a dairy-free frozen dessert, Strauss Fantasia Chocolate Vanilla, which has wafers of chocolate throughout. It reminded me of an ice cream cake my parents occasionally bought when I was a child. Unfortunately, in this case, I liked the idea of it more than its execution. The dessert was somewhat bland.


- On the bright side, Tofutti has so many awesome products I hadn’t seen yet! I recently tried these caramel sundae cones that were awesome. It’s the kind of dessert that us lactose-intolerant folks get to miss: a waffle cone, covered in chocolate on the inside, vanilla “ice cream” with a core of caramel, dipped in chocolate and topped with crunchy bits… My only complaint (which may have more to do with my own freezer than anything else) is that the cone was a bit soggy. But it was delicious!


- The bowl of my food processor broke last spring, so I rushed online to look for new processors. I was very disappointed to see that of Cook’s Illustrated’s top picks, one had been discontinued and another was by a brand I dislike (user comments on Amazon confirmed my suspicions). What struck me was that I felt like none of the new models I looked at had all the functions of my trusty 12-year-old Braun! Since I didn’t have time to carefully consider options and do more research (I use my food processor a lot and needed a replacement quickly), I ended up just buying a replacement bowl. I had to find it myself on Amazon, because I admit that Braun’s customer service never got back to me, but it seems like the updated version of my model is the Combimax 650. The new bowl fits, and I’ve been very happy with my purchase, which was definitely less expensive than a new processor – not to mention, the processor itself still works just fine! I am curious to know, though, if any of my readers have a processor they really love? America’s Test Kitchen now recommends this one, but I’m skeptical.

- Finally, I want to share a line of jewelry I discovered, Chewbeads. It’s made of silicone and doesn’t have any detachable parts, so it’s safe for babies to chew on. I read comments online that the necklaces sometimes snag on long hair, so I ended up getting a bracelet and it’s basically the only one I wear around the Little Prince now. He does have a habit of chewing or pulling on jewelry, so I hardly wear anything I own anymore, but this is one cute accessory that he can pull on all he wants and I don’t worry one bit about him breaking it or swallowing something he shouldn’t. I love this line of jewelry!

Monday, July 07, 2014

Goat Cheese Tomato Quiche


I got this recipe from Life Is a Feast. I wasn’t too sure about it, because tomatoes can release a lot of water when cooked, so they aren’t always the best additions to quiches. I changed the recipe a bit because I made a single, 9-inch quiche instead of several small ones, so I used only one tomato instead of two. I also added a handful of grated parmesan. I loved the result! The Engineer didn’t like it, but he doesn’t like goat cheese to begin with, whereas I was incredibly happy to have lactose-free goat cheese! Note that I bought a pre-made tart shell for this, but you can make your own.

3 large eggs
1 cup lactose-free whole milk
salt and freshly ground black pepper
a dash of nutmeg
1 log of lactose-free goat cheese
1 handful of grated parmesan (optional)
2 ripe tomatoes, sliced to a thickness of about ¼ inch (I used only 1)
1 9-inch tart shell

Preheat the oven heat to 375 °F.

Whisk the milk with the eggs until well blended. Season with salt, pepper and a dash of nutmeg.

Place one ¼-inch or so thick round of goat cheese in the pastry shell and then top with a slice of tomato; repeat. (In my case, the lactose-free goat cheese has to be crumbled, so I just spread out the crumbles as evenly as I could.) Add the parmesan, if using. Fill the pastry shell with the egg filling. Slide quiche into the oven and bake for about 40 minutes or until the filling is puffed up and set. The top – or at least the edges – should be a deep golden color.

Chocolate Peanut Butter Icebox Cake


I got the idea to make icebox cake while listening to this episode of Spilled Milk, and since I have lactose-free cream here in Quebec, I am living it up! I settled on this chocolate peanut butter version by Martha Stewart, which is fa-bu-lous. We both had seconds. Icebox cakes are stupid-easy to make, and the flavoring of the cream with peanut butter kept things simple, yet interesting. Plus, chocolate and peanut butter are a great pairing to begin with! I loved this cake and I’ll be sure to make it once in a while in Quebec. (Note that I couldn’t add the cookies on top of the cake as decoration, because the Engineer had snacked on exactly three chocolate wafers before I could stop him. *grumble* A package of those wafers really does have a standard number that is used in icebox cake recipes!)

2 cups lactose-free cream, well chilled
1/3 cup confectioners' sugar
1/3 cup smooth natural peanut butter (not unsalted)
1 box (9 oz.) chocolate wafer cookies

In a large bowl, whip 1 ½ cups cream with sugar until soft peaks form.

In a small bowl, whisk peanut butter until soft and smooth; whisk in ½ cup cream until light and fluffy. Fold peanut-butter mixture into whipped cream until incorporated.

Dab the bottom of 6 cookies with a very small amount of cream mixture and arrange in a circle on a serving plate; place 1 cookie in the middle of circle. Top with roughly ¾ cup cream mixture, spreading outward to cover all but outer edges of cookies. Repeat process five more times (staggering the cookie layers), ending with cream. Cut 3 cookies in half; decorate top of cake with cookie halves (I usually keep the broken cookies in the box for this purpose).

Refrigerate cake at least 8 hours (or up to overnight). To serve, cut into wedges with a serrated knife.

Thursday, July 03, 2014

Batch of links

- A selection of new food products that seems just delightful!

- What is sushi-grade fish? This is important to know (and if you fishmonger doesn’t seem to know, don’t eat his fish raw!).

- The three foods food experts won’t eat – The Engineer will feel vindicated to see sprouts on that list, albeit for entirely different reasons than he might think.

- More proof that gluten-free dining in Italy is easier than almost anywhere else.

- Rethinking the word “foodie”, which does seem to have a negative meaning. To me, it means “someone who enjoys food”, and that’s probably 95% of the people I’ve met.

- Also, 8 words nutrition experts wish you would stop saying about food.

- An article by Michael Ruhlman about our carb confusion, and why we should say that food is “nutritious” instead of “healthy”.

- Did you know there are edible cupcake wrappers?

- The proper way to cut a cake, if you don’t mind stomping on tradition.

- A group of San Francisco hospitals is revamping its menus with food that is healthier, more sustainable and savory. I feel that hospitals have the biggest mission to do this (and given what I ate when in the hospital last summer, I wish all facilities would follow suit.)

- Tesla Motors has given up all its patents, and I can’t wait to see what creation this generates.

- Journalist Esther Honig asked over 20 Photoshop artists from all over the world to alter her picture and make her “beautiful”, whatever that meant for them. The results are very interesting, as it seems that no one quite agrees, and some artists modified her picture a lot! It won’t surprise anyone that the more natural-looking shots are my favorite, including the original, undoctored one.

- And here are my thoughts on the big issue of the moment. The SCOTUS issued a ruling Monday that despite federal law, certain closely-held, for-profit companies don’t have to cover contraceptives with their health insurance – they can claim a religious exemption. I was following this pretty closely because of the suit brought on by Hobby Lobby (which I am still boycotting, more to my detriment than theirs). The judges were split 5-4, and interestingly, all three women were in the minority who believed that an employer’s religion should not matter as much as an employee’s. The reason I say this is because I still believe that while people are entitled to their own beliefs, one cannot impose one’s beliefs on others. So if one doesn’t believe in birth control, then one has the right not to use it, but not to right to prevent others from using it. As Seth Rogen tweeted, “People love defending people’s rights to deprive other people of their rights.”

I am also appalled that Hobby Lobby and others have been granted the right to decide whether a particular birth control method is an abortifacent. They’ve decided that IUDs are abortifacents and so won’t cover them, but even if one were to accept “preventing the implantation of a fertilized egg in the uterus” as a definition of an abortion (which it isn’t, but let’s say so for the sake of the argument), that’s not actually how IUDs work. IUDs are one of the safest, most used form of reversible long-term birth control, which is a scientific fact not up for debate. On that topic, I strongly recommend this article which deconstructs the most common conservative arguments in favor of the ruling, and I’d also like to point out that despite all this, Hobby Lobby continues to invest 401(k) funds in companies that, according to their own stated religious beliefs, provide aborticafents.

Within 24 hours, 82 companies had announced that they would also consider dropping birth control coverage. (While Hobby Lobby was initially opposed only to some forms of birth control like emergency contraceptives, it appears that some companies are now opting out of any and all forms of birth control coverage.) The original SCOTUS decision impacted 15,000 employees, though I don’t know how many would be un-covered by the 82 lying in wait so far. That being said, closely-held for-profits are about 90% of companies in America, employing about half the workforce – not that they would all want to deny birth control coverage, but this just gives you an idea of how far this ruling could reach. Plus, the court has specifically ruled that it will not inquire into religious claims, so setting this precedent could be very dangerous indeed. What about religions that don’t believe in antidepressants or vaccines? This article explains the downfalls of the ruling.

Wednesday, July 02, 2014

Buckwheat Rhubarb Scones


I almost skipped over a bunch of recipes because I don’t have good pictures. Like the decadent croissant French toast or the delicious, albeit in my case homely, hazelnut pavlova with vanilla-scented rhubarb. But I figure I should post one more rhubarb recipe this year, so rhubarb scones it is! The pairing is actually a great idea, since rhubarb and buckwheat are in the same family. It’s originally a gluten-free recipe, and I have to admit that looking at the pictures from the original post, those scones look way better than mine. However, since I am not in my regular home with my regular pantry, I didn’t have what I wanted to make a gluten-free flour mix and ended up using the equivalent weight of wheat flour. The scones were still very good, but felt more like cake than scones.
The recipe called for rhubarb jam, so I adapted this rhubarb jam recipe by scaling it down, to yield one jar of it (enough for the recipe and then some).

I served the scones with leftover jam and rhubarb curd.

For the rhubarb jam
1 lb. rhubarb
1 cup sugar
1/3 cup water
½ lemon, juiced, seeds reserved in a cheesecloth pouch or tea ball

Place a small plate in the freezer.

Place the rhubarb, sugar, water, and lemon juice, spent half, and seeds (they provide the necessary pectin) in a large bowl and set aside at room temperature for 1 hour.

Pour the contents of the bowl into a large pot and bring to a boil over medium-high heat. Continue to cook, stirring the jam constantly, for about 15 minutes. Skim the foam from the surface as the jam cooks.

Drop the heat to medium. Hold the jam at a constant simmer, checking frequently to make sure the jam isn’t scorched at the bottom of the pot. After 15 minutes, check to see if your jam has set by placing a small spoonful of jam on the plate from the freezer. The rhubarb jam is set when it holds its shape on the cool plate. If it seems loose, continue cooking over medium-low heat until set.

Remove the seed bag and lemon half and discard. Place the rhubarb jam in a jar.


For the scones
115 g. buckwheat flour
140 g. gluten-free all-purpose flour mix (or all-purpose wheat flour)
¼ cup dark brown sugar
2 tsp. baking powder
½ tsp. baking soda
1 ¼ tsp. kosher salt
115 g. (1 stick) cold unsalted butter or vegan margarine, cut into ½-inch pieces
½ cup buttermilk (lactose-free milk with a splash of lemon juice)
1 large egg, at room temperature
½ cup rhubarb jam (see above)

Preheat the oven to 350 °F. Line a baking sheet with parchment paper.

Sift together the buckwheat flour, gluten-free all-purpose flour mix, brown sugar, baking powder, baking soda, and salt in a large bowl. Add the cold butter pieces to the dry ingredients. Use your hands to work the butter into the flour, slowly, until the butter is the size of lima beans. Move as quickly as you can without becoming frantic.

In a small bowl, whisk together the buttermilk and egg. Dribble them into the buttery dough. Stir with a rubber spatula until the dough comes together fairly well. It might still be dry in places and it should not look like a coherent dough ball. However, if you can pinch some of it between your thumb and fingers, and it holds together, you’re ready. (If the dough is still too dry, dribble a tablespoon of buttermilk at a time and stir until the dough feels right.)

Sprinkle a little extra gluten-free all-purpose flour mix onto the counter. Carefully, plop the dough onto the floured counter. Move the dough between your hands, folding and twisting it around, until it’s a ball of dough. Cut the ball in half. Pat each ball of dough into a disc about ¾-inch thick and 7 inches across.

Put one disc of dough onto the baking sheet. Spread the rhubarb jam onto the disc of dough carefully, leaving about 1 inch of space on the edges. Put the other disc of dough on top. Using a sharp knife, cut the scone dough into 8 wedges. Spread them out a bit on the baking sheet.

Bake the scones for 10 to 12 minutes, then rotate the baking sheet. Bake until the scones are golden-brown on top and the jam and rhubarb have bubbled onto the baking sheet, about another 10 to 12 minutes. Remove the baking sheet from the oven. Allow the scones to sit for 10 minutes, then move them to a cooling rack.

Tuesday, July 01, 2014

Pâtes, sauce rosée


Vous le savez, je cherche depuis longtemps une recette de sauce à la crème et à la vodka sans lactose. Ma recette préférée, celle de Rachael Ray, contient de la crème. Je n’ai pas tout à fait réglé mon problème, dans le sens où la recette que je présente ici est sans lactose, mais en fait, il faut de la crème sans lactose pour la faire… J’ai donc deux recettes que je peux faire sans lactose au Québec, mais pas au Texas pour l’instant. De plus, la recette ci-dessous ne contient même pas de vodka, alors en y repensant, je me demande s’il ne s’agit pas plutôt d’une sauce parma rosa! N’empêche, elle est tout aussi facile que celle de Rachael Ray et convient aux femmes enceintes comme à celles qui allaitent ainsi qu’aux bébés qui apprennent à manger solide. De plus, la crème fouettée donne une sauce tout à fait onctueuse! Il s’agit d’une recette de Buddy Valastro (le chef pâtissier de Cake Boss), qui l’a partagée à l’émission de Nate Berkus il y a deux ans en appelant ça des rigatoni alla vodka. Je ne vous donne pas de lien, car le site n’est plus en ligne, mais voici la recette… Je l’ai faite avec des fusilli, mais des penne rigate seraient très bons aussi. Je préfère mélanger les pâtes à la sauce juste avant de servir, pour que les restes soient meilleurs le deuxième jour (réchauffez les pâtes dans de l’eau chaude, et la sauce, dans le chaudron, puis égouttez les pâtes et mélangez).

1 lb. de rigatoni (ou de pâtes courtes à votre choix, sans gluten au besoin)
huile d’olive extra-vierge
½ petit oignon, en dés
6 tranches de prosciutto ou de pancetta, finement tranchées
3 gousses d’ail, émincées
sel et poivre du moulin, au goût
1 grosse boîte (28 oz.) de tomates concassées
1 c. à soupe de sucre
1 tasse de crème sans lactose
quelques feuilles de basilic
un peu de parmesan, pour garnir

Porter un chaudron d’eau à ébullition. Y ajouter du sel et y faire cuire les pâtes al dente.

Pendant ce temps, faire chauffer de l’huile d’olive dans une grande casserole. Ajouter l’oignon et le faire cuire jusqu’à ce qu’il commence à devenir translucide. Ajouter le prosciutto et l’ail et assaisonner de sel et de poivre. Faire cuire une minute (ou un peu plus si vous voulez que la viande soit parfaitement cuite). Ajouter les tomates et le sucre et faire cuire 15 minutes.

Dans un bol, fouetter la crème jusqu’à ce qu’elle forme des pics. L’incorporer délicatement à la sauce tomate.

Égoutter les pâtes et ajouter la sauce (voir la note ci-haut). Mélanger et assaisonner au besoin. Ajouter le basilic et les pâtes et servir immédiatement.

Wednesday, June 25, 2014

Chocolate-Caramel Cake with Fleur de Sel


I forgot to highlight my 1200th post, but 1212th is a good number, too! I’d been eyeing this cake on Bon Appétit for a while, and waiting for lactose-free cream to make it really paid off. The cake wasn’t entirely lactose-free, because I did use butter for the frosting. (If you cut this rich cake in 12 pieces, it’s about 2 Tbsp. of butter per serving, so I used Lactaid. I did recently get my hands on a good vegan frosting recipe with shortening and butter extract instead of butter, but haven’t gotten around to using it as a base to adapt yet.) The frosting was like the center of a Lindt truffle – it was absolutely delicious! The crumb was light and moist (thanks to the mayonnaise), the caramel in the frosting was subtle, and the fleur de sel was the perfect addition. The Engineer called this cake “stellar”, and I’m inclined to agree. The recipe recommends chilling the cake if it won’t be served right away; while I found that chilling it a few hours was fine, beyond that, the frosting hardened too much for my taste, so I like to let it come to room temperature a bit before slicing.

For the cake
2¼ cups all-purpose flour
¾ cup natural unsweetened cocoa powder
1¾ tsp. baking powder
¼ tsp. baking soda
½ tsp. kosher salt
3 large eggs
1½ cups sugar
1¼ cups mayonnaise (not low-fat)
1 Tbsp. vanilla extract
1⅓ cups lukewarm water

For the frosting and assembly
12 oz. bittersweet chocolate, chopped
¾ cup sugar
1 Tbsp. light corn syrup
¼ cup water
1 cup lactose-free cream
1½ cups (3 sticks) unsalted butter, room temperature
¾ tsp. flaky sea salt (such as Maldon)
extra-virgin olive oil (for drizzling; optional, and I didn’t use it)

For the cake
Preheat oven to 325 °F. Lightly coat cake pans with nonstick spray and line bottoms with parchment paper; spray again. (The original recipe called for 8” round cake pans, but I used 9” round pans.)

Whisk flour, cocoa powder, baking powder, baking soda, and salt in a medium bowl.

Using an electric mixer on high speed, beat eggs and sugar until pale and doubled in volume, about 4 minutes. Add mayonnaise and vanilla and beat until just combined. With mixer on low speed, add dry ingredients in 3 additions, alternating with water in 2 additions, beginning and ending with dry ingredients. Scrape batter into pans, dividing evenly.

Bake cakes, rotating halfway through, until a tester inserted into the centers comes out clean, 25–30 minutes. Transfer pans to wire racks and let cool 20 minutes before turning out onto racks. Let cool completely.

For the frosting and assembly
Put chocolate in a medium bowl. Bring sugar, corn syrup, and water to a boil in a small saucepan over medium-high heat, stirring to dissolve sugar. Boil, swirling pan occasionally and brushing down sides with a wet pastry brush, until mixture turns a deep amber color, 10–12 minutes. Remove from heat and whisk in cream (mixture will bubble vigorously). Return to medium heat and cook, stirring, until smooth, about 2 minutes. Pour caramel over chocolate and stir until mixture is smooth; let cool, stirring occasionally.

Using an electric mixer on medium-high speed, beat chocolate mixture, gradually adding butter, until frosting is thickened and smooth, about 1 minute. Chill, stirring occasionally, until stiff enough to spread easily, 20–25 minutes.

Place 1 cake layer on a cake stand or platter. Spread 1 cup frosting over to come just beyond edges. Sprinkle with ¼ tsp. salt and place second cake layer on top, pressing down gently. Repeat process with 1 cup frosting and ¼ tsp. salt. Place third layer on top, and spread remaining frosting over top and sides of cake. (Cake can be made 1 day ahead. Cover and chill.)

Just before serving, sprinkle remaining ¼ tsp. salt over top of cake; drizzle slices with oil, if desired.

Monday, June 23, 2014

Sweet Potato Crisp

I’d been meaning to make this sweet potato crisp for a while, but never got around to it. Then I decided that it would make a good side (colorful vegetable!) to a chicken dish we were having, plus, the Little Prince would definitely like it if I omitted the alcohol (which I did, obviously). As I was reading the ingredients, I realized that it called for a bit of cream, which I can get lactose-free here, so that sealed the deal! (I don’t think the cream is essential, though, so you could use lactose-free milk instead or omit it entirely.) I halved the recipe, since I had no army to feed, used vegan margarine instead of butter, and made it in an 8”x8” dish. It was lovely! I really enjoyed the contrast of the crunchy top and creamy insides, along with the sweet and salty in this dish. The Engineer first said that he liked it, then upgraded his statement to say that he loved it! Note that if you wanted a thicker, more substantial crust, you could double the amounts of topping ingredients and still use the same dish.

For the potatoes
2.5 lbs. sweet potatoes, peeled and cut into 1 ½” cubes
4 Tbsp. unsalted butter, room temperature (or vegan margarine)
¼ cup lactose-free cream
1 Tbsp. maple syrup
salt (to taste)

For the crisp topping
6 Tbsp. all-purpose flour
6 Tbsp. cup old-fashioned rolled oats
6 Tbsp. chopped walnuts (pecans would be good, too)
6 Tbsp. brown sugar
¼ tsp. ground cinnamon
pinch salt
3 Tbsp. unsalted butter or vegan margarine, melted

Preheat the oven to 350 °F.

First, start the sweet potatoes: Place the potatoes in a large pot, and add cold water to cover. Bring to a simmer and cook until very tender, about 20 minutes. Drain potatoes, return to the pot, and mash with the remaining potato ingredients. Purée in batches in a food processor until very smooth, and transfer to a 9”-square (or similar) baking pan. (I simply mashed the potatoes and didn’t use any blade action at all, so don’t worry if you don’t feel like taking out your food processor for this.)

While the potatoes cook, mix the topping ingredients in a medium bowl until well blended. Scatter the topping over the potatoes and bake for about 30 minutes, until the topping has browned. Serve warm.

Note: Both the sweet potatoes and the crisp topping can be made ahead and refrigerated up to 3 days in advance. To serve, bake the sweet potatoes for 20 minutes, add the topping, and bake another 40 minutes.