Another batch of links, this one designed to give you a laugh:
- A point/counterpoint regarding computer users: Via The Onion; contains coarse language, but makes me laugh.
- The four levels of social entrapment: Via Hyperbole and a Half. So true.
- Why I’ll never be an adult: Also via Hyperbole and a Half. I could have written this; it’s me exactly.
- A visual diary of a red-eye flight between New York and Berlin: Excellent.
Et pour les francophones:
- Le générateur de biographies, qui vous invente une vie de vedette;
- Il fait beau dans l’métro, la première pub valorisant le métro de Montréal, datée 1976. Elle me fait sourire à tout coup!

Friday, October 14, 2011


Thursday, October 13, 2011
Strawberry and White Chocolate Mini Cheesecakes

I adapted this recipe from Bon Appétit to make it lactose-free. I also couldn’t find gingersnaps anywhere and I wasn’t in the mood to make my own, so I used Graham crackers instead (though next time, I’ll throw some ground ginger in there for good measure). I love that Graham crackers now come in boxes of sealed packets (3 to 6 per box), and you can make most recipes with 1 or 2 packets only. The rest of the crackers stay freshly sealed in the box until you’re ready to use them (and if, like me, you’ve ever eaten stale Graham crackers in a pie crust, you’ll appreciate this feature). I used about 4 oz of crackers instead of 3.5 oz, which gave me enough crumbs to make an extra crust. Since my gelatin was also in little packets, I used the equivalent of 1 Tbsp diluted in ½ cup of water, and I used the whole 4-oz package of white chocolate instead of 3.5 oz; this gave me extra filling to put in the extra crust, so it all worked out. I got 9 mini-cakes, and I absolutely loved them! They were really awesome. Keep in mind that even though these are lactose-free, they’re not dairy-free. You also need to make them about a day ahead, as they rest in the fridge for a long time.
3 ½ oz gingersnap cookies (about 13; or use Graham crackers)
2 ½ Tbsp unsalted butter or margarine, melted
4 oz high-quality white chocolate (such as Lindt or Perugina), chopped
½ tsp unflavored gelatin
1 8-oz package Tofutti Better Than Cream Cheese
½ cup plain whole-milk lactose-free yogurt (I used Greek)
¾ tsp rose water (or vanilla extract if you must)
¼ cup sugar
8 oz fresh strawberries, hulled, halved or quartered if large, divided
1 Tbsp powdered sugar
Brush 8 standard (1/3-cup) muffin cups lightly with vegetable oil. (I had more crumbs, so I brushed 9 cups.) Line each cup with plastic wrap. Finely grind cookies in processor. Add melted butter; process to blend. Press crust mixture firmly onto bottom of prepared muffin cups, dividing equally (about generous 1 Tbsp for each).
Stir white chocolate in medium metal bowl set over saucepan of simmering water until melted and smooth. Reserve saucepan, adjusting water level to reach depth of ¾ inch to 1 inch; set aside.
Place 2 Tbsp water in small bowl. Sprinkle gelatin over; let stand until softened, about 5 minutes. Bring water in saucepan to simmer. Place small bowl with gelatin in saucepan and stir until gelatin dissolves. Remove small bowl with melted gelatin from water. (If you are using a packet of 1 Tbsp gelatine, you can follow the instructions on the packet, which should call for a total of ½ cup water; you’ll have more filling, and it’ll be a bit blander. You can also reduce the amount of water called for.)
Purée cream cheese, yogurt, rose water, and sugar in processor until smooth. Add melted white chocolate and gelatin; process until smooth. Divide mixture among prepared cups, pouring atop crusts. Cover and chill overnight.
Place half of strawberries in processor. Add powdered sugar and process until smooth. Transfer to small bowl.
Using plastic wrap as aid, lift cheesecakes from cups. Remove plastic wrap and transfer cheesecakes to plates, crust side down. Arrange remaining cut strawberries atop cheesecakes. Spoon strawberry purée over and serve.

Batch of links
I’m in the process of changing computers. I don’t have a new computer yet, but I’m doing things slowly. I started by (finally) installing IE9, which I hate, and 24 hours later, I had Google Chrome – much better, though I’m still getting used to the layout. In switching browsers, though, all my bookmarks got rearranged. You should know that I have WAY more bookmarks than most people, because that’s the way my brain works. I see something I think is interesting, and I put a bookmark there and get back to it later. That’s also why I often have Post-its and scraps of paper on my desk; it’s all little things on which I need to take action, and when I do, I recycle the scrap of paper (or delete the bookmark). Sometimes, I save something thinking I’ll share it here eventually, but I tend to procrastinate on that. But I can usually just look at my latest bookmarks and do whatever housekeeping needs to be done. Now, however, all my bookmarks have been rearranged in alphabetical order instead of chronological. This would be no big deal if I had dozens, but I’ve got hundreds. So my new project is to go through them, alphabetically, and share here anything that seemed relevant at the time. Eventually, I hope to turn this into a weekly post, perhaps on Friday (to go through what I’ve accumulated during the week), and ideally divided by theme (like on Not Martha, I think that rocks).
In the meantime, here is my first batch. Like I said, this will get more organized and timely in the future!
- The Great Typo Hunt: Two friends spend the summer driving around the perimeter of the United States, correcting typos. I loved Eats, Shoots & Leaves, so you can imagine how much I admire him. Here’s a tiny excerpt from the book: “To/too, their/there/they're, and your/ you're confusion, comma and apostrophe abuse, transpositions and omissions, and other sins against intelligibility too heinous to dwell on. Each one on its own amounted to naught but a needle of irritation thrusting into my tender hide. But together they constituted a larger problem, a social ill that cried out for justice.”
- Random acts of kindness: Ideas for doing something nice for other people every day.
- An abandoned lifeboat at world’s end: This fascinating article describes a real-life mystery on Bouvet Island. Bouvet Island is an uninhabited, entirely inhospitable and sometimes inaccessible island in the Southern Ocean; the closest land is Antarctica, 1,750 km away. In 1964, a lifeboat was found on the island, with signs of life after the wreck, but no human remains. There aren’t any trade routes even remotely close to the island, and we have no idea where this lifeboat comes from, how it got there and what happened afterwards. The thoroughly researched article gives more details, as well as hypotheses regarding what could have happened and arguments disproving those hypotheses. A fascinating read, even though there’s no definitive explanation.
- An argument in favor of the Oxford comma: One of my English teachers used to absolutely insist that we use it, but I’ve since found that it isn’t actually mandatory, at least not in the States. As a result, I tend not to use it. In this sentence, however, the Oxford comma helps to clarify the meaning, but as one commenter pointed out, “Proper punctuation should not be relied upon to clear up poor writing.” At least I’m not a stickler for it or against it.
- BBC Dimensions: If you want to know how big something really is (like the area affected by the 2010 floods in Pakistan, for example), you can enter your postal code and see the outline of it over your city/state/province. This is a great tool to give you an idea of the scale of certain events. Also check out this sister site for the same exercise with numbers (like how many people died of a certain disease, how many people watched the Seinfeld finale, etc., compared to the number of contacts in your social networks).
- Blowing bubbles in the ocean could slow global warming. Really!
- Guess the TV show or movie name: This is a fun program that asks you a series of yes/no questions to guess the name of the TV show or movie about which you are thinking.
- Living with less: A great article about one couple’s take on voluntary simplicity. They gave away many of their possessions (whittling things down to 100 items per person), downsized, paid off debt, are now working less and enjoying life more. Fewer material possessions really did increase their happiness.
- Conscious capitalism: It turns out that two of my favorite companies are adepts. I love this. I hadn’t even realized they were Texas-based until I read this article a year ago.
- Steampunk costume creator Just plain fun.
- Dear Sugar: This is quite possibly the best advice column I’ve ever read. I don’t read it often, from lack of time, but the columnist gives wonderful, thoughtful, considerate and kind advice on a variety of very emotional and complicated topics. The link brings you to column #87, but #44 is also a good place to start.
- Dads in Short Shorts: Funny pictures, usually from the 1970s and 1980s, of men wearing what now look like incredibly short shorts. These used to be all the rage, and if you’re my age, I’m sure you have a picture of your dad wearing these.
- My Mom, the Style Icon: People post retro chic pictures of their mothers. It can be quite inspiring.
- Draw a Stickman: You get to draw a stickman and help him through an animated story. A great way to spend the next 5 minutes!
- Simon’s Cat: You have seen the films, right?
- Eat Wild: I’ve talked about it before, but it’s worth mentioning again. Eat Wild helps you find local farms where you can buy grass-fed, organic and free-range meat, poultry and animal products. In our case, the closest farm is LT Beef. The catch is that meat is often sold in big quantities, so it’s ideal if you have a freezer to dedicate to this or if you’re going in with friends. We have neither.
- Jamie Oliver’s school lunch reform in West Virginia catching on: It was about time for a success story!
- Google Easter eggs. No explanation needed.
- 152 Minutes with Hanson: I liked this article (I still like it, but it’s over a year old now). For the video referenced (as well as 5 reasons why MTV likes it), see here.
- 7 Easter eggs in works of art: Even before I read this article, I always loved how Michelangelo snuck in his pursuit of anatomically correct organs (here, the brain, seat of reason and science) onto the ceiling of the Sistine Chapel (even funnier since the Church forbade dissection, a hobby of Michelangelo’s). I can spend entirely too much time on Cracked.com, though.
- There’s a real-life version of the Simpsons’ house!
- Curiosities of scientific nomenclature: Scientifically trained people will have fun with this.
Alright, I’ve spent three days sorting through my bookmarks, and I’m in the Hs now. I’ll post more links next week and will get things sorted out soon, hopefully. Thanks for reading!
In the meantime, here is my first batch. Like I said, this will get more organized and timely in the future!
- The Great Typo Hunt: Two friends spend the summer driving around the perimeter of the United States, correcting typos. I loved Eats, Shoots & Leaves, so you can imagine how much I admire him. Here’s a tiny excerpt from the book: “To/too, their/there/they're, and your/ you're confusion, comma and apostrophe abuse, transpositions and omissions, and other sins against intelligibility too heinous to dwell on. Each one on its own amounted to naught but a needle of irritation thrusting into my tender hide. But together they constituted a larger problem, a social ill that cried out for justice.”
- Random acts of kindness: Ideas for doing something nice for other people every day.
- An abandoned lifeboat at world’s end: This fascinating article describes a real-life mystery on Bouvet Island. Bouvet Island is an uninhabited, entirely inhospitable and sometimes inaccessible island in the Southern Ocean; the closest land is Antarctica, 1,750 km away. In 1964, a lifeboat was found on the island, with signs of life after the wreck, but no human remains. There aren’t any trade routes even remotely close to the island, and we have no idea where this lifeboat comes from, how it got there and what happened afterwards. The thoroughly researched article gives more details, as well as hypotheses regarding what could have happened and arguments disproving those hypotheses. A fascinating read, even though there’s no definitive explanation.
- An argument in favor of the Oxford comma: One of my English teachers used to absolutely insist that we use it, but I’ve since found that it isn’t actually mandatory, at least not in the States. As a result, I tend not to use it. In this sentence, however, the Oxford comma helps to clarify the meaning, but as one commenter pointed out, “Proper punctuation should not be relied upon to clear up poor writing.” At least I’m not a stickler for it or against it.
- BBC Dimensions: If you want to know how big something really is (like the area affected by the 2010 floods in Pakistan, for example), you can enter your postal code and see the outline of it over your city/state/province. This is a great tool to give you an idea of the scale of certain events. Also check out this sister site for the same exercise with numbers (like how many people died of a certain disease, how many people watched the Seinfeld finale, etc., compared to the number of contacts in your social networks).
- Blowing bubbles in the ocean could slow global warming. Really!
- Guess the TV show or movie name: This is a fun program that asks you a series of yes/no questions to guess the name of the TV show or movie about which you are thinking.
- Living with less: A great article about one couple’s take on voluntary simplicity. They gave away many of their possessions (whittling things down to 100 items per person), downsized, paid off debt, are now working less and enjoying life more. Fewer material possessions really did increase their happiness.
- Conscious capitalism: It turns out that two of my favorite companies are adepts. I love this. I hadn’t even realized they were Texas-based until I read this article a year ago.
- Steampunk costume creator Just plain fun.
- Dear Sugar: This is quite possibly the best advice column I’ve ever read. I don’t read it often, from lack of time, but the columnist gives wonderful, thoughtful, considerate and kind advice on a variety of very emotional and complicated topics. The link brings you to column #87, but #44 is also a good place to start.
- Dads in Short Shorts: Funny pictures, usually from the 1970s and 1980s, of men wearing what now look like incredibly short shorts. These used to be all the rage, and if you’re my age, I’m sure you have a picture of your dad wearing these.
- My Mom, the Style Icon: People post retro chic pictures of their mothers. It can be quite inspiring.
- Draw a Stickman: You get to draw a stickman and help him through an animated story. A great way to spend the next 5 minutes!
- Simon’s Cat: You have seen the films, right?
- Eat Wild: I’ve talked about it before, but it’s worth mentioning again. Eat Wild helps you find local farms where you can buy grass-fed, organic and free-range meat, poultry and animal products. In our case, the closest farm is LT Beef. The catch is that meat is often sold in big quantities, so it’s ideal if you have a freezer to dedicate to this or if you’re going in with friends. We have neither.
- Jamie Oliver’s school lunch reform in West Virginia catching on: It was about time for a success story!
- Google Easter eggs. No explanation needed.
- 152 Minutes with Hanson: I liked this article (I still like it, but it’s over a year old now). For the video referenced (as well as 5 reasons why MTV likes it), see here.
- 7 Easter eggs in works of art: Even before I read this article, I always loved how Michelangelo snuck in his pursuit of anatomically correct organs (here, the brain, seat of reason and science) onto the ceiling of the Sistine Chapel (even funnier since the Church forbade dissection, a hobby of Michelangelo’s). I can spend entirely too much time on Cracked.com, though.
- There’s a real-life version of the Simpsons’ house!
- Curiosities of scientific nomenclature: Scientifically trained people will have fun with this.
Alright, I’ve spent three days sorting through my bookmarks, and I’m in the Hs now. I’ll post more links next week and will get things sorted out soon, hopefully. Thanks for reading!
Samosa Latkes

I got this recipe from the blog In Our Grandmothers’ Kitchens, the same place I got the recipe for sweet potato latkes. They were really good! The Engineer laughed when he tasted them, because he felt that the taste really belonged to something else (samosas) rather than latkes. He suggested calling them latkamosas. The flaw with this recipe is that after you make the latkes, you’ll end up with a bowl of peas and onions that just fell out of the mixture. I ended up grating a third potato and throwing in a little flour so that it wouldn’t go to waste, but obviously those were blander. The recipe serves about 6 as a side dish.
2 large baking potatoes (plus a 3rd if you need it), washed and grated (you don’t have to peel them)
1 large onion, more or less finely chopped
2 eggs, beaten
6 Tbsp flour or matzo meal (plus a little more if you need it)
2 tsp finely chopped ginger root
2 tsp kosher salt
1 tsp cumin seeds
1 tsp garam masala
1 tsp curry powder
½ tsp turmeric
¼ tsp red pepper flakes (or Korean pepper, in my case)
2 cups peas, barely cooked
vegetable oil as needed for frying
2 Tbsp finely chopped fresh cilantro, for garnish (optional)
Once you’ve grated the potatoes (and again, I recommend the food processor over the grater), wrap the potato shreds in a clean dish towel. Over the sink, wring out as much liquid as you can. Leave the wrapped shreds to drain while you prepare the rest of the ingredients.
In a medium bowl, combine the potato pieces, onion, eggs, flour, ginger, salt and spices. Stir in the peas. In a large frying pan, heat a few tablespoons of the oil until it begins to shimmer.
Scoop some of the potato mixture out of the bowl and flatten it with your hand. Pop the flattened potato into the oil. It should hiss and bubble a bit; if not, wait before you put more pancakes into the oil. (It’s fine if your latkes are a little ragged around the edges. If they don’t hold together and are hard to turn, however, add a little more flour to your batter.)
Fry the potato cakes a few at a time, turning each when the first side becomes golden. Darin the cooked latkes on paper towels, then pop then into a 250 °F oven to stay warm until your have finished cooking all the latkes. When you are ready to serve, sprinkle the chopped cilantro over the latkes.

Friday, October 07, 2011
Blueberry blintzes

This recipe has been a long time in the making! I cut it out of a Martha Stewart Living magazine five years ago and kept it knowing that someday, I could make it lactose-free. Well, the day finally came! I now have relatively easy access to Tofutti’s Better Than Cream Cheese (also available in several places in Montreal, as I now know), and Lactaid now makes lactose-free cottage cheese. So I was all set, and the blintzes were delicious! I absolutely loved them.
I was running low on vanilla beans. Normally, I buy them at a ridiculously good price at La Dépense, but I didn’t buy any over the summer. I figured that since I’m so close to Mexico, I’d just end up getting Mexican vanilla beans at a good price. It turns out that I haven’t found Mexican vanilla beans, and the beans I did find were totally overpriced. I’ve decided to save the two beans I have left for an occasion where they need to be used in presentation. I did, however, see this Chowhound video on how to make the most of your vanilla beans, and given the consistency of the seeds when they are used, I decided to finally give myself permission to crack open my jar of vanilla bean paste. It was the perfect thing to use, and I really wish I’d started using that sooner!

The crêpe recipe worked perfectly, and I didn’t even have to throw out the first one. That being said, as I’m writing out this recipe, I notice that the directions – but not the ingredients – call for ½ cup water. I hate when a recipe does that, because I often miss that water addition; now, I cannot for the life of me remember whether I used the water or not! I’ll add it to the ingredients below and hope I used it. I ended up straining the batter and letting it rest in the fridge. After that, I had a bit too much filling, so I served the rest on the side. I also found the filling a bit too liquid, so I would recommend straining the cottage cheese overnight before using it. On the bright side, it wasn’t too sweet; as a matter of fact, the Engineer said it had just the right amount of sugar. This recipe makes 8 blintzes, and I found that 1 per serving was sufficient.
For the crêpes
¾ cups + 2 Tbsp lactose-free whole milk
½ cup water
5 Tbsp unsalted butter or margarine, melted (divided)
2 large eggs
1 cup + 2 Tbsp all-purpose flour
¼ tsp coarse salt
3 Tbsp canola oil
For the sauce
1 pint (about 2 cups) blueberries
6 ½ Tbsp sugar
1 Tbsp unsalted butter or margarine
2 Tbsp fresh lemon juice
½ tsp cornstarch
pinch of coarse salt
For the filling
16 oz lactose-free cottage cheese, strained
4 oz Tofutti cream cheese, softened
½ cup + 3 Tbsp sugar
1 vanilla bean, halved lengthwise, seeds scraped and reserved, bean discarded (or ½ tsp vanilla bean paste)
½ pint (about 1 cup) blueberries
For the crêpe batter
Whisk together milk, water, 2 Tbsp melted butter and the eggs in a medium bowl. Whisk in flour and salt. Strain the batter through a sieve and let it rest in the fridge while you continue the recipe.
For the sauce
Stir blueberries, sugar, butter, lemon juice, cornstarch and salt in a medium saucepan over medium-low heat. Bring mixture to a low boil. Reduce heat; simmer, stirring often, until berries begin to break down and release their juices, about 10 minutes. Set aside.
For the filling
Purée cottage cheese, cream cheese, sugar and vanilla seeds in a food processor. Transfer to a medium bowl; stir in blueberries. Set aside.
For the crêpes
Stir together the remaining 3 Tbsp melted butter and the oil in a small bowl; reserve 4 Tbsp for cooking blintzes. Heat an 8-inch non-stick skillet over medium heat. Lightly brush pan using the remaining butter-oil mixture. Pour a scant ¼ cup batter into pan; swirl to form an even layer. Cook until bottom is lightly browned, about 1 ½ minutes. Using a heatproof spatula, flip crêpe; cook 30 seconds. Transfer to a plate. Repeat with remaining butter-oil mixture and batter (I found that I needed to brush the pan again for every other crêpe).
Transfer a crêpe to a clean work surface. Spoon 2 heaping Tbsp of filling onto one end of the crêpe, 1 inch from the sides. Fold the edge over the filling; fold in the sides, and roll up. Repeat with remaining crêpes and filling.
Heat some of the reserved butter-oil mixture in a clean pan over medium heat. Working in batches of two or three, fry blintzes, turning once, until golden and crisp, 2 to 2 ½ minutes per side. Serve with warm sauce spooned over top. (Optional: dust with confectioners’ sugar or serve with a side of leftover filling, if any.)


Thursday, October 06, 2011
Ragù Bolognese

This recipe is from the May 2011 issue of Bon Appétit. I’ll admit right off the bat that I made changes to the recipe: a thick salami instead of the pancetta (I had a sudden craving for the former and couldn’t find the latter), that I cooked less; 16 oz of 75% lean ground beef instead of 6 oz of 85% lean ground beef and 6 oz ground veal (this is partly because of what was available at the store and partly because of my refusal to buy baby animal meat, so I added a bit of fat to compensate); white wine instead of red (only because I misread that part and only had white on hand that afternoon); probably not quite enough tomato paste (I ran out); 2 cups of broth, with the lid off to simmer (instead of 3 cups, with the lid on, because it looked really liquid). So that’s a lot of changes, yes, but I’m still finding some faults with the recipe. I’m basing this on the image on the Bon Appétit website, which shows me that my assessment is accurate: I was expecting a thick sauce, but the result is really chunks of meat with pasta, with liquid that never really emulsifies.
I felt like the dish was trying to be a Bolognese sauce, in which case, my grandmother’s recipe beats it. The only edge it had was from the combination of meat and dairy (if you keep kosher, sorry, just pretend I didn’t say that this combination really elevates the dish); however, in that category, I much prefer my spaghetti with meatballs served with the tomato-butter sauce. So I was disappointed, especially given that this is by no means a fast recipe. I prefer pasta with sauce, not pasta with chunks of stuff. That being said, the first night I served it (the ragù on top of the pasta), Engineer really liked it. The second night (the ragù tossed with the pasta this time after they were warmed separately), he upgraded it to awesome. So I’ll be keeping this recipe for him, and the next time I make it, I’ll make sure to have all the ingredients on hand. That being said, it probably won’t become my favourite pasta dish any time soon. Note that this recipe make about 6 servings (or 4 really generous ones).
2 Tbsp extra-virgin olive oil
2 medium onions, finely chopped (about 1 ½ cups)
2 celery stalks, finely chopped (about 1 cup)
2 carrots, peeled, finely chopped (about ¾ cup)
6 oz ground beef (85% lean)
6 oz ground veal
3 oz thinly sliced pancetta, finely chopped
½ cup dry red wine
3 cups (about) beef stock or chicken stock, divided
3 Tbsp tomato paste
kosher salt and freshly ground black pepper
1 cup lactose-free whole milk
1 lb tagliatelle or fettuccine (preferably fresh egg; gluten-free if necessary)
finely grated Parmesan (for serving)
Heat oil in a large heavy pot over medium-high heat. Add onions, celery, and carrots. Sauté until soft, 8-10 minutes. Add beef, veal, and pancetta; sauté, breaking up with the back of a spoon, until browned, about 15 minutes. Add wine; boil 1 minute, stirring often and scraping up browned bits. Add 2 ½ cups stock and tomato paste; stir to blend. Reduce heat to very low and gently simmer, stirring occasionally, until flavors meld, 1 ½ hours. Season with salt and pepper.
Bring milk to a simmer in a small saucepan; gradually add to sauce. Cover sauce with lid slightly ajar and simmer over low heat, stirring occasionally, until milk is absorbed, about 45 minutes, adding more stock by ¼-cupfuls to thin if needed.
Bring a large pot of water to a boil. Season with salt; add pasta and cook, stirring occasionally, until 1 minute before al dente. Drain, reserving ½ cup pasta water. Transfer ragù to a large skillet over medium-high heat. Add pasta and toss to coat. Stir in some of the reserved pasta water by tablespoonfuls if sauce seems dry. Divide pasta among warm plates. Serve with Parmesan.
Chili au poulet

Baked Egg Cups


Sunday, October 02, 2011
Blouse sans manches

Je suis bien fière de vous montrer le résultat de ce plus récent projet, une blouse sans manches faite avec le patron 2892 de Simplicity. Je savais que la robe que j’ai faite en taille 22 était trop grande dans le haut, alors cette fois-ci, j’ai fait la taille 20. En fin de compte, j’ai rapetissé la blouse de 2 pouces chaque côté en haut (sinon, les trous pour les bras auraient vraiment été trop grands) et de 1 pouce en bas (vers les hanches). J’ai utilisé mon pistolet (apparemment que c’est comme ça qu’on dit French curve en français) pour tracer une courbe qui ait de l’allure; la prochaine fois, je ferai directement la taille 18! (Pour préciser : il s’agit ici des tailles de couture, pas des tailles dans les magasins, ces dernières étant nommées en anglais des « tailles de vanité ». Il y a eu une époque où les tailles en magasin étaient les mêmes que celles sur les patrons; c’est d’ailleurs dans cette unité de mesure que Marilyn Monroe portait du 14, qui en fait correspond à peu près à du 8 actuellement. C’est que depuis, les magasins ont réarrangé les formats pour que les clientes aient l’impression d’acheter une taille plus petite, ce qui flatte leur orgueil. Mais ça me complique la vie!)


J’ai aussi dû me fabriquer du ruban de biais. Le patron précisait qu’il fallait du ruban de biais de ½ pouce à un seul pli. C’était la première fois que j’en utilisais, et je ne me suis pas creusé la tête, alors j’en ai acheté du blanc. C’est seulement quand est venu le temps de l’utiliser que je me suis rendu compte qu’on allait le voir un peu, car il faisait la bordure des tours de bras. Je me suis donc inspirée de ces instructions détaillées géniales pour en fabriquer (et voir ici pour un exemple d’utilisation bourré d’explications). J’ai taillé le ruban dans une retaille de mon tissu et je l’ai repassé à la main; par contre, j’ai depuis acheté un embout pour faire du ruban de ½ pouce, alors au moins les plis devraient être plus faciles à faire la prochaine fois.


C’était un patron facile à suivre et il m’a donné de bons résultats. J’aime beaucoup le col de la blouse. J’ai moins aimé le fait qu’il fallait le terminer avec un point coulé à la main. J’ignore pourquoi ça m’a tant dérangé, si ce n’est que j’avais l’impression qu’un patron, c’est pour se faire de quoi avec la machine, pas à la mitaine, mais dans le fond... C’est joli! Et au premier coup d’œil, ça a l’air d’une « vraie » blouse, alors que je trouvais que ma robe avait des défauts très visibles. J’aime énormément cette blouse, et elle me va d’ailleurs très bien. Côté prix : un patron en vente à 0,99 $, une bobine de fil à 2,79 $ et 2,5 verges de coton imprimé en vente à 4,90 $ la verge, pour un total de 16,03 $ plus taxes. Prochaine étape : travailler mes coutures anglaises (qui, en anglais, s’appellent des coutures françaises!). C’est difficile, parce qu’il me faut plus de lousse que ce qui est prévu par le patron... Mais c’est peut-être là l’utilité de tailler son tissu trop grand!

Friday, September 30, 2011
Tomato and Corn Medley

I’ve decided to call this dish Tomato Corn Medley, because it sounded better than Tomato Corn Thing or Tomato Corn with Stuff. I got the recipe (or guidelines, really) when I was in the waiting room at my GP’s clinic. In the US, there seem to always be televisions in the waiting rooms in doctors’ offices, showing health-related capsules (my gynecologist in Montreal had something similar, but it was usually broken or mind-numbingly boring, and the CLSC sure didn’t have that). This tomato and corn medley is an easy and healthy dish which you can customize according to your taste and the contents of your fridge and pantry. The following is a loose recipe; you can increase the protein to get 4 servings, or add cheese on whole grain crackers to hit all the food groups. I really liked it, especially given how easy it is to make (and no need to follow along with a recipe, either).
1 pint of cherry or grape tomatoes, halved if you want
4 ears of corn, grains cut off with a knife (or the equivalent frozen or from a can)
1 bunch of scallions, white and green parts separated, chopped
1 lime, juiced
1 avocado, peeled and sliced
2 cooked chicken breasts, or protein of your choice
In a skillet, heat some olive oil and cook the white parts of the scallions until they soften. Add the tomatoes and corn and cook to taste (you can cook them all the way through, or just warm them up). Add a splash of lime juice and top with the green parts of the scallions. Serve on a plate with avocado slices and chicken.


Dairy-free macaroni and cheese by Road's End Organics

I want to mention a product I tried recently, this dairy-free macaroni and “cheese” by Road’s End Organics. You see, there was a time when I would occasionally have a box of Kraft macaroni and cheese. It’s artificial as heck, but I liked it (and hey, if you throw in a can of tuna and some frozen peas, you’ve got your four basic food groups right there). I haven’t bought any in years, though, since I can’t have all that lactose. So this product seemed like a good substitute. It’s not as bright orange, but that’s to be expected in a product that is mostly natural. While it was good, it didn’t taste the same as the Kraft version. It probably wasn’t fair of me to compare the two, but I can’t help but feel like that’s what anyone would do if they had Kraft before. I also found that the box contained fewer servings – I don’t know if this is my memory playing tricks on me or not. All in all, I would probably buy it again and keep it in the pantry for one of those nights when I just don’t feel like cooking, but be warned that it’s not really a Kraft substitute! There are also gluten-free versions, and all of the products at the link are vegan.

Wednesday, September 28, 2011
Streusel Plum Cake
I wanted to make another plum cake before plum season was over. I ended up making a dimply plum cake found on Smitten Kitchen and created by the legendary Dorie Greenspan. The cake looked delicious, and I loved the idea of using cardamom instead of cinnamon with the plums. I also liked the other flavour combinations that were suggested (orange with a bit of star anise, cherries with mint or peaches with some fresh lemon and basil). When I tasted it, though, I thought, “Meh.” It was ok, but the dough didn’t impress me.

I started thinking that my mother’s plum cake was better than that. And then I realized that I still didn’t have her recipe! So she emailed it to me and I made it the following week. It’s perhaps not as good looking, but take my word for it, it is better. It was once thought that my sister and I didn’t like it, but that’s only because during plum season, my mother would serve it once a week, so by the fourth week, we were understandably a little tired of it. Just don’t overdo it.The recipe is adapted from Anne Lindsay’s The Lighthearted Cookbook. My mother replaces the cinnamon with nutmeg and uses fresh plums instead of canned. That’s the way I’ve made it, and I love it, but I now think you could use a mix of nutmeg and cardamom. It comes with the option of a glaze, but I like it au natural. The cake isn’t too sweet, but is moist and flavourful. You can also make it with peaches, apples or pears. And take it from me, you don’t even have to separate the eggs. The number of plums you’ll need depends on their size; you need enough to cover the surface of and 8-inch square pan once they’re halved. Enjoy!

For the cake
¼ cup margarine
¾ cup granulated sugar
2 eggs, separated
1 ½ cups all-purpose flour
1 tsp baking powder
½ cup lactose-free milk (2% ideally)
6-8 small plums (or 3-4 bigger ones; see above)
For the streusel topping
½ cup packed brown sugar
1 Tbsp soft margarine
1 tsp nutmeg (or cardamom or, if you really must, cinnamon)
For the cake
Preheat the oven to 350 °F. Grease an 8-inch square cake pan (a 9-inch square pan or springform pan will do too).
In a large bowl, cream together margarine, sugar and egg yolks until fluffy. Combine flour and baking powder; beat into egg mixture alternately with milk.
Beat egg whites until stiff but not dry; fold into batter. Turn into prepared pan.
Halve and pit plums and arrange over top.
For the streusel topping
In a small bowl, combine brown sugar, margarine and nutmeg; mix well and sprinkle over fruit.
Bake for 35 to 45 minutes or until top is golden and toothpick inserted into cake comes out clean.


I started thinking that my mother’s plum cake was better than that. And then I realized that I still didn’t have her recipe! So she emailed it to me and I made it the following week. It’s perhaps not as good looking, but take my word for it, it is better. It was once thought that my sister and I didn’t like it, but that’s only because during plum season, my mother would serve it once a week, so by the fourth week, we were understandably a little tired of it. Just don’t overdo it.The recipe is adapted from Anne Lindsay’s The Lighthearted Cookbook. My mother replaces the cinnamon with nutmeg and uses fresh plums instead of canned. That’s the way I’ve made it, and I love it, but I now think you could use a mix of nutmeg and cardamom. It comes with the option of a glaze, but I like it au natural. The cake isn’t too sweet, but is moist and flavourful. You can also make it with peaches, apples or pears. And take it from me, you don’t even have to separate the eggs. The number of plums you’ll need depends on their size; you need enough to cover the surface of and 8-inch square pan once they’re halved. Enjoy!

For the cake
¼ cup margarine
¾ cup granulated sugar
2 eggs, separated
1 ½ cups all-purpose flour
1 tsp baking powder
½ cup lactose-free milk (2% ideally)
6-8 small plums (or 3-4 bigger ones; see above)
For the streusel topping
½ cup packed brown sugar
1 Tbsp soft margarine
1 tsp nutmeg (or cardamom or, if you really must, cinnamon)
For the cake
Preheat the oven to 350 °F. Grease an 8-inch square cake pan (a 9-inch square pan or springform pan will do too).
In a large bowl, cream together margarine, sugar and egg yolks until fluffy. Combine flour and baking powder; beat into egg mixture alternately with milk.
Beat egg whites until stiff but not dry; fold into batter. Turn into prepared pan.
Halve and pit plums and arrange over top.
For the streusel topping
In a small bowl, combine brown sugar, margarine and nutmeg; mix well and sprinkle over fruit.
Bake for 35 to 45 minutes or until top is golden and toothpick inserted into cake comes out clean.


Salad with Sprouts and Miso-Lemon Dressing

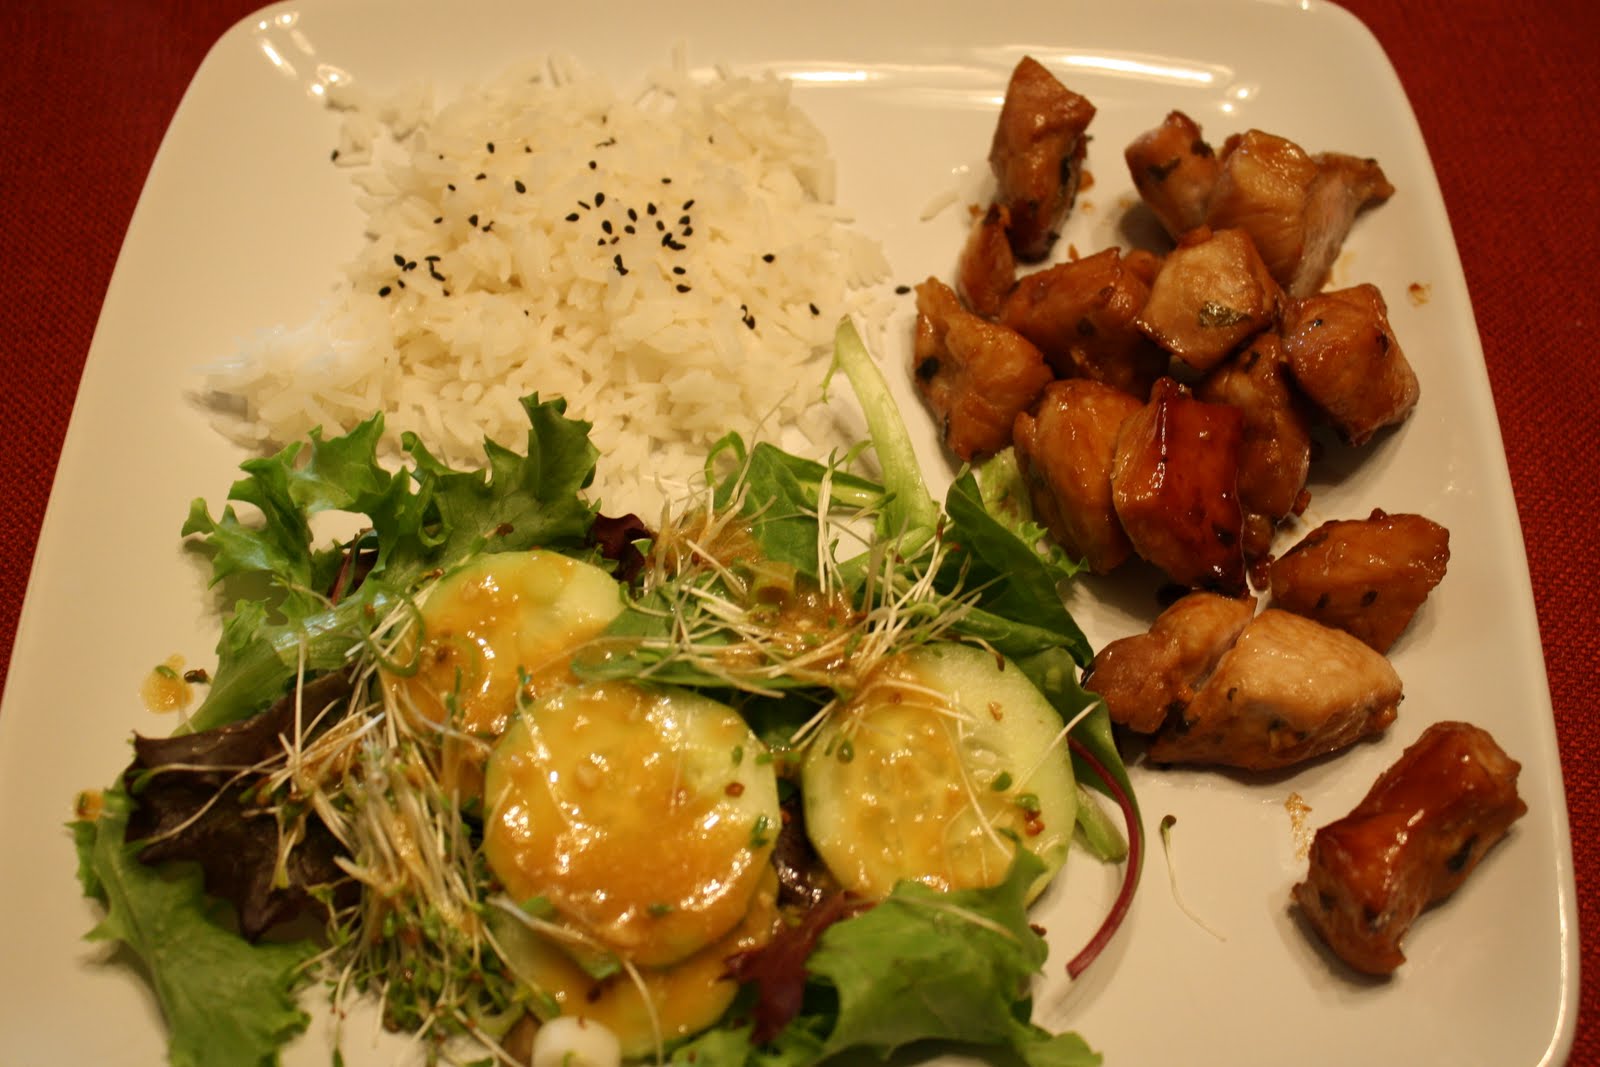
I made this salad to go with the marinated pork. I changed it a bit, because I couldn’t find edamame beans at the store. (I knew that I had seen them in the frozen section previously and was looking for them near the peas. I’ve since realized that they are stored near the raspberries, two aisles over. And that the recipe actually called for edamame seeds, not beans.) I also omitted the fennel, because I’m not always that fond of it. I didn’t measure the ingredients for the salad, I just eyeballed it to make 4 servings (I mean, it’s a salad, live a little!); I did measure the ingredients for the dressing, though. I really liked it! I also finished the salad with some store-bought miso dressing by Oka, which is also really nice.
8 oz mixed salad greens
1 fennel bulb, trimmed and thinly shaved (I omitted it)
1 bunch green onions, trimmed and cut into ½-inch lengths
1 English cucumber, halved and thinly sliced (or all of it)
4 oz sprouts (any variety)
¼ cup roasted edamame seeds, divided
2 lemons, juiced (about ¼ cup)
2 Tbsp miso paste
1 Tbsp soy sauce (or wheat-free tamari sauce)
2 Tbsp olive oil
salt and freshly ground black pepper
Toss the salad greens with the shaved fennel slices and green onions. Toss in the English cucumber slices and sprouts, and toss until the sprouts are evenly distributed throughout the salad. Toss in half the edamame.
Whisk together the lemon juice and miso paste until smooth and completely blended. Whisk in the soy sauce, and olive oil and toss with the greens. (If you’re like me, though, only dress the salad that you’re eating in that sitting, and store the rest separately.) Taste and add salt and pepper if needed. Spread the salad in a bowl or on a platter and sprinkle with the remaining edamame.
Marinade for pork

This is a recipe published in the June edition of Bon Appétit, courtesy of Susan Spicer, chef at Mondo in New Orleans. (I used less sriracha than she calls for, but that’s no big surprise.) She suggests marinating pork shoulder in it, but I had cubes of pork sirloin. I’m sure it would be great with pork chops or pork tenderloin as well! Vegans could also try tofu. I cooked the pork in a wok, then served it with rice with gomashio as well as a salad with miso dressing.
1 cup soy sauce (or wheat-free tamari sauce if you’re eating gluten-free)
½ cup brown sugar
½ cup fresh orange juice
1 Tbsp sriracha (I used a dash; this depends on how much you like the heat)
1Tbsp pomegranate molasses
2 star anise pods
a 1" piece ginger, thinly sliced
4 garlic cloves, thinly sliced
1/3 cup chopped cilantro stems (I used a liberal amount of chopped leaves)
Combine all ingredients, then marinate your pork (or protein of choice) before cooking.

Tuesday, September 27, 2011
Sur la table
I got a catalogue in the mail yesterday announcing the opening of a Sur la table in San Antonio, at a beautiful shopping center (really) that already has a Crate & Barrel and a Williams Sonoma. I always thought Sur la table was super expensive, for some reason, but now I realize that a lot of items are quite reasonably priced. I fell in love with their whiteware dishes (especially the slanted and swoop bowls), and they have some really nice colourful kitchen tools. I also love their collection of vintage-inspired aprons – I’ll be looking at those for inspiration when I’m ready to sew one!

I haven’t bought anything there yet, but I’m looking forward to browsing in person!

I haven’t bought anything there yet, but I’m looking forward to browsing in person!
Monday, September 26, 2011
Dough
I’ve decided to be a little more diligent about restaurant reviews. I used to write some up all the time, for my website especially, but now that’s fallen by the wayside. But last night, the Engineer and I had dinner at Dough, a pizzeria serving authentic pizza napoletana that’s gotten rave reviews. We were both really impressed! The place was pretty full and very busy (we counted at least 17 employees), so we sat at the bar, but I think it was the best place to be, because we could watch the chefs throw dough around in the kitchen and put pizzas in the wood-burning oven. Did you know that true Neapolitan pizza is baked only 90 seconds, but at 800 °F? They all looked like they were taking the heat pretty well, though! The bar seats were actually pretty comfortable because they are wide, albeit backless. The décor is what I’d call bistro-type. And I love the fact that so many products are actually made from scratch in the restaurant (like their mozzarella, bread, gelatos, and dough of course!). They also have their own herb garden.
We started with the bruschetta, which was a few thin slices of bread served with hot multicoloured cherry tomatoes, roasted garlic, herbs, olive oil and what I think was parmesan – I really liked it, even though the format was not what I was expecting. We also had sodas: an Italian raspberry soda for me, and a cherry cream soda for the Engineer. Even though the place serves a dairy-free pizza, I decided to take some Lactaid and go with the Pork Love (tomato sauce, house-made fior di latte, salami, sausage, pancetta and speck), while the Engineer had a margherita to which he added olives and sausage. I found the sausage a little too spicy, but I really loved the pizza; I especially like that the tomato sauce is more fresh tomatoes than tomato paste. Next time, I’ll try the Fontina (fontina, oak-roasted mushrooms, caramelized onions and parmesan). We opted not to have dessert, because we had some at home and we didn’t want to overindulge, but after looking at their menu, I’m sure the Engineer and I could have been easily convinced to try the polenta cake and Nutella Panini, respectively. Plus, house-made sorbetto sounds good to me anytime of the day...
Dough is somewhat on the expensive side, but we really liked our dinner and we hope to go there again eventually.
We started with the bruschetta, which was a few thin slices of bread served with hot multicoloured cherry tomatoes, roasted garlic, herbs, olive oil and what I think was parmesan – I really liked it, even though the format was not what I was expecting. We also had sodas: an Italian raspberry soda for me, and a cherry cream soda for the Engineer. Even though the place serves a dairy-free pizza, I decided to take some Lactaid and go with the Pork Love (tomato sauce, house-made fior di latte, salami, sausage, pancetta and speck), while the Engineer had a margherita to which he added olives and sausage. I found the sausage a little too spicy, but I really loved the pizza; I especially like that the tomato sauce is more fresh tomatoes than tomato paste. Next time, I’ll try the Fontina (fontina, oak-roasted mushrooms, caramelized onions and parmesan). We opted not to have dessert, because we had some at home and we didn’t want to overindulge, but after looking at their menu, I’m sure the Engineer and I could have been easily convinced to try the polenta cake and Nutella Panini, respectively. Plus, house-made sorbetto sounds good to me anytime of the day...
Dough is somewhat on the expensive side, but we really liked our dinner and we hope to go there again eventually.
Sunday, September 25, 2011
Food allergen detector
Anyone with food allergies knows how hard it can be to eat food that hasn’t been prepared in their household – in some cases, like at a buffet, it’s impossible. Wouldn’t it be great if there were a device that detected the presence of allergens in the food before you even took a bite? Well now, thanks to a concept developed by Swedish designer Erik Borg, it’s one step closer to reality. The video at the link gives more details.
Unfortunately, this is still a primitive prototype, but Philips is behind the R&D, so let’s hope they can have fully functional devices soon!
Unfortunately, this is still a primitive prototype, but Philips is behind the R&D, so let’s hope they can have fully functional devices soon!
Friday, September 23, 2011
Two-Ingredient Chocolate Mousse

My friends Rob and Jen sent me this recipe they recommended from Serious Eats (the article with video instructions is here, and the recipe, here). It’s for a two-ingredient chocolate mousse that seemed not only too easy to be any good, but also somewhat like it was defying the laws of physics. I’ve always been told to never mix chocolate with water, because something happens with the fat in the chocolate that would ruin the consistency once water mixes with it. Yet this recipe achieves a chocolate mousse by mixing water and chocolate, and nothing else. I decided to give it a go, and let me tell you right now: don’t be put off by the 5 minutes of whisking by hand; it’s really not that bad. And the result, surprising as it is, is so worth it! You do need quality chocolate, obviously, since it’s the only thing you’ll taste, and you end up with a very rich mousse that is lactose-free, but also nut-free, gluten-free and vegan (as long as your chocolate fits those criteria, but if you have those food restrictions, I’m assuming your favourite chocolate does). I loved the result and will definitely make this part of my repertoire!
350 g dark chocolate, chopped
270 g water
cold water and ice, for ice bath
Put equal parts water and ice into a medium bowl for the ice bath.
Boil the 270 g water in a saucepan, or in the microwave, and pour it into a second medium bowl. Add the chopped chocolate and stir with a spatula or whisk until all the pieces are melted, about 2 minutes.
Place the bowl with the chocolate over the ice bath and whisk vigorously. Continue to whisk until the mixture has the consistency of stiffly whipped cream (about 5 minutes), and then quickly divide it between individual serving cups or into a serving bowl. Refrigerate.

Vegetable and Mint Spring Rolls with Peanut Sauce

I had made vegetable spring rolls once before, but I wanted an actual recipe this time, one with a little more pizzazz than what I had tried before. This one fit the bill, though they are still highly adaptable: I used oyster sauce instead of fish sauce, I omitted the rice noodles and I ended up not using bell peppers, because of a grocery store snafu (we had a package of 3 bell peppers in our cart when we realized that the individual bell peppers were on sale and cheaper than the prepackaged ones, so we put those back and somehow forgot to get the individual ones instead). I also used Korean pepper instead of red pepper flakes. We really loved these rolls, and they were a perfect dish for a hot summer day. I still have to work on my tension when I roll the rice paper, but I’m getting there! We had enough rolls for a meal for two people.
For the sauce
2 Tbsp creamy organic or natural peanut butter
2 Tbsp rice vinegar
2 tsp soy sauce
2 tsp sugar
½ tsp of red pepper flakes (or Korean pepper)
Whisk together the ingredients for the sauce and set aside.
For the rolls
1 ½ oz cellophane noodles (I omitted them)
½ tsp sesame oil
red pepper flakes (optional)
1/3 of a seedless cucumber
1/2 of a medium carrot, peeled
1/2 of a red bell pepper
5 baby radishes or 2-3 medium radishes
1 scallion, chopped
½ Tbsp rice vinegar
½ tsp sugar
1 tsp fish sauce (or oyster sauce or vegan substitute)
juice from 1/2 lime
2 Tbsp cilantro leaves
16-24 fresh mint leaves (mine were big, so I used fewer)
8 rice paper wrappers
Cook the cellophane noodles according to the package directions. Drain the noodles, put them in a bowl, and toss with the sesame oil and a dash of red pepper flakes.
Use a mandoline to slice the cucumber and carrot into thin strips, or simply julienne by hand.
Whisk together the rice vinegar, sugar, fish sauce, and lime juice in a large bowl. Add the vegetables and the scallion, and toss to coat.
Fill a round cake pan halfway with hot water. For each wrapper (one at a time!), immerse it in the hot water bath until it softens, which takes about 30 seconds. Lay it on your work surface and fill it first with about 1-2 tablespoons of noodles (you want to have enough for 8 rolls). Then, add 1/8 of the veggie mixture. Add a few sprigs of cilantro and 2-3 mint leaves, depending on how large they are. To roll up your roll, first fold the edge of the wrapper farthest from you over the filling, then fold in the edges towards the center and continue rolling the filled wrapper towards you until it's closed and snug. If you want to be especially decorative, place the mint leaves closer to the front edge of the wrapper, so that they are rolled into the last layer and show through the top of the finished roll. Continue this process with each of the wrappers. You may need to change your hot water halfway through. As you finish each roll, place it on a cookie sheet and cover the rolls with a damp towel.
To serve, slice in half with a sharp knife and serve the peanut sauce on the side.


Thursday, September 22, 2011
Food Plates
The USDA came out with its MyPlate to replace the food pyramid, arguing that the latter was confusing. While I agree that most people will find the new presentation easier, I noticed right away that the USDA recommends dairy as part of every meal – I can’t help but think that’s because it represents the dairy lobby as well as other groups. It also lacks explanations, and even those on the website are dumbed down and incomplete.
Recently, Harvard came out with its own version of the plate, which I much prefer. It has more explanations and precisions, like “whole grains” and “healthy protein” instead of the broad terms used by the USDA. It also includes healthy oils and water. But it left out eggs, for example, and there is still the issue of portion control.
I don’t think either of these plates will revolutionize the way we eat, though. I have a sweet tooth and I love baking, so baked goods often take the place of fruit for dessert (though I do eat fruit at breakfast, and sometimes bake fruity desserts; plus, I bake with whole grains almost exclusively). I also rarely have three dishes on my plate at any given meal; it’s usually more like a main course and a side, and I try to vary the whole grains and vegetables throughout the day. Also, I’m currently a domestic engineer, and I still don’t get all this stuff on my plate at every meal. You want to tell me parents with full-time jobs are going to be making all of this? That being said, I do like Harvard’s plate much more than the USDA’s.
Recently, Harvard came out with its own version of the plate, which I much prefer. It has more explanations and precisions, like “whole grains” and “healthy protein” instead of the broad terms used by the USDA. It also includes healthy oils and water. But it left out eggs, for example, and there is still the issue of portion control.
I don’t think either of these plates will revolutionize the way we eat, though. I have a sweet tooth and I love baking, so baked goods often take the place of fruit for dessert (though I do eat fruit at breakfast, and sometimes bake fruity desserts; plus, I bake with whole grains almost exclusively). I also rarely have three dishes on my plate at any given meal; it’s usually more like a main course and a side, and I try to vary the whole grains and vegetables throughout the day. Also, I’m currently a domestic engineer, and I still don’t get all this stuff on my plate at every meal. You want to tell me parents with full-time jobs are going to be making all of this? That being said, I do like Harvard’s plate much more than the USDA’s.
Subscribe to:
Posts (Atom)