Monday, March 06, 2023

JUST Egg


This post wasn’t really planned, but I decided to tell you about JUST Egg. I first had it at a local vegan restaurant called Plantology, where I was really pleasantly surprised. It was a vegan substitute for eggs prepared omelet-style, and I couldn’t tell it wasn’t actually eggs. It looked the same, had the same texture, and tasted the same. 

JUST Egg is vegan, made from plants (mostly mung beans); it contains no saturated fat or cholesterol, and has an amount of protein comparable to eggs. It contains natural color (carrot and turmeric) and the one I bought was free of major allergens (check the label for different products by the brand, as that can change). I assume the “just” comes from “justice,” as it would be cruelty-free and probably more sustainable than real eggs. 

I ended up buying a container of JUST Egg at the store and had some for lunch. I cooked them simply, like I would scrambled eggs, though there are also recipes on their website. It basically cooks up like real eggs and can be used in baked goods as well. 

When I ate the scrambled “eggs” plain, they had a faint vegetal taste that was not unpleasant, but if you’re trying to really fool yourself, add seasonings or lactose-free shredded cheese. I think this is a great alternative for vegans, flexitarians, and curious foodies alike.


Triple Ginger Chocolate Chunk Cookies


Apparently I posted six recipes in a row that were main dishes – we’re due for a dessert here! I’m still trying to catch up on which pictures I lost when my iPhone was malfunctioning; I tried that tip for replacing the salt with double the amount of soy sauce in chocolate baked goods, for an umami je-ne-sais-quoi, but it was a big let-down: I used it in my regular brownie recipe, and not only could I not taste anything different even after using 2 teaspoons, but the brownies themselves completely fell apart, even though logic dictates that in such a small amount, this substitution should not make a difference. Too bad. 

I want to give you a good recipe, though, so here’s one for triple-ginger chocolate chunk cookies. These were moist and delicious; the ginger and chocolate really play well together! For the chocolate chunks, I chopped two bars of Ghiradelli bittersweet chocolate. 

The quantities below yield about 24 cookies. 

2 cups + 1 Tbsp. all-purpose flour 
2 tsp. baking soda 
½ tsp. coarse salt 
1 tsp. ground cinnamon 
1 ½ tsp. ground ginger
¼ tsp. ground cloves 
1 Tbsp. cocoa powder, sifted 
¾ cup (1 ½ sticks) lactose-free butter, at room temperature 
2/3 cup light or dark brown sugar, packed 
1 Tbsp. grated fresh ginger 
2 large egg yolks 
½ cup unsulphured molasses 
1 tsp. vanilla extract 
1/3 cup candied ginger, coarsely chopped 
8 ounces dark chocolate chunks 
granulated sugar, for rolling 

Whisk together flour, baking soda, salt, cinnamon, ground ginger, ground cloves, and cocoa in a large bowl. Set aside. 

With a stand or hand mixer, cream together butter and brown sugar until light and fluffy, 2-3 minutes. Add fresh ginger and egg yolks and beat briefly to combine. 

Add molasses and vanilla. Beat briefly to combine. Add flour mixture. Mix until combined and no flour pockets remain. Stir in chocolate chunks and candied ginger. 

Chill dough until firm, at least 3 hours or overnight. 

Place about ½ cup granulated sugar in a small bowl (it’s fine to start with less and add any as needed). 

Roll 1.5-ounce pieces (about the size of a golf ball) of cookie dough into balls and roll in the sugar. (Mine were a bit bigger.) Place on a lined cookie sheet 2 inches apart. Freeze for about 10 minutes while you preheat the oven to 350 °F. 

Bake for 10 to 12 minutes, rotating after 5 minutes (I did not bother), until beginning to crack and edges are just set. Do not overbake. 

Let cookies cool briefly on baking sheet, then transfer to a cooling rack and cool completely.


Saturday, March 04, 2023

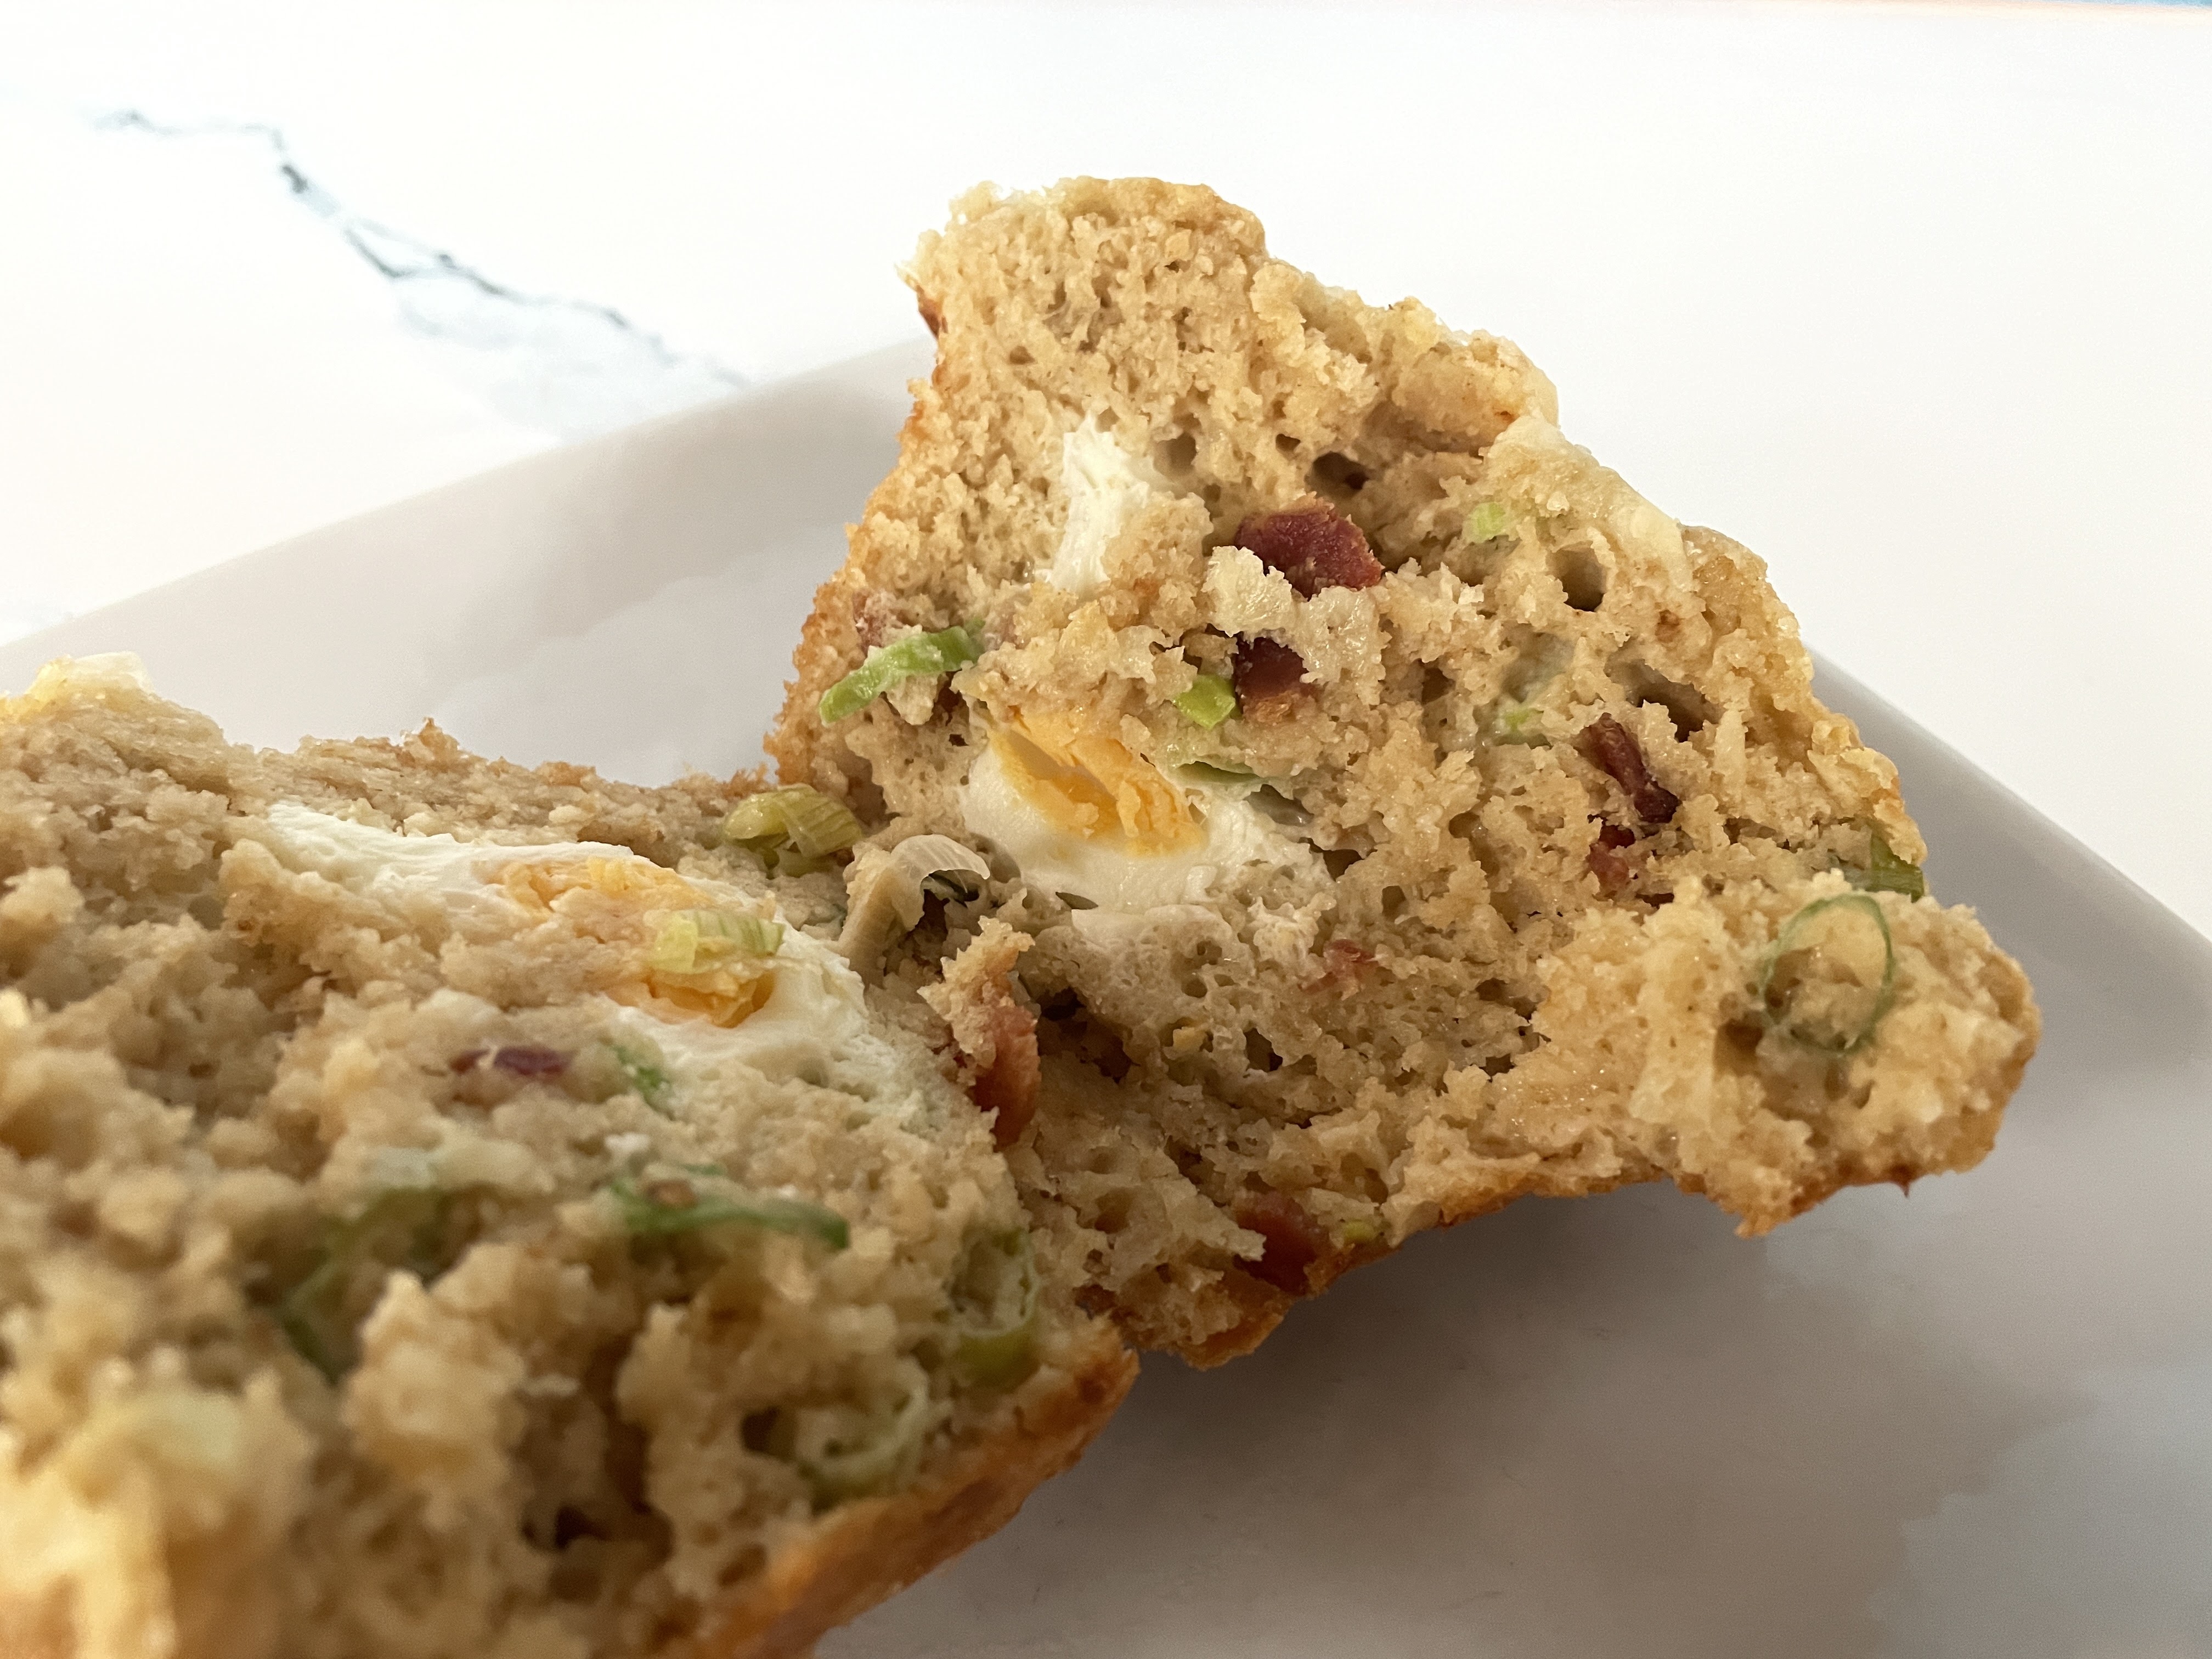
Bacon and Egg Jumbo Muffins

I tried two very similar recipes for what are essentially jumbo muffins with an egg baked in the center. Sadly, I seem to have lost the bookmark to that first recipe – it called for hard-boiling the eggs first, then the dough was wrapped around them. They were good, but not great. (I reserve the right to edit this post if I find that recipe again.) 


The second recipe is from BuzzFeed. These muffins are not as pretty, but I preferred them. They have a proper batter instead of dough, and the eggs were cooked right in the center at the same time as the batter. I’m not sure how these would fare in a lunchbox, but when served warm, they were fantastic! My husband and I loved these, but my kids (who ate them warm, at home, on a severe weather day) were not fans. I can’t understand why, so I’m still recommending them! 

3 cups flour (I used white whole wheat flour) 
1 Tbsp. sugar 
1 Tbsp. baking powder 
1 tsp. salt 
7 eggs, divided (1 + 6) 
1 ¼ cup lactose-free buttermilk substitute 
3 Tbsp. lactose-free butter, melted 
1 cup lactose-free sour cream 
1 cup cooked and chopped bacon 
1 cup chopped green onions 
1 ½ cup shredded lactose-free cheddar cheese, divided (1 ¼ cup + ¼ cup) 

Preheat oven to 350 ˚F. Grease a 6-cup jumbo muffin tin. 

In a large mixing bowl, whisk together flour, sugar, baking powder and salt. Set aside. 

In a medium mixing bowl, whisk together 1 egg, buttermilk, melted butter, and sour cream. 

To the dry ingredients, add and fold in the wet ingredients, cooked bacon, green onions and 1 ¼ cup of the cheddar cheese until just incorporated. 

Using an ice cream scoop, fill each cup of a prepared large muffin tin with one large scoop. 

Using a spoon, create a well in each of the scoops, pressing the batter up against the side of the pan, making sure it is deep enough to hold an egg. 

Crack an egg into each of the wells of batter. 

Using two spoons, drop small scoops of batter, first around the outside of the egg, building up the outer edge of the muffin and sealing in the egg whites and yolk, and finally over the top to cover the yolk. Be careful not to apply too much pressure while dropping above the yolk or it may break. 

Top each muffin with remaining ¼ cup of cheddar cheese (I had a bit more). 

Bake in preheated oven for 25-30 minutes. 

Remove from oven and allow to set 5 minutes before removing from pan. These are best served warm; leftovers should be refrigerated and warmed up before serving.


Saturday, February 25, 2023

Roasted Winter Squash with Kale Pipián

I made roasted winter squash with kale pipián for lunch and it was great! Before anyone asks, Wikipedia says that pipián is a sauce made from puréed greens and ground pumpkin seeds. Note that to be more traditional, you should use hoja santa (“a robust aromatic Mexican herb”) instead of kale, but it’s just hard to come by. The Tuscan kale in this recipe is also called lacinato or dinosaur kale; it is much smaller and less sturdy than the traditional curly leaf kale that you’re used to seeing. It goes well with the pumpkin seeds, and this was possibly my first time using tomatillos at home – the sauce really worked! It would be great on other roasted vegetables, too. 

1 cup raw pumpkin seeds (pepitas), divided 
3 lbs. mixed winter squash pieces (such as 1”-thick delicata rounds or kabocha wedges, and/or quartered honeynut), seeds removed 
3 Tbsp. extra-virgin olive oil 
kosher salt 
¼ white onion, thinly sliced 
3 garlic cloves, crushed 
8 oz. tomatillos (about 4), husks removed, rinsed 
1 small bunch Tuscan kale, ribs and stems removed, leaves torn 
2 serrano chiles (I omitted them) 
flaky sea salt 
cilantro leaves with tender stems and lime wedges (for serving) 

Preheat oven to 350 °F. Toast pumpkin seeds on a rimmed baking sheet until lightly browned, 6–8 minutes. Let cool. 

Increase oven temperature to 425 °F. Toss squash pieces and oil on another rimmed baking sheet to coat; season with kosher salt. Roast, tossing occasionally, until browned and tender, 30–40 minutes. 

Bring onion, garlic, tomatillos, and 2 cups water to a simmer in a large saucepan over medium-high. Cook until tomatillos are almost tender, about 5 minutes. Add kale and cook just until wilted and bright green, about 1 minute. Let onion mixture cool in pan until warm. 

Char chiles over the flame of a gas burner, turning occasionally, until blackened and slightly softened, about 1 minute (or, arrange chiles on a rimmed baking sheet and use broiler). 

Transfer onion mixture to a blender with a slotted spoon; reserve liquid. Add charred chiles and ¾ cup pumpkin seeds to blender and purée, adding reserved liquid as needed to get things moving, until a smooth, pourable sauce forms. Season pipián with kosher salt. 

Divide squash among plates. Drizzle with pipián and sprinkle with sea salt. Top with remaining ¼ cup pumpkin seeds and cilantro. Serve with lime wedges.


Thursday, February 23, 2023

Ginger Beef and Green Bean Stir-Fry


I didn’t bother taking great photos of this ginger beef and green bean stir-fry, because really, it’s somewhat of an unassuming dish. But then… everyone liked it, even the Fox! It’s a rare thing to give a meal 4 thumbs up in this house, so it deserves to be shared! My modifications are below – note that I didn’t use any rooster sauce because I was out, but I served hot sauce on the side for those who wanted it. 

1 cup long-grain white rice 
1 ½ lbs. flank steak, thinly sliced against the grain 
2 Tbsp. cornstarch 
2 Tbsp. lower-sodium soy sauce, divided 
3 Tbsp. chili-garlic sauce (such as sambal oelek – I omitted that) 
1 tablespoon sesame oil 
4 scallions 
3 Tbsp. canola oil 
a 2-inch piece fresh ginger, peeled and cut into thin matchsticks (I minced mine) 
12 oz. trimmed green beans 
2 Tbsp. toasted sesame seeds 

Cook rice according to package directions. Remove from heat and let stand, covered, for 5 minutes. 

Meanwhile, toss steak, cornstarch, and 1 tablespoon soy sauce in a medium bowl until steak is evenly coated. Combine chili-garlic sauce, sesame oil, and remaining soy sauce in a small bowl. Roughly chop scallion whites and thinly slice dark green scallion tops. 

Heat canola oil in a large wok or skillet over high. Add steak mixture in a single layer; cook, undisturbed, for 1 minute. Stir once and cook, undisturbed, for 1 minute. Add ginger and scallion whites; cook, stirring often, until steak is well browned, about 2 minutes. 

Push steak to sides of pan, creating room in middle, and add beans. Cook, undisturbed, for 1 minute. Continue to cook, stirring occasionally, until beans are barely tender, 3 to 5 minutes. Add soy sauce mixture; cook, stirring often, until steak and vegetables are well coated, about 1 minute. Serve with rice, topped with sliced scallion greens and sesame seeds.


Tuesday, February 21, 2023

Salade arc-en-ciel au quinoa, vinaigrette aux amandes


Voici une délicieuse salade de Coup de Pouce. J’ai fait rôtir le brocoli avec la patate douce parce qu’il faisait froid cette journée-là et j’avais donc besoin de manger chaud. J’ai vraiment aimé cette salade! J’ai préféré mettre les restes au frigo séparément, de manière à pouvoir faire chauffer le quinoa, la patate douce et le brocoli, puis j’ai ajouté les dés de pomme fraîchement coupés, les arilles de grenade, les graines de tournesol et les fines herbes au moment de servir. 

Pour la vinaigrette (environ 1 tasse) 
1/3 tasse de beurre d’amandes 
¼ tasse de jus de citron 
¼ tasse de sirop d’érable 
1 petite gousse d’ail hachée finement 
sel et poivre 

Dans un petit bol, à l’aide d’un fouet (ou dans un petit pot muni d’un couvercle), mélanger le beurre d’amandes, le jus de citron, le sirop d’érable et l’ail. Au besoin, ajouter de l’eau, un peu à la fois, pour obtenir la consistance désirée (la recette d’origine parlait de 1/3 tasse, mais c’était trop à mon goût). Saler et poivrer. (La vinaigrette se conservera jusqu’à 5 jours au réfrigérateur. Laisser revenir à la température ambiante et fouetter avant d’utiliser.) 

Pour la salade 
1 tasse de quinoa, rincé et égoutté 
2 tasses d’eau 
1 patate douce, pelée et coupée en dés de ½ po (1 cm) 
2 c. à thé d’huile végétale 
2 tasses de feuilles de chou frisé (kale), déchiquetées 
2 tasses de bouquets de brocoli haché grossièrement 
2 pommes rouges, le cœur enlevé, coupées en dés 
½ tasse d’arilles de grenade 
½ tasse de graines de tournesol 
2 c. à soupe de menthe fraîche hachée grossièrement 
2 c. à soupe de persil italien frais haché grossièrement 
sel et poivre 

Dans une casserole, mélanger le quinoa et l’eau. Saler, puis porter à ébullition. Réduire le feu, couvrir et cuire de 12 à 15 minutes ou jusqu’à ce que l’eau ait été absorbée et que le quinoa soit tendre. À l’aide d’une fourchette, défaire les grains de quinoa. Mettre le quinoa dans un grand bol et laisser refroidir. 

Entre-temps, préchauffer le four à 425 °F. Sur une plaque de cuisson, mélanger les dés de patate douce et l’huile (voir note plus haut). Saler et poivrer. Étendre la patate douce en une seule couche sur la plaque et cuire au four pendant 15 minutes ou jusqu’à ce qu’elle soit tendre (remuer à mi-cuisson). Retirer la plaque du four et laisser tiédir. 

Dans le grand bol contenant le quinoa refroidi, ajouter la patate douce, le kale, le brocoli, les pommes, les arilles de grenade, les graines de tournesol, la menthe et le persil. (La salade se conservera jusqu’au lendemain, au réfrigérateur.) Au moment de servir, arroser de la vinaigrette et mélanger pour bien enrober les ingrédients.


Burgers de dinde


Voici une recette de Coup de Pouce que j’ai beaucoup aimée. Non seulement ces hamburgers sont faits avec une viande maigre, mais ils étaient très goûteux, et en plus, ils se font au four. Au four! Ça veut dire que je n’ai pas à m’occuper des boulettes à cuire en deux fois dans une poêle (parce que je double la recette), et je n’ai pas à nettoyer tout le dessus du poêle par la suite, alors j’adore le concept. 

Pour les céréales de riz brun (ou carrément des Rice Krispies), il se vend de petits formats qui ressemblent à un bol en plastique en portion individuelle, ce qui évite de devoir en acheter toute une boîte. J’ai aussi fait une purée de dattes en mettant quelques dattes à tremper dans l’eau chaude pour les ramollir, puis je les ai passées au mélangeur sur pied. J’ai doublé la recette pour obtenir 8 boulettes; j’ajoute mes autres notes ci-dessous. J’ai servi le tout sur des pains plats de blé entier, avec des épinards et du fromage sans lactose. 

1 lb. de dinde hachée 
1 tasse de céréales de riz brun croustillant 
1 tasse de jeunes épinards hachés, et davantage pour garnir 
½ tasse de cheddar sans lactose râpé, et davantage pour garnir 
2 c. à soupe d’épices à steak (j’en mettrai moins la prochaine fois) 
1 c. à soupe de purée de dattes 
4 pains à hamburgers 

Préchauffer le four à 400 °F. 

Dans un grand bol, bien mélanger l’ensemble des ingrédients avec la purée de dattes. Avec les mains mouillées, façonner le mélange en quatre galettes d’environ 1 po (2,5 cm) d’épaisseur et former un petit creux au centre de chacune. Déposer les galettes sur une plaque de cuisson tapissée de papier parchemin. 

Cuire au four pendant 25 minutes ou jusqu’à ce que les galettes soient dorées et qu’elles aient perdu leur teinte rosée à l’intérieur (les retourner délicatement à mi-cuisson – moi, j’ai fait cuire deux fois 15 minutes).


Monday, February 20, 2023

English-Style Chicken Banana Curry


This is a post about chicken curry. It is also a post about digital files disappearing. You see, I’ve been having intermittent issues with my iPhone over the course of a few months, where it would mangle videos and simply fail to take pictures. I mean, when I took the photo, everything looked fine, but then when I went back in the Photos folder, there was no record of it, and not even a gap in the file names to justify its disappearance. After trying to troubleshoot this with Apple support, I had to do a factory reset on the phone, and hopefully now the problem is fixed. But I lost some photos from my business, family holidays, and recipes. There’s no record of the mango chicken curry I made. But here’s a banana chicken curry to compensate. 

Even that recipe is the result of a file missing online, because I once made a copy of a similar recipe in an LCBO magazine. Unfortunately, I only made a copy of the page with the photo, ingredients, and first step, without realizing that the recipe was continued on page 76. In the years since, it has been impossible to find that recipe, be it on the LCBO’s website or elsewhere. But when I searched for similar recipes, I found this one, and the ingredients are close enough that I was confident it would satisfy my curiosity. 

OK, so, a banana curry, you say? I’m not sure if it was the British who first paired bananas with curry or whether this was done in Asia as well, but in any case, it’s actually very good! There are also apples and raisins in the dish, so it skews sweet, and I could definitely imagine this with coconut. I served it with Right Rice, and I prefer to slice the bananas fresh instead of mixing them in to be stored overnight; I wrote that below. I ended up not using the raisins because I knew my kids wouldn’t go for it; I used 2 apples and increased the amount of chicken to have leftovers. I also reordered the ingredients below to make the recipe easier to follow. 

2 Tbsp. vegetable oil, divided 
1 large onion, chopped 
2 Tbsp. mild curry powder 
1 clove garlic, minced 
1 fresh bay leaf 
2 cups chicken stock 
1 medium Granny Smith apple, diced 
¼ cup raisins (I would prefer golden raisins) 
½ tsp. salt 
1 lb. boneless chicken, cut into 1-inch pieces (I made mine smaller and had more chicken) 
1 ½ Tbsp. flour (I needed more) 
2 Tbsp. fresh lime juice 
2 ripe bananas, sliced 
¼ cup chopped fresh parsley (I think cilantro would be better) 

Sweat the onion (cook on low heat until they are translucent) in a small amount of vegetable oil. Add the curry powder and cook for 5 minutes. Then add the garlic, bay leaf and chicken stock, stirring as you go. Bring to a boil for 3 minutes. 

Add the apple, raisins, and salt and reduce the heat, simmering for a few minutes. 

While the sauce is simmering, toss the chicken pieces in the flour. 

Heat vegetable oil in a large pan. Brown the chicken and then add the sauce (I had more chicken than called for, so I cooked it in two batches). 

Simmer for 10 minutes and then add the lime juice and stir. 

To serve, top with bananas and parsley. Serve with rice.


Sunday, February 19, 2023

Tarte aux bleuets et au chocolat


Cette recette vient de Ricardo. Même si j’ai dû faire des changements, même si tout n’a pas super bien fonctionné, même si je n’avais pas de fleurs comestibles pour la rendre aussi belle que celle d’origine (ça vaut vraiment la peine d’aller voir!)… Cette tarte était absolument excellente, et il va falloir que je la refasse! 

Déjà, pour la croûte, je n’avais pas de biscuits au chocolat, mais j’avais un sac de mini Oreos dont je voulais me débarrasser, alors j’ai utilisé ce sac avec ¼ tasse de beurre sans lactose et 1 pincée de sel. J’ai utilisé un moule à tarte à fond amovible de 9 pouces (au lieu de 10,5 pouces) et j’ai eu juste assez de croûte, mais pas assez de garniture gélifiée, alors je ne vous recommande pas plus grand. Et au lieu de la crème chantilly au chocolat blanc, j’ai utilisé de la crème végétalienne en bonbonne et des copeaux de chocolat blanc. Un délice! 


Pour la croûte 
280 g (2 tasses) de chapelure de biscuits au chocolat 
2 c. à soupe de sucre 
6 c. à soupe de beurre sans lactose, fondu 
1 pincée de fleur de sel 

Pour la crème au chocolat noir 
115 g (¾ tasse) de bleuets frais 
225 g (8 oz) de chocolat noir à 60 %, haché 
1 tasse de crème à fouetter sans lactose 
½ tasse de lait sans lactose 
¼ tasse de sucre 
3 jaunes d’œufs 

Pour la chantilly au chocolat blanc 
55 g (2 oz) de chocolat blanc, haché 
½ tasse de crème à fouetter sans lactose 

Pour la gelée aux bleuets 
1 c. à thé de gélatine 
5 c. à thé d’eau froide, divisée 
2 c. à thé de fécule de maïs 
2 c. à soupe de sucre 

Pour le montage 
¼ tasse de bleuets frais 
fleurs comestibles, mûres (facultatif) 


Pour la croûte 
Placer la grille au centre du four. Préchauffer le four à 350 °F. 

Dans un bol, mélanger tous les ingrédients (j’ai fait ça dans mon robot). Presser fermement le mélange dans le fond et sur la paroi d’un moule à tarte à fond amovible de 10,5 pouces de diamètre (9 pouces pour moi, et c’est ce que je recommande). 

Cuire au four 10-12 minutes. Laisser refroidir 30 minutes. 

Pour la crème au chocolat noir
Répartir les bleuets sur la croûte. 

Dans un autre bol, placer le chocolat. 

Dans une casserole, hors du feu, mélanger au fouet la crème, le lait, le sucre et les jaunes d’œufs. Cuire à feu moyen-doux en remuant constamment jusqu’à ce que la crème ait légèrement épaissi. Verser sur le chocolat et laisser fondre 2 minutes sans remuer. Mélanger au fouet jusqu’à ce que le mélange soit lisse. Verser la crème au chocolat dans la croûte sur les bleuets. Réfrigérer 2 heures ou jusqu’à ce que la crème soit prise. 

Pour la chantilly au chocolat blanc 
Entre-temps, dans un troisième bol, déposer le chocolat blanc. 

Dans une petite casserole, porter la crème à ébullition. Verser la crème chaude sur le chocolat et laisser reposer 1 minute sans remuer. Mélanger au fouet jusqu’à ce que le mélange soit homogène. Couvrir et réfrigérer 2 heures. 

Pour la gelée aux bleuets 
Dans un petit bol, saupoudrer la gélatine sur 1 c. à soupe de l’eau. Laisser gonfler 5 minutes. 

Dans un autre petit bol, délayer la fécule dans le reste de l’eau (2 cuillères à thé). 

Dans une petite casserole, porter à ébullition les bleuets avec le sucre jusqu’à ce que le sucre soit dissous. Au mélangeur à main, réduire les bleuets et le sucre en purée lisse. Passer la purée au tamis (je n’ai pas fait ça, j’ai ma vie à vivre) et remettre dans la casserole. Incorporer le mélange de fécule à la purée de bleuets. 

Cuire à feu moyen en remuant au fouet jusqu’à ce que le mélange épaississe. Retirer du feu. Ajouter la gélatine et bien mélanger jusqu’à ce qu’elle soit dissoute. Laisser tiédir 5 minutes. 

Verser délicatement la gelée sur la crème au chocolat et l’étendre sur toute la surface de la tarte à l’aide d’une spatule coudée (je n’en avais pas tout à fait assez, même si mon moule était plus petit). Laisser figer au réfrigérateur 1 heure.

Pour le montage 
Au batteur électrique, fouetter la chantilly jusqu’à ce qu’elle forme des pics fermes mais encore souples (ne pas trop fouetter, sinon la crème tournera en beurre). Dans mon cas, ça n’a pas fonctionné, mais je tiens à préciser que j’avais un substitut de crème végétalien, alors c’est peut-être de ma faute. 

Garnir la tarte de pointes de crème chantilly. (J’ai plutôt utilisé de la crème végétalienne en cannette et des copeaux de chocolat blanc.) Répartir les bleuets, les mûres et les fleurs comestibles. La tarte se conservera quelques jours au réfrigérateur.


Friday, February 17, 2023

Thon grillé à la lime et à l'échalote


Bon, le vrai titre du plat serait trop long: thon grillé à la lime et à l’échalote, betteraves sautées au miel et au cidre, purée de petits pois au gingembre et à la menthe, mais avouez que ça a l’air excellent! J’ai fait ce plat parce que ça avait l’air délicieux sur l’image, et parce que le thon est pas mal le seul poisson que je peux apprécier. Les enfants n’ont pas trippé, mais c’est tant pis. 

Pour préparer le tout, j’ai commencé d’avance : d’abord les betteraves jaunes, puis les rouges, puis la purée de petits pois. Vers l’heure du souper, j’ai fait réchauffer tout ça séparément pendant que le thon cuisait sur le poêle. Est-ce que je vais me donner autant de trouble souvent? Non, clairement, mais une fois, ça va. 


Pour le thon 
¼ tasse d'huile d’avocat ou d’olive 
½ tasse d’échalote française hachée finement 
1 c. à thé de zeste de lime râpé 
¼ tasse de jus de lime 
1 c. à soupe de miel liquide 
1 c. à soupe de sauce soya à teneur réduite en sel 
4 darnes de thon, épongées (environ 6 oz / 180 g chacune) 
1 c. à soupe d’huile de canola 
oignons frits du commerce et feuilles de menthe, pour servir 
sel et poivre 

Dans un petit poêlon, chauffer l’huile d’avocat à feu moyen-doux. Ajouter l’échalote et cuire de 2 à 3 minutes ou jusqu’à ce qu’elle ait ramolli. Transférer la préparation dans un bol. Ajouter le zeste, le jus de lime, le miel et la sauce soya, et mélanger. Réserver à la température ambiante. 

Régler le barbecue à puissance moyenne. Badigeonner le thon de l’huile de canola. Saler et poivrer. Déposer le thon sur la grille huilée du barbecue et cuire de 4 à 6 minutes pour un poisson mi-cuit ou jusqu’au degré de cuisson désiré (le retourner à mi-cuisson). Déposer le thon sur une planche et laisser reposer 5 minutes. 

Au moment de servir, répartir la purée au centre de quatre assiettes. Garnir du thon et des betteraves. Arroser de la préparation à l’échalote réservée. Parsemer d’oignons frits et de feuilles de menthe, si désiré. 


Pour les betteraves 
(Pour que les betteraves jaunes gardent leur belle couleur dorée sans virer au rose, on les fait cuire puis sauter avant les betteraves rouges, avec la moitié du vinaigre et du miel.) 
4 petites betteraves jaunes 
4 petites betteraves rouges 
1 c. à soupe de beurre sans lactose 
2 c. à soupe de vinaigre de cidre 
1 c. à soupe de miel liquide 
sel et poivre 

Dans une casserole d’eau bouillante salée, cuire les betteraves de 20 à 30 minutes ou jusqu’à ce qu’elles soient tendres. Les égoutter et les passer sous l’eau froide jusqu’à ce qu’elles aient suffisamment refroidi pour pouvoir les manipuler. Peler les betteraves, puis les couper en quartiers. 

Dans un poêlon, chauffer le beurre à feu moyen. Ajouter les betteraves et les réchauffer 2 minutes, en brassant. Ajouter le vinaigre et le miel, et poursuivre la cuisson, en brassant, 1 minute ou jusqu’à ce que les betteraves soient bien enrobées. Saler et poivrer. 


Pour la purée de petits pois 
4 tasses de petits pois frais ou surgelés 
1/3 tasse d’huile d’avocat ou d’olive (j’en mettrais bien moins)
¼ tasse de jus de citron 
2 c. à thé de gingembre frais râpé 
15 feuilles de menthe fraîche 
sel et poivre 

Dans une casserole d’eau bouillante salée, cuire les petits pois. Les égoutter. Au robot culinaire ou au mélangeur, réduire en purée lisse les petits pois égouttés, l’huile, le jus de citron, le gingembre et la menthe. Passer la préparation au tamis fin. Saler et poivrer.


Thursday, February 16, 2023

Sheet Pan Gnocchi with Soy Sauce and Mushrooms


This recipe is from Bon Appétit. I’m just a sucker for sheet pan dinners that include gnocchi! Plus, mushrooms are one of the few vegetables that the Fox actually likes. The quantities below yield 4 delicious servings. 

2 medium carrots, peeled
6 scallions, divided 
1 onion, sliced ¼” thick 
1 17.5-oz. package shelf-stable or refrigerated potato gnocchi 
14 oz. mixed mushrooms (such as shiitake, oyster, or trumpet), trimmed, cut into large pieces 
6 Tbsp. extra-virgin olive oil, divided 
kosher salt, freshly ground pepper 
1 garlic clove, finely grated 
2 Tbsp. soy sauce 
1 Tbsp. mirin 
1 Tbsp. unseasoned rice vinegar 
2 tsp. granulated sugar 
2 tsp. toasted sesame oil 
toasted sesame seeds, for serving 

Place a rack in the middle of the oven; preheat to 400 °F. 

Slice carrots and 5 scallions on a diagonal to match length of gnocchi. Toss carrots, scallions, onion, gnocchi, mushrooms, and 4 tablespoons olive oil on a large rimmed baking sheet to coat. Season with salt and pepper and toss again. 

Roast gnocchi and vegetables, stirring once or twice, until gnocchi and onion are golden and mushrooms are starting to crisp around the edges, 30-35 minutes. 

Meanwhile, place garlic, soy sauce, mirin, vinegar, sugar, sesame oil, and remaining 2 tablespoons of olive oil in a small jar. Cover and shake to combine. 

Remove baking sheet with gnocchi and vegetables from the oven and drizzle dressing over; toss to coat. 

Divide gnocchi and vegetables among plates and sprinkle with sesame seeds. Thinly slice remaining scallion on a diagonal and scatter over the dish before serving.

Wednesday, February 15, 2023

Beef and Cauliflower Taco Skillet


This is a great recipe not only if you like southwest flavors, but also if you are trying to reduce the amount of meat or increase the amount of vegetables in your diet. The recipe is from Budget Bytes. I used frozen riced cauliflower because it’s just easier, but of course you can make it fresh if you want. I also made this a mild dish (my modifications are below) and served hot sauce on the side. We give this dish 4 thumbs up! 

2 cloves garlic 
1 Tbsp. olive oil 
1 lb. ground beef 
1 15oz. can black beans 
1 10-oz. can diced tomatoes with green chiles (I had a 15-oz. can of tomatoes without chiles) 
1 Tbsp. chili powder (I used 1 pinch Korean pepper) 
1 tsp. smoked paprika 
1 tsp. ground cumin 
½ tsp. dried oregano 
¼ tsp. salt 
1/8 tsp. pepper 
3 cups riced cauliflower 
2 oz. lactose-free cheddar cheese, shredded 
1 avocado 
1 tomato 
¼ cup finely diced red onion (I sed a shallot) 
1 handful fresh cilantro 

Mince the garlic. Add the garlic, olive oil, and ground beef to a large skillet and cook over medium heat until the ground beef is browned. (If you're using a high fat content beef, you may want to drain off the excess fat before the next step.) 

Drain the can of black beans and add them to the skillet along with the diced tomatoes with green chiles (not drained), chili powder, smoked paprika, cumin, oregano, salt, and pepper. Stir and cook until the skillet is simmering. 

Add the riced cauliflower to the skillet (no need to thaw, if frozen). Continue to stir and cook over medium heat until the cauliflower is tender, about five minutes. 

While the beef and cauliflower are heating, dice the tomato, avocado, and red onion. Roughly chop the cilantro. 

Top the beef and cauliflower mixture with the shredded cheddar. Place a lid on the skillet, and let it heat over medium for a few minutes, or until the cheddar has melted. (I didn’t do this part and made the cheese an optional topping.) 

Once the cheese is melted, top the skillet with the tomato, avocado, red onion, and cilantro. Serve immediately.

Fall Salad


This recipe is from Weelicious. While it is no longer fall, you might still be able to find persimmons; if not, keep this in mind for the next time they’re in season! I’ve decided that I really like persimmons and want to eat more of them. This was a great way to enjoy them fresh! They are so beautiful sliced across the equator. Note that I assembled the salad willy-nilly over several days and used more fruit than the directions call for. 

For the salad 
1 lb. arugula (or favorite salad greens) 
1 pear, cored and thinly sliced 
½ cup pomegranate arils 
1 persimmon, sliced (I used a fuyu persimmon) 
1/3 cup walnuts, toasted (I only had pecans on hand) 
¼ cup lactose-free feta cheese, crumbled 

For the dressing 
1 small shallot, finely diced 
3 Tbsp. fig or regular balsamic vinegar 
¼ cup olive oil 
¼ tsp. kosher salt 

Place all the salad ingredients in a large bowl. 

Place the vinaigrette ingredients in a jar and shake vigorously to combine. 

Drizzle some of the vinaigrette over the salad and toss to just coat the salad.

Tuesday, February 14, 2023

Chocolate Cranberry Fudge Cake


For Thanksgiving, I made my usual, beloved cranberry sauce, but the Little Prince wanted to taste the famous canned cranberry sauce from Ocean Spray, so I bought that too. Of course, we had leftovers of each after the meal, so I froze them for a while, then came across this recipe for a chocolate cranberry cake that uses the canned sauce as a base! So I used my regular, fresh-berry sauce in the cake (I blitzed it with the immersion blender first because it also had orange segments), and the jellied canned sauce in the frosting. This was really good, and it’s a great way to use up those leftovers! 

For the cake 
2/3 cup semi-sweet chocolate chips 
½ cup lactose-free butter or margarine 
1 oz unsweetened chocolate 
1 cup Ocean Spray® Whole Berry Cranberry Sauce (see above) 
½ cup sugar 
2 large eggs 
1 tsp. vanilla 
¼ cup all-purpose flour
½ tsp. baking powder 
1 pinch of salt 

For the glaze 
¼ cup lactose-free whipping cream 
½ cup semi-sweet chocolate chips 
¼ cup Ocean Spray® Jellied Cranberry Sauce 


For the cake 
Preheat oven to 325 °F. Line an 8-inch round cake pan with foil (I just used wax paper on the bottom). Coat foil with cooking spray. Dust the pan with cocoa and tap to remove excess. 

Microwave 2/3 cup chocolate chips, butter and unsweetened chocolate in large microwave-safe bowl on High for 1 minute (I did this in a double-boiler). Stir until smooth. Microwave for 30 more seconds if necessary to melt chocolate. 

Add cranberry sauce and sugar; mix well. Add eggs and vanilla; mix well. 

In a small bowl, whisk together flour, baking powder, and salt. Add to the wet ingredients and mix until combined. Pour batter in prepared pan. 

Bake for 40 minutes or until center is set and a toothpick comes out clean. Cool in pan 30 minutes, then refrigerate 1 hour or until cold. 

For the glaze 
Microwave cream and chocolate chips together in medium microwave-safe bowl for 1 minute on High (I also did this in a double-boiler). Stir until smooth. Microwave for 30 more seconds if necessary to melt chocolate. Add cranberry sauce; mix well. 

Turn cake out onto serving plate; remove foil. Spread glaze over top allowing some to drip down sides of cake. Chill 1 hour or until glaze is firm. (The cake can be stored in the fridge or at room temperature.)


Monday, February 13, 2023

Mochi Waffles


This mochi waffle recipe is from Bon Appétit. I really liked the consistency of these and how chewy they were! Note that in my version, below, I simplified the toppings (otherwise, you’d be making a sort of bananas foster and it would be a waste of maple syrup). 

1 ¼ cups mochiko (sweet rice flour) 
1 cup all-purpose flour 
1 Tbsp. baking powder 
1 ½ Tbsp. Diamond Crystal or ¾ tsp. Morton kosher salt 
2 large eggs, separated 
1 ½ cups lactose-free whole milk 
1/3 cup sugar 
1 Tbsp. vanilla extract 
4 Tbsp. (½ stick) lactose-free butter 
bananas and maple syrup (for serving) 

Whisk mochiko, all-purpose flour, baking powder, and salt in a medium bowl. 

Whisk egg yolks, milk, sugar, and vanilla in a large bowl until smooth. 

Melt 4 Tbsp. butter in a small skillet over medium heat, then gradually add to egg yolk mixture, whisking constantly. Add dry ingredients to bowl and whisk until smooth. 

Lightly whisk egg whites in a small bowl until foamy, then whisk into batter. 

Heat a waffle iron on high; lightly coat with nonstick spray. Pour a heaping ½ cup of batter (or enough to cover surface) onto iron and cook until waffles are golden brown and cooked through, about 4 minutes. Repeat with remaining batter, coating iron with more nonstick spray as needed. 

Serve topped with bananas and maple syrup.


Sunday, February 12, 2023

Almond Flour Chocolate Cupcakes


Not too long ago, my mother-in-law came to visit, so we needed some gluten-free recipes. I decided to try these almond flour chocolate cupcakes, which you can also make low-carb. And the chocolate frosting has only two ingredients! These were delicious; I’m glad we tried them. 

In the recipe below, I added some weights and a few notes. The cupcakes will keep at room temperature for a few days, or in the fridge for up to a week. 

For the cupcakes 
2 ½ (300 g) cups almond flour 
½ cup (60 g) cocoa powder 
1 cup granulated sweetener or choice (such as monk fruit sweetener or erythritol) 
1 tsp. baking soda 
¼ tsp. salt 
3 large eggs 
1 cup lactose-free sour cream (or Greek yogurt) 
1 tsp. vanilla extract 

For the chocolate frosting 
¾ cup coconut cream, chilled (chill a can of full fat coconut cream; remove the liquid and measure out ¾ cup) 
1 ½ cups chopped chocolate (I used 7 oz.; ideally, do not use chocolate chips here) 


For the cupcakes 
Preheat the oven to 350 °F. Lightly grease a 12-count muffin tin or use muffin liners. 

In a large mixing bowl, whisk together the dry ingredients until combined. 

In a medium bowl, whisk the rest of the ingredients until combined. Fold them into the dry ingredients until just combined and mostly smooth. 

Distribute your cupcake batter evenly amongst the muffin tin. Bake for around 20 minutes (25 minutes for me), or until a skewer comes out mostly clean. 

Remove from the oven and let cool completely before frosting. 

For the frosting 
In a mixing bowl, put the chilled coconut cream and set aside. 

In a microwave safe bowl, add the chocolate and melt in 20-second spurts until melted. (I did this in a double boiler.) 

Add the melted chocolate into the mixing bowl and whisk together with the coconut cream until thick and glossy. Cover the bowl and refrigerate for at least two hours, to thicken. 

Remove the bowl from the refrigerator. Using a stick mixer, beat together the firm frosting until light and fluffy. Pipe the frosting onto the cupcakes (it will be somewhat thick, but by no means solid).


Saturday, February 11, 2023

Bol smoothie noix de coco, banane et mangue


Ce bol smoothie était vraiment délicieux, et joli en plus! Seul défaut : il ne contient pas assez de protéines, alors ça vaudrait la peine d’ajouter des protéines en poudre ou quelque chose du genre, pour éviter d’avoir trop faim avant midi. Bon appétit! 

1 banane 
1 mangue 
½ tasse de boisson à la noix de coco 
½ tasse de yogourt grec nature sans lactose 
1 c. à thé de sirop d’érable 
tranches de kiwi 
arilles de grenade 
graines de chia 
flocons de noix de coco 

Réduire en purée la banane, la mangue, la boisson à la noix de coco, le yogourt et le sirop d’érable. 

Verser le smoothie dans un bol et garnir de tranches de kiwi, d'arilles de grenade, de graines de chia et de flocons de noix de coco.

Zucchini Sausage Rolls


It feels weird calling these zucchini sausage rolls because, even though there’s technically more vegetables than meat, you really can’t tell when you’re eating them! Sausage rolls are akin to pigs in a blanket, but instead of a little sausage encased in dough, it’s sausage filling with aromatics encased in dough. I doubled the recipe to use up a whole pound of meat and froze a bunch of the rolls – these are good for school lunches! The single recipe, as written below, yields a dozen rolls. 

2 medium zucchini (about 8 oz. total), scrubbed 
1 small white onion (about 4 oz.), halved 
8 oz. ground pork 
1¾ cups panko 
¼ cup finely chopped parsley 
2 Tbsp. extra-virgin olive oil 
1 Tbsp. finely grated lemon zest 
2 tsp. coarsely ground fennel seeds (I’d recommend 1 tsp.) 
2 tsp. Diamond Crystal or 1¼ tsp. Morton kosher salt 
2 tsp. freshly ground black pepper 
2 tsp. garlic powder 
2 tsp. paprika 
1 large egg 
1 package frozen puff pastry, thawed 

Grate zucchinis and onion on the small holes of a box grater into a large bowl. Add pork, panko, parsley, olive oil, lemon zest, fennel seeds, salt, pepper, garlic powder, and paprika. Beat egg in a small bowl to blend; set 2 Tbsp. egg aside in another small bowl. Add remaining egg to zucchini mixture and, using a sturdy wooden spoon or your hands (I used a fork), mix vigorously until evenly combined (it’s preferable to overmix rather than undermix here). 

Unfold puff pastry sheets. (If using a 14-oz. package with only 1 sheet of pastry, cut in half lengthwise and roll out each half on lightly floured surface until about 14"x9".) Working with 1 sheet, spoon half of meat mixture about 1" away from edge of pastry closest to you. Pat mixture into sausage shape, running along length of pastry. Fold pastry up and over mixture, then roll up to encase fully (mine were more oblong than rolled). Gently run your thumb along seam to seal (no need to pinch both ends of roll closed). Place sausage roll, seam side down, on a parchment-lined baking sheet. Repeat process with remaining sheet of pastry and meat mixture. Chill, uncovered, at least 30 minutes and up to 2 hours. 

Place a rack in lower third of oven; preheat to 375 °F. Brush sausage rolls with reserved egg. Using a paring knife, cut slashes in top of pastry at regular intervals. Cut each roll into 6 pieces to make a total of 12. Arrange evenly on baking sheet and bake until rolls are puffed and light golden brown, 30–40 minutes. Reduce oven temperature to 350 °F and continue to bake until deep golden brown, 15–20 minutes longer.


Thursday, February 09, 2023

Persimmon Cake


I decided that I really wanted to enjoy some persimmons while they were in season a few months ago, so I made Catherine McCord’s persimmon cake. This cake is dense and moist, and has a more delicate taste than the dark crumb would let you think. It was delicious! 

You should know that there are two main kinds of persimmons: fuyus and hachiyas. The fuyus, pictured here, are the most readily available in stores. They can be eaten when firm, and I really enjoy them. The hachiyas are more oblong, and those are trickier because they must be soft-ripe before they can be eaten. 


To make persimmon purée, all you need to do is peel some persimmons, remove the core if it is tough and/or white, chop them, and purée them in the food processor. It will look odd at first, like a chunky mixture that isn’t doing what you want it to, and you’ll wonder if you should have steamed the fruit first, but keep processing and it’ll come together! I used 6 or 7 fuyu persimmons and got a bit more than 2 cups of purée – I ate the extra purée with yogurt and vanilla powder. 


2 cups all-purpose flour 
2 tsp. baking soda 
1 ½ tsp. ground cinnamon
½ tsp. freshly grated nutmeg 
¾ tsp. kosher salt 
1 ¼ granulated sugar 
¾ cup lactose-free butter, melted 
2 cups persimmon purée (see above) 
3 large eggs, at room temperature 
2 tsp. vanilla extract 
powdered sugar, for dusting (optional) 

Preheat the oven to 350 °F. Coat a 10-cup (2.5-liter) bundt cake or tube pan with butter or nonstick cooking spray. 

In a large bowl, sift together the flour, baking soda, cinnamon, nutmeg, and salt. Stir in the granulated sugar. 

In a medium bowl or standing mixer, stir together the ¾ cup melted butter, persimmon purée, eggs, and vanilla. 

Add the flour mixture on low and stir just until everything is moistened; don't over mix. 

Scrape the batter into the prepared pan and bake until a toothpick inserted into the cake comes out clean, about 1 hour (50 minutes in my case). Remove from the oven and let cool completely. 

Once the cake is cool, invert onto a serving plate. Dust with powdered sugar and serve.