Sans fanfare, je partage avec vous quelques liens et photos éparpillées sur mon ordinateur depuis des semaines. Il s’agit de plats dont je n’ai pas parlé ici, pour diverses raisons. Comme parce que c’est tellement simple que je me sentirais gênée de donner une recette, mettons pour le yakisoba de Tea and Cookies.
Ou parce que j’ai déjà publié la recette, dans le cas des magrets de canard rôtis avec poires au miel.
Ou parce que je n’ai tout simplement pas aimé ça. Je pense surtout à la salade chaude de carottes et de hijiki; j’ai beau essayer, mais je n’aime pas les algues cuites!
Il y a eu aussi le gâteau aux oranges et à l’huile d’olive de Leite’s Culinaria, qui ne nous a pas impressionnés et ne vaut pas la peine d’être refait.
Par contre, cette semaine, j’ai fait une recette du tonnerre, alors quand je mettrai en ligne la purée de pommes de terre au safran, vous attacherez bien votre tuque!
Friday, January 20, 2012
Feux sur Montréal
Je ne sais pas si vous êtes au courant, mais Montréal fait parler d’elle un peu partout ces temps-ci! Il y a une série de publicités disjonctées pour des festivals comme Montréal en lumière; je n’ai pu trouver aucune image en ligne, alors j’en reproduis une ci-dessous, trouvée dans l’épicurien Bon Appétit.
Ce même magazine avait publié un petit guide touristico-culinaire sur Montréal pour le temps des fêtes 2010; il mentionne toujours Joe Beef, parle du livre de cuisine, cite Frédéric Morin, et dans le numéro de janvier 2012, c’était au tour de Martin Picard et de la cabane à sucre du Pied de cochon.
Ce magazine culinaire n’est pas le seul à parler de Montréal; il y a aussi le magnifique A little relish, un magazine en ligne dont le deuxième numéro est consacré à Montréal. Et surtout, surtout, Anthony Bourdain qui passe 26 heures à Montréal dans le cadre de son émission The Layover (si vous avez une quarantaine de minutes et comprenez l’anglais, ça vaut la peine, c’est très bien fait!). Et une pub d’Adidas (qui ne parle pas de nourriture, celle-là, mais met en vedette le métro).
Enfin, le site de Tourisme Montréal est très bien conçu, et la version en anglais est superbe (rares sont les sites bilingues bien faits!). Il y a en plus un blogue et un vidéo présentant Montréal en deux minutes que je trouve génial. Tout ça pour dire que j’aime beaucoup ma ville!
Ce même magazine avait publié un petit guide touristico-culinaire sur Montréal pour le temps des fêtes 2010; il mentionne toujours Joe Beef, parle du livre de cuisine, cite Frédéric Morin, et dans le numéro de janvier 2012, c’était au tour de Martin Picard et de la cabane à sucre du Pied de cochon.
Ce magazine culinaire n’est pas le seul à parler de Montréal; il y a aussi le magnifique A little relish, un magazine en ligne dont le deuxième numéro est consacré à Montréal. Et surtout, surtout, Anthony Bourdain qui passe 26 heures à Montréal dans le cadre de son émission The Layover (si vous avez une quarantaine de minutes et comprenez l’anglais, ça vaut la peine, c’est très bien fait!). Et une pub d’Adidas (qui ne parle pas de nourriture, celle-là, mais met en vedette le métro).
Enfin, le site de Tourisme Montréal est très bien conçu, et la version en anglais est superbe (rares sont les sites bilingues bien faits!). Il y a en plus un blogue et un vidéo présentant Montréal en deux minutes que je trouve génial. Tout ça pour dire que j’aime beaucoup ma ville!
Creamy Saffron Yogurt
For dessert after the coconut chicken curry, I made some creamy saffron yogurt adapted from a recipe published in the same menu in Châtelaine. Mine is easier, but I find it’s better not to follow a set recipe for it (I did last time, and ended up with way too much of the spices). Basically, you need lactose-free yogurt; you can use plain yogurt and add a bit of sugar, or use vanilla or honey yogurt and leave it as is. You can strain it to thicken it if you want, but it’s not necessary. Throw in a pinch of ground saffron and a pinch of ground cardamom and mix well (adjust the spices from there, but remember that a little goes a long way). Top it off with some sliced mango and perhaps pomegranate seeds or raspberries, and you’ve got yourself a healthy dessert with Indian flavors. Bon appétit!
Coconut Chicken Curry
This is my mother’s recipe for chicken curry, which she adapted slightly from Châtelaine by omitting the water (as do I) and by reducing the amount of spices. I’m reproducing it below with the original amounts, but feel free to adjust it to your taste. Sometimes, my mother throws a peeled and cubed sweet potato in there with the coconut milk, for extra color, which is a pretty good idea considering that the dish doesn’t have any vegetables otherwise apart from the onion. I served it with brown rice, but lentils and naan bread would be wonderful.
1 large onion, coarsely chopped
3 garlic cloves, peeled and finely minced
4 skinless, boneless chicken breasts, cut into 1-inch cubes
1 Tbsp vegetable oil
3 whole cloves
1 Tbsp finely grated fresh ginger
2 tsp ground cumin
1 to 2 tsp chili powder (I used 1 tsp of Korean pepper)
1 tsp salt
¾ tsp ground turmeric
½ tsp ground cardamom
½ tsp mustard powder
400-mL can unsweetened coconut milk
1 cup coarsely chopped fresh coriander
2 to 3 tsp freshly squeezed lemon juice
Heat oil in a large wide saucepan set over medium-low heat. Add whole cloves to pan and stir-fry until fragrant, about 1 minute. Add onion and garlic. Stir often until onion softens, about 5 minutes.
Increase heat to medium-high. Add chicken. Stir-fry until golden-tinged, from 4 to 5 minutes. Then stir in ginger, cumin, 1 tsp chili powder, salt, turmeric, cardamom, and mustard powder. Stir in coconut milk. Taste, and for more kick, stir in remaining teaspoon chili powder.
Cover and reduce heat to medium-low. Simmer, stirring often, until chicken is cooked, 25 to 30 minutes. Remove from heat. Stir in coriander and 2 tsp lemon juice. Taste. Add remaining teaspoon lemon juice, if needed. Serve immediately.
Thursday, January 19, 2012
Couscous Salad with Winter Squash and Cranberries
This recipe, from The Kitchn, was really good. I like having a healthy vegetarian dish that’s easy to make and filling, and this hit the spot. The mix of spices was really good. I used butternut squash, which is my favorite, but you could use other types (like buttercup, to name just one). I used red wine vinegar instead of white wine vinegar (that’s what I have in the pantry), and I forgot about the orange zest. I also didn’t use nuts. If you can’t find lactose-free goat cheese, or if you want a vegan version of the dish, omit that, too.
1 medium butternut squash (or other hard winter squash), peeled and cut into 1-inch chunks
¾ cup uncooked couscous
1 cup water
1 onion, diced
4-5 Tbsp white wine vinegar (I used red wine vinegar)
2 Tbsp olive oil
zest of one orange
½ tsp coriander
1 tsp cinnamon
½ tsp nutmeg
1 tsp cumin
1-3 tsp salt, to taste
1 can chickpeas, drained
½ cup dried cranberries
2 oz lactose-free goat cheese (if desired)
½ cup walnuts or pecans, coarsely chopped (if desired)
Preheat oven to 400 ° F. Toss squash with a bit of olive oil and spread on a baking sheet. Roast squash, stirring occasionally, until tender, about 30 minutes. Allow to cool before combining with other ingredients.
Heat water in sauce pan to boiling. Add couscous and stir. Remove pan from heat, cover with a lid, and let sit for about 10 minutes until the couscous has absorbed all the water. Fluff with a fork and set aside.
Sauté onion in a skillet over medium-high heat until translucent. Set aside and allow to cool.
In a small bowl, whisk together vinegar, olive oil, zest, spices, and 1 tsp of salt.
In a large bowl, combine squash, couscous, onions, chickpeas, and cranberries. Pour on the vinegar-oil dressing and stir to combine. Taste to check seasoning and add salt if needed.
If including, crumble the goat cheese into chunks and gently fold into the salad. (Note: Make sure the salad is room temperature at this point or the goat cheese will melt.) Top each serving with a sprinkle of walnuts (if desired) and enjoy. This salad can be served at room temperature or cold.
1 medium butternut squash (or other hard winter squash), peeled and cut into 1-inch chunks
¾ cup uncooked couscous
1 cup water
1 onion, diced
4-5 Tbsp white wine vinegar (I used red wine vinegar)
2 Tbsp olive oil
zest of one orange
½ tsp coriander
1 tsp cinnamon
½ tsp nutmeg
1 tsp cumin
1-3 tsp salt, to taste
1 can chickpeas, drained
½ cup dried cranberries
2 oz lactose-free goat cheese (if desired)
½ cup walnuts or pecans, coarsely chopped (if desired)
Preheat oven to 400 ° F. Toss squash with a bit of olive oil and spread on a baking sheet. Roast squash, stirring occasionally, until tender, about 30 minutes. Allow to cool before combining with other ingredients.
Heat water in sauce pan to boiling. Add couscous and stir. Remove pan from heat, cover with a lid, and let sit for about 10 minutes until the couscous has absorbed all the water. Fluff with a fork and set aside.
Sauté onion in a skillet over medium-high heat until translucent. Set aside and allow to cool.
In a small bowl, whisk together vinegar, olive oil, zest, spices, and 1 tsp of salt.
In a large bowl, combine squash, couscous, onions, chickpeas, and cranberries. Pour on the vinegar-oil dressing and stir to combine. Taste to check seasoning and add salt if needed.
If including, crumble the goat cheese into chunks and gently fold into the salad. (Note: Make sure the salad is room temperature at this point or the goat cheese will melt.) Top each serving with a sprinkle of walnuts (if desired) and enjoy. This salad can be served at room temperature or cold.
Maple Corn Bread
This recipe, from Real Simple, seemed like the perfect complement to the chili I was making. Chili and corn bread sounds like a very Southern pairing to me, but this corn bread had a little Canadian twist with the addition of maple syrup, both in the batter and on top. The result was a fluffy, moist corn bread with a sweet, crunchy glazed top. It was a big hit, especially with the Engineer, and might become my go-to cornbread from now on.
¾ cup (1 ½ sticks) unsalted butter or margarine, melted and cooled, divided; plus more for the pan
2 cups all-purpose flour, spooned and leveled
2 cups cornmeal
2 Tbsp baking powder
1 tsp baking soda
1 tsp kosher salt
2 cups lactose-free milk
4 large eggs
¾ cup pure maple syrup, divided
Heat oven to 425 ° F. Butter a 9-by-13-inch baking pan.
In a medium bowl, whisk together the flour, cornmeal, baking powder, baking soda, and salt. Make a well in the center of the flour mixture and add the milk, eggs, ½ cup of the maple syrup, and ½ cup of the butter; whisk together the wet ingredients, then incorporate the dry ingredients until just combined (do not overmix).
Transfer the batter to the prepared pan and bake until a toothpick inserted in the center comes out clean, 20 to 25 minutes.
Meanwhile, in a small bowl, combine the remaining ¼ cup of butter and ¼ cup of maple syrup. After removing the corn bread from oven, brush with the butter mixture. Cool completely in the pan, then cut into pieces.
Chili with Chocolate
I was dying to try one of those recipes that calls for unsweetened chocolate in a savory dish like a beef stew (not a mole, just chocolate in a sauce to bring out certain notes). I had been seeing this trick, if you can call it that, in several places and was really intrigued. I decided to try David Lebovitz’s Chili with Chocolate, since I also had some good heirloom pinto beans by Rancho Gordo to use. (I realize that officially, Texas chili doesn’t have beans, but that’s not how I was raised.) I made a few changes, such as the use of only 12 oz of beer (which is enough and easier to manage, as you don’t end up with a mostly full bottle to use when you don’t even like drinking beer) and modifying the spices to suit my taste. While I did buy a fresh chili pepper for this, seeded it and minced it, I chickened out and ended up serving it as an optional topping for the Engineer’s use. My verdict is as follows: this chili is good, but not great. While the chocolate is undetectable (as it should be), and while the browned meat was a good idea in theory, I actually prefer my mother’s chili (which uses ground beef). I promise I’ll get around to sharing that recipe eventually.
The first two steps of this recipe should be done the day before. It makes something like 8 servings, so I froze some of it. I served this chili with maple corn bread, which seemed a very Southern thing to do, and I really recommend it.
1 lb dried red or variegated heirloom beans
2 lbs beef stewing meat, such as boneless short ribs or chuck roast, cut into 1-inch cubes (or smaller)
3 tsp salt, divided
1 bay leaf
2 to 4 dried chili peppers, or 1 fresh chili pepper, minced (adjust this to suit your taste, or omit it)
2 Tbsp cooking oil
2 medium onions, peeled and diced
4 cloves garlic, peeled and minced
2-3 tsp red chili powder (I only used 1)
1 tsp ancho chili powder (I used Korean pepper)
2 tsp dried oregano
2 tsp ground cumin
1 tsp paprika
12 oz beer (the original recipe calls for 2 cups)
2 15-oz cans of crushed or diced tomatoes
1 Tbsp brown sugar
2 oz unsweetened chocolate
3 Tbsp cider vinegar or lime juice
Rinse the beans and sort them to remove any debris. Put in a bowl and cover with cold water and let soak overnight.
Put the cubes of beef in a freezer bag with 1 ½ tsp of salt, massage gently, and refrigerate overnight.
The next day, drain the beans, put them in a saucepan, and cover with several inches of water. Add the bay leaf and bring to a full boil for 10 minutes. Lower the heat to a gentle simmer and cook until tender, one to three hours, adding more water if the water boils away. (One hour was enough for me.) Once done, remove the bay leaf.
In a large casserole or Dutch oven (at least 6 quarts), heat the oil. Working in batches so you don’t crowd the pan, brown the pieces of beef, resisting the urge to turn them until they are truly dark on each side. The browning adds a great deal of flavor. As the pieces brown, remove them to a separate plate and brown the remaining pieces. If necessary, add a bit more oil to the pan as you go.
If using dried chili peppers, snip them into a small bowl in very tiny pieces with scissors and pour just enough boiling water over them to cover. If using a fresh chili pepper, remove the stem and chop it finely. (You can either discard the seeds, which are hot, or use them.)
Once all the meat is browned, fry the onions in the pot until they are wilted, about 5 minutes. Add the garlic as well as the remaining 1 ½ tsp salt, chili powders, oregano, cumin, and paprika, and cook for another minute, stirring constantly to release the flavors of the spices.
Add the beans to the pot along with their liquid, as well as the chili peppers, beer, tomatoes (and their juices), brown sugar and chocolate.
Simmer the chili at the absolute lowest temperature possible (consider using a flame tamer), for at least 1 hour, or until the meat is tender. If necessary to cook much longer, you may need to add additional water if the chili becomes too thick. When done, stir in the vinegar or lime juice. Taste and adjust any seasonings, such as the chili powder and the salt.
Serve with your choice of lactose-free sour cream, sharp cheddar, green onions or cilantro.
The first two steps of this recipe should be done the day before. It makes something like 8 servings, so I froze some of it. I served this chili with maple corn bread, which seemed a very Southern thing to do, and I really recommend it.
1 lb dried red or variegated heirloom beans
2 lbs beef stewing meat, such as boneless short ribs or chuck roast, cut into 1-inch cubes (or smaller)
3 tsp salt, divided
1 bay leaf
2 to 4 dried chili peppers, or 1 fresh chili pepper, minced (adjust this to suit your taste, or omit it)
2 Tbsp cooking oil
2 medium onions, peeled and diced
4 cloves garlic, peeled and minced
2-3 tsp red chili powder (I only used 1)
1 tsp ancho chili powder (I used Korean pepper)
2 tsp dried oregano
2 tsp ground cumin
1 tsp paprika
12 oz beer (the original recipe calls for 2 cups)
2 15-oz cans of crushed or diced tomatoes
1 Tbsp brown sugar
2 oz unsweetened chocolate
3 Tbsp cider vinegar or lime juice
Rinse the beans and sort them to remove any debris. Put in a bowl and cover with cold water and let soak overnight.
Put the cubes of beef in a freezer bag with 1 ½ tsp of salt, massage gently, and refrigerate overnight.
The next day, drain the beans, put them in a saucepan, and cover with several inches of water. Add the bay leaf and bring to a full boil for 10 minutes. Lower the heat to a gentle simmer and cook until tender, one to three hours, adding more water if the water boils away. (One hour was enough for me.) Once done, remove the bay leaf.
In a large casserole or Dutch oven (at least 6 quarts), heat the oil. Working in batches so you don’t crowd the pan, brown the pieces of beef, resisting the urge to turn them until they are truly dark on each side. The browning adds a great deal of flavor. As the pieces brown, remove them to a separate plate and brown the remaining pieces. If necessary, add a bit more oil to the pan as you go.
If using dried chili peppers, snip them into a small bowl in very tiny pieces with scissors and pour just enough boiling water over them to cover. If using a fresh chili pepper, remove the stem and chop it finely. (You can either discard the seeds, which are hot, or use them.)
Once all the meat is browned, fry the onions in the pot until they are wilted, about 5 minutes. Add the garlic as well as the remaining 1 ½ tsp salt, chili powders, oregano, cumin, and paprika, and cook for another minute, stirring constantly to release the flavors of the spices.
Add the beans to the pot along with their liquid, as well as the chili peppers, beer, tomatoes (and their juices), brown sugar and chocolate.
Simmer the chili at the absolute lowest temperature possible (consider using a flame tamer), for at least 1 hour, or until the meat is tender. If necessary to cook much longer, you may need to add additional water if the chili becomes too thick. When done, stir in the vinegar or lime juice. Taste and adjust any seasonings, such as the chili powder and the salt.
Serve with your choice of lactose-free sour cream, sharp cheddar, green onions or cilantro.
Tuesday, January 17, 2012
Porc à l'orange du Sichuan
Cette recette, ça fait longtemps que je veux la partager avec vous. Elle est tirée du magazine de la LCBO, À bon verre, bonne table et quelque peu adaptée à mes goûts. J’en ai aussi profité pour tester une recette de sauce hoisin, pour en faire une version sans gluten végétalienne (donc acceptable pour les gens ayant des allergies au poisson, entre autres). Pour faire la recette de porc sans gluten, utilisez de la sauce tamari sans blé au lieu de la sauce soya. J’adore le porc apprêté de cette façon et je le sers toujours avec mon riz au lait de coco. Quand l’Ingénieur et moi avons commencé à nous fréquenter, je lui ai fait cela pour son anniversaire, et il a tant aimé ça que les 4 portions ont disparu le soir-même. Bon appétit!
Pour le porc
1 lb (500 g) de filet de porc
1 blanc d'œuf
1 c. à soupe de fécule de maïs
1 c. à soupe d'eau
1 c. à soupe de sauce soya
Pour la sauce aigre-douce
1 c. à soupe de sauce hoisin
1 c. à thé de sauce au piment asiatique (au goût)
2 c. à soupe de sauce soya
3 c. à soupe de jus d'orange
¼ tasse de Triple Sec (facultatif)
1 c. à thé de cassonade (facultatif)
Pour la sauce aux poivrons
3 c. à soupe d'huile végétale
2 c. à soupe de zeste d'orange, coupé en julienne
1 c. à thé d'ail haché finement
1 c. à soupe de gingembre haché finement
1 poivron rouge, coupé en cubes
1 poivron orange, coupé en cubes
1 c. à thé de fécule de maïs
1 c. à soupe d'eau
Couper le porc en cubes de ½ po (1 cm). Placer dans un bol. Mélanger le blanc d'œuf, la fécule, l'eau et la sauce soya ensemble et ajouter au porc en remuant.
Mélanger les ingrédients de la sauce aigre-douce ensemble et réserver.
Chauffer 2 c. à soupe d'huile dans un wok à feu vif. Égoutter le porc et ajouter dans le wok. Faire sauter le porc jusqu'à ce qu'il soit juste rose à l'intérieur, environ 3 minutes. Retirer du wok et réserver. Essuyer le wok.
Pour la sauce aux poivrons, ajouter le reste de l'huile dans le wok. Faire sauter le zeste d'orange pendant 30 secondes, puis ajouter l'ail et le gingembre. Remuer ensemble. Ajouter les poivrons et faire sauter jusqu'à ce qu'ils soient dorés et ramollis, environ 2 minutes.
Remettre le porc dans le wok avec son jus, ajouter la sauce aigre-douce et porter à ébullition. Mélanger ensemble l'eau et la fécule et verser dans le wok en remuant. Porter à ébullition en remuant et cuire jusqu'à ce que la sauce épaississe. Servir immédiatement, avec du riz.
Pour le porc
1 lb (500 g) de filet de porc
1 blanc d'œuf
1 c. à soupe de fécule de maïs
1 c. à soupe d'eau
1 c. à soupe de sauce soya
Pour la sauce aigre-douce
1 c. à soupe de sauce hoisin
1 c. à thé de sauce au piment asiatique (au goût)
2 c. à soupe de sauce soya
3 c. à soupe de jus d'orange
¼ tasse de Triple Sec (facultatif)
1 c. à thé de cassonade (facultatif)
Pour la sauce aux poivrons
3 c. à soupe d'huile végétale
2 c. à soupe de zeste d'orange, coupé en julienne
1 c. à thé d'ail haché finement
1 c. à soupe de gingembre haché finement
1 poivron rouge, coupé en cubes
1 poivron orange, coupé en cubes
1 c. à thé de fécule de maïs
1 c. à soupe d'eau
Couper le porc en cubes de ½ po (1 cm). Placer dans un bol. Mélanger le blanc d'œuf, la fécule, l'eau et la sauce soya ensemble et ajouter au porc en remuant.
Mélanger les ingrédients de la sauce aigre-douce ensemble et réserver.
Chauffer 2 c. à soupe d'huile dans un wok à feu vif. Égoutter le porc et ajouter dans le wok. Faire sauter le porc jusqu'à ce qu'il soit juste rose à l'intérieur, environ 3 minutes. Retirer du wok et réserver. Essuyer le wok.
Pour la sauce aux poivrons, ajouter le reste de l'huile dans le wok. Faire sauter le zeste d'orange pendant 30 secondes, puis ajouter l'ail et le gingembre. Remuer ensemble. Ajouter les poivrons et faire sauter jusqu'à ce qu'ils soient dorés et ramollis, environ 2 minutes.
Remettre le porc dans le wok avec son jus, ajouter la sauce aigre-douce et porter à ébullition. Mélanger ensemble l'eau et la fécule et verser dans le wok en remuant. Porter à ébullition en remuant et cuire jusqu'à ce que la sauce épaississe. Servir immédiatement, avec du riz.
Braised French Onion Chicken
This dish (created by Faith Durand of The Kitchn) is just like a French onion soup, but without the soup, and with chicken instead of bread. It’s a good winter meal, hearty and rich without being too heavy. I served it with mashed potatoes, though green beans and bread would work well, too (especially if you use the bread to soak up the sauce). I really liked it, and even the Engineer had no complaints (he normally dislikes French onion soup). It takes a while to make, so it’s a good weekend dish; it makes about 6 servings.
3 Tbsp unsalted butter or margarine
2 lbs onions (about 3 big onions), sliced into thin half-moons
kosher salt and freshly ground black pepper
4 garlic cloves, sliced
2 small sprigs thyme, leaves only
a 4-inch sprig rosemary
2 cups chicken broth, divided
1 Tbsp balsamic vinegar
2 Tbsp Dijon mustard
3 lbs boneless skinless chicken thighs
2 oz lactose-free Gruyère cheese, finely grated or shaved (about 1 cup)
Melt the butter in a deep 10-inch sauté pan over medium heat. When the butter has melted completely and foams up, add the onions. They will fill the pan to the top, at this point. Stir as you add the onions to coat them in the butter. Sprinkle lightly with salt and black pepper. Cook the onions for about 40 minutes over low or medium heat, stirring occasionally.
When the onions have developed an evenly light beige color throughout, add the garlic, thyme leaves, and whole rosemary sprig, and cook for a few minutes more, stirring frequently. Turn the heat up to high and cook for a further 5 minutes, stirring frequently. You want dark, slightly burnt spots to appear on the onions, and for them to develop a rich mahogany color. When the onions get quite dark, add 1 cup of the beef or chicken broth. Add it slowly, stirring and scraping the pan vigorously to scrape up any burnt or stuck-on bits. When the liquid has been added, bring it back up to a simmer and simmer lightly for 5 minutes, or until it is somewhat reduced.
Take the onions off the heat and pour them into a 3-quart oven-safe dish with a lid. (If you don't have a Dutch oven or another oven-safe dish with a lid, you can use a 9x13-inch baking dish. Just cover it tightly with a double layer of foil.)
Heat the oven to 325 °F.
While the onions are cooking, brown the chicken. Heat another 10-inch or cast iron skillet over medium-high heat. Pat the chicken thighs dry and season lightly with kosher salt and black pepper. When the skillet is hot, add the thighs and brown for about 3 minutes on each side, 6 minutes total. When they've developed a golden-brown crust, remove from the pan and set on top of the caramelized onions in the baking dish.
Add the remaining 1 cup broth to the pan. Stir vigorously, scraping up any browned bits on the bottom of the pan. Whisk in the balsamic vinegar and Dijon mustard. Simmer for about 5 minutes or until reduced by half. Pour this sauce over the chicken and onions, and put the lid on the baking dish. The chicken and onions will look quite saucy; there will be plenty of liquid in the baking dish. (At this point you can refrigerate the dish for up to 48 hours. Let it sit at room temperature for at least 15 minutes before baking, or else add about 5 minutes to the bake time.)
Bake at 325 °F for 30 minutes. Remove the chicken from the oven and turn the heat up to broil. Take the lid off the baking dish, and sprinkle the cheese evenly over the top of the chicken. When the broiler has heated up, return the dish to the oven and broil for 3 to 4 minutes, or until the cheese is melted and golden on top.
30-Minute Rolls
I found this recipe on The Littlest Crafter: these rolls are not only super quick to make, they are also absolutely delicious! The Engineer had more than one, saying that they deserved an encore. I’ll be sure to keep this recipe on hand next time I want rolls! The quick rising time also came in very handy because the night I made them, I had actually forgotten about them until about an hour before dinner, and I still had plenty of time. I served them warm, with coconut red lentil soup.
1 cup + 2 Tbsp warm water
1/3 cup oil
2 Tbsp yeast (I believe I used active dry yeast)
¼ cup sugar
½ tsp salt
1 egg
3 ½ cups flour (I used white flour here)
Preheat the oven to 400 °F. Grease a 9”x13” pan and set aside.
In the bowl of your mixer, combine the water, oil, yeast and sugar and allow it to rest for 15 minutes.
Using the dough hook attachment, mix in the salt, egg and flour. Knead with the hook until well incorporated and the dough is soft and smooth (just a few minutes).
Form dough into 12 balls and place them in the greased pan. Allow to rest for 10 minutes.
Bake for 10 minutes or until golden brown. Enjoy!
1 cup + 2 Tbsp warm water
1/3 cup oil
2 Tbsp yeast (I believe I used active dry yeast)
¼ cup sugar
½ tsp salt
1 egg
3 ½ cups flour (I used white flour here)
Preheat the oven to 400 °F. Grease a 9”x13” pan and set aside.
In the bowl of your mixer, combine the water, oil, yeast and sugar and allow it to rest for 15 minutes.
Using the dough hook attachment, mix in the salt, egg and flour. Knead with the hook until well incorporated and the dough is soft and smooth (just a few minutes).
Form dough into 12 balls and place them in the greased pan. Allow to rest for 10 minutes.
Bake for 10 minutes or until golden brown. Enjoy!
Coconut Red Lentil Soup
This awesome soup from 101 Cookbooks was a hit in our household, and I’m sure to make it again. The seasoning was fantastic, though it should be said that I used chicken broth instead of water. I also used more peas than the original recipe called for (1 ½ cups each instead of 1 cup), and only 6 cups of broth – plus the coconut milk. The consistency seemed soupy to me, but the author says that you can make it thicker and spoon it over rice or farro. Note that it is a thick soup, and the addition of green onions and raisins actually works really well. You can easily make this vegetarian or vegan by using a fake chicken broth or vegetable broth if you don’t want water, and oil instead of butter. I served the soup with 30-minute rolls, which I also strongly recommend.
1 cup yellow split peas
1 cup red lentils
6 cups broth (or water), plus more to taste
1 medium carrot, cut into ½-inch dice
2 Tbsp fresh peeled and minced ginger
2 Tbsp curry powder
2 Tbsp butter, margarine or vegetable oil
8 green onions, thinly sliced
1/3 cup golden raisins
1/3 cup tomato paste
1 14-oz can coconut milk
2 tsp fine grain sea salt
one small handful cilantro, chopped
Give the split peas and lentils a good rinse - until they no longer put off murky water. Place them in an extra-large soup pot, cover with the broth, and bring to a boil. Reduce heat to a simmer and add the carrot and ¼ of the ginger. Cover and simmer for about 30 minutes, or until the split peas are soft.
In the meantime, in a small dry skillet or saucepan over low heat, toast the curry powder until it is quite fragrant. Be careful though, you don't want to burn the curry powder, just toast it. Set aside.
Place the butter in a pan over medium heat, add half of the green onions, the remaining ginger, and raisins. Sauté for two minutes stirring constantly, then add the tomato paste and sauté for another minute or two more.
Add the toasted curry powder to the tomato paste mixture, mix well, and then add this to the simmering soup along with the coconut milk and salt. Simmer, uncovered, for 20 minutes or so. The texture should thicken up, but you can play around with the consistency if you like by adding more water, a bit at a time. Or simmer longer for a thicker consistency.
To serve, sprinkle each bowl generously with cilantro and the remaining green onions. (I topped mine with some lactose-free sour cream, and it was perfect.)
1 cup yellow split peas
1 cup red lentils
6 cups broth (or water), plus more to taste
1 medium carrot, cut into ½-inch dice
2 Tbsp fresh peeled and minced ginger
2 Tbsp curry powder
2 Tbsp butter, margarine or vegetable oil
8 green onions, thinly sliced
1/3 cup golden raisins
1/3 cup tomato paste
1 14-oz can coconut milk
2 tsp fine grain sea salt
one small handful cilantro, chopped
Give the split peas and lentils a good rinse - until they no longer put off murky water. Place them in an extra-large soup pot, cover with the broth, and bring to a boil. Reduce heat to a simmer and add the carrot and ¼ of the ginger. Cover and simmer for about 30 minutes, or until the split peas are soft.
In the meantime, in a small dry skillet or saucepan over low heat, toast the curry powder until it is quite fragrant. Be careful though, you don't want to burn the curry powder, just toast it. Set aside.
Place the butter in a pan over medium heat, add half of the green onions, the remaining ginger, and raisins. Sauté for two minutes stirring constantly, then add the tomato paste and sauté for another minute or two more.
Add the toasted curry powder to the tomato paste mixture, mix well, and then add this to the simmering soup along with the coconut milk and salt. Simmer, uncovered, for 20 minutes or so. The texture should thicken up, but you can play around with the consistency if you like by adding more water, a bit at a time. Or simmer longer for a thicker consistency.
To serve, sprinkle each bowl generously with cilantro and the remaining green onions. (I topped mine with some lactose-free sour cream, and it was perfect.)
Sunday, January 15, 2012
Gigi's Cupcakes
Right before Christmas, the Engineer and I bought some cupcakes at Gigi’s Cupcakes to try them out; we had two that evening, and froze the other two for a week or so, to enjoy them after the holidays. The shop itself was nice, and I appreciate that they have some space with tables and chairs for people who want to linger a bit and eat on the spot. It can take a while to choose, too, as there are over 60 flavors in all – though “only” about a dozen each day. Take a look at their menu!
The cupcakes are beautiful and look very impressive because of their mile-high frosting, though that makes them a bit hard to eat. I must admit that I ate them on a plate with a fork, scraping most of the frosting away. The cakes themselves, though, were fabulous. The crumb was moist and flavorful, and I’d have them again any day!
The flavors we tried are vanilla (the one with the Christmas tree frosting), Scarlett’s Red Velvet (the one with the angel; it was good, though not very red at all), White Midnight Magic (delicious chocolate cake with chocolate chips on a cream cheese frosting) and Canadian Bacon (my favorite; it was a bacon-maple cupcake with maple frosting topped with crumbled bacon). They were all very good.
I’m not sure I’d go out of my way for those, probably because the frosting is a bit off-putting (especially for someone who’s lactose-intolerant), but then again, I’ve only really been out of my way for Montreal’s Cocoa Locale (or more accurately, I’ve deliberately made it my way on more than one occasion). That being said, I could easily be convinced to pull over if I’m driving by!
The cupcakes are beautiful and look very impressive because of their mile-high frosting, though that makes them a bit hard to eat. I must admit that I ate them on a plate with a fork, scraping most of the frosting away. The cakes themselves, though, were fabulous. The crumb was moist and flavorful, and I’d have them again any day!
The flavors we tried are vanilla (the one with the Christmas tree frosting), Scarlett’s Red Velvet (the one with the angel; it was good, though not very red at all), White Midnight Magic (delicious chocolate cake with chocolate chips on a cream cheese frosting) and Canadian Bacon (my favorite; it was a bacon-maple cupcake with maple frosting topped with crumbled bacon). They were all very good.
I’m not sure I’d go out of my way for those, probably because the frosting is a bit off-putting (especially for someone who’s lactose-intolerant), but then again, I’ve only really been out of my way for Montreal’s Cocoa Locale (or more accurately, I’ve deliberately made it my way on more than one occasion). That being said, I could easily be convinced to pull over if I’m driving by!
Chickpea Casserole
I’ve mentioned that I like casseroles because they’re the ultimate meal-in-one. This one has the added bonus of being vegetarian, using chickpeas for protein, and is pretty light on the dairy. I did make it lactose-free, using Lactaid’s cottage cheese. I also used a red onion instead of the shallots. While the consistency was good, I found it a bit bland, and I would add some grated sharp cheddar to the chickpea mixture next time (added below). We had leftovers for days with this dish!
3 15-oz cans chickpeas, rinsed and drained, or 5 cups cooked chickpeas
1 cup cooked brown rice
4 large shallots, minced or grated
2 cloves garlic, minced
juice and zest of 1 lemon
salt and freshly ground black pepper
2 large eggs, beaten
1 cup lactose-free cottage cheese (ideally the small curd variety of cottage cheese, but beggars can’t be choosers)
¾ cup plain lactose-free yogurt (ideally full-fat yogurt, and not Greek yogurt, which has too little moisture)
a big handful of grated sharp cheddar (optional)
1 cup grated Parmesan cheese, divided
½ cup fresh flat-leaf parsley
2 stalks fresh rosemary (leaves only)
2/3 cup dried bread crumbs
olive oil
Preheat the oven to 375 °F and lightly grease a 9”x13” or other 3-quart baking dish with olive oil.
In a large bowl, mix the chickpeas with the rice, shallots, garlic, and lemon zest and juice. Season with salt and pepper.
Mix the beaten eggs in a medium bowl with the cottage cheese, yogurt, cheddar, and ½ cup of the Parmesan cheese. Finely mince the parsley and fresh rosemary leaves. Stir the cottage cheese mixture and herbs into the chickpea mixture.
Spread the mixture in the prepared baking dish and top with the remaining ½ cup Parmesan and the bread crumbs. (At this point the casserole can be covered and refrigerated for up to 24 hours.) Drizzle with olive oil. Bake for 45 minutes, or until bubbling and golden. Let stand for 10 minutes before serving.
Saturday, January 14, 2012
The Engineer's cakes, with a recipe
I was looking for something somewhat meaningful for my 700th post, and I decided that the Engineer’s cakes are it. I was waiting for the end of the cake recipes, but this cake chapter in Baking Illustrated is really long, and we’re still not done! (Plus, I’ve had these pictures on my hard drive forever, y’all.) It should be said that the Engineer is really taking this seriously, making sure all ingredients are at the right temperature and eschewing substitutions. In this case, the fact that he didn’t have any baking experience before starting this project actually worked in his favor, because he didn’t have any bad habits to break. I’ve got a lifetime of measuring dry ingredients in volume (and usually not even in dry measuring cups), just because that’s the way North American home cooks have always done it. But he’s doing it the proper way, and I have to admit that it really does make for better cakes. So I think I’ll make an effort to do things the proper way (weigh) too, when a recipe gives me weight measurements.
To recap, there was angel food cake, chiffon cake, pound cake, upside-down pineapple cake and apple cake.
There was carrot cake, crumb coffeecake (the one with pecans on top, which was great), sour cream coffeecake, chocolate sheet cake, yellow cupcakes with chocolate frosting, yellow layer cake, white layer cake, coconut layer cake, sponge cake and Boston cream pie.
Then there were three more kinds of chocolate cakes (chocolate layer cake, German chocolate cake and devil’s food cake). Plus a génoise layer cake with almond buttercream and raspberry filling before the holidays, a raspberry jelly roll for New Year’s Eve, and last weekend, a baked Alaska (with lactose-free ice cream, of course).
We’ve got a lot of lactose coming up with fruit trifle this weekend (there’s still no lactose-free cream in the States), and about a month and a half after that, four kinds of cheesecake (the irony is that the Engineer doesn’t even like cheesecake, and since I can’t really eat it, his coworkers will be well-fed).
I’ll share the devil’s food cake recipe here, because we changed it a little and absolutely loved the results. The original recipe calls for three 8-inch cake pans and a lot of buttercream frosting, but we used a 10-inch springform pan and served it plain – perfect. We even made it with lactose-free sour cream from Green Valley Organics, so I could eat it without getting sick!
4 oz unsweetened chocolate, chopped
¼ cup Dutch-processed cocoa
1 ¼ cups boiling water
¾ cup unbleached all-purpose flour
¾ cup plain cake flour
1 tsp baking soda
¼ tsp salt
1 cup unsalted butter or margarine, softened but still cool
1 ½ cups dark brown sugar
3 large eggs
½ cup sour cream (lactose-free, or use lactose-free plain Greek yogurt)
1 tsp vanilla
Preheat the oven to 350 °F. Grease a 10-inch springform pan; line the bottom with wax paper and grease again.
Combine the chocolate and cocoa in a medium bowl; pour the boiling water over and whisk until smooth.
Sift together the flours, baking soda and salt; set aside.
Beat the butter in the bowl of a stand mixer at medium-high speed until creamy, about 1 minute. Add the brown sugar and beat at high speed until light and fluffy, about 3 minutes. Stop the mixer and scrape down the bowl with a rubber spatula. With the mixer at medium-high speed, add the eggs one at a time, beating 30 seconds after each addition. Reduce the speed to medium; add the sour cream and vanilla and beat until combined, about 10 seconds. Stop the mixer and scrape down the bowl.
With the mixer at low speed, add about a third of the flour mixture, followed by about half of the chocolate mixture. Repeat, ending with the flour mixture; beat until just combined, about 1 second. Do not overbeat. Remove the bowl from the mixer; scrape the bottom and sides of the bowl with a rubber spatula and stir gently to thoroughly combine.
Pour the batter into the prepared cake pan and smooth it out to the edges with a rubber spatula. Bake until a toothpick inserted in the center comes out clean, about 45 minutes (at least that’s what it took in our oven, as opposed to 20 minutes for the three 8-inch cakes). Cool on a wire rack before unmolding.
To recap, there was angel food cake, chiffon cake, pound cake, upside-down pineapple cake and apple cake.
There was carrot cake, crumb coffeecake (the one with pecans on top, which was great), sour cream coffeecake, chocolate sheet cake, yellow cupcakes with chocolate frosting, yellow layer cake, white layer cake, coconut layer cake, sponge cake and Boston cream pie.
Then there were three more kinds of chocolate cakes (chocolate layer cake, German chocolate cake and devil’s food cake). Plus a génoise layer cake with almond buttercream and raspberry filling before the holidays, a raspberry jelly roll for New Year’s Eve, and last weekend, a baked Alaska (with lactose-free ice cream, of course).
We’ve got a lot of lactose coming up with fruit trifle this weekend (there’s still no lactose-free cream in the States), and about a month and a half after that, four kinds of cheesecake (the irony is that the Engineer doesn’t even like cheesecake, and since I can’t really eat it, his coworkers will be well-fed).
I’ll share the devil’s food cake recipe here, because we changed it a little and absolutely loved the results. The original recipe calls for three 8-inch cake pans and a lot of buttercream frosting, but we used a 10-inch springform pan and served it plain – perfect. We even made it with lactose-free sour cream from Green Valley Organics, so I could eat it without getting sick!
4 oz unsweetened chocolate, chopped
¼ cup Dutch-processed cocoa
1 ¼ cups boiling water
¾ cup unbleached all-purpose flour
¾ cup plain cake flour
1 tsp baking soda
¼ tsp salt
1 cup unsalted butter or margarine, softened but still cool
1 ½ cups dark brown sugar
3 large eggs
½ cup sour cream (lactose-free, or use lactose-free plain Greek yogurt)
1 tsp vanilla
Preheat the oven to 350 °F. Grease a 10-inch springform pan; line the bottom with wax paper and grease again.
Combine the chocolate and cocoa in a medium bowl; pour the boiling water over and whisk until smooth.
Sift together the flours, baking soda and salt; set aside.
Beat the butter in the bowl of a stand mixer at medium-high speed until creamy, about 1 minute. Add the brown sugar and beat at high speed until light and fluffy, about 3 minutes. Stop the mixer and scrape down the bowl with a rubber spatula. With the mixer at medium-high speed, add the eggs one at a time, beating 30 seconds after each addition. Reduce the speed to medium; add the sour cream and vanilla and beat until combined, about 10 seconds. Stop the mixer and scrape down the bowl.
With the mixer at low speed, add about a third of the flour mixture, followed by about half of the chocolate mixture. Repeat, ending with the flour mixture; beat until just combined, about 1 second. Do not overbeat. Remove the bowl from the mixer; scrape the bottom and sides of the bowl with a rubber spatula and stir gently to thoroughly combine.
Pour the batter into the prepared cake pan and smooth it out to the edges with a rubber spatula. Bake until a toothpick inserted in the center comes out clean, about 45 minutes (at least that’s what it took in our oven, as opposed to 20 minutes for the three 8-inch cakes). Cool on a wire rack before unmolding.
Batch of links
More housekeeping, while I’m still not having any luck with tech-support from Blogger. I’m sure I’ll figure it out eventually, I’d just rather not pay someone to do it for me… Anyway, on with the links!
- Websites that help coordinate meals: These are intended when, for example, many people volunteer to bring meals to a new mother; you can take into consideration things like food restrictions and schedules. I imagine it working well for a potluck meal, too. I think it’s a nice idea, but is it really more helpful than a combination of Google Calendar and a Google Doc?
- How to decorate plates by stamping on a design, with ink made from confectioners’ sugar and food coloring: Absolutely brilliant! I’d love to do this if I’m ever feeling particularly Martha-Stewarty someday.
- Five things TV chefs do that are wrong: So true. My pet peeve is when they take a dish out of the oven without oven mitts and dig right in (this isn’t wrong so much as adapted for the magic of television, but still).
- An infographic on burger chain dominance: This is something that the Engineer and I noticed while on our first cross-country road trip south. While there are some McDonald’s restaurants here in Texas, there are many more competitors we’d never seen before in Quebec (Sonic, Whataburger, Jack in the Box, to name a few). They’re not any healthier, but it’s nice to have variety.
- The splendiferous array of culinary tools: I’d love this on a kitchen wall somewhere.
- Roots of the deli: A Saveur article about the Jewish roots of delicatessen food.
- Survival tips for the self-checkout lane: These are very informative, but I still prefer the manned lines, thank you.
- Websites that help coordinate meals: These are intended when, for example, many people volunteer to bring meals to a new mother; you can take into consideration things like food restrictions and schedules. I imagine it working well for a potluck meal, too. I think it’s a nice idea, but is it really more helpful than a combination of Google Calendar and a Google Doc?
- How to decorate plates by stamping on a design, with ink made from confectioners’ sugar and food coloring: Absolutely brilliant! I’d love to do this if I’m ever feeling particularly Martha-Stewarty someday.
- Five things TV chefs do that are wrong: So true. My pet peeve is when they take a dish out of the oven without oven mitts and dig right in (this isn’t wrong so much as adapted for the magic of television, but still).
- An infographic on burger chain dominance: This is something that the Engineer and I noticed while on our first cross-country road trip south. While there are some McDonald’s restaurants here in Texas, there are many more competitors we’d never seen before in Quebec (Sonic, Whataburger, Jack in the Box, to name a few). They’re not any healthier, but it’s nice to have variety.
- The splendiferous array of culinary tools: I’d love this on a kitchen wall somewhere.
- Roots of the deli: A Saveur article about the Jewish roots of delicatessen food.
- Survival tips for the self-checkout lane: These are very informative, but I still prefer the manned lines, thank you.
Tuesday, January 10, 2012
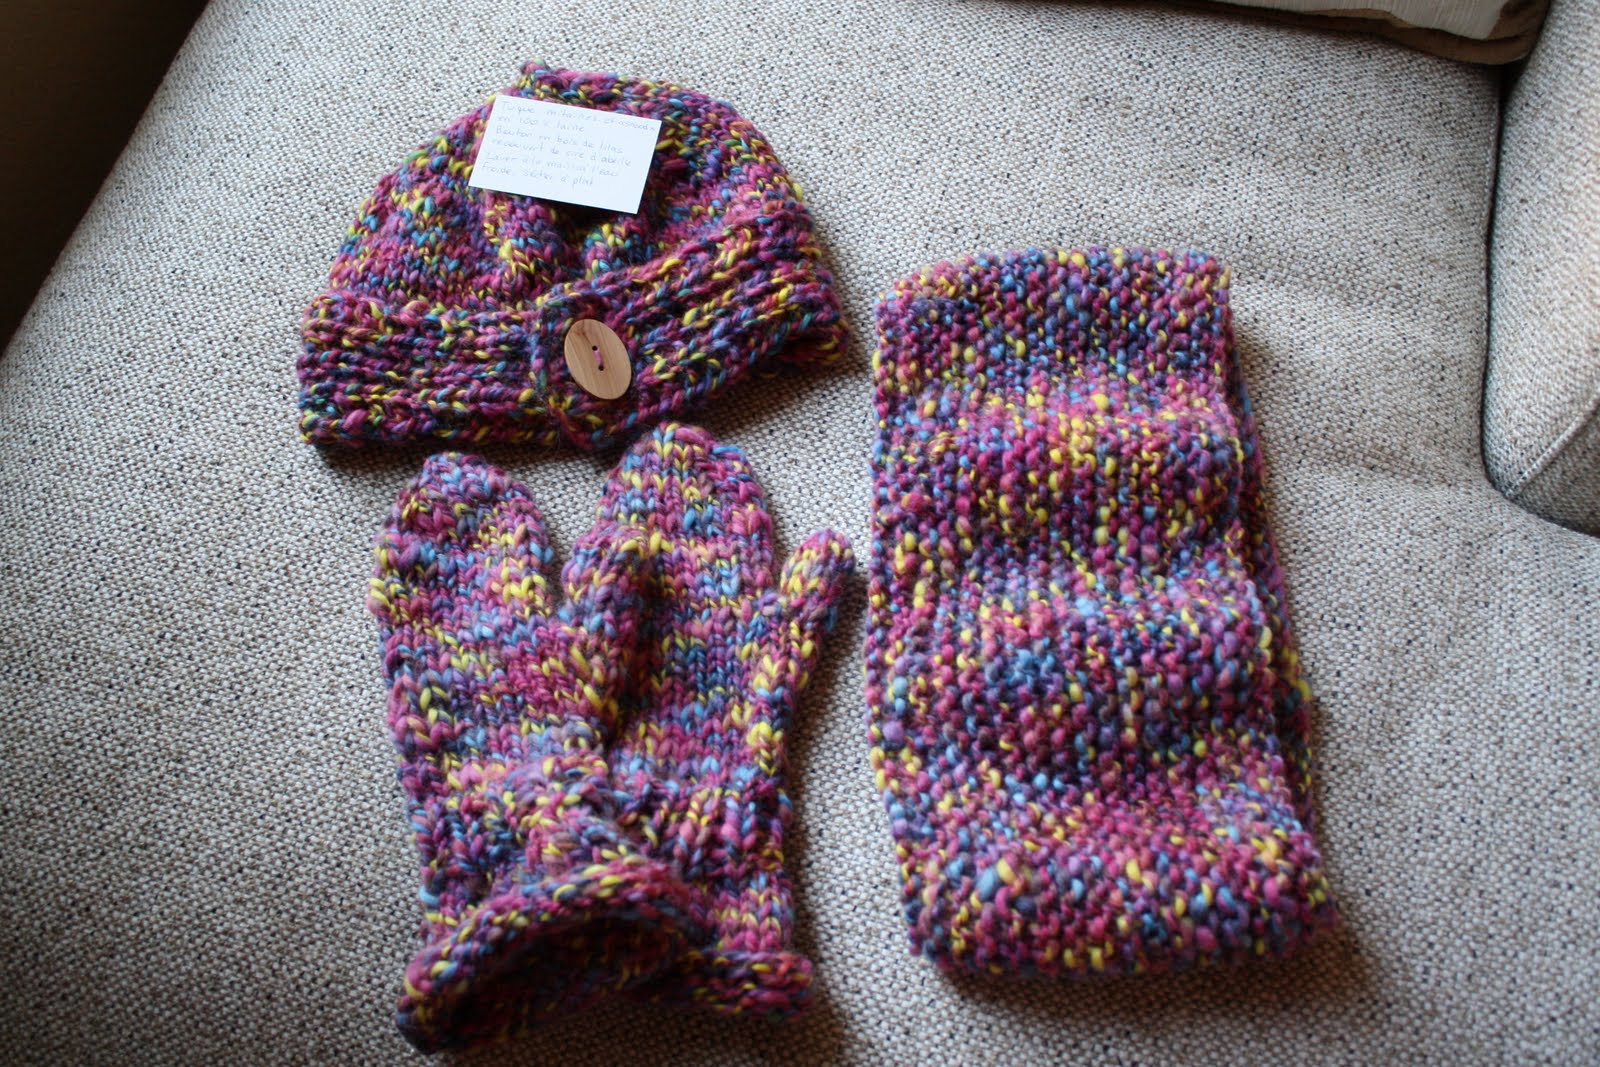
Chapeaux boutonnés et mitaines
Je ne pouvais pas en parler avant, pour ne pas gâcher la surprise, mais j’ai tricoté des cadeaux de Noël pour ma mère et pour ma sœur, avec de la laine qu’elles avaient choisi elles-mêmes il y a des années et qui se languissait depuis, entreposée dans une boîte. Pour ma sœur, avec une balle de Rowan Big Wool blanche, j’ai pu faire un chapeau; pour ma mère, avec trois balles de Rowan Big Wool multicolores, j’ai fait un chapeau, une paire de mitaines et un « snood » (tour de cou).
Pour les chapeaux et les mitaines, j’ai suivi le patron Plymouth 2119, acheté chez Jimmy Beans Wool. C’était ma première paire de mitaines, et je les ai beaucoup aimées car elles sont assez longues pour cacher les poignets (et on déteste toutes avoir froid aux poignets l’hiver!). Les chapeaux étaient amusants aussi, car l’ajout d’un bouton est à la fois stylé et pratique (pour ajuster la taille du tour de tête). Je ne peux plus aller chez mon fibulanomiste préféré et je n’ai pas trouvé de boutique équivalente ici, alors je suis devenu accro à Etsy pour la mercerie. J’y ai déniché entre autres un bouton en bois de lilas recouvert de cire d’abeille pour une des tuques!
Pour le snood, qui semble être la grosse mode dans les catalogues français ces temps-ci, j’ai pris un patron de Phildar (semblable à ceci. Ce n’est pas compliqué à faire, et on peut y passer tous nos restants de laine jusqu’aux derniers pouces! Ça me donne presque envie d’habiter dans un climat avec des hivers plus rigoureux…
Pour les chapeaux et les mitaines, j’ai suivi le patron Plymouth 2119, acheté chez Jimmy Beans Wool. C’était ma première paire de mitaines, et je les ai beaucoup aimées car elles sont assez longues pour cacher les poignets (et on déteste toutes avoir froid aux poignets l’hiver!). Les chapeaux étaient amusants aussi, car l’ajout d’un bouton est à la fois stylé et pratique (pour ajuster la taille du tour de tête). Je ne peux plus aller chez mon fibulanomiste préféré et je n’ai pas trouvé de boutique équivalente ici, alors je suis devenu accro à Etsy pour la mercerie. J’y ai déniché entre autres un bouton en bois de lilas recouvert de cire d’abeille pour une des tuques!
Pour le snood, qui semble être la grosse mode dans les catalogues français ces temps-ci, j’ai pris un patron de Phildar (semblable à ceci. Ce n’est pas compliqué à faire, et on peut y passer tous nos restants de laine jusqu’aux derniers pouces! Ça me donne presque envie d’habiter dans un climat avec des hivers plus rigoureux…
Foulard en dentelle
Bon, vous avez sûrement remarqué les changements ici. Je n’ai pas encore terminé, il me reste certaines choses à faire, mais le savoir technologique et le soutien technique me manquent! Quand même, ce n’est pas une raison pour arrêter de mettre en ligne des billets, alors allons-y pour un peu de tricot…
J’ai fait ce foulard avec de la laine Kidsilk Haze de Rowan (la même que pour mon châle). C’est une laine très fine, et il n’est pas toujours aisé de tricoter avec (il est notamment presque impossible de défaire son tricot pour le recommencer). C’est toutefois une laine idéale pour la dentelle, et j’aime qu’elle crée un voilé translucide d’un fil à l’autre. Il m’en a fallu deux balles pour ce foulard (à noter que le patron est modifiable et peut être fait plus étroit ou plus large, selon vos goûts). J’ai offert ce foulard à ma belle-cousine et j’espère qu’il lui plaira!
Sunday, January 01, 2012
Bonne année, grand nez!
Bonne année tout le monde! L’Ingénieur et moi sommes revenus d’un court séjour au Canada, durant lequel nous avons pu voir nos familles respectives, avoir une petite dose de froid et de neige ainsi que faire quelques courses. J’ai un nouvel ordinateur portatif, car le mien est sur le bord de lâcher; je l’ai acheté au Canada car il me faut un clavier canadien français pour mon travail (j’ai une carte verte!). Je n’ai pas pu trouver le modèle que je voulais, un Lenovo V570, mais je me suis rabattue sur un HP qui était presque le même prix. J’ai aussi acheté des vêtements chez Reitmans. Ma belle-mère ne comprend jamais pourquoi j’achète quoi que ce soit au Canada, parce qu’elle pense que tout est moins cher aux États-Unis, mais je ne suis pas d’accord. Par exemple, je n’ai jamais trouvé de pantalons à taille élastique comme ceux que j’aime ailleurs que chez Reitmans, alors je ne vois pas pourquoi je devrais m’en priver quand je suis à Montréal. De plus, il y avait de grosses ventes, alors même en achetant un article au plein prix (36,00 $), sur les trois autres articles, j’ai économisé 73,63 $ en tout, pour une facture totale de 74,37 $ avant taxes! Bon, il ne restait plus des robes de Marie Saint-Pierre à ma taille, mais tant pis.
J’ai découvert un nouveau restaurant que j’ai trouvé génial, Yakimono. Il s’agit d’un restaurant de sushi cachères, donc sans fruits de mer (goberge au lieu de crabe, etc.). Les sushis étaient de qualité, et puisque je n’ai jamais été folle des fruits de mer (en rouleau ou pas), ça a fait mon affaire. Il y a aussi une bonne sélection de rouleaux sans poisson cru. Je recommande les rouleaux « onion blast » (thon, avocat et oignons frits croustillants), « spécial du chef » (thon, saumon et avocat, frit dans le tempura), « dream » (thon, miel, masago, concombre, mangue et tempura) ainsi que « veggie papillon » (patate douce frite, avocat et concombre, le tout recouvert de patate douce et de sauce douce et épicée). Cependant, ce que j’ai le plus aimé, c’est que le restaurant ne sert aucun produit laitier – d’autant plus génial rendu à la carte des desserts! Ce n’est pas écrit dans le menu, mais vous pouvez donc commander des desserts contenant dans la description de la crème glacée, du fromage à la crème, etc., sans aucune crainte! J’ai pris la crème brûlée, car il ne restait plus de gâteau au fromage, mais la prochaine fois, j’aimerais aussi essayer les cigares au chocolat. En tout cas, j’y retournerai sûrement!
Enfin, j’ai eu la chance d’aller voir Les Aventures de Tintin doublé en français. C’était la première fois depuis mon adolescence que je voulais voir un film doublé, mais là, Tine-Tine et Snowy, je n’étais pas capable. Il fallait que ce soit en français, comme j’ai connu les personnages, sans accents britanniques ni écossais. Je n’ai pas été déçue, c’était absolument génial! Par contre, l’Ingénieur n’ayant jamais lu un album de Tintin (car les traductions anglaises ne se sont pas rendues loin en Amérique du Nord avant maintenant), il n’a pas été emballé du tout. Mais moi, j’ai grandi avec Tintin et j’ai été absolument enchantée. À voir!
J’ai découvert un nouveau restaurant que j’ai trouvé génial, Yakimono. Il s’agit d’un restaurant de sushi cachères, donc sans fruits de mer (goberge au lieu de crabe, etc.). Les sushis étaient de qualité, et puisque je n’ai jamais été folle des fruits de mer (en rouleau ou pas), ça a fait mon affaire. Il y a aussi une bonne sélection de rouleaux sans poisson cru. Je recommande les rouleaux « onion blast » (thon, avocat et oignons frits croustillants), « spécial du chef » (thon, saumon et avocat, frit dans le tempura), « dream » (thon, miel, masago, concombre, mangue et tempura) ainsi que « veggie papillon » (patate douce frite, avocat et concombre, le tout recouvert de patate douce et de sauce douce et épicée). Cependant, ce que j’ai le plus aimé, c’est que le restaurant ne sert aucun produit laitier – d’autant plus génial rendu à la carte des desserts! Ce n’est pas écrit dans le menu, mais vous pouvez donc commander des desserts contenant dans la description de la crème glacée, du fromage à la crème, etc., sans aucune crainte! J’ai pris la crème brûlée, car il ne restait plus de gâteau au fromage, mais la prochaine fois, j’aimerais aussi essayer les cigares au chocolat. En tout cas, j’y retournerai sûrement!
Enfin, j’ai eu la chance d’aller voir Les Aventures de Tintin doublé en français. C’était la première fois depuis mon adolescence que je voulais voir un film doublé, mais là, Tine-Tine et Snowy, je n’étais pas capable. Il fallait que ce soit en français, comme j’ai connu les personnages, sans accents britanniques ni écossais. Je n’ai pas été déçue, c’était absolument génial! Par contre, l’Ingénieur n’ayant jamais lu un album de Tintin (car les traductions anglaises ne se sont pas rendues loin en Amérique du Nord avant maintenant), il n’a pas été emballé du tout. Mais moi, j’ai grandi avec Tintin et j’ai été absolument enchantée. À voir!
Subscribe to:
Posts (Atom)