Tuesday, February 12, 2013
Spaghetti with Cannellini Bean "Meatballs" and Tomato Sauce
I figured this dish, from Cooking Canuck, would be a good all-in-one vegetarian meal. In the end, I think the Engineer liked it more than I did! I found the “meatballs” a little bland, to be honest; maybe I’d try them with more herbs or some nutritional yeast next time. I couldn’t help but compare this to my omnivorous equivalent, and I have to admit that I much prefer the taste of Molly Wizenberg’s meatballs. I do think it remains a good vegetarian option, though. I made this with my usual tomato-butter sauce, so that’s the recipe I’m giving here, but you can use any good marinara sauce.
To roast a bell pepper, here’s what I do: cook it in the oven at 350 °F for 1 hour, flipping it over after 30 minutes. Remove it from the oven and immediately place it in a bowl and cover it with plastic wrap; the condensation will then help you peel the pepper once it has cooled down.
1 ½ 15-oz cans cannellini beans, drained and rinsed
1 roasted bell pepper (see note above), roughly chopped
½ medium yellow onion, grated or very finely chopped
2 cloves garlic, minced
¼ cup chopped Italian parsley
1 ½ tsp. dried oregano
1 egg
½ cup dried breadcrumbs
½ tsp. kosher salt
½ tsp. freshly ground black pepper
2 28-oz cans whole peeled tomatoes in juice, drained, juice reserved, tomatoes finely chopped
½ cup unsalted butter (or margarine, if you can’t digest butter)
1 or 2 medium onions, peeled, halved through root end
½ tsp. (or more) salt
cooked spaghetti or pasta of your choice
parmesan, for grating
Preheat oven to 350 °F. Coat a large baking sheet with cooking spray.
In the bowl of a food processor, combine beans and roasted red pepper. Pulse until chopped, but not smoothly puréed.
Transfer the mixture to a medium-sized bowl and stir in grated onion, garlic, parsley, oregano, egg, breadcrumbs, salt and pepper until well combined. (The amount of breadcrumbs can change depending on the humidity. If you find that the first few “meatballs” are not holding together as firmly as you would like, add more breadcrumbs, then reshape.)
Using a rounded 2 Tbsp.-portion of the bean mixture, form “meatballs” by rolling between the palms of your hands. Place the “meatballs” on the prepared baking sheet, spacing evenly. Bake until the meatballs are firm to the touch and have developed a light golden brown coating, 15 to 20 minutes.
Meanwhile, to make the sauce, combine tomatoes with juice, butter, onions and salt in a large wide pot. Bring to a simmer over medium heat. Reduce heat and simmer uncovered for 35 minutes, stirring occasionally. Discard onions. Using and immersion blender, process sauce briefly to break up any large pieces of tomato (texture should be even but not completely smooth). Season sauce with more salt and freshly ground black pepper, to taste.
Add the “meatballs” to the sauce and stir to coat, then simmer, but for no longer than 5 to 10 minutes, or they risk falling apart.
Serve over spaghetti and top with grated parmesan cheese.
Friday, February 08, 2013
Coconut and Chicken Curry Soup
I made this soup from a blog called Cooking for Seven. It basically served to remind me that I have a tendency of following recipes almost blindly the first time I make them, trusting the instructions to a fault. I read the ingredients and wrote them down on our grocery list, noting that the soup was supposed to make 6 servings and thinking to myself, “Great, we’ll have enough for two or three days!” But then I made the soup. And granted, I changed some things, like omitting the green bell pepper and the jalapeño and using 2 chicken breasts instead of 3, but with a grand total of 14 oz. of coconut milk plus 1 ½ cups of chicken broth… Ain’t no way that’s 6 servings! We had small servings the first evening, and supplemented them with bread. On the second evening, I added 2 cups of broth and threw in 2 servings of red rice noodles, and that was just perfect! The soup was so good that I decided to modify the recipe before keeping it. What you see below is my version, which is roughly a double batch of the original recipe, with a few modifications. You are obviously free to make the original version if you only want 2 large servings.
vegetable oil
3 or 4 chicken breasts, cut into bite sized chunks
1 large onion, finely chopped
2 Tbsp. grated fresh ginger
3 to 4 cups chicken broth (or more, to taste)
2 14-oz. cans of unsweetened coconut milk
1 Tbsp. curry powder (I use mild curry)
1 jalapeño, seeded, minced (optional, I omitted it)
2 Tbsp. lime juice
1 cup chopped fresh cilantro, plus extra for garnish
½ cup unsweetened toasted coconut chips, for garnish (optional)
rice noodles (optional)
Heat the vegetable oil in a medium sized soup pot over medium heat. Add the chicken to the oil, season lightly with salt and pepper. Sauté until cooked through and golden. Remove chicken and set aside. Sauté the onion, adding more oil if necessary, until tender.
Return the chicken to the pot with the onion. Add the ginger; cook for 1 minute. Add chicken broth, coconut milk, curry powder and jalapeño, if using. Bring to a simmer over medium heat. Add cilantro and simmer an additional 3 minutes. Stir in lime juice. Season to taste with salt and pepper.
Optional: Spoon rice noodles into 4 bowls. Top with a few ladles of soup. Garnish with additional cilantro and a sprinkling of coconut chips. Serve.
In the event of a zombie apocalypse...
… you will want me on your team. Here’s why:
- I can grow food.
- I can cook food.
- I can sew.
- I can knit, so basically get me two sticks and a string and I’ll give you clothes.
- While I do not own a firearm and would have to be taught how to clean one, I can load pretty fast and I’m a decent shot.
- I won’t use up group resources by accidently getting pregnant (although I do come with a husband, a child-in-the-making and a dog, and that’s non-negotiable).
Y’all ready for the rest of The Walking Dead?
- I can grow food.
- I can cook food.
- I can sew.
- I can knit, so basically get me two sticks and a string and I’ll give you clothes.
- While I do not own a firearm and would have to be taught how to clean one, I can load pretty fast and I’m a decent shot.
- I won’t use up group resources by accidently getting pregnant (although I do come with a husband, a child-in-the-making and a dog, and that’s non-negotiable).
Y’all ready for the rest of The Walking Dead?
Batch of links
- What to eat if pregnancy has made you too queasy to cook, on The Kitchn. There are some great suggestions in there. Personally, I found that I liked crackers (saltines and Nilla wafers), natural ginger ale, fruit sorbet, raw fruits and vegetables (apples, clementines, carrots, veggie rolls in rice paper), brothy soups and, unexpectedly, plain pasta. The Engineer also picked the weekly menu once when I really couldn’t stomach doing it. As far as your health and that of the baby are concerned during the first trimester, as long as you’re taking your prenatal vitamins and anything else prescribed by your obstetrician, any food you can keep down is good; your body probably already has all the reserves it needs to grow an embryo. If you’re like me, you’ll have other periods when you’re starving all the time, so then anything goes. I found that I did best if I had small snacks throughout the day (eating too much in one sitting was a mistake, and going too long without eating was just as bad). Bon Appétit also had suggestions for Kate Middleton. Which brings me to…
- Please stop saying that Kate Middleton had “morning sickness.” What she had was a medical condition called hyperemesis gravidarum (HG). As this article points out, “morning sickness […] resembles hyperemesis the way a twisted ankle resembles a compound fracture with two bones sticking out through the skin.” Here’s Prue Clark’s account of how she experienced it. In the Western world, women could die from HG before medicine advanced to what it is today. And even today, in areas where the population doesn’t have access to quality medical care, women STILL die from HG! No one ever died from morning sickness.
- Your hormones might be out of whack during pregnancy, leading to mood swings. I will not say that I have or have not been more emotional than usual, but I WILL say that this video made me cry, at the very end.
- Ultrasound parties: New frontier in pregnancy oversharing. This seems so over-the-top to me! As much as I love seeing our baby at an ultrasound, there’s NO WAY I’d send out invitations and do this in my living room with a bunch of people, regardless of how close we all are.
- The Engineer and I form a dual-language household. I do speak in English with him more often than not, but this is just the knee-jerk reflex of any bilingual Montrealer. I will definitely raise the baby in French, though, to make sure he/she can speak it and write it properly. Babies raised in two languages start speaking later than unilingual babies, but once they start speaking, they have vocabulary in both languages. I was pleased, however, to read articles like this one explaining how bilingualism gives babies “cognitive advantages”, including in their senior years. (That article says it makes babies smarter, but I’d caution that this depends on how you measure intelligence.) Plus, even if babies don’t understand the words one says to them, they are able to distinguish between several languages based on the sounds they hear. Here’s a fascinating TED Talk about the ways our brains form around language acquisition.
- Please stop saying that Kate Middleton had “morning sickness.” What she had was a medical condition called hyperemesis gravidarum (HG). As this article points out, “morning sickness […] resembles hyperemesis the way a twisted ankle resembles a compound fracture with two bones sticking out through the skin.” Here’s Prue Clark’s account of how she experienced it. In the Western world, women could die from HG before medicine advanced to what it is today. And even today, in areas where the population doesn’t have access to quality medical care, women STILL die from HG! No one ever died from morning sickness.
- Your hormones might be out of whack during pregnancy, leading to mood swings. I will not say that I have or have not been more emotional than usual, but I WILL say that this video made me cry, at the very end.
- Ultrasound parties: New frontier in pregnancy oversharing. This seems so over-the-top to me! As much as I love seeing our baby at an ultrasound, there’s NO WAY I’d send out invitations and do this in my living room with a bunch of people, regardless of how close we all are.
- The Engineer and I form a dual-language household. I do speak in English with him more often than not, but this is just the knee-jerk reflex of any bilingual Montrealer. I will definitely raise the baby in French, though, to make sure he/she can speak it and write it properly. Babies raised in two languages start speaking later than unilingual babies, but once they start speaking, they have vocabulary in both languages. I was pleased, however, to read articles like this one explaining how bilingualism gives babies “cognitive advantages”, including in their senior years. (That article says it makes babies smarter, but I’d caution that this depends on how you measure intelligence.) Plus, even if babies don’t understand the words one says to them, they are able to distinguish between several languages based on the sounds they hear. Here’s a fascinating TED Talk about the ways our brains form around language acquisition.
Thursday, February 07, 2013
Jam-Jams
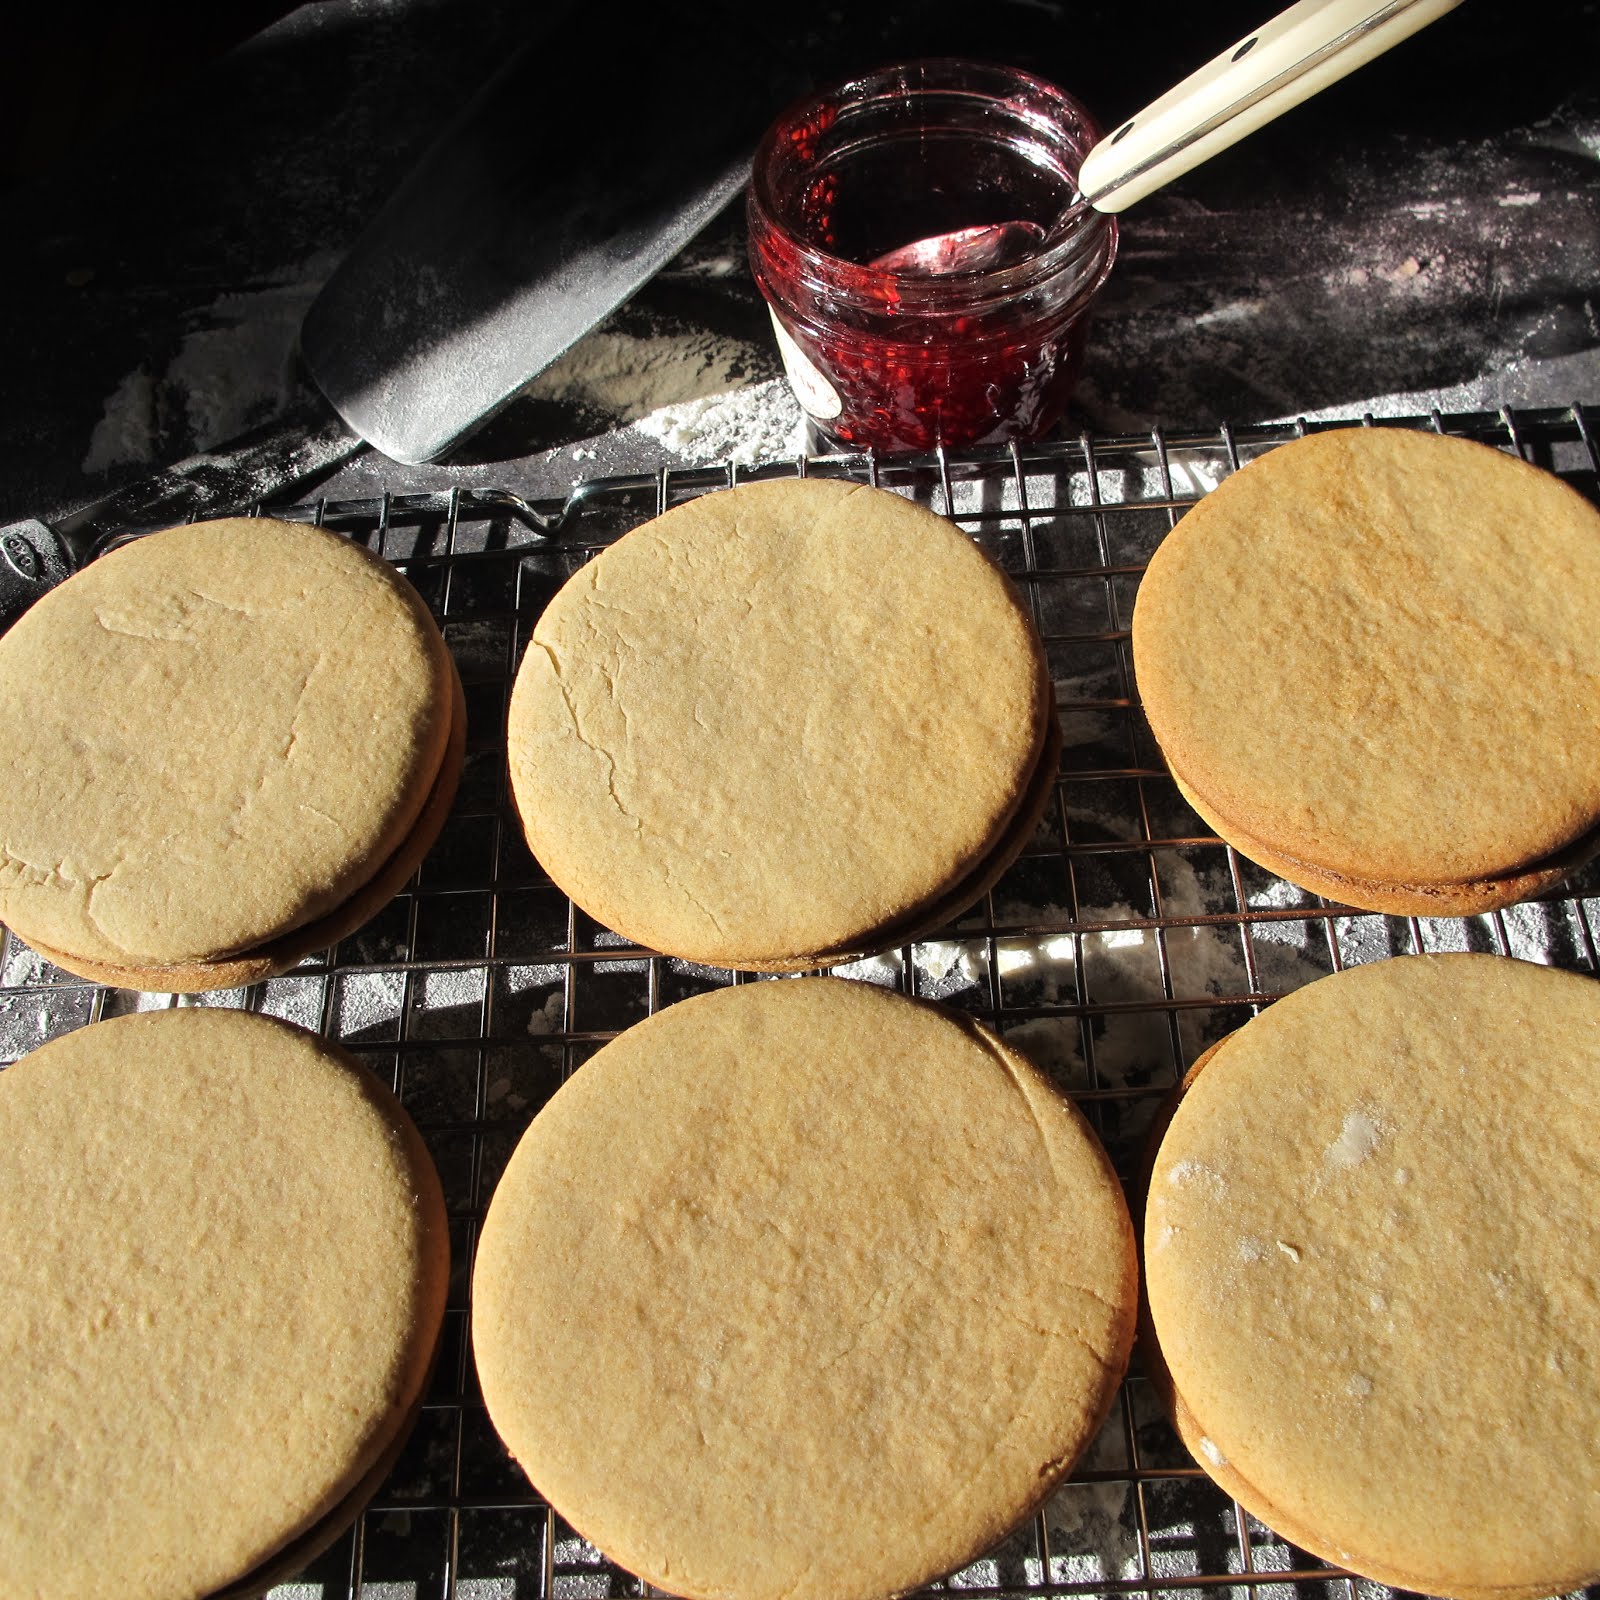
Since I haven’t been baking as much, I figured I’d have my friend Jennifer do a guest post. She recently made some Jam-Jams and had beautiful pictures, so I think you’ll appreciate this.
This is an old family recipe, which I'm pretty sure I got from this cookbook, although I'm sure my mom has a hand-written copy from my paternal grandmother somewhere. It's one of those old-fashioned recipes where they write "soda" for baking soda and don't actually give a precise measurement for the flour, a recipe just like your grandmother would make. I ended up adding closer to 4 cups of flour, but start with 2 and go from there. The directions to add enough until it pulls away from the side of the bowl do give an accurate indication of what needs to be happening; since you are going to be rolling the dough out, you don't want it to be too sticky. I used corn syrup, but if you were against that sort of thing I suppose molasses could be substituted. I used raspberry jam, but strawberry is also nice. Other flavors are less traditional, and I suppose you could fill it with anything if you wanted to (but then they wouldn't be called Jam-Jams). You don't want to overfill the cookies; mine were quite large and a teaspoon of jam was more than enough. It should just cover the cookie and not drip out the sides when you eat it.
1 cup butter or margarine
1 cup brown sugar
2 eggs
6 Tbsp. corn syrup
2 tsp. baking soda
1 tsp. vanilla
flour, approximately 2-3 cups
jam, for insides
Cream margarine and sugar. Add corn syrup and eggs and beat to combine. Add vanilla and baking soda. Add flour until the dough pulls away from the sides of the bowl and is capable of being rolled out. Roll out the dough and cut into circles. Bake at 350 °F for 12-15 min. While warm, put together with jam.
YIELD: 3 ½ dozen 2-inch cookies (18 Jam-Jams)
This is an old family recipe, which I'm pretty sure I got from this cookbook, although I'm sure my mom has a hand-written copy from my paternal grandmother somewhere. It's one of those old-fashioned recipes where they write "soda" for baking soda and don't actually give a precise measurement for the flour, a recipe just like your grandmother would make. I ended up adding closer to 4 cups of flour, but start with 2 and go from there. The directions to add enough until it pulls away from the side of the bowl do give an accurate indication of what needs to be happening; since you are going to be rolling the dough out, you don't want it to be too sticky. I used corn syrup, but if you were against that sort of thing I suppose molasses could be substituted. I used raspberry jam, but strawberry is also nice. Other flavors are less traditional, and I suppose you could fill it with anything if you wanted to (but then they wouldn't be called Jam-Jams). You don't want to overfill the cookies; mine were quite large and a teaspoon of jam was more than enough. It should just cover the cookie and not drip out the sides when you eat it.
1 cup butter or margarine
1 cup brown sugar
2 eggs
6 Tbsp. corn syrup
2 tsp. baking soda
1 tsp. vanilla
flour, approximately 2-3 cups
jam, for insides
Cream margarine and sugar. Add corn syrup and eggs and beat to combine. Add vanilla and baking soda. Add flour until the dough pulls away from the sides of the bowl and is capable of being rolled out. Roll out the dough and cut into circles. Bake at 350 °F for 12-15 min. While warm, put together with jam.
YIELD: 3 ½ dozen 2-inch cookies (18 Jam-Jams)
Croquettes de poulet à l'érable
J’ai fait un plat tout simple récemment, simple et satisfaisant. Il s’agit des croquettes de poulet au thym et au sirop d’érable de Mitaine écarlate, que j’ai modifiées un peu en doublant les quantités et en utilisant de la chapelure matzo du commerce parce que je n’avais plus assez de pain. J’ai trouvé ce poulet délicieux, avec son goût d’érable, d’ail et de citron! Plus savoureux que les croquettes de poulet traditionnelles, cuites au four plutôt que frites, et en plus, faites sans œufs (je connais une petite fille allergique aux œufs, alors j’aime bien l’imaginer manger des croquettes de poulet permises!).
La recette ci-dessous donne 4 petites portions, qui doivent être accompagnées. Comme à-côté, j’ai fait les frites au four de Gwyneth Paltrow. Elles avaient l’air poché, mais étaient excellentes! La prochaine fois, je les ferai cuire sur une plaque recouverte de papier parchemin plutôt que de papier aluminium.
2 grosses poitrines de poulet, coupées en gros cubes
le jus et le zeste d'un gros citron
2 gousses d'ail, broyées
½ tasse de sirop d'érable pur
½ tasse d'huile de canola
4 rôties de pain de blé, broyées (ou 1 tasse de chapelure du commerce)
1 c. à thé de thym (l2 c. à thé de thym frais, c’est meilleur)
sel et poivre
Dans un sac de plastique, mettre les cubes de poulet, le jus et le zeste de citron, l'ail, le sirop d'érable et l'huile. Bien mélanger. Laisser mariner au frigo pendant environ 3 heures.
Préchauffer le four à 350 °F. Dans un bol, mélanger les rôties broyées, le thym, le sel et le poivre. Bien enrober les cubes de poulet marinés dans la chapelure. Cuire sur une plaque à pâtisserie couverte de papier parchemin environ 20 minutes. Vérifier que le poulet est bien cuit et ajuster le temps de cuisson en conséquence. Servir tout de suite, en gardant l’option de tremper dans du sirop d’érable.
La recette ci-dessous donne 4 petites portions, qui doivent être accompagnées. Comme à-côté, j’ai fait les frites au four de Gwyneth Paltrow. Elles avaient l’air poché, mais étaient excellentes! La prochaine fois, je les ferai cuire sur une plaque recouverte de papier parchemin plutôt que de papier aluminium.
2 grosses poitrines de poulet, coupées en gros cubes
le jus et le zeste d'un gros citron
2 gousses d'ail, broyées
½ tasse de sirop d'érable pur
½ tasse d'huile de canola
4 rôties de pain de blé, broyées (ou 1 tasse de chapelure du commerce)
1 c. à thé de thym (l2 c. à thé de thym frais, c’est meilleur)
sel et poivre
Dans un sac de plastique, mettre les cubes de poulet, le jus et le zeste de citron, l'ail, le sirop d'érable et l'huile. Bien mélanger. Laisser mariner au frigo pendant environ 3 heures.
Préchauffer le four à 350 °F. Dans un bol, mélanger les rôties broyées, le thym, le sel et le poivre. Bien enrober les cubes de poulet marinés dans la chapelure. Cuire sur une plaque à pâtisserie couverte de papier parchemin environ 20 minutes. Vérifier que le poulet est bien cuit et ajuster le temps de cuisson en conséquence. Servir tout de suite, en gardant l’option de tremper dans du sirop d’érable.
Wednesday, February 06, 2013
Infertility
This is a big, rambling, super personal, hopefully one-time post on infertility, from the point of view of someone who managed to conceive quite quickly with a very simple fertility treatment. If you do not suffer from infertility, or (think) you do not know anyone who does, or if you just don’t want to hear about someone who conceived quickly with the right medication, feel entirely free to skip this post! There is actually a tie-in with lactose, though. And I’ll be back soon with another recipe.
I was educated in the French schooling system. Not only do I feel like I got a great education all around, but unlike in many Southern American curriculums, when came time for sex ed (STD prevention, birth control, emergency contraception and pregnancy interruption), we glossed over abstinence and learned everything about all the actually useful stuff, including the importance of going double Dutch*. Which is to say that I’ve always been very careful. So I naturally assumed that when I stopped taking all those precautions, I’d just get pregnant immediately. Or at least within several months. But that’s not how it happened.
(*The Engineer informs me he’s never heard of this expression before, which is not to be confused with going Dutch on a dinner date. I didn’t make it up, though: according to its Wikipedia disambiguation page, “double Dutch” refers to “using multiple forms of contraceptives simultaneously, usually one by the female, and one by the male.” This is standard practice in the Netherlands, hence the name.)
You see, when you decide to not get pregnant, you’re in control; ergo, getting pregnant is a choice, something that happens because you made (or didn’t make) certain decisions. This then gives you the illusion that you can also choose to get pregnant, by controlling it in a similar way. But that’s just it, an illusion, even for many couples who are perfectly fertile. When I thought of famous TV couples to represent the Engineer and me, I liked picturing Marshall and Lily, but it turns out we are more like Chandler and Monica. I’m not sure why that’s surprising, really, considering that I’ve always been more Monica than Lily!
There are always people who ask couples when they’re planning on having kids. This usually starts immediately after the wedding (sometimes right after the ceremony on the day of the wedding). And the longer you go without producing an heir, the more people will ask. Sometimes it’s just good-natured ribbing by people who mean well, and sometimes it’s actually parents and/or in-laws anxious to become grandparents and who, often quite knowingly, put pressure on the couple. At first, the Engineer and I didn’t really mind, because we just weren’t ready to have kids and didn’t mind saying so. Then it became more delicate, because we were indeed trying to have a baby, but weren’t willing to shout it from the rooftops. (And had I been pregnant, we wouldn’t have wanted to say anything before the second trimester anyway, so the constant inquisition would have led to a few months of flat-out lying.) It really became bothersome, though, when we realized that we were having fertility problems but, again, weren’t ready to share that information. And some people just keep prying and asking and pressuring and getting all up in our business and being completely oblivious to our cues that this was not a topic we wished to discuss. It seemed that no amount of “Don’t worry, when we have something to announce, we’ll announce it” would satisfy them. Was our family afraid that we would have a child in Texas in secret and never bring said child with us to Canada? Sometimes it came from people we don’t see often, so they might have honestly thought they were the first to ask us this, ever. This happened at my sister’s wedding, for example, where three different relatives asked when we would have kids already, and a family friend simply assumed I was pregnant, probably because I wasn’t drinking wine (I never do, but he doesn’t know me well enough to know that) and I was wearing an empire-waist dress (I just like the style, dude). So that third phase was the really tough part, at least for me.**
(** I am not saying this to be in any way hurtful to the relatives involved. It’s simply my side of the experience and how it felt from my point of view. I tend to be a private person and I share the information I wish to share; when I don’t give any news on a particular topic, it’s either because there are no news or because the news are private. After talking with some of my fertile friends and reading accounts of infertility from other women, I realize that they have experienced the same thing and resented the intrusion on their personal life as much as I did. That’s why I chose to share this, because I know others can relate and because it is almost always part of being infertile.)
It’s not that I wanted to be in the infertility closet for the rest of my life. As of recently, I’m halfway out: my immediate family and close friends know, but my extended family and acquaintances don’t, which is the way I want to keep it. (Coming out often really has to do with how much questioning the couple is willing to deal with, how much explaining they want to do, how much pressure they can take… But there’s pressure either way, pressure to have kids or pressure to explain what they are going through. I hope that with this post, any explaining will be out of the way for us! Here’s an account of a woman who came out because she felt it suited her personality best, although both she and the commenters can see both sides of the issue, as well as one where the woman is mostly in the closet still.) But some people respect your privacy and some people just don’t see the same socially accepted personal boundaries we do. For the latter, my experience has been that if you give them an inch, they take a mile. If you so much as open the door on your personal life and give them a piece of information, they think they’ve been granted permission to ask even more personal questions, more often. Case in point: before her first pregnancy, my friend Natasha (not her real name) was very open about the fact that she and her husband would be trying after a certain date, that she was off birth control, etc. As a result, everyone kept asking her if she was pregnant yet, several times a week, including right on her Facebook wall for the world to see! It was painful for her to have to say “No” for four months, then to have to lie and say “No” for another three months. For the next two pregnancies, she kept the trying part under wraps until she was ready to make an announcement, and apart from her parents, no one bugged her. As for me, I knew that if I said we were trying and weren’t having any luck, we’d get a deluge of “What’s wrong?” and “Are you going to see a doctor?” and “What did the doctor say?” and so on from some people. And if I had said we’d be trying fertility treatments, then it would have been “When did you ovulate?” and “Did it work?” for weeks, probably for multiple cycles. I refused to put myself in that position.
That two-week wait between ovulation and expected day of period is just killer at first, too. I referred to it as Schrodinger’s uterus, because there may or may not be an embryo in there, but you have to wait to find out. The slightest little twinge can be twisted into proof of a pregnancy (bloating, cramps, sensitive breasts, dizziness, frequent urination, hunger, fatigue, etc.). And the truth is, I’ve felt all that when I wasn’t pregnant. Here’s a funny post with ten ideas to make it through that two-week wait. I always took precautions as if I were pregnant during that time (no sushi, no wine sauce, no raw eggs, etc.), and the Engineer and I cheered ourselves up with a sushi dinner when I got my period. Eventually, though, sushi wasn’t enough to cheer me up. I did get to the point where I had stopped hoping it would happen naturally, so those two weeks eventually became like any other weeks. (When I finally did get pregnant, I had cramps that, until taking the test, I had attributed to perhaps eating something with lactose, even though I could tell it wasn’t really coming from my digestive tract. I’m telling you, I really wasn’t expecting it anymore. The cramps only made sense after I saw the second line on the pregnancy test!)
Of course, you’re free to try natural fertility supplements or fertility-boosting foods (see here, here or here for examples) early in the process, but let’s face it, if you have a physiological problem, it’s probably not going to help at all. My best recommendation today to a couple in their twenties or early thirties would be to seek the help of a fertility specialist if you haven’t been able to conceive after one year (if you are older, seek help sooner). But if you have any kind of fertility problem, or even if you don’t and it takes you 6 months to conceive naturally instead of the 1 or 2 it took your best friends, it will be in your face all the time. Friends and family around you get pregnant (even some who weren’t trying), characters in your TV shows get pregnant, pregnant women and babies and adorable baby clothes start popping up everywhere, and teen moms stare at you from the tabloid covers in the checkout lane at the grocery store. I even have a friend who first started trying to get pregnant at the same time I did, and she’s due with her second child in less than two months – at that rate, I was afraid her kids would end up babysitting mine! And the women around you who complain that they “can’t” get pregnant reveal they’ve only been trying for a few months, so it’ll take all your restraint not to high-five them. In the face.
I found it difficult to come across good infertility blogs when I was looking for online support. They’re definitely out there (start with the top 50), but many of them either turned into mommy blogs (encouraging, sure, but not what I wanted to read about at the time) or got depressing (like one poor woman contemplating her 21st IVF cycle, since the first 20 did not work, and she had to pay for all of it out of pocket – so she had it way worse than me, but it’s also not what I wanted to hear right then). My advice would be to look through the archives of various blogs and find what you need from each timeline. Redbook magazine also has a great series featuring videos of real women talking about their infertility, which can bring some comfort to those who feel alone or isolated. (Statistically, though, something like 1 in 8 couples will deal with infertility, so it’s really a pretty common problem. According to Time magazine, 5 million babies have been born using assisted-reproduction technologies since the first test-tube baby in 1978.) Some people may find Quips and Tips for Couples Dealing with Infertility useful. I also sympathized with Kate Hawkins’ tale of trying to conceive. And while we’re trying to get a few laughs, here’s a list of 50 things not to say to your wife if she’s suffering from infertility, as well as a feature I enjoyed on the blog Conceive This: Yahoo Answers, Not So Much (see another edition here or here). And here’s also an infertility board on Pinterest that had me in stitches!
As for those of you who have never dealt with infertility, if you want to know what to avoid saying, read this and this. Some of my favorites? “Getting pregnant is the fun part” – well then obviously, you’ve never really had to try to get pregnant. Another is “I know exactly how you feel. It took us three whole months to get pregnant!” Um, shut up. Or suggesting charting ovulation, having frequent sex, just relaxing… You don’t think we’ve tried that already? (Just one more reason we didn’t announce we were trying; I didn’t have to deal with misguided advice like that on a regular basis.) And don’t ever ask people if they’re pregnant, or whether there’s something physically wrong with them if they’re not, that’s usually just rude.
Long story short, we tried for almost two years before we ended up getting a correct diagnosis from a fertility clinic: I have polycystic ovarian syndrome, a.k.a. PCOS (here are links to its definition on Wikipedia and PubMed Health, depending on your reading preferences). In a nutshell, it means that my ovaries are producing eggs, but are not releasing them – I am not ovulating. I did not see this coming because a) I do not fit the textbook symptoms, and b) I used pee-on-a-stick ovulation tests for most of those two years and got positive results (it turns out that they are not reliable in women with PCOS because of the hormone they test, and I might have realized something was wrong sooner had I tested my sweat, saliva or temperature instead of the LH hormone in my urine). PCOS is actually such a common problem that there’s even a reality show about it (gotta love America). So technically, I am not infertile, “only” sub-fertile, though I might decide I prefer the term fertility-challenged in the future.
I had to take clomiphene (Clomid by its street name), which was of course prescribed by my fertility doctor. Clomid triggers ovulation. Couples who are prescribed this medication are obviously trying to conceive. Interestingly, though, the drug came with warnings saying that it should not be taken by women trying to become pregnant… So, why do you think I’m taking it in the first place? Do people actually take clomiphene just for fun? And clomiphene, by the way, contains lactose. So, yeah. I was so worried about the possible side effects from the active ingredients of what is probably the most prescribed fertility drug that it didn’t even occur to me to check the other ingredients. My nurse did have the good idea of telling me to take the clomiphene before bed, though, so that I would sleep through most of the side effects. I still dealt with a few things, but I’m aware it could have been much worse. And in the end, the Engineer and I got really lucky, because the clomiphene worked immediately. It could have taken much longer to work, it could have been ineffective, we could have ended up doing IUI or IVF or adopting, but our infertility was “resolved” quickly, and for that we are very grateful. This could have been emotionally and financially a whole lot harder – not to mention physically, in the case of IVF.
(I’m still going to share some links on international adoption that I really liked, in case it helps someone else: an article written by a woman born in Korea and adopted as a child by American parents, titled What No One Told Me About Adoption, and another one written by a mother then in the process of adopting two children from Ethiopia, called How To Adopt In 9 “Easy-Peasy” Stages. And if you have 16 minutes, here’s a very interesting account of what happened at FAO Schwartz when a new baby doll came out and the store sold out of white dolls – did parents choose Latino dolls, Asian ones or African-American ones instead? The result is pretty disturbing, but the story is told in a very entertaining way, and I think that it reflects much of society’s views on international adoptions.)
(Plus two articles about dealing with the cost of IVF, one from Newsweek and one from Time. And while we’re at it, if anyone is still reading, here are two posts I liked on So Close: IVF Barbie to differentiate the attitudes of various women who undergo this procedure, and How to be good friends with an infertile, if your friends don’t know how to act around you now that you’ve come out.)
Anyway, I hope this post might bring comfort to someone else, which is why I decided to publish it (that, and it was a good occasion to vent). I’ve made it into the second trimester, and I can’t even tell you how awesome it is to now go to a regular obstetrician’s office and have ultrasounds where I get to keep my pants on!
I was educated in the French schooling system. Not only do I feel like I got a great education all around, but unlike in many Southern American curriculums, when came time for sex ed (STD prevention, birth control, emergency contraception and pregnancy interruption), we glossed over abstinence and learned everything about all the actually useful stuff, including the importance of going double Dutch*. Which is to say that I’ve always been very careful. So I naturally assumed that when I stopped taking all those precautions, I’d just get pregnant immediately. Or at least within several months. But that’s not how it happened.
(*The Engineer informs me he’s never heard of this expression before, which is not to be confused with going Dutch on a dinner date. I didn’t make it up, though: according to its Wikipedia disambiguation page, “double Dutch” refers to “using multiple forms of contraceptives simultaneously, usually one by the female, and one by the male.” This is standard practice in the Netherlands, hence the name.)
You see, when you decide to not get pregnant, you’re in control; ergo, getting pregnant is a choice, something that happens because you made (or didn’t make) certain decisions. This then gives you the illusion that you can also choose to get pregnant, by controlling it in a similar way. But that’s just it, an illusion, even for many couples who are perfectly fertile. When I thought of famous TV couples to represent the Engineer and me, I liked picturing Marshall and Lily, but it turns out we are more like Chandler and Monica. I’m not sure why that’s surprising, really, considering that I’ve always been more Monica than Lily!
There are always people who ask couples when they’re planning on having kids. This usually starts immediately after the wedding (sometimes right after the ceremony on the day of the wedding). And the longer you go without producing an heir, the more people will ask. Sometimes it’s just good-natured ribbing by people who mean well, and sometimes it’s actually parents and/or in-laws anxious to become grandparents and who, often quite knowingly, put pressure on the couple. At first, the Engineer and I didn’t really mind, because we just weren’t ready to have kids and didn’t mind saying so. Then it became more delicate, because we were indeed trying to have a baby, but weren’t willing to shout it from the rooftops. (And had I been pregnant, we wouldn’t have wanted to say anything before the second trimester anyway, so the constant inquisition would have led to a few months of flat-out lying.) It really became bothersome, though, when we realized that we were having fertility problems but, again, weren’t ready to share that information. And some people just keep prying and asking and pressuring and getting all up in our business and being completely oblivious to our cues that this was not a topic we wished to discuss. It seemed that no amount of “Don’t worry, when we have something to announce, we’ll announce it” would satisfy them. Was our family afraid that we would have a child in Texas in secret and never bring said child with us to Canada? Sometimes it came from people we don’t see often, so they might have honestly thought they were the first to ask us this, ever. This happened at my sister’s wedding, for example, where three different relatives asked when we would have kids already, and a family friend simply assumed I was pregnant, probably because I wasn’t drinking wine (I never do, but he doesn’t know me well enough to know that) and I was wearing an empire-waist dress (I just like the style, dude). So that third phase was the really tough part, at least for me.**
(** I am not saying this to be in any way hurtful to the relatives involved. It’s simply my side of the experience and how it felt from my point of view. I tend to be a private person and I share the information I wish to share; when I don’t give any news on a particular topic, it’s either because there are no news or because the news are private. After talking with some of my fertile friends and reading accounts of infertility from other women, I realize that they have experienced the same thing and resented the intrusion on their personal life as much as I did. That’s why I chose to share this, because I know others can relate and because it is almost always part of being infertile.)
It’s not that I wanted to be in the infertility closet for the rest of my life. As of recently, I’m halfway out: my immediate family and close friends know, but my extended family and acquaintances don’t, which is the way I want to keep it. (Coming out often really has to do with how much questioning the couple is willing to deal with, how much explaining they want to do, how much pressure they can take… But there’s pressure either way, pressure to have kids or pressure to explain what they are going through. I hope that with this post, any explaining will be out of the way for us! Here’s an account of a woman who came out because she felt it suited her personality best, although both she and the commenters can see both sides of the issue, as well as one where the woman is mostly in the closet still.) But some people respect your privacy and some people just don’t see the same socially accepted personal boundaries we do. For the latter, my experience has been that if you give them an inch, they take a mile. If you so much as open the door on your personal life and give them a piece of information, they think they’ve been granted permission to ask even more personal questions, more often. Case in point: before her first pregnancy, my friend Natasha (not her real name) was very open about the fact that she and her husband would be trying after a certain date, that she was off birth control, etc. As a result, everyone kept asking her if she was pregnant yet, several times a week, including right on her Facebook wall for the world to see! It was painful for her to have to say “No” for four months, then to have to lie and say “No” for another three months. For the next two pregnancies, she kept the trying part under wraps until she was ready to make an announcement, and apart from her parents, no one bugged her. As for me, I knew that if I said we were trying and weren’t having any luck, we’d get a deluge of “What’s wrong?” and “Are you going to see a doctor?” and “What did the doctor say?” and so on from some people. And if I had said we’d be trying fertility treatments, then it would have been “When did you ovulate?” and “Did it work?” for weeks, probably for multiple cycles. I refused to put myself in that position.
That two-week wait between ovulation and expected day of period is just killer at first, too. I referred to it as Schrodinger’s uterus, because there may or may not be an embryo in there, but you have to wait to find out. The slightest little twinge can be twisted into proof of a pregnancy (bloating, cramps, sensitive breasts, dizziness, frequent urination, hunger, fatigue, etc.). And the truth is, I’ve felt all that when I wasn’t pregnant. Here’s a funny post with ten ideas to make it through that two-week wait. I always took precautions as if I were pregnant during that time (no sushi, no wine sauce, no raw eggs, etc.), and the Engineer and I cheered ourselves up with a sushi dinner when I got my period. Eventually, though, sushi wasn’t enough to cheer me up. I did get to the point where I had stopped hoping it would happen naturally, so those two weeks eventually became like any other weeks. (When I finally did get pregnant, I had cramps that, until taking the test, I had attributed to perhaps eating something with lactose, even though I could tell it wasn’t really coming from my digestive tract. I’m telling you, I really wasn’t expecting it anymore. The cramps only made sense after I saw the second line on the pregnancy test!)
Of course, you’re free to try natural fertility supplements or fertility-boosting foods (see here, here or here for examples) early in the process, but let’s face it, if you have a physiological problem, it’s probably not going to help at all. My best recommendation today to a couple in their twenties or early thirties would be to seek the help of a fertility specialist if you haven’t been able to conceive after one year (if you are older, seek help sooner). But if you have any kind of fertility problem, or even if you don’t and it takes you 6 months to conceive naturally instead of the 1 or 2 it took your best friends, it will be in your face all the time. Friends and family around you get pregnant (even some who weren’t trying), characters in your TV shows get pregnant, pregnant women and babies and adorable baby clothes start popping up everywhere, and teen moms stare at you from the tabloid covers in the checkout lane at the grocery store. I even have a friend who first started trying to get pregnant at the same time I did, and she’s due with her second child in less than two months – at that rate, I was afraid her kids would end up babysitting mine! And the women around you who complain that they “can’t” get pregnant reveal they’ve only been trying for a few months, so it’ll take all your restraint not to high-five them. In the face.
I found it difficult to come across good infertility blogs when I was looking for online support. They’re definitely out there (start with the top 50), but many of them either turned into mommy blogs (encouraging, sure, but not what I wanted to read about at the time) or got depressing (like one poor woman contemplating her 21st IVF cycle, since the first 20 did not work, and she had to pay for all of it out of pocket – so she had it way worse than me, but it’s also not what I wanted to hear right then). My advice would be to look through the archives of various blogs and find what you need from each timeline. Redbook magazine also has a great series featuring videos of real women talking about their infertility, which can bring some comfort to those who feel alone or isolated. (Statistically, though, something like 1 in 8 couples will deal with infertility, so it’s really a pretty common problem. According to Time magazine, 5 million babies have been born using assisted-reproduction technologies since the first test-tube baby in 1978.) Some people may find Quips and Tips for Couples Dealing with Infertility useful. I also sympathized with Kate Hawkins’ tale of trying to conceive. And while we’re trying to get a few laughs, here’s a list of 50 things not to say to your wife if she’s suffering from infertility, as well as a feature I enjoyed on the blog Conceive This: Yahoo Answers, Not So Much (see another edition here or here). And here’s also an infertility board on Pinterest that had me in stitches!
As for those of you who have never dealt with infertility, if you want to know what to avoid saying, read this and this. Some of my favorites? “Getting pregnant is the fun part” – well then obviously, you’ve never really had to try to get pregnant. Another is “I know exactly how you feel. It took us three whole months to get pregnant!” Um, shut up. Or suggesting charting ovulation, having frequent sex, just relaxing… You don’t think we’ve tried that already? (Just one more reason we didn’t announce we were trying; I didn’t have to deal with misguided advice like that on a regular basis.) And don’t ever ask people if they’re pregnant, or whether there’s something physically wrong with them if they’re not, that’s usually just rude.
Long story short, we tried for almost two years before we ended up getting a correct diagnosis from a fertility clinic: I have polycystic ovarian syndrome, a.k.a. PCOS (here are links to its definition on Wikipedia and PubMed Health, depending on your reading preferences). In a nutshell, it means that my ovaries are producing eggs, but are not releasing them – I am not ovulating. I did not see this coming because a) I do not fit the textbook symptoms, and b) I used pee-on-a-stick ovulation tests for most of those two years and got positive results (it turns out that they are not reliable in women with PCOS because of the hormone they test, and I might have realized something was wrong sooner had I tested my sweat, saliva or temperature instead of the LH hormone in my urine). PCOS is actually such a common problem that there’s even a reality show about it (gotta love America). So technically, I am not infertile, “only” sub-fertile, though I might decide I prefer the term fertility-challenged in the future.
I had to take clomiphene (Clomid by its street name), which was of course prescribed by my fertility doctor. Clomid triggers ovulation. Couples who are prescribed this medication are obviously trying to conceive. Interestingly, though, the drug came with warnings saying that it should not be taken by women trying to become pregnant… So, why do you think I’m taking it in the first place? Do people actually take clomiphene just for fun? And clomiphene, by the way, contains lactose. So, yeah. I was so worried about the possible side effects from the active ingredients of what is probably the most prescribed fertility drug that it didn’t even occur to me to check the other ingredients. My nurse did have the good idea of telling me to take the clomiphene before bed, though, so that I would sleep through most of the side effects. I still dealt with a few things, but I’m aware it could have been much worse. And in the end, the Engineer and I got really lucky, because the clomiphene worked immediately. It could have taken much longer to work, it could have been ineffective, we could have ended up doing IUI or IVF or adopting, but our infertility was “resolved” quickly, and for that we are very grateful. This could have been emotionally and financially a whole lot harder – not to mention physically, in the case of IVF.
(I’m still going to share some links on international adoption that I really liked, in case it helps someone else: an article written by a woman born in Korea and adopted as a child by American parents, titled What No One Told Me About Adoption, and another one written by a mother then in the process of adopting two children from Ethiopia, called How To Adopt In 9 “Easy-Peasy” Stages. And if you have 16 minutes, here’s a very interesting account of what happened at FAO Schwartz when a new baby doll came out and the store sold out of white dolls – did parents choose Latino dolls, Asian ones or African-American ones instead? The result is pretty disturbing, but the story is told in a very entertaining way, and I think that it reflects much of society’s views on international adoptions.)
(Plus two articles about dealing with the cost of IVF, one from Newsweek and one from Time. And while we’re at it, if anyone is still reading, here are two posts I liked on So Close: IVF Barbie to differentiate the attitudes of various women who undergo this procedure, and How to be good friends with an infertile, if your friends don’t know how to act around you now that you’ve come out.)
Anyway, I hope this post might bring comfort to someone else, which is why I decided to publish it (that, and it was a good occasion to vent). I’ve made it into the second trimester, and I can’t even tell you how awesome it is to now go to a regular obstetrician’s office and have ultrasounds where I get to keep my pants on!
Tuesday, February 05, 2013
Homemade chocolate spread
I just realized that today is World Nutella Day. I’m not sure who comes up with these holidays, and considering that it’s always the day or week of something or other, I tend not to pay any attention to all the hype. I do, however, have a post about homemade Nutella in the works, so I decided to see if I could get it ready to post it today.
I first decided to make Nutella (or perhaps I should say chocolate spread) last spring, and as I did, I wrote down my impressions (so it’s not like the fridge is full of Nutella right now, far from it). The first recipe I tried was the one on David Lebovitz’s blog. It called for 40 g. of almonds and 160 g. of hazelnuts, but the amount of almonds is so small that I ended up using 200 g. of blanched hazelnuts (thereby saving myself the trouble of peeling them). There’s nothing like the smell of roasting hazelnuts! I just love it; it smells sweet and almost like raspberries, and it really brings out the taste. The recipe called for both milk (I used lactose-free milk, naturally) and milk powder (I used soy milk powder). It also called for 6 oz. of semisweet chocolate, which I had, and for 5 oz. of milk chocolate, but for that I used instead 4 oz. of milk chocolate and 1 oz. of bittersweet chocolate, since I do like dark chocolate more anyway. While the result was good, I found it a little grainy, and even after refrigeration, I thought it was too liquid, probably because of the milk. Plus, it was really pale, almost like chestnut paste, and didn’t taste enough like chocolate to me. And I ended up with 3 Bonne Maman jars full of it! I used them up in recipes that call for Nutella, including Ricardo’s Nutella brownies, but I’m not posting that recipe just yet, since the result literally paled in comparison to what I normally get. (Who ever thought a chocolate spread by David Lebovitz would fail to meet my chocolate expectations?)
For my next recipe, I tried a vegan one from The Kind Life. This one called for 12 oz. of vegan milk chocolate, and since I couldn’t find any, I used 12 oz. of semisweet chocolate, which I prefer anyway. I also couldn’t find hazelnuts that day, but I did have macadamia nuts in the freezer, so I used those (and again, they’re peeled!) and toasted them for 5-6 minutes in the oven. I also reduced the salt from ¾ tsp. to ½ tsp. The color was much better than my previous batch, and I loved the taste, but I did find it a little too stiff to spread on bread. (Then again, I put it in the fridge as a reflex, but it could be stored at room temperature for a week without a problem.) This recipe is my second favorite.
I had set all that aside for months, and got back into it recently, trying a third and final recipe (after eliminating one that I had seen on Pinterest, because it was basically the same but had more sugar). It’s from The Kitchn and is faster than the other two, because you don’t have to melt any chocolate. Just use quality cocoa powder, throw everything in a food processor and call it a day! That being said, I did have to peel the hazelnuts, but I did it the Alice Medrich way, which was new to me, and it was much easier than toasting-then-rubbing-in-a-tea-towel. Do follow the link and watch her show her method to Julia Child, it’s wonderful! This Nutella was delicious, and though I must admit that it does get a bit too stiff if refrigerated, it’s perfectly safe to leave it at room temperature if you are going to be eating it within a week (and trust me, you will). This is the recipe I’m sharing here, and it happens to be vegan too!
Before we get there, though, I’d like to mention a chocolate spread that I discovered in Montreal over the summer. It’s made in Israel and imported by a company based in New York State. It is is called Hashahar H’Aole L’Mehadrin Special Cocoa Spread, and is not only vegan, but it also has the distinction of being nut-free! I’ve got a jar on hand and it does keep for a long time. While it has good color and consistency, though, I must admit I find it a little too sweet (sugar is the first ingredient, followed by vegetable oil and then cocoa). I’m sure there are other recipes for nut-free chocolate spread online, but I haven’t really taken the time to look.
So here’s the recipe I preferred, the one using cocoa powder. I made this one recently, and strangely, the Engineer was under the impression that I made chocolate spread all the time. I told him that it was only the third time I made ANY chocolate spread, and I was really pleased with myself for finding a winning recipe, but to him, it was just like, “Oh look, my wife made Nutella AGAIN.” Not that he’s tired of it, I don’t think, but I do tend to eat sweet breakfasts more often than him, as he’s in more of a savory kind of mood in the morning. So anyway, my making Nutella does not impress him at all, but I think it’s worth it, especially since I think this tastes much better than actual Nutella (I think it’s the salt). This would also be great to replace Nutella in recipes, not just as a spread! The recipe makes a little less than a cup, but it could be doubled if you wish.
For toasting the hazelnuts
2 cups boiling water
3 Tbsp. baking soda
1 cup hazelnuts
In a medium saucepan with high sides, bring 2 cups of water to a boil. Add 3 Tbsp. of baking soda to the water – the water will foam up. As a matter of fact, it will foam up quite a bit later on, too, so don’t be afraid to use a much larger pot than you think you need!
Add the nuts to the boiling water and boil for about 3 minutes. The water will turn black – don’t be alarmed. While the hazelnuts are boiling, prepare a medium bowl of ice cold water. After three minutes, use a slotted spoon to remove one test nut, placing the nut into the prepared bowl of ice water. Use your fingers to remove the skin; if the skin doesn’t come off easily, boil the nuts 1-2 minutes longer and try another test nut. When a test skin rubs right off, add the rest of the nuts to the ice water and peel them with ease.
Place peeled nuts into a kitchen towel or paper towels and dry them thoroughly.
Place the peeled and dried nuts on a baking sheet and toast at 350 °F for about 10 minutes (or up to 15 minutes). The taste is worth it, and your kitchen will smell delicious!
For the chocolate spread
1 cup toasted peeled hazelnuts
¼ cup dark cocoa powder
½ cup powdered sugar
¾ tsp. vanilla extract
¼ tsp. kosher salt
4 Tbsp. canola oil
Place the hazelnuts in your food processor and blend continuously until they turn into a smooth butter, about 3 minutes. (This would work better with a Vitamix, but I did get pretty good results with my food processor; I stopped when the nuts were the consistency of wet sand.) Add the remaining ingredients and continue blending until smooth and creamy.
Assuming the weather is not too warm, the chocolate spread will keep on the counter for a week. Otherwise, refrigerate it for up to a few weeks.
I first decided to make Nutella (or perhaps I should say chocolate spread) last spring, and as I did, I wrote down my impressions (so it’s not like the fridge is full of Nutella right now, far from it). The first recipe I tried was the one on David Lebovitz’s blog. It called for 40 g. of almonds and 160 g. of hazelnuts, but the amount of almonds is so small that I ended up using 200 g. of blanched hazelnuts (thereby saving myself the trouble of peeling them). There’s nothing like the smell of roasting hazelnuts! I just love it; it smells sweet and almost like raspberries, and it really brings out the taste. The recipe called for both milk (I used lactose-free milk, naturally) and milk powder (I used soy milk powder). It also called for 6 oz. of semisweet chocolate, which I had, and for 5 oz. of milk chocolate, but for that I used instead 4 oz. of milk chocolate and 1 oz. of bittersweet chocolate, since I do like dark chocolate more anyway. While the result was good, I found it a little grainy, and even after refrigeration, I thought it was too liquid, probably because of the milk. Plus, it was really pale, almost like chestnut paste, and didn’t taste enough like chocolate to me. And I ended up with 3 Bonne Maman jars full of it! I used them up in recipes that call for Nutella, including Ricardo’s Nutella brownies, but I’m not posting that recipe just yet, since the result literally paled in comparison to what I normally get. (Who ever thought a chocolate spread by David Lebovitz would fail to meet my chocolate expectations?)
For my next recipe, I tried a vegan one from The Kind Life. This one called for 12 oz. of vegan milk chocolate, and since I couldn’t find any, I used 12 oz. of semisweet chocolate, which I prefer anyway. I also couldn’t find hazelnuts that day, but I did have macadamia nuts in the freezer, so I used those (and again, they’re peeled!) and toasted them for 5-6 minutes in the oven. I also reduced the salt from ¾ tsp. to ½ tsp. The color was much better than my previous batch, and I loved the taste, but I did find it a little too stiff to spread on bread. (Then again, I put it in the fridge as a reflex, but it could be stored at room temperature for a week without a problem.) This recipe is my second favorite.
I had set all that aside for months, and got back into it recently, trying a third and final recipe (after eliminating one that I had seen on Pinterest, because it was basically the same but had more sugar). It’s from The Kitchn and is faster than the other two, because you don’t have to melt any chocolate. Just use quality cocoa powder, throw everything in a food processor and call it a day! That being said, I did have to peel the hazelnuts, but I did it the Alice Medrich way, which was new to me, and it was much easier than toasting-then-rubbing-in-a-tea-towel. Do follow the link and watch her show her method to Julia Child, it’s wonderful! This Nutella was delicious, and though I must admit that it does get a bit too stiff if refrigerated, it’s perfectly safe to leave it at room temperature if you are going to be eating it within a week (and trust me, you will). This is the recipe I’m sharing here, and it happens to be vegan too!
Before we get there, though, I’d like to mention a chocolate spread that I discovered in Montreal over the summer. It’s made in Israel and imported by a company based in New York State. It is is called Hashahar H’Aole L’Mehadrin Special Cocoa Spread, and is not only vegan, but it also has the distinction of being nut-free! I’ve got a jar on hand and it does keep for a long time. While it has good color and consistency, though, I must admit I find it a little too sweet (sugar is the first ingredient, followed by vegetable oil and then cocoa). I’m sure there are other recipes for nut-free chocolate spread online, but I haven’t really taken the time to look.
So here’s the recipe I preferred, the one using cocoa powder. I made this one recently, and strangely, the Engineer was under the impression that I made chocolate spread all the time. I told him that it was only the third time I made ANY chocolate spread, and I was really pleased with myself for finding a winning recipe, but to him, it was just like, “Oh look, my wife made Nutella AGAIN.” Not that he’s tired of it, I don’t think, but I do tend to eat sweet breakfasts more often than him, as he’s in more of a savory kind of mood in the morning. So anyway, my making Nutella does not impress him at all, but I think it’s worth it, especially since I think this tastes much better than actual Nutella (I think it’s the salt). This would also be great to replace Nutella in recipes, not just as a spread! The recipe makes a little less than a cup, but it could be doubled if you wish.
For toasting the hazelnuts
2 cups boiling water
3 Tbsp. baking soda
1 cup hazelnuts
In a medium saucepan with high sides, bring 2 cups of water to a boil. Add 3 Tbsp. of baking soda to the water – the water will foam up. As a matter of fact, it will foam up quite a bit later on, too, so don’t be afraid to use a much larger pot than you think you need!
Add the nuts to the boiling water and boil for about 3 minutes. The water will turn black – don’t be alarmed. While the hazelnuts are boiling, prepare a medium bowl of ice cold water. After three minutes, use a slotted spoon to remove one test nut, placing the nut into the prepared bowl of ice water. Use your fingers to remove the skin; if the skin doesn’t come off easily, boil the nuts 1-2 minutes longer and try another test nut. When a test skin rubs right off, add the rest of the nuts to the ice water and peel them with ease.
Place peeled nuts into a kitchen towel or paper towels and dry them thoroughly.
Place the peeled and dried nuts on a baking sheet and toast at 350 °F for about 10 minutes (or up to 15 minutes). The taste is worth it, and your kitchen will smell delicious!
For the chocolate spread
1 cup toasted peeled hazelnuts
¼ cup dark cocoa powder
½ cup powdered sugar
¾ tsp. vanilla extract
¼ tsp. kosher salt
4 Tbsp. canola oil
Place the hazelnuts in your food processor and blend continuously until they turn into a smooth butter, about 3 minutes. (This would work better with a Vitamix, but I did get pretty good results with my food processor; I stopped when the nuts were the consistency of wet sand.) Add the remaining ingredients and continue blending until smooth and creamy.
Assuming the weather is not too warm, the chocolate spread will keep on the counter for a week. Otherwise, refrigerate it for up to a few weeks.
The Engineer's cookies
Since I haven’t posted that many desserts lately, I figured I’d let you have a look at the Engineer’s cookies, all from Baking Illustrated. He started with sugar cookies, snickerdoodles, two kinds of chocolate chip cookies (crisp and chewy), then double-chocolate cookies and oatmeal cookies. The peanut butter cookies were fantastic, and just look at how nice his pecan sandies are! Those were delicious as well.
Then he made molasses spice cookies, glazed lemon cookies, black and white cookies, ice box cookies, sandwich cookies, glazed butter cookies (the giant Texas one and the Christmas ones), gingerbread cookies, hermits (so-called because you can leave them alone on a countertop and they’ll still be good in a week), and nut crescent cookies. Plus shortbread, rugelach, and four kinds of biscotti: lemon-anise, honey-lavender, spiced and orange-almond.
He moved on to almond macaroons (neither one of us had ever had this version of the cookie; it was a chocolate mix that was great coming out of the oven, but hardened very quickly), then coconut macaroons, meringue cookies with chocolate chips (which were wonderfully crisp, so apparently one CAN make meringues in San Antonio), and finally, lace cookies.
All that’s left now are the brownies and bar cookies, then he’s done with his project! He’s already got the next one lined up, though, so I’m looking forward to that (it will be America’s Test Kitchen Healthy Family Cookbook, and he plans to work his ways through the various sections on a rotating basis).
Then he made molasses spice cookies, glazed lemon cookies, black and white cookies, ice box cookies, sandwich cookies, glazed butter cookies (the giant Texas one and the Christmas ones), gingerbread cookies, hermits (so-called because you can leave them alone on a countertop and they’ll still be good in a week), and nut crescent cookies. Plus shortbread, rugelach, and four kinds of biscotti: lemon-anise, honey-lavender, spiced and orange-almond.
He moved on to almond macaroons (neither one of us had ever had this version of the cookie; it was a chocolate mix that was great coming out of the oven, but hardened very quickly), then coconut macaroons, meringue cookies with chocolate chips (which were wonderfully crisp, so apparently one CAN make meringues in San Antonio), and finally, lace cookies.
All that’s left now are the brownies and bar cookies, then he’s done with his project! He’s already got the next one lined up, though, so I’m looking forward to that (it will be America’s Test Kitchen Healthy Family Cookbook, and he plans to work his ways through the various sections on a rotating basis).
Monday, February 04, 2013
Cause for celebration
I suddenly got over 1,000 page views on Thursday, January 31st, and I’m still not sure why… But regardless, hello to all the new readers! I happened to look at the statistics this morning, since it’s my blogaversary – I first posted 4 years ago today. There have been two developments in late 2012 that I think were particularly noteworthy. One, I finally had the blog moved to its own domain name, and I’m only sorry I didn’t do it sooner. It’s fantastic having a good URL to which you can refer people!
The second development, I’ve been keeping under wraps for a few months. Or perhaps I should say I’ve been keeping it under my shirt… The Engineer and I are expecting a baby in July! That’s in part why recipe updates have been a bit slow. You see, even when I liked a recipe, sometimes looking at pictures of it a week or two later made me a little queasy, and I had to write posts in several sittings. That Thanksgiving one nearly killed me! Plus, there were many weeks when I could not, for the life of me, think of what I would like to eat. I ended up digging through my blog archives more than my pile of recipes to try, for things that were fresh and not too heavy. (I want sushi, except I can’t have sushi, or miso soup, except I’m cutting way back on soy.) Brothy soups are awesome, people! And plain pasta, with maybe a little margarine or parmesan on top. Not to forget salads. But that’s usually not exciting enough for the blog! Plus, I pretty much lost my sweet tooth for a while, preferring lemon sorbet and Nilla wafers to any cupcake or chocolate chip cookie, which is obviously very unlike me. Now that I’m in the second trimester, though, I am starting to feel a little better.
Last night was actually the first time that I started showing a little (it could have been the shirt I was wearing or the way I was standing, but the Engineer and I noticed it several times in the evening). That being said, we notice it because we know I’m pregnant, but someone who doesn’t know me could still legitimately think it’s a burrito baby and nothing else. The fetus is supposed to be roughly the size of an avocado right now. I just love those websites that compare its size too that of produce! (For a list geared towards men and their stereotypical frame of reference instead, click here!) It was amazing how fast it went from a poppy seed to an apple seed to a blueberry. But it is, in fact, headed for the size of a melon, which I then have to push out of my lady garden, so that’s another story.
I want to reassure some of you who are bound to ask: I do not intend for this to turn into a mommy blog. I mean, obviously pregnancy and motherhood will affect even the food portion of it, as there are now a lot of foods that I either avoid entirely or cut back on (so you won’t see tofu or wine sauces for a while), and I will eventually have to talk about meals that freeze well or meals that you can prepare really quickly with a baby on one hip. There will also probably be a lull in late summer, as I adjust to the new addition. I will write posts related to babies or children or parenting once in a while, as there has always been a “slice of life” component to this blog, but really, the focus will still be on food, not babies.
The second development, I’ve been keeping under wraps for a few months. Or perhaps I should say I’ve been keeping it under my shirt… The Engineer and I are expecting a baby in July! That’s in part why recipe updates have been a bit slow. You see, even when I liked a recipe, sometimes looking at pictures of it a week or two later made me a little queasy, and I had to write posts in several sittings. That Thanksgiving one nearly killed me! Plus, there were many weeks when I could not, for the life of me, think of what I would like to eat. I ended up digging through my blog archives more than my pile of recipes to try, for things that were fresh and not too heavy. (I want sushi, except I can’t have sushi, or miso soup, except I’m cutting way back on soy.) Brothy soups are awesome, people! And plain pasta, with maybe a little margarine or parmesan on top. Not to forget salads. But that’s usually not exciting enough for the blog! Plus, I pretty much lost my sweet tooth for a while, preferring lemon sorbet and Nilla wafers to any cupcake or chocolate chip cookie, which is obviously very unlike me. Now that I’m in the second trimester, though, I am starting to feel a little better.
Last night was actually the first time that I started showing a little (it could have been the shirt I was wearing or the way I was standing, but the Engineer and I noticed it several times in the evening). That being said, we notice it because we know I’m pregnant, but someone who doesn’t know me could still legitimately think it’s a burrito baby and nothing else. The fetus is supposed to be roughly the size of an avocado right now. I just love those websites that compare its size too that of produce! (For a list geared towards men and their stereotypical frame of reference instead, click here!) It was amazing how fast it went from a poppy seed to an apple seed to a blueberry. But it is, in fact, headed for the size of a melon, which I then have to push out of my lady garden, so that’s another story.
I want to reassure some of you who are bound to ask: I do not intend for this to turn into a mommy blog. I mean, obviously pregnancy and motherhood will affect even the food portion of it, as there are now a lot of foods that I either avoid entirely or cut back on (so you won’t see tofu or wine sauces for a while), and I will eventually have to talk about meals that freeze well or meals that you can prepare really quickly with a baby on one hip. There will also probably be a lull in late summer, as I adjust to the new addition. I will write posts related to babies or children or parenting once in a while, as there has always been a “slice of life” component to this blog, but really, the focus will still be on food, not babies.
Friday, February 01, 2013
Kale and Pepper Stir-Fry
I made this a long time ago, but somehow it languished in my “Blog” folder. It’s from Real Simple and was the perfect lunch, and while I suppose it might make a good light dinner, I suspect it might be better as a side dish. It serves about 4 as a side dish, and is enough for lunch for 2 people. When I made it, I reduced the amount of kale and used half a bell pepper, to end up with one generous serving.
2 Tbsp. canola oil
1 red bell pepper, sliced
2 tsp. grated fresh ginger
kosher salt
1 medium bunch kale, thick stems removed and leaves torn into bite-size pieces (about 10 cups)
1 Tbsp. soy sauce
½ tsp. sesame oil
1 tsp. toasted sesame seeds
Heat the canola oil in a large skillet (I used a wok) over medium-high heat. Add the pepper and ginger, season with ½ tsp. salt, and cook until tender, 2 to 3 minutes.
Add the kale and soy sauce and cook, tossing occasionally, until the kale is tender, 6 to 8 minutes. Mix in the sesame oil and sprinkle with the sesame seeds.
Wednesday, January 30, 2013
Tarte aux tomates du jardin
Je vous avais parlé de mes tomates en octobre, puis j’ai oublié de partager des photos plus récentes. Au début décembre, trois tomates ont mûri sur le plant. Malheureusement, je n’ai pas été assez rapide pour les cueillir, alors j’en ai perdu deux aux insectes. Mais on a mangé la troisième, une petite noire de Crimée, dans des tacos.
À l’annonce d’un gel prolongé débutant le 11 décembre, j’ai décidé de cueillir tout ce qui restait, même si c’était vert, parce que je savais que les plants ne survivraient pas (je n’ai pas fait le compte total, mais chaque plant a produit, même le petit semis parti à l’intérieur; je dirais en gros deux douzaines de tomates vertes). J’avais en tête des recettes de beignets de tomates vertes, ou du ketchup de tomates vertes, mais je ne me décidais pas à les manger. Finalement, la grande majorité a mûri à l’intérieur au cours du mois suivant! Comme quoi y’a pas besoin de modifier génétiquement les tomates pour qu’elles survivent quelques jours à l’épicerie…
J’en ai mis deux grosses dans une salade quinoa, tomates et avocat pendant le temps des fêtes. Il y a eu des sandwichs BLT et d’autres tomates-avocat-laitue-fromage facultatif.
Et ensuite j’ai fait une tarte aux tomates avec deux big rainbow (celles avec du jaune) et deux rouges (dur de dire s’il s’agissait de brandywine ou de supersteak, malheureusement). La recette a été publiée sur Serious Eats et m’intriguait, avec sa croûte au parmesan et au romarin sans gluten! Elle contient donc des produits laitiers, mais pas de lactose (il en existe également une variation sans produits laitiers, que je noterai ci-dessous). La croûte était absolument délicieuse! L’Ingénieur m’a même fait un compliment dessus, sans jamais se douter qu’elle ne contenait pas de gluten… On a tous les deux adoré cette tarte, même que l’Ingénieur m’a fait sa petite face contente avant de dire à quel point c’était bon!
La recette donne 4 petites portions, si vous servez avec un à-côté comme une salade verte. On s’est resservis tous les deux après (donc 4 portions de 2 morceaux chacune, en ayant coupé la tarte en 8).
Pour la pâte
4 oz. (environ 1 tasse) de farine de riz blanc
¾ tasse de parmesan râpé (omettez-le pour la version sans produits laitiers)
1.25 oz. (environ ¼ tasse) de farine de riz glutineux
1 oz. (environ ¼ tasse) de fécule de tapioca
1 c. à thé de romarin frais, haché
½ c. à thé de sel (ou ¾ c. à thé pour la version sans produits laitiers)
4 oz. (1 bâton) de beurre froid, coupé en morceaux (ou 10 c. à soupe de shortening pour la version sans produits laitiers)
2 oz. (¼ tasse) d’eau glacée
Pour la tarte
1 gros oignon, pelé et coupé en morceaux de ¼ pouce
2 c. à soupe de beurre ou d’huile végétale
4 oz. de fromage sans lactose, râpé (j’ai pris du gruyère et un reste de parmesan)
2 grosses tomates, environ 16 oz., coupées en tranches de ¼ pouce
huile d’olive
sel casher
quelques feuilles de basilic, hachées
Dans un robot culinaire, combiner la farine de riz blanc, le parmesan, la farine de riz glutineux, la fécule de tapioca, le romarin et le sel. Ajouter le beurre et combiner jusqu’à ce qu’il ne reste plus de gros morceaux. Ajouter l’eau et combiner jusqu’à ce que la pâte se forme.
Graisser un moule à tarte de 9 ou 10 pouces (avec votre huile ou margarine préférée ou avec un vaporisateur). Prendre des morceaux de pâte et les placer dans le moule en les répartissant de façon égale, puis presser la pâte dans le fond du moule et sur les côtés. Mettre au congélateur pendant 30 minutes. (J’anticipe la question : ce qui fait qu’on peut habituellement prendre un rouleau à pâte et étaler la pâte à tarte sur le comptoir, puis la transférer d’un morceau dans le moule, c’est le gluten! Ici, il n’y a pas de gluten, alors ça ne fonctionnera pas. Une autre solution : mettre une feuille de papier ciré sur le comptoir et étaler la pâte dessus avec un rouleau, puis soulever la feuille avec la pâte et, rapidement, la renverser sur le moule. Décoller le papier doucement et presser la pâte dans le moule.)
Pendant ce temps, faire chauffer le beurre ou l’huile dans une poêle à fond épais à feu moyen-élevé, pour faire brunir les oignons. Dès qu’ils commencent à brunir, baisser le feu presque au plus bas et faire caraméliser les oignons en remuant fréquemment jusqu’à ce qu’ils soient mous et très bruns, environ 30 minutes.
Préchauffer le four à 375 °F. Retirer la pâte du congélateur et la mettre au four pendant 20 minutes, jusqu’à ce qu’elle soit légèrement dorée. Retirer la croûte du four et la mettre sur une grille. Augmenter la température de four à 425 °F.
Étaler le fromage de façon égale dans la croûte. (Pour une version sans produits laitiers, omettre le fromage et enduire la croûte d’huile d’olive avec un pinceau, ce qui la gardera croustillante.) Ajouter les oignons sur le fromage et répartir les tranches de tomates sur le dessus. Ajouter un filet d’huile d’olive et saler.
Faire cuire jusqu’à ce que les tomates amollissent, environ 18 minutes. Placer la tarte sur une grille pour la laisser refroidir 5 minutes avant de la tailler en pointes. Répartir le basilic sur la tarte et servir.
À l’annonce d’un gel prolongé débutant le 11 décembre, j’ai décidé de cueillir tout ce qui restait, même si c’était vert, parce que je savais que les plants ne survivraient pas (je n’ai pas fait le compte total, mais chaque plant a produit, même le petit semis parti à l’intérieur; je dirais en gros deux douzaines de tomates vertes). J’avais en tête des recettes de beignets de tomates vertes, ou du ketchup de tomates vertes, mais je ne me décidais pas à les manger. Finalement, la grande majorité a mûri à l’intérieur au cours du mois suivant! Comme quoi y’a pas besoin de modifier génétiquement les tomates pour qu’elles survivent quelques jours à l’épicerie…
J’en ai mis deux grosses dans une salade quinoa, tomates et avocat pendant le temps des fêtes. Il y a eu des sandwichs BLT et d’autres tomates-avocat-laitue-fromage facultatif.
Et ensuite j’ai fait une tarte aux tomates avec deux big rainbow (celles avec du jaune) et deux rouges (dur de dire s’il s’agissait de brandywine ou de supersteak, malheureusement). La recette a été publiée sur Serious Eats et m’intriguait, avec sa croûte au parmesan et au romarin sans gluten! Elle contient donc des produits laitiers, mais pas de lactose (il en existe également une variation sans produits laitiers, que je noterai ci-dessous). La croûte était absolument délicieuse! L’Ingénieur m’a même fait un compliment dessus, sans jamais se douter qu’elle ne contenait pas de gluten… On a tous les deux adoré cette tarte, même que l’Ingénieur m’a fait sa petite face contente avant de dire à quel point c’était bon!
La recette donne 4 petites portions, si vous servez avec un à-côté comme une salade verte. On s’est resservis tous les deux après (donc 4 portions de 2 morceaux chacune, en ayant coupé la tarte en 8).
Pour la pâte
4 oz. (environ 1 tasse) de farine de riz blanc
¾ tasse de parmesan râpé (omettez-le pour la version sans produits laitiers)
1.25 oz. (environ ¼ tasse) de farine de riz glutineux
1 oz. (environ ¼ tasse) de fécule de tapioca
1 c. à thé de romarin frais, haché
½ c. à thé de sel (ou ¾ c. à thé pour la version sans produits laitiers)
4 oz. (1 bâton) de beurre froid, coupé en morceaux (ou 10 c. à soupe de shortening pour la version sans produits laitiers)
2 oz. (¼ tasse) d’eau glacée
Pour la tarte
1 gros oignon, pelé et coupé en morceaux de ¼ pouce
2 c. à soupe de beurre ou d’huile végétale
4 oz. de fromage sans lactose, râpé (j’ai pris du gruyère et un reste de parmesan)
2 grosses tomates, environ 16 oz., coupées en tranches de ¼ pouce
huile d’olive
sel casher
quelques feuilles de basilic, hachées
Dans un robot culinaire, combiner la farine de riz blanc, le parmesan, la farine de riz glutineux, la fécule de tapioca, le romarin et le sel. Ajouter le beurre et combiner jusqu’à ce qu’il ne reste plus de gros morceaux. Ajouter l’eau et combiner jusqu’à ce que la pâte se forme.
Graisser un moule à tarte de 9 ou 10 pouces (avec votre huile ou margarine préférée ou avec un vaporisateur). Prendre des morceaux de pâte et les placer dans le moule en les répartissant de façon égale, puis presser la pâte dans le fond du moule et sur les côtés. Mettre au congélateur pendant 30 minutes. (J’anticipe la question : ce qui fait qu’on peut habituellement prendre un rouleau à pâte et étaler la pâte à tarte sur le comptoir, puis la transférer d’un morceau dans le moule, c’est le gluten! Ici, il n’y a pas de gluten, alors ça ne fonctionnera pas. Une autre solution : mettre une feuille de papier ciré sur le comptoir et étaler la pâte dessus avec un rouleau, puis soulever la feuille avec la pâte et, rapidement, la renverser sur le moule. Décoller le papier doucement et presser la pâte dans le moule.)
Pendant ce temps, faire chauffer le beurre ou l’huile dans une poêle à fond épais à feu moyen-élevé, pour faire brunir les oignons. Dès qu’ils commencent à brunir, baisser le feu presque au plus bas et faire caraméliser les oignons en remuant fréquemment jusqu’à ce qu’ils soient mous et très bruns, environ 30 minutes.
Préchauffer le four à 375 °F. Retirer la pâte du congélateur et la mettre au four pendant 20 minutes, jusqu’à ce qu’elle soit légèrement dorée. Retirer la croûte du four et la mettre sur une grille. Augmenter la température de four à 425 °F.
Étaler le fromage de façon égale dans la croûte. (Pour une version sans produits laitiers, omettre le fromage et enduire la croûte d’huile d’olive avec un pinceau, ce qui la gardera croustillante.) Ajouter les oignons sur le fromage et répartir les tranches de tomates sur le dessus. Ajouter un filet d’huile d’olive et saler.
Faire cuire jusqu’à ce que les tomates amollissent, environ 18 minutes. Placer la tarte sur une grille pour la laisser refroidir 5 minutes avant de la tailler en pointes. Répartir le basilic sur la tarte et servir.
Tuesday, January 29, 2013
Chocolate, Banana and Teff Cupcakes
I found this recipe a while back on Cannelle et Vanille. It was originally for 12 cupcakes and a loaf cake, so I was planning on freezing the cupcakes. Unfortunately, either our loaf pans are way different, or something happened in my kitchen despite my using a scale, but I only had enough batter for 12 cupcakes plus 2 ramekins (so maybe 14 to 16 cupcakes in all). That being said, despite the quantity snafu, the recipe was delicious! I’m not used to baking with teff, but it was delicious here and does go well with chocolate (though I must admit the taste doesn’t really stand out). In fact, I really wouldn’t have known these cupcakes (almost muffins, really) were gluten-free if I hadn’t made them myself. They disappeared quickly, and I ended up not freezing any of them. You are free to frost them, of course, but I liked them plain, especially for breakfast.
3 eggs
200 g. natural cane sugar
300 g. ripe bananas, mashed (this was 2 bananas for me)
175 g. light olive oil (I used ¾ cup safflower oil instead)
2 tsp. vanilla extract
100 g. teff flour
50 g. sweet rice flour
50 g. hazelnut meal (I used almond meal)
15 g. cocoa powder
½ tsp. salt
½ tsp. baking soda
100 g. chocolate chips
Preheat the oven to 350 °F. Grease a standard muffin tin along with two ramekins or another few muffin molds.
In a medium bowl, whisk together the eggs, sugar, banana purée, oil and vanilla.
In a large bowl, whisk together the teff, sweet rice flour, hazelnut meal, cocoa powder, salt and baking soda. Add the wet ingredients to the dry and whisk until combined. Fold in the chocolate chips.
Divide the batter between the muffin tins. Bake for 20 minutes for the cupcakes (a little longer for ramekins). Frost if desired.
Triple-Smoky Mac & Cheese
It’s taking me a while to write these posts, sorry about that! So, the Engineer gave me a vegetarian cookbook for Christmas, Herbivoracious (from the author of the blog of the same name). There are tons of recipes in there that look really good, though I must admit I haven’t done the methodical sweep where I stick Post-It tabs on the interesting pages (I’ve done that to several cookbooks lately, and I’m pretty much out of tabs is why). The Engineer actually picked the first recipe I should try, this triple-smoky mac & cheese. I realize we might have a mac & cheese obsession in this household! I modified it a little to make it lactose-free (though it still has a lot of dairy), and I’ve written those modifications below. The thing is that it can be hard to find a cheese that is both smoky and lactose-free, so I used regular cheese (and gruyere instead of mozzarella) as well as a little liquid smoke, to compensate.
It might seem like an extra hassle to make the bread crumbs yourself, but it really wasn’t hard, and it is SO worth it! They are far superior to store-bought bread crumbs, and add a wonderful crunch to the dish – it wouldn’t be the same without it. I recommend that you only spread a minimal amount on the pasta as you are baking it, and reserve the rest of the crumbs. Then, when you reheat leftovers, toast the crumbs again in a skillet and top the mac & cheese before serving, so that the crumbs stay crunchy.
The Engineer loved this dish and exclaimed, “It’s everything I was hoping for!” I liked it, but could have done with a little less smoke (the Engineer respectfully disagrees, and has already requested that I make this again).
This makes about 6 servings.
For the bread crumbs
6 slices of stale bread (or fresh bread, toasted)
3 Tbsp. extra-virgin olive oil
¼ tsp kosher salt
2 cloves garlic, grated
Grate the bread in a food processor, using the grating blade. Empty the crumbs from the bowl and replace the grating blade with the regular steel blade. Put the crumbs back in the processor bowl and process until the crumbs reach the desired texture.
Heat the oil in your largest skillet over medium-low heat. When the oil is hot, add the bread crumbs, salt and garlic. Toast, stirring frequently, until the crumbs are well-browned and crispy, about 10 minutes.
Set aside to cool and use as needed. Store what you are not using immediately in a zipper-top plastic bag at room temperature, or in the freezer for longer term storage.
For the mac & cheese
1 lb. elbow macaroni (or other short pasta)
6 Tbsp. butter or vegan margarine, divided
¼ cup all purpose-flour
4 cups lactose-free whole milk
1 tsp. liquid smoke (if neither cheese is smoked)
½ onion, finely diced
1 Tbsp. smoked paprika
1 tsp. rosemary, minced
1 chipotle pepper (canned in adobo sauce), minced, or ¼ cup Frontera chipotle sauce
1 tsp. oregano
¼ tsp. nutmeg (preferably freshly grated)
8 oz. lactose-free cheddar, grated
8 oz. lactose-free gruyère, grated
salt, to taste
Bring a large pot of salted water to a boil. Boil the macaroni according to package directions, draining when it is just becoming al dente. This will bake more in the oven, so don't overcook it. Drain and toss with 2 Tbsp. butter.
Preheat oven to 350 °F and grease a large baking dish.
In a medium saucepan, melt the remaining 4 Tbsp. of butter over medium-low heat. Sprinkle in the flour and whisk pretty constantly for 3 minutes. Whisk in the milk and liquid smoke. Add the onion, smoked paprika, rosemary, chipotle, oregano, and nutmeg. Simmer, whisking occasionally until it begins to thicken.
Gradually whisk in the grated cheeses, stirring each batch to incorporate.
Taste the sauce, and adjust the seasoning to your preference. It will probably need a little salt, but maybe not too much depending on the cheeses. Add more spiciness if desired. Remember that the sauce should be pretty intense because it is going to be diluted by a full pound of pasta.
Stir the macaroni into the sauce. Pour the macaroni into the prepared pan. (It will look really liquid, but don’t worry, it turns out great!)
Top with the garlicky breadcrumbs (you might not need all of them; see note above). I actually put the crumbs on top of the pasta only about 5 minutes before taking the whole thing out of the oven, because I didn’t want them too brown, and I was satisfied with the result.
Bake for about 30 minutes, until you can see bubbling around the sides and the breadcrumbs are nicely browned.
Let stand for 5-10 minutes (to set) and serve.
Subscribe to:
Posts (Atom)