Tuesday, November 16, 2010

Honey Ice Cream


I found this recipe on Orangette, but Molly Wizenberg adapted the recipe slightly from Pure Desserts by Alice Medrich (which, by the way, looks like a really good cookbook). I changed it myself to make it lactose-free, by using coconut milk instead of the heavy cream. I ended up with an ice cream that was very light and had a soft consistency, but that was quite pleasant. Since the coconut milk has a stronger taste than the cream, though, I recommend using the full ½ cup of honey, perhaps even a little more, in order not to lose its taste to the coconut (taste your mixture before refrigerating it and decide for yourself, since honey can vary in sweetness). This is a very good dessert and is very easy to make, but it has a refined, subtle taste that is quite refreshing.

½ cup lactose-free milk
½ cup honey (see note above)
1 pinch salt
400 mL coconut milk (1 can)

In a small saucepan, warm the milk over medium heat until it begins to simmer gently around the edges. Pour it into a medium bowl, and allow to cool a bit (this will prevent curdling when the honey is added). Add the honey and salt, and stir well to dissolve the honey. Stir in the coconut milk. Taste, and adjust the amount of honey as needed. Cover and chill thoroughly, preferably overnight.


Freeze according to the instructions for your ice cream maker. Then, before serving, store the ice cream in the freezer until hard enough to scoop, at least 3 to 4 hours.


Served here with a sesame cookie.

Crunchy Sesame Cookies


I’ve found my new favourite sesame cookie here. Unlike the marathon cookies, these aren’t covered in sesame seeds, but they are rolled in sugar (and I would recommend something coarser than regular granulated sugar). I baked them slightly less than called for, so they still had some chewiness. I also used brown rice syrup instead of corn syrup. The cookies were delicious, and tasted almost like peanut butter cookies – except they contain no peanuts or tree nuts. They’re very filling, but not too sweet. I wholeheartedly recommend them!

1 ½ cups all-purpose flour
1 ½ Tbsp cornstarch
1 tsp baking powder
½ tsp baking soda
¼ tsp salt
1 cup packed brown sugar
1/3 cup tahini
2 Tbsp sesame oil
1 Tbsp brown rice syrup
2 tsp vanilla extract
1 large egg
2 Tbsp granulated sugar (with big grains is fine)

Preheat oven to 375 °F.

Combine flour, cornstarch, baking powder, baking soda, and salt, stirring with a whisk; set mixture aside.

Place brown sugar, tahini, and oil in a large bowl; beat with a mixer at medium speed until well blended.


Add syrup, vanilla, and egg; beat well.


Gradually add flour mixture to sugar mixture, beating at low speed just until combined.


Shape dough into 24 balls (about 1 inch each). Place granulated sugar in a shallow bowl. Roll dough balls in granulated sugar; place 2 inches apart on baking sheets lined with parchment paper.


Flatten balls slightly with the bottom of a glass.


Bake for 10 minutes or until lightly browned. Cool on pans 2 minutes. Remove cookies from pans; cool completely on a wire rack.


Monday, November 15, 2010

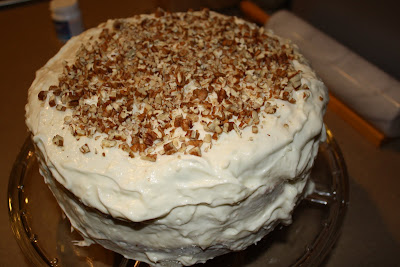
All I wanted was hummingbird cake, y'all


I’d had this recipe for hummingbird cake bookmarked for the longest time; it’s on the Martha Stewart Living website, but courtesy of Paula Deen. The latter is probably the chef I most easily associate with Southern cooking, and since this is a Southern cake, I was very eager to try it. But I changed a few things, because Paula Deen doesn’t exactly cook the healthiest food around, and this was certainly not lactose-free. I mean, butter AND cream cheese in the frosting? And 2 lbs of powdered sugar? I don’t think so.

So I made the cake itself with few modifications, only using all-purpose flour, baking powder and salt instead of the self-rising flour (as suggested here). I diligently used the nuts, because I wanted an authentic hummingbird cake. They were chopped really small, but they were still... in the way. And while the cake itself was good, the Engineer said that he “would have expected a cake called ‘hummingbird’ to be light and airy”, which this was definitely not.

Then came the frosting. The amount suggested seemed insufficient to frost a whole cake, so I decided to double it. (And after watching the video, I now know that Paula Deen does the same. It’s good to know my instincts were right about something! I should point out that Martha Stewart used a single recipe, though.) I started by using the recipe as a guide to make a lactose-free frosting reminiscent of cream cheese, with Tofutti Better Than Cream Cheese (which is bland) and plain Greek yogurt (which is thick and tangy), along with margarine sticks instead of the butter, and no liquids. Well, that was a complete disaster. It was more of a glaze than anything else. I used the whisk attachment to get more air into it, I added powdered sugar to solidify it, but nothing worked. It was a mess. So I abdicated and went to the corner store to get the ingredients Paula Deen calls for. I made the frosting, but even then I must admit to only using half the sugar, and it was still plenty sweet (though not the perfect consistency).

In the end, it really wasn’t as good as I had hoped, and it wasn’t lactose-free either. I’m still nowhere near having a recipe for lactose-free “cream cheese style” frosting, though I’ll keep working at it. If anyone has one to share, I’m all ears. This cake kept well in the fridge – it lasted for days with only the two of us in the house. You might want to use a bread knife to cut the pieces; a spatula makes for messy slices.

For the cake
3 cups all-purpose flour
1 ½ Tbsp baking powder
1 ½ tsp salt
2 cups granulated sugar
¾ cup vegetable oil
½ cup finely chopped pecans
2 very ripe large bananas, mashed
1 (8-oz) can crushed pineapple, with juice
1 tsp pure vanilla extract
1 tsp ground cinnamon
4 large eggs, beaten

For the frosting (you might want to double this)
1 lb (1 box) confectioners' sugar
1 (8-oz) package cream cheese, room temperature
6 Tbsp (¾ stick) unsalted butter, softened
1 tsp pure vanilla extract
1 Tbsp milk, or more if needed
½ cup finely chopped pecans

Preheat oven to 325 °F. Spray and flour three 8-inch round cake pans, tapping out excess flour; set aside.

Prepare the cake: in a large bowl, stir to combine flour, baking powder, salt, sugar, oil, pecans, bananas, pineapple, vanilla, cinnamon, and eggs. (Out of habit, I separated the dry and wet ingredients at first.)


Divide batter evenly between prepared pans, smoothing with an offset spatula. Bake, rotating pans halfway through, until the tops spring back when gently pressed with your fingertips, 26 to 28 minutes.


Transfer pans to a wire rack to cool 10 minutes. Invert cakes onto wire rack. Re-invert cakes and let them cool completely, top sides up.


Prepare the frosting: in the bowl of an electric mixer fitted with the paddle attachment, combine sugar, cream cheese, butter, vanilla, and 1 tablespoon milk on medium speed until frosting is smooth. If needed, add more milk, 1 teaspoon at a time, to achieve the proper spreading consistency.


Using a serrated knife, trim tops of cakes to make level (if necessary; it wasn’t in my case, nor in the demonstration video). Place four strips of parchment paper around perimeter of a serving plate or lazy Susan. Place the first layer on the cake plate. Spread the top of the first layer with some of the frosting. Place the second layer on top and repeat process with more frosting. Place the remaining layer on top of the second layer. Spread entire cake with remaining frosting. Sprinkle the top with pecans. Remove parchment paper strips; refrigerate until ready to serve.


Farro with Lentils and Caramelized Onions


Lately, I’ve been on a kick about discovering new grains. Enter farro, which I could not find in Montreal, but of course here it’s no problem. Farro is a wheat grain, and once cooked, it reminds me of Sugar Crisp cereal in its appearance. Like a lot of grains, it is sold either pearled or semi-pearled; the pearled variety takes longer to cook, but can be used here without a problem. The longest part here is caramelizing the onions; I took my time and started two hours before dinner, and everything worked out perfectly.

The recipe is Molly Wizenberg’s; interestingly, I also got my mujadara recipe from her, and the two are very similar. The dish is perfect for when the weather starts getting cold. It is not pretty to look at, sure, but it is comforting. You can also throw in some greens, like kale or spinach, and add some lemon juice or hot sauce. I added some feta, which went nicely with the dish even though it’s not lactose-free, but it’s optional. Like mujadara, this dish is great eaten warm for dinner, but is also good straight from the fridge for lunch.

2 medium or large yellow onions
olive oil
kosher salt
¾ cup farro (semi-pearled)
½ cup French lentils, carefully picked through for pebbles and debris
feta cheese (optional)
hot sauce (optional)
lemon juice (optional)

First, the onions: slice them thinly. Pour a few glugs of olive oil into a large, heavy-bottomed skillet or pan (I used my Dutch oven). You want to be generous here, nearly coating the bottom of the skillet. Warm the oil over medium-high heat. When it’s hot, dump in the onions. They should sizzle. Stir them to coat, and then add a couple of pinches of salt. Reduce the heat to low, and continue to cook slowly, stirring occasionally. First, they will soften a bit; then they will go a little golden; and then they will begin to caramelize. It takes a long time to do this properly, so be patient – and stir regularly, especially as they take on color. When they’re done, they will have shrunk down in volume by quite a lot, and they should be a deep amber color and almost translucent.


Meanwhile, once you’ve got the onions started, put the farro in a medium bowl, add cold water to cover, and set it aside to soak for 30 minutes. Then drain it, turn it out into a medium saucepan, and add 3 cups of cold water and ¼ teaspoon salt. Bring to a boil over medium-high heat; then reduce the heat and simmer until tender but still a little chewy, about 30 minutes. It’s up to you, really, how “done” you want your farro. When the farro is ready, drain it, and set aside.

While the farro is cooking, put the lentils into another medium saucepan. Add 3 cups of cold water and ¼ teaspoon salt. Bring to a boil over medium-high heat; then reduce the heat and simmer until tender but not falling apart, about 20 to 25 minutes. Drain, and rinse briefly under cool water.

By this point, ideally, your onions will be nicely caramelized. Now combine it all – onions, farro, and lentils – in a bowl and stir gently. Taste, and adjust seasoning, if necessary. Serve with feta crumbled on top and, if you like, hot sauce and/or a squeeze of lemon.


Thursday, November 11, 2010

Green Bean and Pasta Salad


I got this recipe from Real Simple magazine. It is, as the name suggests, real(ly) simple. It’s also healthy and filling, and makes a great quick dinner or lunch. Enjoy!

4 oz penne or short pasta, gluten-free if you want (about 1 ¼ cups)
4 oz green beans, halved crosswise (about 1 cup)
1 cup canned red or kidney beans, rinsed
¼ cup chopped fresh flat-leaf parsley
2 Tbsp grated Parmesan (or more, to taste)
2 Tbsp olive oil
2 Tbsp fresh lemon juice
kosher salt and black pepper

Cook the pasta according to the package directions, adding the green beans during the last 3 minutes of cooking. Drain and run under cold water to cool a bit.

Toss the warm pasta and green beans with the red beans, parsley, Parmesan, olive oil, lemon juice, ½ teaspoon kosher salt, and ¼ teaspoon black pepper.

Rice with Gomashio


I found this recipe on the wonderful blog Tea & Cookies. This humble rice recipe is at once so good and so simple that it has become my new “standard” way of making rice, so it’s graced our table more than once in the past two weeks. I use a bit less salt than recommended, but my real issue is that if you mix the salt with the sesame seeds, the former falls to the bottom, so the last servings are topped with too much salt. I think it’s better to sprinkle salt and sesame seeds separately on the rice. I strongly recommend you make this recipe, though, it’s surprisingly addictive. (And at the rate we’re eating this dish, it makes our huge container of sushi rice seem almost too small.) This makes two generous servings.

1 cup short grain sushi rice
2 tsp sesame seeds, toasted (black and white, or a mixture of both)
¼ tsp salt
toasted sesame oil, for topping

Thoroughly wash the rice in cold water, until the rinse water runs clear (I use a wire mesh strainer for this). In a small pot with a close-fitting lid, add the washed and drained rice and 1 ½ cup cold water. With the top on the pot, bring the rice mixture to a boil and reduce heat to a simmer. Keep an eye on the rice and begin testing it once the water has fully absorbed. Cooking time takes 15-20 minutes, depending on the size of the pot used.

Toast the sesame seeds (I do this in a pan).


Spoon the hot rice into a bowl, top with sesame seeds and salt and drizzle with sesame oil. Serve hot.

Blueberry-Almond Granola


This recipe is originally by Martha Stewart, but I had to change it a bit because the oven temperature was way too high (I lost my first batch to it). I’ll admit this isn’t as good as my usual granola recipes, but it called for dried blueberries, and I just love the fact that I can go to my regular grocery store and buy these like they’re the most common thing ever (when I had never even seen them in my Montreal grocery store). Dried blueberries taste a bit like little raisins, but better. If you’re going to make this granola, consider adding your favourite spices – I think that’s what missing from this recipe.

2 cups old-fashioned rolled oats
½ cup unsweetened shredded coconut
½ cup sliced almonds
2 Tbsp vegetable oil
2 Tbsp honey
1 cup dried blueberries

Preheat oven to 300 °F. On a large rimmed baking sheet, toss oats, coconut, and almonds. In a small bowl, stir together oil and honey. Pour over oat mixture and toss. Bake, tossing occasionally, until lightly toasted, 15 to 20 minutes (be sure to keep an eye on it).


Place mixture in a large bowl and stir in blueberries. (To store, keep in an airtight container, up to 1 month.)

Rice Cheese


I recently tried rice cheese, a lactose-free alternative to cheese that also happens to be soy-free (I’m still amazed with soy cheese, though). Rice cheese comes in several different varieties, but I got the “American cheese” style, because those thin orange slices used to be the perfect way to make a grilled cheese sandwich, being the right size and shape and all. This rice cheese was very good too; it is blander than Daiya cheese, it melts just like regular cheese, and it is a good source of calcium to boot. I just love having all these choices here!


Wednesday, November 10, 2010

Lactose-Free Strawberry Lemonade Ice Cream


Now that I’ve been reunited with my ice cream maker, I’ve decided to make all those ice cream recipes I’ve had bookmarked. I’m trying to make them lactose-free, and sometimes dairy-free. The lemonade ice cream recipe was originally created by Emeril Lagasse, but I found the strawberry adaptation on The Repressed Pastry Chef. They were a nice touch, because I feel the lemonade by itself would get boring after a while. I used lactose-free substitutes for the ingredients. As the Engineer confirmed, this was by far my best ice cream yet; the texture was very creamy, and it was delicious. The taste was rich, but not overpowering and not too sweet. I did add a splash of vodka to the strawberries to prevent them from freezing solid, but it wasn’t enough; feel free to be a bit heavy-handed here. I did throw in a few spoonfuls of plain lactose-free Greek yogurt, but that being said, it wasn’t needed for the consistency at all (I just had it in the fridge and didn’t want it going to waste).

1 ½ cups coconut milk (or the whole 400 mL can)
1 cup soy creamer
¾ cup sugar
2 Tbsp finely grated fresh lemon zest (from about 4 lemons)
5 large egg yolks
½ cup lemon juice (from the same 4 lemons)
1 Tbsp limoncello (optional, I didn’t use it)
1 package strawberries (the exact amount is up to you), chopped
1 dash of sugar
1 splash of vodka


In a medium, heavy saucepan, bring the coconut milk, creamer, sugar and lemon zest to a boil, stirring occasionally until the sugar is melted. Remove from the heat.

In a medium bowl, beat the egg yolks until thick and pale, about 2 minutes. In a slow stream, whisking constantly, add about 1 cup of the hot coconut milk mixture to the egg yolks. Beat until well incorporated. Return the yolk mixture to the saucepan with the hot coconut milk and bring to a bare simmer. Cook until a thick custard forms, and the mixture reaches 170 °F on an instant-read thermometer, about 6 minutes. (Do this only if you are worried about the raw eggs; otherwise, you can use pasteurized eggs or forgo the thermometer altogether.) Remove from the heat and strain through a fine-mesh strainer into a clean container. Stir in the lemon juice and limoncello, and cover with plastic wrap, pressing down against the custard to prevent a skin from forming. Refrigerate until well-chilled, about 2 hours.

Meanwhile, put the strawberries in a bowl; sprinkle with sugar and add a dash of vodka. Refrigerate.


Transfer the custard to an ice-cream maker and process according to the manufacturer’s instructions. Transfer to an airtight plastic container, mix in the strawberries (without the juice) and freeze until ready to serve.


If you are wondering what to do with the remaining 5 egg whites, I suggest egg white crêpes.