Sunday, February 11, 2024

Coconut Cream Party Cake

 I believe I bought Jessica Battilana’s Repertoire: All the Recipes You Need because it was recommended by Molly Wizenberg, but it also looks like a cookbook that would be right up my alley. In the end, though, I only bookmarked two recipes from it. The first was this greenest green salad, which was fine.


The other was the coconut cream party cake, which I asked the Engineer to make for my birthday. And it was good! That being said, I think I’ll refer to this post if we ever want to make it again, and I’ll donate the cookbook.

The cake itself has a tender and delicate crumb, there’s coconut pastry cream between the layers, and it’s covered in a chocolate ganache that uses water instead of cream. We didn’t use the coconut flakes on the outside of the cake because while I could have gone either way, neither of the kids likes it, and the Engineer knew he would be happier without it.


For the coconut pastry cream
2 cups lactose-free whole milk
2 cups finely shredded sweetened flaked coconut
1 vanilla bean
2 large eggs
½ cup sugar
3 Tbsp. flour
3 Tbsp. lactose-free butter, at room temperature

In a medium saucepan over medium-high heat, combine the milk and coconut. Split the vanilla bean lengthwise and use the tip of a knife to scrape out the seeds; add both seeds and pod to the milk mixture. Bring mixture to a gentle simmer, stirring occasionally.

In a medium bowl, whisk together the eggs, sugar, and flour. While whisking, drizzle about a third of the hot milk mixture into the egg mixture, then slowly whisk the egg-milk mixture back into the saucepan. Cook over medium-high heat, whisking, until the pastry cream thickens and begins to bubble, 4 to 5 minutes.

Remove from heat, stir in butter, and remove and discard the vanilla bean pod. Transfer to a bowl and let cool slightly, then cover the bowl with a sheet of plastic wrap, pressing it down directly on the surface of the pastry cream to prevent a skin from forming. Refrigerate until cold, about 3 hours. The pastry cream can be made ahead and kept, refrigerated, for 2 days.


For the cake
2 ¼ cups cake flour
1 ¼ tsp. baking powder
¼ tsp. baking soda
½ tsp. kosher salt
½ cup lactose-free milk, at room temperature
1/3 cup lactose-free sour cream, at room temperature
1 cup lactose-free butter, at room temperature
1 ¾ cup granulated sugar
1 Tbsp. vanilla extract
3 large eggs, at room temperature
2 large egg yolks, at room temperature

Preheat the oven to 350 °F and arrange a rack in the center of the oven. Grease two 8-inch round cake pans, line the bottom of each pan with parchment paper, and grease and flour the parchment. Sift the flour, baking powder, baking soda, and salt together into a bowl. In a second bowl, stir together the milk and sour cream.

In the bowl of an electric mixer fitted with the paddle attachment, beat the butter and sugar on medium speed until soft and fluffy, about 4 to 5 minutes. Mix in the vanilla. Add the eggs, one at a time, mixing between each addition, then add the egg yolks and mix just until combined, scraping down the sides of the bowl with a rubber spatula as needed.

Add a third of the dry ingredients to the batter and mix until just combined, scraping down sides of the bowl as needed. Add half the milk-sour cream mixture and mix. Add half the remaining dry ingredients, mixing just until combined. Add the remaining milk-sour cream mixture and beat until just combined, then add the remaining dry ingredients and mix just until combined. Remove from the mixer and, with a rubber spatula, scrape down the sides of the bowl and give the bater one final stir.

Divide the batter evenly between the prepared cake pans, transfer them to the oven, and bake for 30 to 35 minutes, until golden around the edges and beginning to pull away from the sides of the pan; a toothpick inserted in the center should come out clean. Let cool in the pan on a wire rack for 10 minutes, then gently turn the layers out, peel the parchment off, and let cool completely. The cakes can be made up to 1 day in advance. When the layers are cool, tightly wrap them in plastic wrap and refrigerate until ready to use. The cooled layers can also be tightly wrapped and frozen for up to a month.


For the ganache
4 oz. good-quality milk chocolate, chopped (we used semisweet)
4 oz. good-quality semisweet chocolate (64%), chopped
1/3 cup water
10 Tbsp. lactose-free butter, cubed

¼ cup large-flake coconut, lightly toasted, for garnish (optional)

While the cake cools, make the ganache. In a medium bowl, combine the chocolate and water. Set the bowl over a pan of simmering water, making sure that the bottom of the bowl does not touch the water, and heat, stirring occasionally, until the chocolate has melted and the mixture is smooth. Remove from the heat and whisk in the butter, then transfer to the refrigerator to chill, stirring occasionally, until the ganache has the texture of peanut butter, about 20 minutes (alternatively, you can let the ganache cool at room temperature until it reaches the desired consistency, about 1 hour; the refrigerator just speeds up the process). The ganache can be made ahead and refrigerated; let come to room temperature before using.

To assemble the cake, use a large serrated knife to cut each cake layer in half lengthwise to create 2 thin layers. (Note: It can be easier to cut a chilled, or even frozen, cake.) Set a cake layer on a cake stand or large plate. Spoon a third of the chilled pastry cream onto the layer of cake and, with an offset spatula, spread into a thin, even layer, stopping just short of the edges. Top with a second layer of cake, top the cake with half the remaining pastry cream, and spread it into an even layer. Repeat this layering until you’ve used all the pastry cream and all 4 cake layers, leaving the final layer of cake plain.

Spoon half the ganache frosting on top of the cake and, with an offset spatula, spread over the top and sides of the cake in a thin layer. Spon the remaining frosting on the top of the cake and spread it evenly over the cake. Press the toasted coconut, if using, onto the sides of the cake. Refrigerate the cake at least 15 minutes before serving; if you’re refrigerating the cake longer, allow some time for the frosting to come to room temperature before serving. With a sharp knife, cut the cake into thick wedges. Celebrate!


Saturday, February 10, 2024

Sweet Potato and Black Sesame Marble Bundt Cake


This sweet potato and black sesame marble bundt cake is from Hetti McKinnon’s Tenderheart. I believe I heard about it through Spilled Milk, and since I had black sesame paste (after making black tahini and poppy seed swirls), I knew I had to make this cake. The original recipe says you could swap pumpkin purée for the sweet potato; if you need it vegan, use flax eggs and vegan butter; for a gluten-free version, substitute an equal amount of all-purpose gluten-free flour. And if you are unable to find black tahini, you could try mixing a tablespoon or two of cocoa into white tahini.

I absolutely loved this cake! The sweet potato part was moist, the black sesame part was denser but nutty and delicious; the cake wasn’t too sweet, even with a dusting of powdered sugar. Really, a perfect cake; no notes.

450 g sweet potatoes, peeled and cut into 2-cm pieces
225 g (1 ½ cups) plain flour
2 tsp. baking powder
½ tsp. sea salt
220 g (1 cup) white sugar, plus extra for dusting
125 g (8 Tbsp.) lactose-free butter, melted
2 large eggs
2 tsp. vanilla extract
150 g (½ cup) black sesame paste (black tahini)
3 Tbsp. lactose-free milk, oat milk or soy milk
icing sugar, for dusting

Pour 2-3 cm of water into a saucepan and bring to a boil. Add the sweet potato to a steaming basket, then place the steamer in the pan, making sure that the water doesn’t touch the bottom of the steamer. Cover and steam for 10 minutes or until the sweet potato is completely soft. Remove the sweet potato from the steamer and transfer to a bowl. Mash until completely puréed.

Preheat the oven to 340 °F.

Place the flour, baking powder and salt in a bowl and whisk together to combine well.

In another bowl, combine the sugar and melted butter and whisk until blended. Whisk in the eggs, one at a time, followed by the vanilla. Fold in the flour mixture, a third at a time, stirring well after each addition.

Divide the mixture in half, separating it into two bowls (I just eyeball this, though you can weigh it if you like). To one bowl of batter, add the mashed sweet potato and fold until combined. To the other bowl of batter, add the black sesame paste and milk and fold until combined.

Prepare your bundt pan right before you are ready to fill it – this prevents the oil from running to the bottom of the tin. Grease a 10–12 cup capacity bundt pan with non-stick oil spray, making sure to pay extra attention to any details and crevices in your pan, then scatter with sugar. Shake the pan to evenly distribute the sugar, then remove any excess sugar by tipping the pan upside-down over the sink (you can also use a 22cm/9in springform pan or large 25cm x13cm/10inx5in loaf pan lined with baking paper).

Add spoonfuls of the two batters alternately to the bundt tin, distributing it evenly. Run a single chopstick or knife through the mixture to create a marbled effect. (I didn’t run my knife deep enough – the top looked fine, but the bottom wasn’t marbled. I was too afraid of muddying the batter!)

Bake in the middle of the oven for 1–1 ¼ hours (It was 1 hour for me). Start checking the cake for doneness at the 1-hour mark. Insert a toothpick or bamboo skewer into the cake and if it comes out clean, it is ready.

Leave the cake in the pan on a wire rack to cool for 10 minutes, before turning out to cool completely. Once cooled, dust the cake with a little icing sugar.


Sunday, February 04, 2024

Gruau de quinoa au chocolat


Voici une recette tirée de Coup de Pouce. Il s’agissait au départ d’un gruau de quinoa du genre à être laissé au frigo pendant la nuit pour être mangé le matin, mais moi, j’aime les gruaux servis chauds! Je suis donc partie de ½ tasse de quinoa cru, je l’ai fait cuire le matin-même, et voilà. Bon, ça a davantage de protéines que le gruau d’avoine, mais quand même, la faim revient bien avant midi. Au moins, c’est bon! 

1 tasse de quinoa cuit (voir note plus haut) 
¾ tasse de lait sans lactose ou de boisson végétale non sucrée 
3 c. à table de sirop d'érable 
2 c. à table de poudre de cacao 
½ c. à thé d'essence de vanille 
½ banane en tranches, pour garnir (facultatif) 
¼ tasse d'amandes tranchées, pour garnir (facultatif) 
2 c. à table de mini-brisures de chocolat, pour garnir (facultatif) 

Dans une petite casserole, à feu moyen, combiner le quinoa, le lait, le sirop d’érable, le cacao et la vanille. Remuer jusqu’à ce que le quinoa ait absorbé les saveurs et une partie du liquide (environ 5 minutes). Fermer le feu et laisser tempérer pendant quelques minutes. 

Pour manger le gruau froid, transférer dans un bocal en verre. Ajouter les garnitures désirées, fermer le couvercle et déposer au réfrigérateur jusqu’au moment de déguster (ou jusqu’au lendemain). Sinon, servir immédiatement.


Coconut Cranberry Chews


I made these coconut cranberry chews around the holidays; I’d heard about them on Spilled Milk, because the wife of one of the hosts has made every cookie in this Sunset holiday collection from December 2001, and the coconut cranberry chews had been the grand prize winner. I made a half recipe and got 18 cookies out of it. Maybe the ratio of butter to flour was a bit off, because I found these cookies a bit too crumbly. And they actually made me feel like they should have pecans as well, which is not something I say often! They were really good, though, and the orange zest was a great touch.

about 1 ½ cups (¾ lb.) lactose-free butter or margarine, at room temperature
2 cups sugar
1 Tbsp. grated orange peel
2 tsp. vanilla
3 ¼ cups all-purpose flour
1 tsp. baking powder
¼ tsp. salt
1 ½ cups dried cranberries
1 ½ cups sweetened flaked dried coconut

In a large bowl, with a mixer on medium speed, beat 1 ½ cups butter, sugar, orange peel, and vanilla until smooth.

In a medium bowl, mix flour, baking powder, and salt. Add to butter mixture, stir to mix, then beat on low speed until dough comes together, about 5 minutes. Mix in cranberries and coconut.

Shape dough into 1-inch balls and place about 2 inches apart on buttered 12- by 15-inch baking sheets (I lined mine with a silpat). I would recommend flattening the cookies a bit before baking.

Bake in a 350 °F regular or convection oven until cookie edges just begin to brown, 8 to 11 minutes (shorter baking time will yield a chewier cookie; longer baking time will yield a crispier cookie). If baking two sheets at once in one oven, switch their positions halfway through baking. Let cookies cool on sheets for 5 minutes, then use a wide spatula to transfer to racks to cool completely.


One-Pan Maple Rosemary Chicken

I tried this one-pan maple rosemary chicken. This was really good, though I must warn you to cut the vegetables smaller than I did, as they were underdone.

2 cups purple potatoes, halved
1 ½ cups brussels sprouts, halved
1 ½ cups baby carrots
1 ½ cups butternut squash, diced
1 red apple, sliced
½ large red onion, diced
olive oil, to taste
salt, to taste
pepper, to taste
1 tsp. dried sage, or to taste
¼ cup Dijon mustard
¼ cup maple syrup
3 cloves garlic, minced
1 tsp. fresh rosemary, minced
1 Tbsp. lemon juice
6 chicken thighs

Preheat the oven to 400 °F and line a baking sheet with parchment paper.

To the baking sheet, add the purple potatoes, Brussels sprouts, baby carrots, butternut squash, apple, and red onion. Add oil, salt, pepper, and sage and mix well.

In a small bowl, whisk together the Dijon mustard, maple syrup, garlic, rosemary, and lemon juice. Add salt and pepper to taste.

Lay the chicken thighs skin-side down on top of the vegetables. Season the chicken with salt and pepper, then brush with about ½ of Dijon-maple mixture. Flip the chicken over and brush with the rest of the Dijon-maple mixture.

Bake for 30 minutes (it needed longer in my case), or until juices from the chicken run clear. Optional: Broil for 2-3 minutes to brown and crisp the chicken skin. Serve.


Cosmic Brownies with Date Chocolate Frosting


I wanted to try this date-sweetened chocolate frosting on something, and decided to use these homemade cosmic brownies as a base, simply making the date frosting instead of the ganache. This was a hit with my kids! While the brownies were thick and pleasantly fudgy, I found them too sweet, and wonder in hindsight whether the original ganache would have tamed them a bit, considering that there was no sweetener beyond what is already in the chocolate… In any case, this was really good.

For the brownies
¾ cup (1 ½ sticks) lactose-free butter
1 ½ cups granulated sugar
½ cup light brown sugar
3 large eggs + 1 egg yolk
1 Tbsp. vanilla extract
1 ½ cups (180 g) high quality cocoa powder, sifted
1 cup (120 g) all-purpose flour (gluten-free if needed)
1 tsp. salt
¼ tsp. baking soda
2 Tbsp. corn starch
¼ cup vegetable oil

Preheat oven to 350 °F. Lightly grease a light metal pan; line it with parchment paper on the bottom and edges to create a sling and grease again. (A dark metal pan might cause the brownies to bake too quickly, while glass pans tend to be too slow and get the edges too dark before the center is baked.)

In a large microwave-safe bowl (I used a double boiler), put the butter, granulated sugar, and brown sugar. Microwave for 3 minutes, stir, then microwave for 30 seconds more. Carefully remove bowl from microwave and stir until smooth. Let cool for 2-3 minutes.

To the butter and sugar mixture, stir in the eggs, egg yolk, and vanilla extract.

In a small bowl, whisk together the cocoa, flour, salt, baking soda, and cornstarch. Once combined, stir the dry ingredients into the wet ingredients until just combined (it is better to do this by hand, or on the slow speed of a stand mixer, to avoid overmixing). Stir in vegetable oil.

Spread the brownie batter into the prepared pan until smooth. Bake at 350 °F for 24-26 minutes or until center looks set and no longer jiggles when you gently shake the pan (do not overbake). Let cool completely in the pan.


For the date-sweetened chocolate frosting
1 cup tightly packed pitted dates (if they are dry, soak in warm water for 10 minutes, then drain)
¼ cup warm water
2/3 cup unsalted cashew butter (I used almond butter)
½ cup cacao or unsweetened cocoa powder, sifter
½ tsp. vanilla extract
1 pinch sea salt (optional)
2 Tbsp. melted coconut oil (if avoiding oil, sub more water or cashew butter)
rainbow sprinkles of your choice, for garnishing the brownies

Add the pitted dates to a food processor with the “S” blade attached. Pulse until very small bits remain or they form into a ball. Add warm water and pulse again until they form a loose paste that appears like caramel, scraping down sides as needed.

Add cashew butter, cacao powder, vanilla, and sea salt and pulse again until the mixture is well combined. Scrape down sides.

Add coconut oil and mix again until a smooth paste forms — it should be thick but spreadable like frosting! If chunky or dry, add more oil as needed. Use immediately (if you prefer a firmer frosting, cover and refrigerate at least 1 hour or overnight, but with these brownies, it shouldn’t be an issue).

Spread on the brownies, then top with rainbow sprinkles and serve.


Sunday, January 28, 2024

Country-Style Chicken Pot Pie


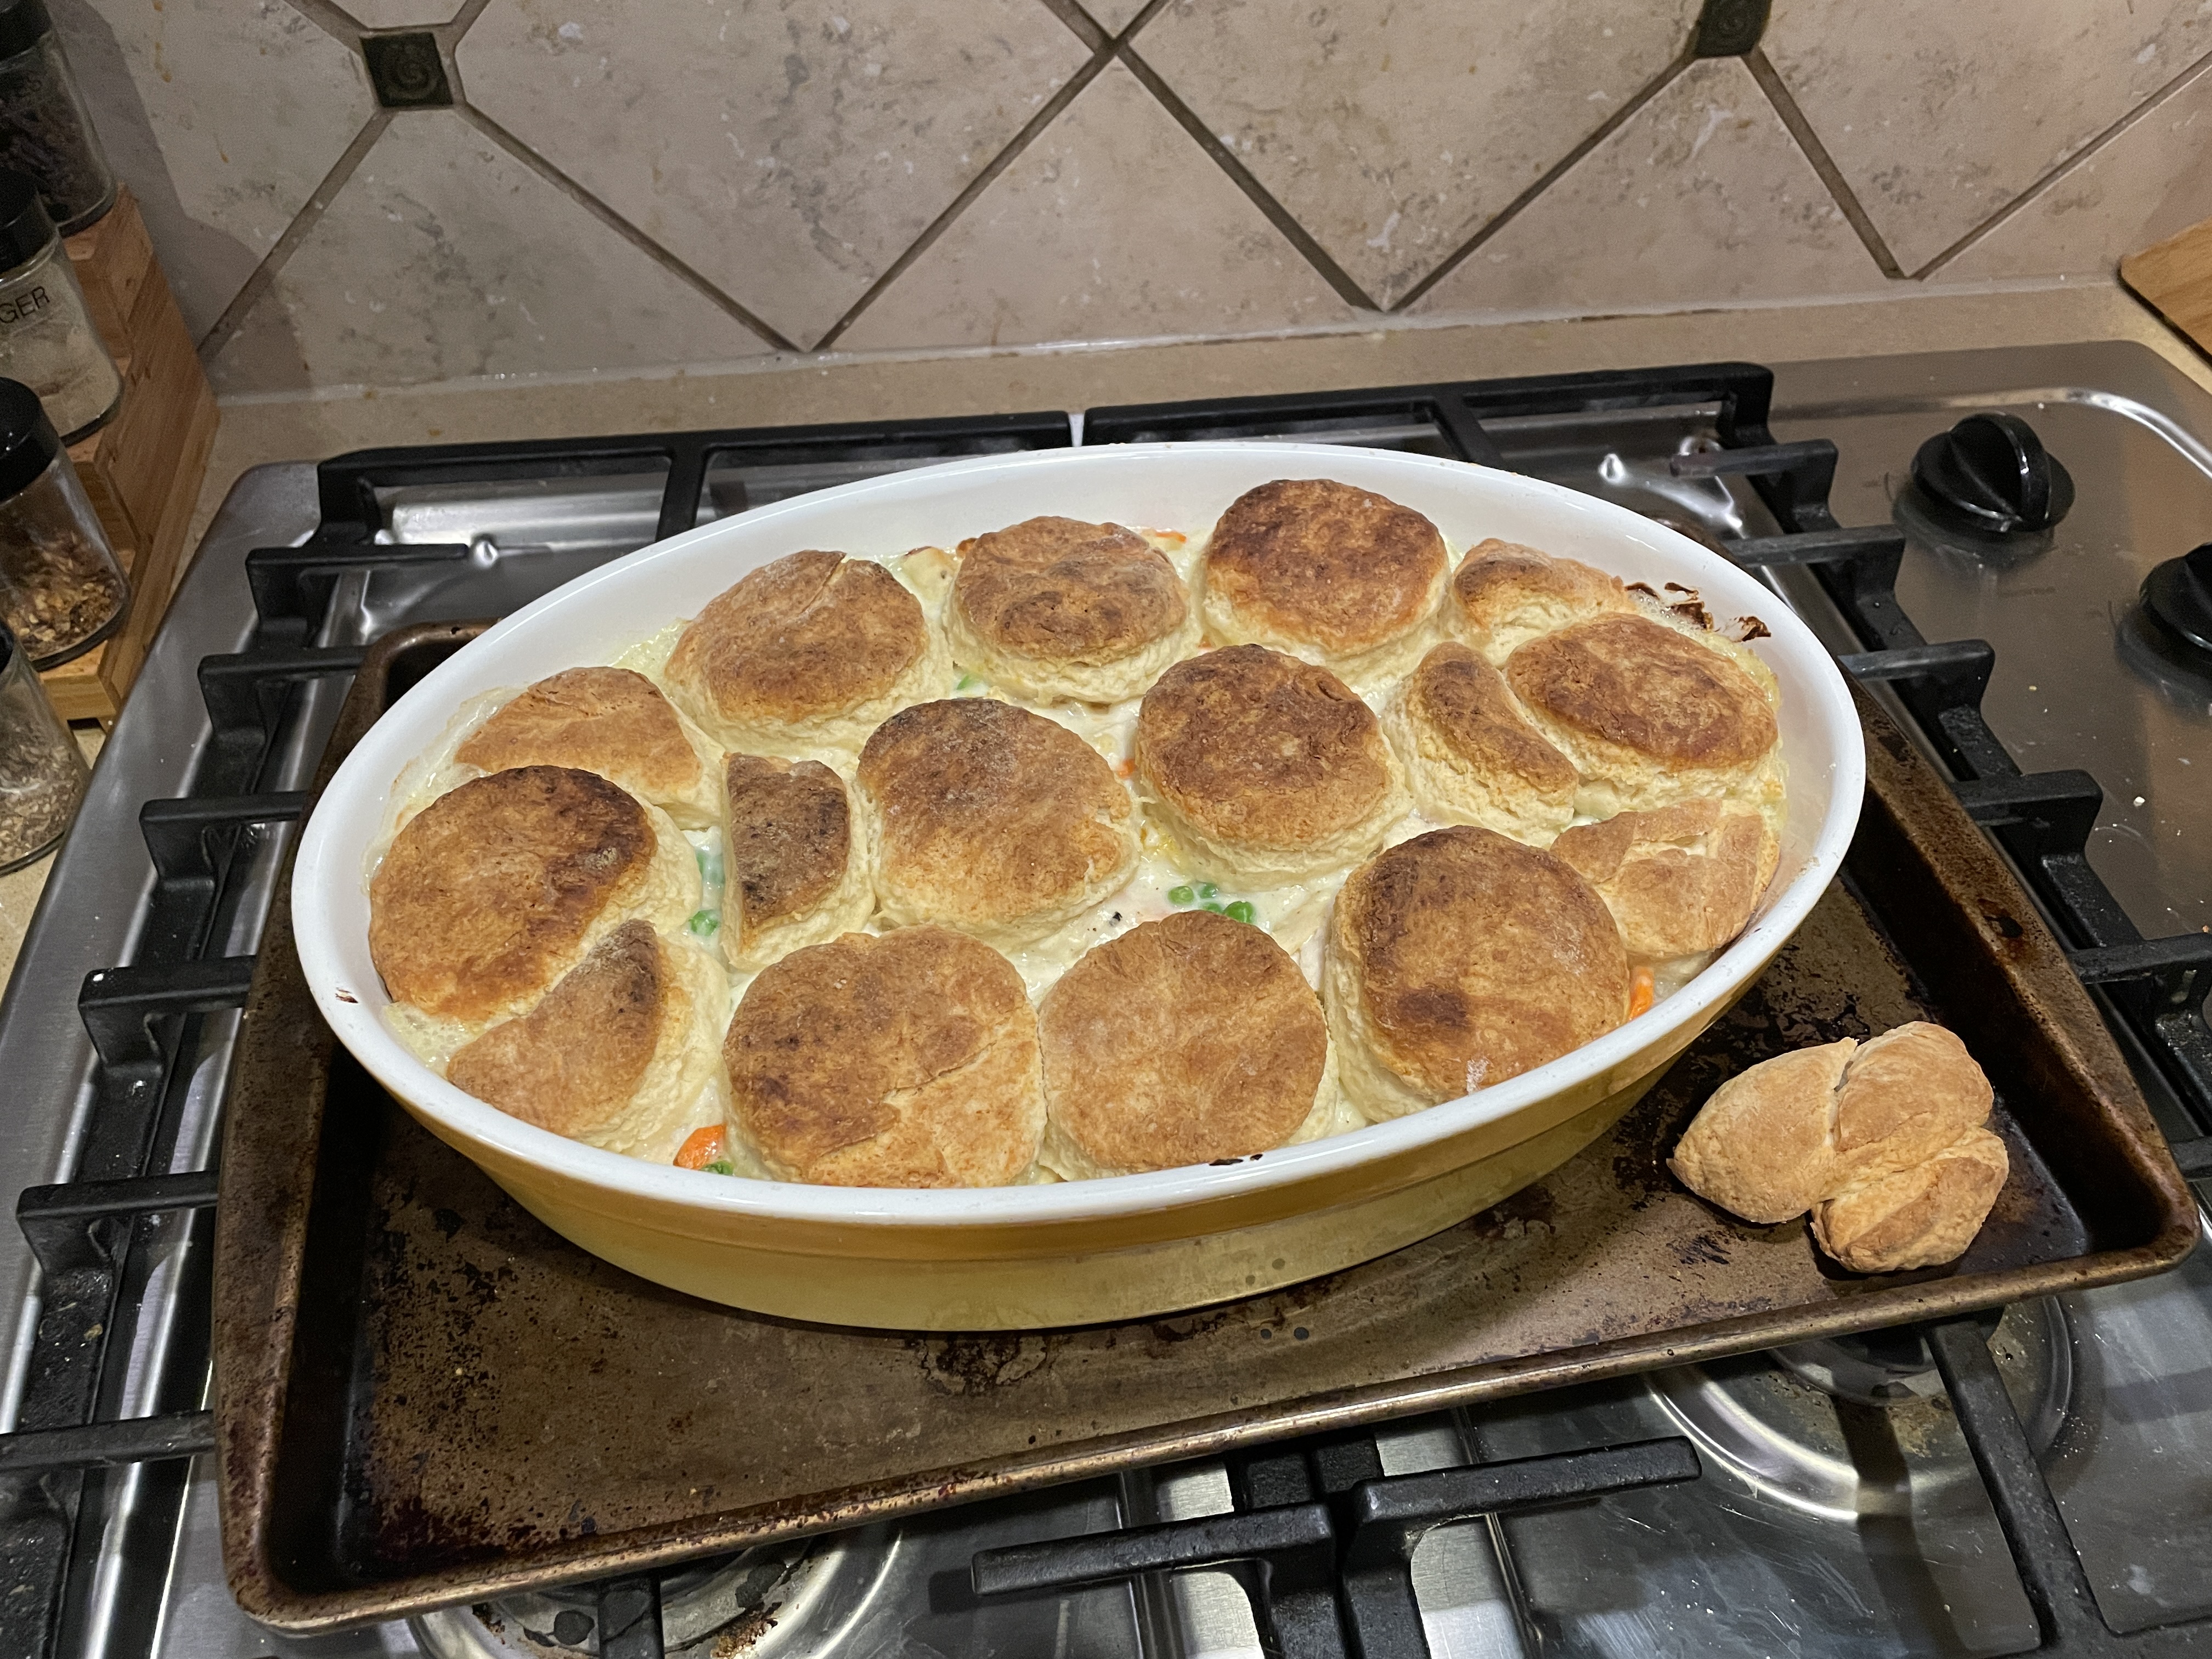
I was recently reminded of my mom’s chicken pot pie topped with biscuits. The Little Prince asked for something along those lines, and it was such a great idea! This recipe is originally from The Fannie Farmer Cookbook (12th edition), and was adapted by my mother, then by me. I don’t know why I’d never made it before, but it’s so good! I’ll have to add it to the rotation. Here is my current version.

For the chicken, I seasoned some chicken breasts with garlic powder, onion powder, paprika, turmeric, ginger, salt, and pepper, and cooked them at 425 °F for 20-25 minutes.


For the baking powder biscuits
2 cups flour
½ tsp. salt
4 tsp. baking powder
½ tsp. cream of tartar
1 Tbsp. sugar
½ cup lactose-free butter (or vegetable shortening)
2/3 cup lactose-free milk

In a large bowl (I actually did this with a food processor), whisk together the flour, salt, baking powder, cream of tartar, and sugar. Cut the butter into the flour with a pastry cutter or two knives (or, see, this is where the food processor blade is handy) until the mixture resembles coarse meal. Add the milk and stir just until the dough forms a ball around the fork (or blades).

Turn the dough onto a lightly floured surface and knead 14 times. Pat until ½-inch thick (I used a rolling pin). Cut into rounds with a 2-inch cookie cutter or a glass. Reroll scraps and cut out more biscuits. At this point, you can either set them aside for a bit, or store them in the fridge until you need them.


For the chicken pot pie
6 Tbsp. lactose-free butter
6 Tbsp. flour
½ tsp. mustard powder (optional)
3 cups lactose-free milk (or 2 cups chicken broth + 1 cup lactose-free cream)
½ tsp. freshly ground pepper
salt, to taste
4 cups cooked chicken, cut into chunks
12 small white onions or 1 onion, chopped
3 smallish carrots, peeled and cubed or sliced
¾ cup peas

Preheat the oven to 450 °F.

Melt the butter into a saucepan, stir in the flour and mustard powder, and cook, stirring, for 2 minutes. Slowly add the broth, cream, pepper, and salt to taste. Cook for 5 minutes, until thickened and smooth.

Meanwhile, in a large pan with a bit of oil, cook the onions and carrots until almost tender, then add the peas for the last few minutes.

Stir the chicken, onions, carrots, and peas with the sauce, then pour the mixture in a large casserole dish.

Place the biscuit rounds, edges touching, all over the top of the pie. Bake for 15-20 minutes until browned.


Saturday, January 27, 2024

Smoothie choco-cajou


Voici une recette de Famille futée 4, que j’ai un peu adaptée. Il s’agit ici davantage d’une collation que d’un déjeuner, mais c’était très bon! J’ai ajouté 2 cuillères à souper de poudre de graines de citrouille pour avoir davantage de protéines. Si vous évitez les noix, essayez du beurre de soja à la place des noix de cajou. 

1 tasse de fraises surgelées
¼ tasse de flocons d’avoine à caisson rapide 
½ tasse de noix de cajou naturelles 
2 c. à soupe de graines de chia 
2 c. à soupe de cacao 
2 c. à soupe de sirop d’érable 
2 tasses d’eau (j’ai pris 1 tasse d’eau et 1 tasse de lait sans lactose) 
1 banane mûre en tronçons 

Déposer tous les ingrédients dans le récipient d’un mélangeur électrique à haute vitesse. Ne pas mélanger, mais couvrir et réfrigérer au moins 12 heures. 

Au moment de servir, ajouter la banane et mixer 2 minutes ou jusqu’à ce que le smoothie soit lisse et homogène.

Waffle Corn Dogs

Here’s something else I made for the kids’ lunches: waffle corn dogs (very similar in ingredients to corndog muffins, just different presentation). They liked these, but did not love them, I think. I thought it was original, and combined things that they liked, so it’s appealing to me!

2 hot dog sausages
1 box corn muffin mix
1 large egg
½ cup lactose-free sour cream
2 Tbsp. melted lactose-free butter
½ cup shredded lactose-free cheddar
2 Tbsp. chives (optional)

Preheat a waffle iron. Meanwhile, in a large bowl, combine corn muffin mix, egg, and sour cream. Stir until evenly combined, then fold in cheddar and chives.

Cut each hot dog sausage in half lengthwise and then in half crosswise; stick a skewer into each piece (I didn’t do the skewer part).

Grease the waffle iron. Spread about half of the batter onto waffle iron. Place hot dogs on top, then spread the remaining batter over hot dogs.

Close the waffle iron and cook until the waffle is cooked through, about 4 minutes. Carefully remove waffle and slice into eighths.


Root Vegetable Beef Stew with Mushroom and Spinach Polenta

That’s quite a mouthful, isn’t it? And it’s a very involved recipe. But it’s also hearty and perfect for a cold winter night – that is also why I don’t have a good picture! There was no light by dinnertime, and I was hungry anyway, so all you get is two sad unsightly pictures. Just know that this dish is excellent! I made some modifications, so here are a few notes.


The veal demi-glace concentrate is there to add concentrated flavor. I couldn’t find it in stores and had to order it online, and it wasn’t exactly cheap. Honestly, next time, I would just use some Better Than Bouillon paste and call it good enough. I used baby carrots, but that was a mistake because they didn’t soften quickly enough, so I would chop regular carrots next time (I am not in a place where I can easily find the whole miniature ones). As for the spinach, I didn’t want to have to pick over 10 ounces of fresh spinach, so I bought a 10-ounce package of frozen spinach, thawed it, squeezed the water out of it, chopped it up, and threw it into the polenta.

For the stew
3 lbs. trimmed chuck roast, cut into 3-inch chunks
2 tsp. kosher salt, plus more as needed
1 tsp. freshly ground black pepper, plus more as needed
2 Tbsp. vegetable oil
1 small onion, very finely chopped
1 large carrot, very finely chopped
1 celery stalk, very finely chopped
3 large cloves garlic, very finely chopped
¼ cup tomato paste
2 cups fruity red wine
4 cups (1 quart) beef stock, plus more as needed
1 (1.5-oz.) container veal demi-glace concentrate (see note above)
2 fresh rosemary sprigs
4 fresh thyme sprigs
1 lb. whole petite carrots, or regular carrots cut into 4-inch lengths
1 lb. fingerling or miniature Dutch potatoes, scrubbed and halved lengthwise
8 oz. rutabaga, peeled and cut into large bite-sized cubes (I dislike it and omitted it)
8 oz. parsnip, peeled and cut into large bite-sized chunks
4 oz. peeled fresh or frozen pearl onions

For the mushroom and spinach polenta
3 cups water
2 cups lactose-free whole milk
1 tsp. kosher salt, plus more to taste
1 ½ cups fine or medium-grind polenta
2 Tbsp. lactose-free butter
freshly ground black pepper
2 Tbsp. olive oil
1 small yellow onion, finely chopped (about 1 cup)
2 cups thickly sliced gourmet mix or cremini mushrooms (about 8 ounces)
3 cloves garlic, finely chopped
10 oz. baby spinach


For the stew
Pat the meat dry with paper towels and season with the measured salt and pepper. Heat the oil in a large heavy pot or Dutch oven over high heat until shimmering. Working in batches, add the beef to the pot and sear on all sides, 2 to 3 minutes per side. Remove the seared meat to a large bowl.

Reduce the heat to medium-high and add the finely chopped onion, carrot, celery, and garlic to the pot. Stir to loosen the browned bits from the bottom of the pot. Add a splash of water if the mixture begins to scorch.

Add the tomato paste and cook, stirring continuously, until it sizzles, about 1 minute. Stir in the wine, beef stock, and demi-glace concentrate, stirring until the concentrate dissolves. Drop in the rosemary and thyme.

Return the seared meat and any accumulated juices to the pot. The braising liquid should be level with the meat, so add more stock if needed. Bring to a boil. Reduce the heat to very low, cover tightly, and cook at a bare simmer until the meat is spoon-tender, about 2 hours.

Stir in the whole carrots, potatoes, rutabaga, parsnip, and pearl onions. Cover and simmer until tender, about 20 minutes. Meanwhile, make the polenta. (When the stew is ready, keep it warm since it will be ready before the polenta – note that I shredded the beef at this point to make it easier to serve.)

For the polenta
Bring the water, milk, and salt to a boil in a large saucepan over high heat. Whisking continuously, add the polenta in a slow, steady stream. Cook, stirring continuously, for 3 minutes.

Reduce the heat to low and simmer until the polenta is thick and no longer tastes raw, about 45 minutes (I cooked mine for a lesser amount of time). Stir occasionally with a wooden spoon and make sure it isn't sticking in the corner. Stir more often as the polenta thickens. If the polenta turns stiff before it is done, add a little warm water.

Stir in the butter. Season generously with salt and pepper, and keep warm over very low heat.

Heat the olive oil in a large skillet over medium-high heat until shimmering. Add the onion, stir to coat, and cook until tender, about 8 minutes.

Stir in the mushrooms and garlic and cook until tender, stirring often, about 5 minutes. Transfer into the saucepan with the polenta. Add the spinach a handful at a time, stirring to wilt before adding more.

Remove and discard the rosemary and thyme stems from the stew. Taste and season both the stew and polenta with salt and pepper as needed. Serve the stew over the polenta.


Product review - Better Batter cake and Fitbake frosting

When my mother-in-law last came to visit, I used the opportunity to try two new products I’d been eying. First, since I get the occasional email from Better Batter, I bought some of their gluten-free chocolate cake mix on sale. I decided to pair it with Fitbake’s vegan keto vanilla buttercream frosting. 


The cake turned out really nice! The crumb was fluffy and not too sweet, and of course because it was a mix, it was super easy to make. As for the keto frosting, it was a bit bland, but I guess that’s to be expected for something low-carb! The consistency was stiff, though – I could barely spread it between the two layers of cake, and it was ripping off the crumb as I went. I ended up piping the rest on top, and as you can see, only had enough for some basic decoration. If you want to fully frost a 9-inch layer cake, you’d probably need 2 or 3 containers of that frosting. So, a handy product for a shortcut, but you still have to account for a few things... I threw on some sprinkles because why not. 


I also had some Better Batter all-purpose flour left, so I made their gluten-free vegan dinner rolls, which were great! I think my mother-in-law would have preferred something taller, as these were shaped more like biscuits than true rolls, but the crumb was perfect. For what it’s worth, my 2 eggs weighed 102 grams (without the shell), and I only used 2 tablespoons of butter for the topping.


Thursday, January 25, 2024

Strawberry-Rose Vegan Cheesecake


This recipe was originally called a white chocolate, strawberry, rose vegan cheesecake, but I found that to be misleading. There isn’t any white chocolate in this! And I know that white chocolate is essentially cocoa butter and sugar, but still, this did not taste at all like white chocolate, so I’m dropping that part. I also found the rose taste very subtle, and since I love rose water, I think you should add more.

I made this cake when my mother-in-law was visiting us; this was perfect because she has coeliac disease, but it’s gluten-free. (And it’s raw, paleo, vegan, lactose-free, etc.) I changed the nuts in the crust too because she also has oral allergy syndrome and reacts to raw almonds, so I used 1 cup of pistachios, ¼ cup of pine nuts, and ¾ cup of walnut pieces (this is purely based on what I had in my pantry at the time – just use what you have). I had to increase the number of dates to 16 for consistency; I also omitted the ½ cup of water entirely from the filling and switched up the garnish. Here is my version, which was lovely! (Sadly, it turns out that my mother-in-law had never tasted rose water before and to her, it tasted strongly of alcohol and she did not like it. But I couldn’t have known that because she didn’t know that. I still thought it was delicious!)


For the crust
2 cups raw almonds (see note above)
½ cup medjool dates, pitted, about 8-10 (see note above)
¼ cup cacao powder
2 Tbsp. cacao nibs

For the cheesecake filling
1 bag frozen strawberries, completely thawed (I used 1 lb. of strawberries)
¾ cup maple syrup, preferably medium or dark (former grade B)
1 Tbsp. vanilla extract
1 Tbsp. rose water (see note above)
1 pinch sea salt
3 cups raw cashews, soaked overnight and drained
1 cup melted cacao butter

For the topping
2/3 cup bittersweet chocolate chips
a sprinkle of organic dried rose petals (I used candied rose petals)


For the crust
Pulse all the crust ingredients in a food processor. Press into a 9-inch springform pan.

For the filling
In a high-speed blender, blend the strawberries, maple syrup, vanilla, rose water, and salt. Once smooth, add the cashews and blend again. Add the cacao butter last and blend one more time.

Pour the filling on top of the crust. Place the cheesecake in the freezer overnight.

For the topping
Take the cheesecake out of the freezer, unmold it, place it on a serving plate, and let it thaw in the fridge for about 3 hours.

Melt the chocolate chips until smooth. Pour the chocolate into a ziploc bag, snip the tip of a corner, and pipe melted chocolate all over the cheesecake. Finish with a sprinkle of rose petals.

To serve, run a sharp knife under very hot water. For pretty slices, rinse it after every cut.


Chicken Burrito Bowls


Here are some chicken burrito bowls I made for dinner – leftovers keep very well. For taco seasoning, I use this recipe. And I added avocado, because why wouldn’t I? This really hit the spot.

3 boneless, skinless chicken breasts
3 bell peppers, any color, sliced
1 large red onion, sliced
2 Tbsp. olive oil
1 Tbsp. taco seasoning (see note above)
salt and pepper, to taste
1 jar salsa (I much prefer mild salsa)
3 cups brown rice, cooked (I used a package of Right Rice)
1 can black beans, drained and rinsed
1 can corn
1 cup shredded lactose-free cheddar cheese
1 lime, sliced into wedges
2 Tbsp. fresh cilantro, to garnish

Preheat oven to 400 ˚F.

Line a baking sheet with foil. Place the chicken, peppers, and onions onto the baking sheet and drizzle with oil. Sprinkle the taco seasoning evenly over both sides of the chicken breasts. Sprinkle salt and pepper on the bell peppers and onions, tossing to coat. Top each chicken breast with a generous pour of salsa. Bake in a preheated oven for 25 minutes.

Rest chicken for 10 minutes, before slicing into strips.

Add a base of brown rice to 4 bowls. Top each with a scoop of black beans, corn, additional salsa, cheddar cheese, cooked bell peppers and onions, and sliced chicken. Garnish with fresh cilantro and a lime wedge.

Sunday, January 21, 2024

Half-and-Half Chocolate Chocolate Chip Cookies


Have you noticed that I’ve been posting fewer desserts lately? It’s not actually that I’ve been eating fewer (I still definitely have a sweet tooth and have dessert after dinner), but the ones I tried weren’t that good. There was an apple and honey rice kugel that I made last September, but it disappointed me. I tried the golden squash yogurt cake from Tara Spencer’s Easy PCOS Diet Cookbook, but it was a disaster, which not only would *not* unmold from the pan, but didn’t even taste good. (I literally managed to get one piece that looked decent to take a picture, and there it is.)


I made a brown butter almond-apple cake, and while it was nice the first day, it just got too moist and crumbly after that. I also had high hopes for the chickpea and white chocolate blondie from the 3 fois par jour Desserts cookbook, but that just wasn’t doing it for us.

Then I went back to basics and made something that looked like a sure bet: half-and-half chocolate chocolate chip cookies. I reordered the ingredients below and added some weights, and I left a note about baking times. These were delicious! We ate many of them, gave some away as holiday cookies, and still have a few in the freezer (we got a total of 44-and-a-half cookies).

For the chocolate chip cookie dough
9 Tbsp. (126 g) lactose-free butter, melted and cooled slightly
¾ cup (150 g) granulated sugar
¾ cup (150 g) brown sugar
¾ tsp. fine salt
1 large egg
1 large egg yolk
1 Tbsp. pure vanilla extract
1 tsp. baking powder
½ tsp. baking soda
2 cups (284 g) all-purpose flour (I used white whole wheat)
7 oz. (200 g) semi-sweet or bittersweet chocolate, chopped
flaky sea salt, for sprinkling (optional)

For the double chocolate cookie dough
9 Tbsp. (126 g) lactose-free butter, melted and cooled slightly
¾ cup (150 g) granulated sugar
¾ cup (150 g) brown sugar
¾ tsp. fine salt
1 large egg
1 large egg yolk
1 Tbsp. pure vanilla extract
1 tsp. baking powder
½ tsp. baking soda
1 ½ cups (234 g) all-purpose flour (I used white whole wheat)
½ cup (50 g) Dutch-process cocoa powder, sifted
7 oz. (200 g) semi-sweet or bittersweet chocolate, chopped
flaky sea salt, for sprinkling (optional)


For the chocolate chip cookie dough
In a large bowl, combine the melted butter, granulated and brown sugars, and salt. Mix to combine. Add the egg, yolk, vanilla, baking powder, and baking soda, and whisk together until totally combined. Add the flour and stir in until combined. (I’m a bit old-fashioned and prefer to mix my dry ingredients together before adding them to the wet ingredients.) Add the chopped chocolate and stir again. It may take a minute to incorporate all of the chocolate, and you can use your hands to knead it into the dough if necessary.

For the double chocolate cookie dough
Follow the directions above for the chocolate chip cookie dough (you can even use the same bowl!), but add the cocoa powder to the dough along with the flour.

To assemble
Adjust an oven rack to the middle of the oven and preheat the oven to 400 °F (see note below) Line a sheet pan with parchment paper (you will need more than one pan for all the cookies, but I prefer to bake them one batch at a time and keep raw dough in the fridge or freezer until I need it.).

Form the dough into balls, about 1 tablespoon each (25 g). Press one ball of the chocolate chip cookie dough and one ball of the double chocolate cookie dough together, but keep their unique colors. Press the piece into a cookie scoop or roll it into a ball. Place 8 cookies on the sheet pan (honestly, you can fit 12). Sprinkle each cookie with a little flaky salt, if desired.

Bake one pan at a time, rotating halfway through baking. Bake until the cookie tops are golden brown and the cookies are slightly puffed in the middle, about 10 minutes. Remove the baking sheet from the oven and use the back of a spoon to gently press the middle of each cookie to flatten it.

Let the cookies rest on the sheet pan for 5 minutes, then transfer them to a wire rack to finish cooling. Cookies are best eaten slightly warm, but can be stored in an airtight container for up to 3 days.

The baking instructions above are those of the original recipe. Personally, I found that baking 8 minutes was enough, 10 minutes for baking from frozen. I also baked some straight-from-the-fridge dough at 350 °F for 11 minutes and it turned out great! So don’t worry too much about the high temps here.


Turkey sliders

I made two turkey burger recipes lately: these Asian turkey burgers with peanut butter and broccoli slaw, and then these turkey sliders with garlic and oregano. While they were both good, I think we all preferred the sliders, so that’s the recipe I’m sharing below. Note that while I did splurge and use King’s Hawaiian buns here (they’re just so good!), I had used Orowheat’s keto buns in the other recipe, and those are a better bet if you’re carb-conscious.

I don’t have Italian seasoning, so I used equal quantities of basil, oregano, and thyme. Note that I doubled the slider recipe to have leftovers (a total of 16 sliders instead of 8), but left the sauce quantities as is. Serve with baked fries, chips, or a salad. We give it a very rare 4 thumbs up!

For the garlicky mayonnaise
2 garlic cloves, minced (I would use only 1 next time)
6 Tbsp. reduced fat olive oil mayonnaise
2 tsp. dried oregano
salt and cracked pepper, to taste

For the sliders
8 mini brioche hamburger buns (see note above)
1 lb. 93%-lean ground turkey
2 tsp. garlic powder
2 tsp. onion powder
2 tsp. Italian seasoning (see note above)
salt and cracked pepper, to taste

To garnish
fresh baby arugula
red onion, thinly sliced


Mix together the ingredients for the mayonnaise, season to taste, and then set aside.

Preheat the oven to 350 °F.

Slice the buns open and spray with oil. Then place them in a baking tray face up. Place in the oven and toast for 3 – 5 minutes or until browned/toasted to your liking.

Set a carbon steel or cast iron skillet on medium-high heat. (Honestly, I just used my regular skillet.)

In a bowl, gently mix together ingredients for the burger using your hands – overmixing can make for rubbery, tough burger. Use an ice cream scoop or spoon to evenly make eight 2-ounce sliders.

Spray the pan with oil, then add the patties. As you add the patties, press down on each one to flatten. This is the ONLY time you press down on them while the burger meat is still cold and the “juices” have not warmed to flow yet.

Cook sliders on each side for 3 – 5 minutes or until sear marks appear. Since this is turkey, you want to cook it all the way through, not medium rare or rare like beef. (I used my meat thermometer to check doneness.)

Bring it all together and build the sliders! Add the mayonnaise or your choice of condiment to the sliders. Then add the patties and top with arugula and red onion. Enjoy!


Thursday, January 11, 2024

Double-Chocolate Smoothie Bowl


This double chocolate smoothie bowl recipe is from Weelicious. The original recipe called for Earth Echo Cacao Bliss Superfood Elixir Blend, which I don’t have, so I used a greens blend with chocolate, and I’m sure you could use cacao too. The recipe below makes 2 servings; adjust as you see fit, and maybe add some protein powder if you’re having it for breakfast.

3 frozen bananas
1 cup frozen cauliflower (I used riced cauliflower, but small florets will work too)
2 scoops chocolate powder of choice (see note above)
2 Tbsp. dairy free chocolate or carob chips or cocoa nibs, divided
1/3 to 1/2 cup lactose-free milk of choice
Optional toppings: dairy free chocolate, carob chips, cocoa nibs, dried coconut, banana slices, raspberries, granola or anything you enjoy

Place ingredients in a blender. Use the tamper to force the mixture to purée.

Spread the mixture into bowls and place desired toppings on top.

Greens with Roasted Squash and Tahini


This green salad with roasted squash and tahini by Jenny Rosenstrach was just what I needed! It was very simple, the kind of dish that you can use as a base for what you have on hand. I added a hard-boiled egg for protein, but roasted tofu or chickpeas would have been good, too, if you wanted to keep it vegan! Note that I didn’t have a lot of greens on hand, so used them as a side rather than the focus here.

For the maple-tahini dressing
¼ cup tahini
2 tsp. maple syrup
1 Tbsp. olive oil
1 dash hot sauce
¼ tsp. kosher salt
1 to 4 Tbsp. warm water

Whisk together the tahini, maple syrup, olive oil, hot sauce, salt, and 1 tablespoon of warm water (I like shaking things together in a jar). Add water, 1 tablespoon at a time, until the dressing reaches drizzle-able consistency (depending on your tahini, it might seize a bit, but keep adding water and whisking/shaking, and it will loosen).

For the salad
a 14- to 16-lb.delicata squash, halved, seeded, and sliced into moons (you do not have to peel)
1-2 Tbsp. olive oil
1 tsp. smoked paprika
kosher salt and freshly ground black pepper
2 large handfuls fresh greens (I used spinach and would love arugula)
2 Tbsp. finely minced red onion
2 Tbsp. dukkah (or, alternatively, use crushed pistachios like I did)

Preheat oven to 425 °F. On a parchment- or foil-lined baking sheet, using your hands, toss squash slices with olive oil, paprika, salt, and pepper. Roast for 20 minutes or until golden. (I find they are more toasted and golden on their undersides; you could flip halfway through if you want, but I never do.) Let cool.

Divide greens between two bowls and season lightly with salt and pepper. Top each with squash slices, minced onions, a nice drizzle of dressing, and a sprinkling of dukkah.

Apple, Caramelized Onion, and Spinach Quesadillas

I tried this quesadilla recipe not only because I liked the flavor combinations, but because it was baked in the oven instead of fried in a pan, so I was curious. The original recipe called for 15 minutes at 425 °F, but with some trial and error, I’m recommending 10 minutes at 400 °F instead (like those in the last photo).

8 (8”) flour tortillas
16 oz. lactose-free white cheddar cheese
1 Honeycrisp apple, thinly sliced
2 cups spinach (I used arugula)
1 cup caramelized onions

Preheat oven to 400 °F.

Line 2 large baking sheets with parchment paper. Grease the parchment with cooking spray or apply olive oil with a brush.

Working with one tortilla at a time, layer 1 oz cheese, 1/4 cup spinach, 1/8 cup caramelized onions, a few apple slices then 1 oz more cheese onto one half of each of the tortillas.

Fold in half and brush with olive oil. Arrange on a parchment lined baking sheet and bake for 10 minutes, until golden brown and crispy.


Thursday, January 04, 2024

Pâtes au pesto de roquette et chou-fleur grillé à l'érable


J’ai fait cette recette de pâtes au pesto de roquette et de chou-fleur grillé à l’érable, qui est différente de ce que je fais habituellement, mais c’était très bon. Même que l’Ingénieur m’a fait promettre de l’intégrer aux recettes que je referai à l’avenir!

Pour le chou-fleur grillé à l’érable
1 chou-fleur moyen, en petites fleurettes
3 c. à soupe d’huile d’olive
¼ tasse de graines de citrouille
¼ c. à thé de flocons de piment fort
2 petites gousses d’ail, hachées
3 c. à soupe de câpres, rincées (je ne les ai pas utilisées)
2 c. à soupe de sirop d’érable
½ c. à thé de sel

Pour le pesto de roquette
1 tasse de feuilles de roquette bien tassées
1 tasse de feuilles de persil italien bien tassées
½ tasse d’huile d’olive
jus et zeste de 1 petit citron bien lavé
3 gousses d’ail hachées
1 tasse de graines de citrouille grillées
1 c. à thé de sel

Pour les pâtes et la garniture
340 g (12 oz.) de spaghettis, sans gluten si nécessaire
roquette
zeste de citron
fleur de sel
poivre
1 pincée de flocons d’érable


Pour le chou-fleur grillé à l’érable
Préchauffer le four à 425 °F et placer la grille au centre. Tapisser 1 ou 2 plaques à cuisson de papier parchemin.

Dans un grand bol, mélanger tous les ingrédients du chou-fleur grillé. Étendre sur la plaque à cuisson en prenant soin de bien espacer le chou-fleur de manière à ce qu’il grille bien. Utiliser 2 plaques au besoin.

Cuire au four 25 minutes et terminer par 2 minutes à broil. Réserver.

Pour le pesto de roquette
Déposer tous les ingrédients du pesto dans un mélangeur ou un robot et mixer jusqu’à l’obtention d’une purée lisse. Réserver.

Pour l’assemblage
Dans une grande casserole d’eau bouillante salée, cuire les pâtes selon le temps indiqué sur l’emballage. Prélever ½ tasse d’eau de cuisson des pâtes. Égoutter les pâtes.

Dans la même casserole, mélanger les pâtes avec le pesto et l’eau de cuisson. Servir avec le chou-fleur grillé et garnir de roquette, de zeste de citron, de fleur de sel et d’une pincée de flocons d’érable.