Sunday, July 24, 2016

Maya Angelou's Caramel Cake

I’ll start this with an a parte about the last layer cake I made, in April. It was a coconut layer cake in Bon Appétit. The cake was absolutely beautiful in the magazine (of course!), but reality turned out very differently. Here’s the running commentary in my notes: “My cakes didn’t rise much at all, so next time, I would switch pans from upper to lower rack halfway through baking (as it was, I moved the lowest cakes to the top rack for an extra 5 minutes). I won’t split them, obviously. [At this point, I tried to unmold them.] Oh, for God’s sake, line the pans with paper next time! GAH! [I don’t believe I’ve ever had cakes come out of the pan in this many pieces.] I’m not soaking the layers in alcohol, nor am I adding alcohol to the frosting because it would be too liquid. Never mind, the frosting is an absolute disaster anyway. This whole cake is a disgrace.” Really, I thought I’d get better results with a recipe from Bon Appétit, but I was wrong. Thankfully, it takes more than one dud of a recipe to discourage me from layer cakes!

I finally, finally got the opportunity to make Maya Angelou’s caramel cake, from Hallelujah! The Welcome Table: A Lifetime of Memories with Recipes (there’s a great story to go with this cake, obviously, but I can’t reprint it here without violating copyrights). The recipe was also published on Oprah.com. It calls for cream, so I waited to get lactose-free cream in Quebec. However, as it turned out, that didn’t really matter because the main flavor profile in the frosting is browned butter – not lactose-free. (Vegan browned butter is iffy at best, though I hear it might be possible to make by adding soy milk powder to melted vegan margarine. I haven’t had a chance to try it.) That being said, the Lactaid was totally worth it for this! I could eat the frosting by the spoonful (and I sort of did).


Note that I recommend doubling the amount of frosting below, because otherwise you have about enough for the middle and top of the cake, but not the sides (unless you’re going for the naked cake look). Moreover, I found the caramel to be odd. Normally, I make caramel by mixing sugar and water, then not stirring until it’s amber in color, then I stir and add cream or butter or salt or whatever else. This recipe called for stirring just sugar over heat until it melts, then adding water. I thought it was odd, but who am I to criticize Maya Angelou’s grandmother’s recipe, right? So I made it the way I was instructed. That being said, next time I would make it the way I’m more used to, because it tastes better to me and the consistency is more viscous than watery, which is part of what makes a good caramel, in my opinion. Plus, since the recipe for caramel syrup makes a lot more than you need for the cake, you’ll appreciate having leftovers that taste extra good! We shared the cake with friends of ours, so there wasn’t too much lactose to deal with for me. :)

And on another side note (I promise I’ll get to the recipe soon, and it’s worth the wait): remember how surprised I was that Bergeron had the balls to write 100% soy on their margarine when it was actually something like 95% soy and there was lactose-full whey in the remainder? Well, S!gnal margarine takes the cake (no pun intended). Look at this label: the front clearly say 100% soybean oil, but on the list of ingredients, suddenly it’s down to 80%, and there’s whey in that too! We need better labelling laws! I did find Earth Balance sticks later, at Avril (a store that I love, possibly the closest thing to a Whole Foods I’ve seen anywhere), where it was on sale at $4.99 a package – more in line with the American prices, and certainly more affordable than the $8.49 IGA charges!


For the cake
8 Tbsp. (1 stick) butter or margarine
1 ¼ cups sugar, divided
1/4 cup caramel syrup (recipe follows)
2 cups sifted all-purpose flour
2 tsp. baking powder
½ tsp. salt
1 cup lactose-free milk
2 large eggs
caramel frosting (recipe follows)

Preheat oven to 375 °F. Line two 8-inch layer cake pans with greased wax paper.

In large mixing bowl, beat butter and add 1 cup sugar gradually until light and fluffy. Beat in syrup.

In medium mixing bowl, sift flour, baking powder and salt together. Add sifted ingredients to creamed mixture, alternating with milk.

In separate medium mixing bowl, beat eggs about 3 minutes, until foamy. Add remaining sugar, and beat until there is a fine spongy foam. Stir into cake batter until blended. Divide batter between cake pans. Bake for about 25 minutes. Remove pans from oven. Gently press center of cake with forefinger. Cake should spring back when finger is removed. If it doesn't, return to oven for 10 minutes (5 minutes did the trick for me). Cool in pans for 10 minutes. Turn out onto rack and remove wax paper. Let cakes cool to room temperature before frosting.

To assemble: Center one cooled cake layer on cake plate. Cover top and sides with generous helping of frosting. Place second layer evenly on frosted layer. Repeat frosting procedure. Make certain that sides are completely frosted. Cool in refrigerator until ready to serve.

For the caramel syrup (see note above)
1 cup white sugar
1 cup boiling water

Heat sugar in heavy skillet over low heat. Stir constantly until melted to a brown liquid. When it bubbles over entire surface, remove from heat. Slowly add boiling water, stirring constantly. Pour into container and cool.

For the caramel frosting (I had to double this recipe)
6 Tbsp. (¾ stick) butter
one 8-oz. package confectioner's sugar
4 Tbsp. lactose-free (or heavy) cream
1 ½ tsp. vanilla extract
a pinch of salt

Brown butter in heavy pot over medium heat—be vigilant or it will burn. Allow butter to cool. In large mixing bowl, add confectioner's sugar, cream, vanilla extract and salt to butter, and beat until smooth. If frosting is too stiff, add a tablespoon of half-and-half or full cream to thin.

Saturday, July 23, 2016

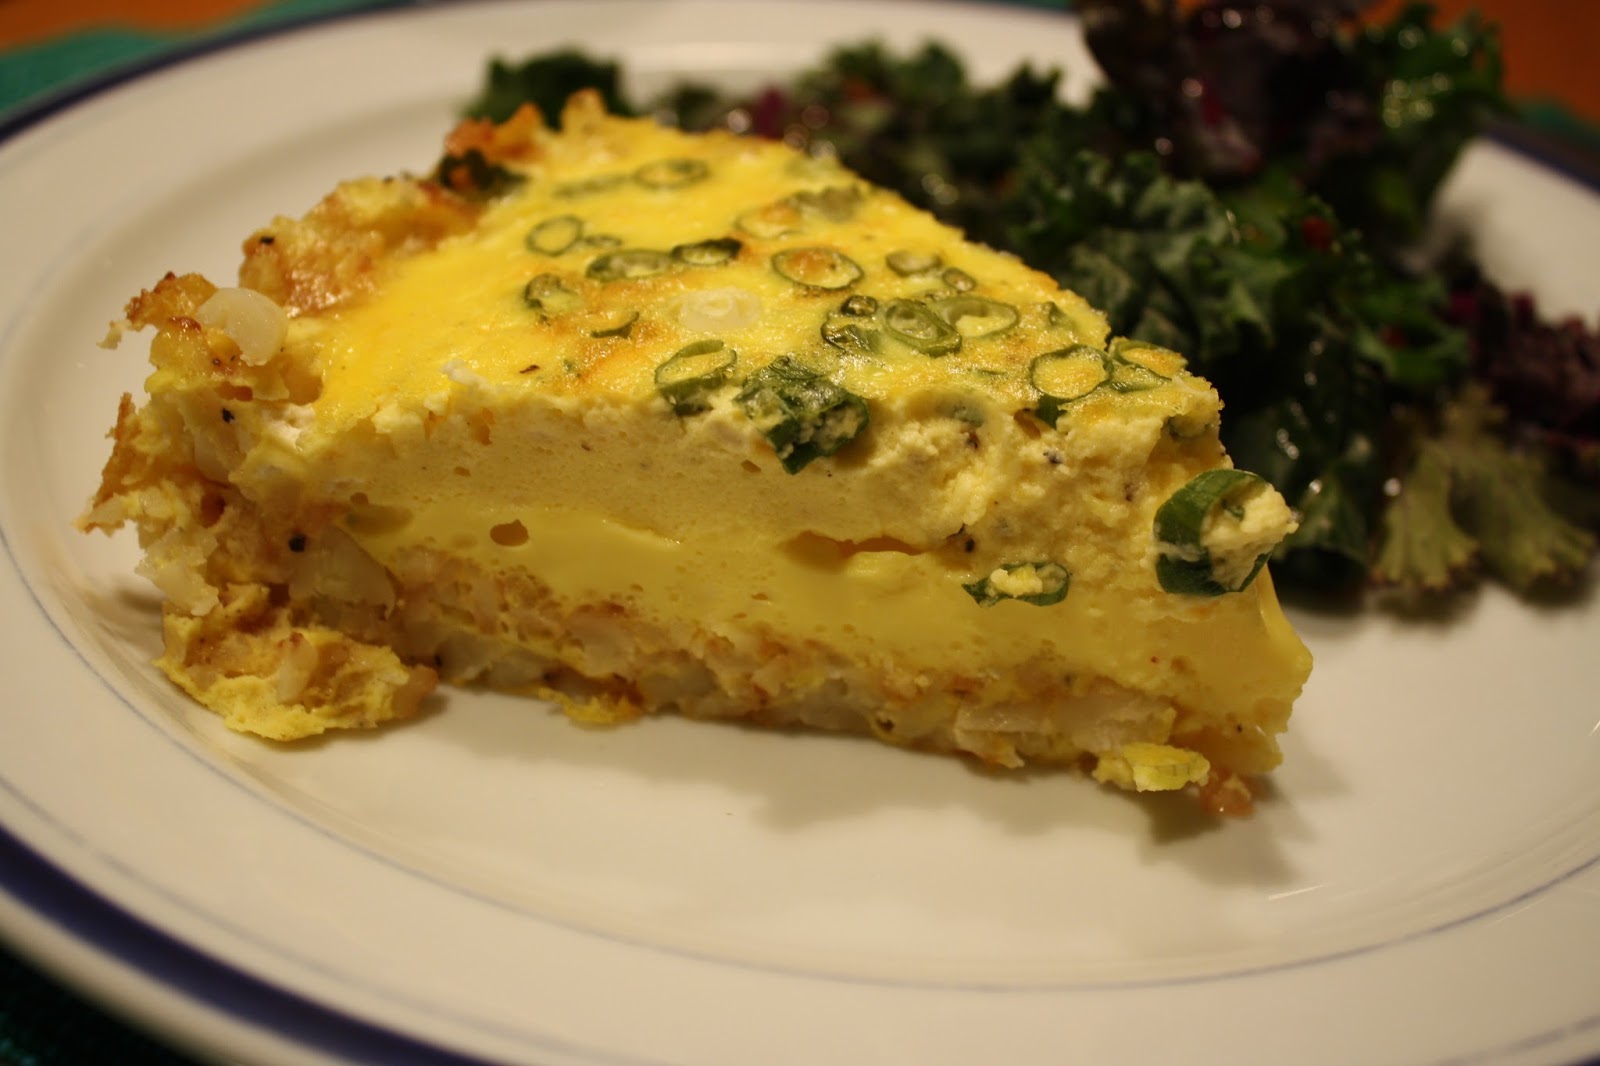
Goat Cheese Quiche with Hashbrown Crust

This recipe is from Martha Stewart. I had to go to my old Montreal neighborhood (Côte-des-Neiges) to find Damafro’s lactose-free goat cheese, but once I had that, I was good to go. And it was really good quiche! As it turns out, even though the Engineer doesn’t usually like goat cheese, he actually had seconds! He said that “the green onions make this hum”, and it’s true that it would be a bit boring without that green topping. It happens to be gluten-free and kosher for Passover (assuming the potatoes are as well), but you could make this in a regular crust, too.

2 Tbsp. butter or margarine, softened, plus more for pan
1 package (1 lb.) frozen hash brown potatoes, thawed
12 large eggs (seriously)
coarse salt and ground pepper
1 ½ cups lactose-free sour cream
1 package lactose-free soft goat cheese, room temperature
4 scallions, thinly sliced

Preheat oven to 375 °F. Brush a 9-by-2 ½-inch springform pan with butter. Line the sides of the pan with strips of waxed paper (the same height as pan); brush paper with butter.

Squeeze excess moisture from hash browns. Mix in a bowl with butter, 1 egg, 1 teaspoon coarse salt, and ¼ teaspoon pepper. Pat into bottom and up sides of prepared pan, using a moistened dry measuring cup. Place on a rimmed baking sheet; bake until set, 15 to 20 minutes.

In a large bowl, whisk sour cream, goat cheese, 1 ½ teaspoons coarse salt, and ¼ teaspoon pepper until well combined; whisk in 11 remaining eggs. Pour into crust, and sprinkle with scallions. Bake until set, 45 to 50 minutes (the filling will still jiggle slightly in the middle, but not on the sides). Unmold quiche, and peel off waxed paper before serving.

Chestnut Chocolate Cake


This recipe for chestnut chocolate cake is from Food and Drink magazine. The frosting calls for mascarpone, so I looked up how to make it on Not Without Salt. However, the setup seemed impossible to achieve in my fridge (hanging cheese over a bowl – I really didn’t have that much clearance), plus I made it in the morning and planned to make the cake that afternoon, not the following day, so I only let it drain for a few hours, not overnight. I guess I’m too used to making ricotta (which, by the way, is ever-so-much creamier when made with a 1-3 ratio of cream to milk instead of just milk!). Since I thought my mascarpone was a bit runny, I didn’t use rum in the frosting, and I think that compensated a bit and helped me achieve the proper consistency. That being said, after a night in the fridge, the frosting had become hard, so maybe that’s where rum comes in handy. It’s very good cake, dense and not too chocolatey, and it just happens to be gluten-free, too. Enjoy!

Note that the original cake recipe claims that the size of the can of chestnut purée doesn’t really matter; the size listed here is the one most commonly found by the creators of the recipe, but a slightly greater or smaller amount would work fine, too. I actually weighed mine, but it’s not necessary.

For the mascarpone (see note above)
2 cups lactose-free cream
1 Tbsp. fresh lemon juice

Pour the cream in a saucepan and set it over medium-low heat. Stirring continually, so as not to let the bottom scorch, heat the cream to 190 °F.

Add the lemon juice – the mixture will immediately get a bit thicker. Heat at 190 °F for another 5 minutes, attiring often.

Remove from heat, cover the pan and refrigerate overnight, or until completely cool.

Once the cream has cooled, it will be nearly as thick as sour cream. Place a strainer lined with four layers of cheesecloth over a medium bowl. Add the thickened cream to the cheesecloth. Gather the corners and carefully tie the ends to form a bundle. Hang this in the fridge and let drain into the bowl for another 12-24 hours, or overnight. There should be a couple tablespoons of whey left in the bowl after it’s finished draining (I only had a few teaspoons, but as I stated I didn’t let it drain nearly as long).

Set aside for the frosting.


For the cake
4 oz. (125 g.) bittersweet chocolate
¾ cup granulated sugar, divided
4 eggs, separated
1 can or jar (440 g.) chestnut purée (see note above)

For the frosting
6 oz. (175 g.) bittersweet chocolate
3 Tbsp. softened butter or margarine
1/3 cup lactose-free mascarpone (see recipe above)
2 Tbsp. rum (I omitted it)

Preheat oven to 350 °F. Grease a 9-inch sprinform pan; line the bottom with parchment paper and grease again.

Melt chocolate on top of double boiler or heavy pot on low heat. Remove from heat to cool slightly.

Reserve 2 Tbsp. sugar. With an electric mixer, beat egg yolks and remaining sugar for about 3 minutes or until tripled in volume. Beat in cooled chocolate and chestnut purée.

Beat egg whites until frothy, then beat in reserved 2 Tbsp. sugar, whisking until mixture is thick and glossy, about 6 to 7 minutes. Stir one quarter of egg whites into cake, then gently fold in remaining egg whites. Spoon into springform and bake for 35 to 40 minutes or until a cake tester comes out clean. Cool completely in pan (my cake deflated, but that’s normal), then turn out onto a wire rack.


To make frosting, melt chocolate in heavy pot over low heat (I did this in a double boiler again). Beat in butter, mascarpone and rum. Remove from heat. Cool for 15 minutes, then frost the cake with it.

Refrigerate cake overnight before serving (I only refrigerated it a few hours before serving it, but leftovers were stored in the fridge as well).

Friday, July 22, 2016

40-Clove Garlic Chicken with Creamed Spinach Mashed Potatoes

I had made a recipe for 40-clove garlic chicken once, years ago, and believe it or not, it was actually bland. (Crazy, right? Obviously, the cloves weren’t raw, but still.) I decided to try it again, though, when I saw this recipe online. The original recipe calls for pieces of chicken with the skin, but I chose to use cut-up skinless boneless chicken breasts. As it turns out, this dish was much tastier than my previous one, and we all enjoyed it very much! It’s not very photogenic, but it’s good, homey food.

For the chicken
40 cloves of garlic (about 3 heads), peeled
2 Tbsp. vegetable oil
8-10 pieces of cut up chicken (you can use breast or thighs)
a small handful of flat leaf parsley, roughly chopped
½ cup low-sodium chicken broth
¼ cup lactose-free cream
1 Tbsp. unsalted butter or margarine
salt and black pepper

Preheat the oven to 450 °F.

Pat the chicken and skin dry with paper towels and season with 1 teaspoon of salt and ½ teaspoon of pepper (or to taste).

Heat the oil in a dutch oven or oven-safe skillet just until you start to see wisps of smoke. Place chicken in skillet skin-side down, and cook until the skin is well browned, about 7-10 minutes.

Transfer the chicken to a plate (don’t try to pry the chicken off from the pan, if it is well browned, it will loosen by itself) skin-side up and set aside. Remove all the fat (the fat from the chicken will have rendered out and add to the oil you began with) until you’re left with just 1 tablespoon of oil and reduce the heat to medium-low. Add the garlic and cook until evenly browned for about 1 minute.

Add in the chicken stock to deglaze the pan. Scrape the brown bits off the pan and into the garlic. Add in the chopped parsley and cream. Return the chicken to the dutch oven, skin side up and remove from heat. Place the dutch oven in the oven for about 20-25 minutes, or until the juices run clear.

Meanwhile, make the potatoes.

For the creamed spinach mashed potatoes
2 lbs. potatoes, peeled and cut into cubes
½ cup lactose-free cream
2 Tbsp. unsalted butter or margarine
1 tsp. salt + 1/3 tsp. black pepper (or to taste)
6 cups baby spinach

Cover potatoes with salted cold water in a large saucepan and simmer, uncovered, for 20 to 30 minutes (I prefer to boil mine, and it’s faster, too).

While potatoes are simmering, bring cream, butter, salt, and pepper to a simmer in a small saucepan. Remove from heat and keep warm, covered.

Drain potatoes in a colander and cool slightly.

Stir spinach into warm cream, tossing to coat, and when slightly wilted (after about 1 minute), immediately add to potatoes. Mash potatoes and spinach until almost smooth. Season to taste and keep warm.

Once the chicken is ready, place the pieces on a serving dish. Mash the garlic in the dutch oven and stir in the unsalted butter. There will be more than enough heat to melt it and make the sauce glossy. Serve the chicken with the sauce and the spinach mashed potatoes.

Thursday, July 21, 2016

Ginger Scones with Chocolate Chunks

I tried baking with seasonal fruit for breakfast, but with mixed results. Rhubarb muffins were good, but there was a bit too much cinnamon, and the pieces of rhubarb exposed to air quickly became leathery-tough. Blueberry muffins came out all wrong – I think there just isn’t enough flour in the recipe. The best breakfast I made so far didn’t involve fruit at all, actually. It was these ginger scones with chocolate chunks.

Surprisingly enough, I didn’t have baking powder on hand and failed to notice until I had actually started the recipe. So I googled how to substitute for it, and I ended up using 1 ½ tsp. baking soda plus 1 Tbsp. cream of tartar. I also omitted the cinnamon from these. They were really good, though with Baker’s chocolate, there was that awkward moment when my breakfast wanted me to do math with fractions first thing in the morning…


3 cups flour
2 Tbsp. baking powder
1 ½ Tbsp. ground ginger (or a bit less, to taste)
¼ tsp. cinnamon
1 pinch allspice
½ cup turbinado sugar, plus extra for sprinkling
½ tsp. salt
1/3 cup vegetable oil
1 ¼ cups non-dairy milk (or lactose-free dairy milk)
1 tsp. pure vanilla extract
about 5 oz. chocolate, roughly chopped

Preheat the oven to 400 °F. Lightly grease a baking sheet or cover it with parchment paper or a silpat.

In a large bowl, whisk together the flour, baking powder, ground ginger, cinnamon, allspice, sugar, and salt.

In a small bowl, mix together the vegetable oil, milk, and vanilla extract. Add that to the dry ingredients and stir quickly until everything is just moistened (a few streaks of flour are fine). Gently fold in the chocolate chunks.

Using an ice cream scoop or a ¼-cup dry measuring cup, portion out the dough and place it onto the prepared baking sheet (I got a total of 14). Dust them with a few pinches of turbinado sugar (I think I forgot this step).

Bake for 15 minutes. These keep well at room temperature in an air-tight container for a few days, or you can freeze them.

Classic Chocolate Mousse


This classic chocolate mousse from Bon Appétit has both eggs and cream, making it very rich. That being said, it’s still only as good as the chocolate you use! I was stuck with Baker’s, but I would have preferred Ghiradelli. I decided to tackle this recipe before trying my hand again at a vegan aquafaba version (more on that in a later post). We really liked this version, though!

¾ cup chilled lactose-free cream, divided
4 large egg yolks
¼ cup espresso or strong coffee, room temperature
⅛ tsp. kosher salt
3 Tbsp. sugar, divided
6 oz. semisweet chocolate (60-72% cacao), chopped
2 large egg whites

Beat ½ cup cream in medium bowl until stiff peaks form; cover and chill.

Combine egg yolks, espresso, salt, and 2 tablespoons of sugar in a large metal bowl. Set over a saucepan of gently simmering water (do not allow bowl to touch water). Cook, whisking constantly, until mixture is lighter in color and almost doubled in volume and an instant-read thermometer inserted into the mixture registers 160 °F, about 1 minute.

Remove bowl from pan. Add chocolate; whisk until melted and smooth. Let stand, whisking occasionally, until room temperature.

Using an electric mixer, beat egg white in another medium bowl on medium speed until foamy. With mixer running, gradually beat in remaining 1 tablespoon of sugar. Increase speed to high and beat until firm peaks form.

Fold egg whites into chocolate in 2 additions; fold whipped cream into mixture just to blend.

Divide mousse among six teacups or 4-oz. ramekins. Chill until firm, at least 2 hours. Before serving, whisk remaining ¼ cup cream in a small bowl until soft peaks form; dollop over mousse.

Monday, July 18, 2016

Gâteau au fromage cottage sans lactose

Ah, comme le temps file! L’été passe toujours trop vite à mon goût, et je finis toujours par bloguer moins que je voudrais… En gros, c’est de ça qu’il a l’air, mon été.


Quand même, étant au Québec, j’en profite pour faire des recettes que je ne pourrais pas faire telles quelles aux États-Unis, notamment celles avec de la crème sans lactose. Il s’agit ici d’un gâteau au fromage fait avec du fromage cottage et de la crème. C’était vraiment délicieux, et plus léger qu’un gâteau au fromage traditionnel. J’ai pris du fromage cottage sans lactose de la marque du Choix du Président, je crois que c’est le seul qu’il existe ici (Lactaid en fait peut-être aussi, mais alors c’est dur à trouver). J’ai pris la recette sur Les Carnets de Miss Diane (sa version est également sans gluten), qui explique que c’est à l’origine une recette de Margo Oliver.


1 ½ tasse de chapelure graham
2 c. à soupe de sucre blanc ou brun
4 c. à soupe d’huile de coco (il m’en a fallu 6 c. à soupe)
2 contenants de 16 oz de fromage cottage sans lactose
5 œufs
½ tasse de farine
1 tasse de sucre
2 c. à thé de zeste de citron
2 c. à soupe de jus de citron
½ c. à thé de vanille
1 tasse de crème sans lactose

Préchauffer le four à 350 °F et sortir un moule à ressort de 9 pouces de diamètre. (Je dois préciser ici que c’était la première fois que je me servais de ce four et qu’il y était écrit « four à convexion », alors je l’ai plutôt réglé à 325 °F. Cependant, cela n’était pas nécessaire, et j’ai dû le faire cuire plus longtemps.)

Mélanger la chapelure, le sucre et l'huile de coco et l'étendre au fond du moule, en pressant légèrement. Réfrigérer jusqu'au moment d'utiliser.

Passer le fromage au tamis dans un bol (c'est long, mais ne vous découragez pas). Ajouter les œufs, un à la fois, en battant bien après chaque addition.

Mêler la farine et le sucre et ajouter le tout au mélange de fromage, en battant. Ajouter le zeste et le jus de citron, ainsi que la vanille.

Fouetter la crème et l'incorporer à la préparation. Verser sur la croûte dans le moule à ressort. Cuire au four, 1 heure ou moins ou jusqu'à ce que le tout soit pris (dans mon cas, je l’ai sorti du four après 1 h 50 min, alors qu’il bougeait encore un peu au centre). Laisser refroidir dans le moule et réfrigérer ensuite (c’est normal si le gâteau s’affaisse un peu)

Servir avec des fruits (comme des fraises, des cerises, un coulis de framboises ou une compote de bleuets), ou encore avec de la sauce au chocolat.

Tuesday, June 28, 2016

Batch of links

- A European vegan supermarket chain will open in the US next year, in Portland, Oregon. Because of course.

- Two more links on the topic of food waste. In Southern California, there’s an organization called Copia that matches people/restaurants that have excess food with those who are lacking. So far, over 830,000 pounds of food have been saved from the landfill and been put to good use feeding people in need. There’s also a service called CropMobster: using the app, farmers with unsold crops can connect with families who can’t afford to pay full price for them. Win-win!

- On a somewhat related note, there’s a petition asking the USDA to let people use their food stamps to buy food online, thereby granting everyone access to healthy food regardless of where they live (food desert or not). I like the principle of it, obviously, but I worry that healthy food like produce, without being subsidized, is still too expensive to be bought with food stamps. I also think that the number of places accepting food stamps should be expanded, including to farmers’ markets.

- According to the latest census, Americans now spend more money eating out than doing groceries. And yet food blogs and cooking shows are more popular than ever! I can’t help but wonder whether they are a hit only with a subset of the population, or whether people like reading about cooking but with no intention of actually doing any of it…

- Jungle Jim’s and the Art of the Tourist-Attraction Grocery Store, or what I must visit if I’m ever in Cincinnati.

- A great (English-language) article about Juliette Brun, she of Juliette & Chocolat (and my former middle-school classmate).

- Cool map that shows the living wage in every US state. Follow that with a video about global economic equality.

- And finally, I’ve said before that I pitied Lucky, the elephant at the San Antonio Zoo, because I felt she was anything but lucky. She’s alone in her pen (even though elephants are highly social animals), and the pen itself is small and devoid of stimulation. I was gung-ho about sharing this petition I came across a few days ago, demanding that Lucky be relocated to a sanctuary. So imagine my surprise when, just this morning, the Engineer sent me this article announcing that the zoo has taken in a second elephant, Nicole, rescued from the circus. I’m still hoping that the pen in which the elephants are kept will be improved, but the two seem to be getting along, and I’m so happy that Lucky has some company now!

[Update: I was just reading the August 2016 edition of San Antonio Magazine, and it says that the elephants do in fact have a new habitat! It includes a pool and a dozen new trees, along with other features. Looking forward to seeing it!]

Monday, June 27, 2016

Tahini cookies, two more ways

In an effort to polish off my jar of tahini before I left San Antonio, I ended up making two recipes for tahini cookies. I know I’ve published similar recipes before, including some great ones in 2010, but my most recent forays had left me dissatisfied. These two recipes were a bit different in that one called for dates, while the other called for almonds, and yet they were still very similar.

The first recipe, from Christelle is Flabbergasting, is vegan but can easily be made non-vegan if that’s more convenient for you. I found that it’s important to purée the dates well, so I’d recommend soaking them in warm water first, then finely chopping them before puréeing them. If you can buy premade date purée, go with that! Also, note that I used white whole wheat flour instead of all-purpose and whole wheat. The cookies were very good, and surprisingly filling. Keep them in an airtight container at room temperature. I got 21 cookies from this recipe.

¾ cup (100 g.) whole wheat flour
1 ¼ cup (150 g.) all-purpose flour
1 pinch fleur de sel
2/3 cup (100 g.) cane sugar
1/3 cup canola or safflower oil (or ½ cup softened margarine or butter), plus more for brushing
½ cup (125 g.) tahini
2 Tbsp. ground flax seeds soaked in 6 Tbsp. warm water for a few minutes (or 2 large eggs)
1 tsp. vanilla
8 large, soft Medjool dates, puréed
white and/or black sesame seeds, to decorate

Preheat the oven to 350 °F. Line a baking sheet with a silpat or parchment paper.

In a medium bowl, whisk together the flours and fleur de sel. Set aside.

In a large bowl, beat the sugar, oil, and tahini until well mixed. Add the flax seeds and water along with the vanilla and beat again.

Add the flours and fleur de sel and beat until well incorporated. The dough must be somewhat crumbly but still hold together.

Add the date purée and mix well.

Roll the dough into balls roughly the size of a walnut, flatten them slightly and place them on the prepared baking sheet. Brush the tops with oil and sprinkle with sesame seeds.

Bake for 15 minutes or until the cookies are very lightly golden (they should still be a bit soft when you pull them out of the oven, since they’ll harden as they cool).


The second recipe is from David Lebovitz’s blog, and he got it in Israel. They would be a great basic cookie with which to tinker, by adding cinnamon or ground cardamom, for instance. I got a total of about 30 cookies, and they keep really well.

1 cup (140 g.) all-purpose flour
1 cup plus 2 Tbsp. (140 g.) whole wheat flour
2 ½ oz. (70 g) ground almonds
5 ½ oz. (150 g.) cold unsalted butter or margarine, cut into cubes
¾ cup (150 g.) sugar
1 tsp. vanilla extract
1 pinch of salt
2 Tbsp. water
¾ cup plus 2 Tbsp. (200 g.) raw tahini paste

Preheat oven to 350 °F. Line two baking sheets with parchment paper.

In a food processor, blend the all-purpose flour, whole wheat flour, ground almonds, butter, sugar, vanilla and salt, and process until the mixture looks crumbly.

Add water and tahini and process until a smooth dough begins to form. Remove the dough from the food processor bowl and knead it a few times on the counter until smooth. (If the dough feels very dry, dampen your hands and knead the dough slightly.)

Create small balls of the dough, place them on the baking sheet, then flatten each one slightly with your fingers.

Bake for about 12-14 minutes, or until golden brown. Cool completely and serve.

Wednesday, June 22, 2016

Blueberry Clafoutis

Before leaving San Antonio, I tried two new clafoutis recipes. Both were originally gluten-free, but I didn’t have an all-purpose gluten-free flour mix handy so, since I was in fact trying to empty the pantry, I used an equal amount of all-purpose wheat flour.

One was dairy-free and called for ground almonds as well as silken tofu, which I was curious about, but I’ve decided that I didn’t like it nearly as much as regular versions, so I won’t be making it again.


The other was Gluten-Free Girl’s Blueberry Clafoutis, which is adapted from Julia Child’s recipe. I liked this one, and since I didn’t have a gluten-free recipe yet, I’ll be keeping the recipe!

2 cups blueberries (fresh or frozen)
½ tsp. cinnamon
2 Tbsp. honey
1 ¼ cup soy milk (almond milk or lactose-free dairy milk would work, too)
2/3 cup sugar, divided
3 eggs
1 tsp. vanilla extract
½ tsp. almond extract
1/8 tsp. kosher salt
70 g. (1/2 cup) all-purpose flour (gluten-free if necessary)

Preheat the oven to 350 °F. Grease a deep-dish pie plate.

Toss the blueberries with the cinnamon and honey and let them marinate for a bit. Set aside.

Thrown the soy milk, 1/3 cup sugar, eggs, vanilla, almond extract, salt, and flour into a blender and purée until the batter resembles a somewhat thick pancake batter.

Pour a thin layer of batter onto the bottom of the prepared pie plate. Put it in the oven and let it bake until the layer no longer jiggles when you shake the pan, about 5 minutes. (This will prevent the blueberries from being on the very bottom of the clafoutis.)

Spoon the honeyed blueberries evenly over the bottom layer. Sprinkle on the remaining sugar. Pour in the remaining batter.

Bake until top is golden brown and batter is set, about 45 minutes to 1 hour. The clafoutis will be puffed up when you pull it from the oven and will deflate as it cools.

Serve warm or at room temperature, or even cold.

Monday, June 20, 2016

Strawberry-Rhubarb Salad with Mint

I’ve been absent from this space for a few weeks while we drove up to Canada and settled in, and got used to doing groceries in Quebec once again. Lactose-free goat cheese proved harder to find than last summer, but it still exists – I bought four packages yesterday. And President’s Choice makes lactose-free sour cream now, so really, the only thing the US has that Canada doesn’t is lactose-free cream cheese. But Canada has lactose-free cream, so that more than compensates. (Also, we got quite a shock purchasing Earth Balance margarine in sticks, which not only are hard to find here, but are a whopping $8.49 per package! We pay about $4.00 in the States, and even factoring in the exchange rate, that seems outrageous.) Plus, I’m once again surprised at how hard it is to find decent everyday ingredients like vanilla, baking chocolate or cocoa. Sure, there is natural vanilla, but it comes literally last on the ingredient list, after water and alcohol and even sugar. As for the rest, it seems like there’s only Baker’s and Fry’s, respectively, which reminds me why I liked Aubut so much. (Both those brands are perfectly acceptable in most cases, but when you’ve tasted better, it’s hard to be limited to something so bland!)

Another thing Quebec does have is the best strawberries in the world, and they’re in season right now, so we’re enjoying them – the Little Prince seems especially fond of them. There’s a recipe that I made early last summer and somehow I never got around to posting about it, but it was really good. If you have access to great strawberries, now the perfect time for this fresh salad! It can be a light dessert, though I think it would be perfect for brunch.

2 rhubarb stalks, thinly sliced on the diagonal
2 Tbsp. sugar
1 Tbsp. Cointreau or fresh orange juice
1 Tbsp. fresh lemon juice
2 lbs. strawberries, hulled, quartered
¼ cup torn fresh mint leaves

Toss rhubarb, sugar, Cointreau, and lemon juice in a medium bowl. Let sit until rhubarb is slightly softened and releases its juices, about 30 minutes. Toss with strawberries and mint. (The salad is best eaten right away, but will keep for a day or two in the fridge.)

Friday, June 03, 2016

Spring outings 2016

After our trip in January, we stuck to more local outings this spring. In February (which really felt like spring here), we visited the San Antonio Missions, which I’d been wanting to see for about 5 years! They are a UNESCO World Heritage site. We started at the southern end with Mission Espada and made our way north to Mission San Juan, Mission San José and, finally, Mission Concepción. We did all this on a Sunday morning, and I can confirm that all four churches are still in use today. If you are short on time and can only visit one, I’d recommend Mission San José, which was the most impressive.


In March, the Engineer’s father and his wife came for a visit, so we had a few outings with them. We of course went to the Alamo and the Riverwalk, but the highlight was the zoo. This time was much more fun than our visit a year ago, mainly because the Little Prince was ready for the zoo this year! He showed an interest in the animals, and kept saying how we had seen flamingoes, fish, bears, etc. We did get to see the okapi this year, as well as the new giraffes! It’s a father giraffe and his two sons who live there now. The downside is that the animals who used to be in that pen were moved, so the rhino and zebras get much smaller quarters than they used to, and I didn’t see any ostriches. Also, we were there on St-Patrick’s Day, in the middle of spring break, and as it turns out, it was the busiest day in the zoo’s history (as we learned in the following day’s paper). I do have to say that the crowds were impressive, and traffic in particular was insane. Keep that in mind if you want to visit San Antonio during spring break…


Also, on Easter, we had an unexpected outing to the Palladium movie theater, which housed a replica of the 1960’s Batmobile for the weekend. What a treat for me! If you’re a fan of the old series, check out this collection of bat-labels that appeared on the show.


Our April outing was to the King William Fair. King William is a beautiful neighborhood in San Antonio, with old Victorian-style houses and mature trees. I kept wanting to come back and gawk at them, but that isn’t something the Engineer is interested in, so I figured the fair (technically part of Fiesta) was killing two birds with one stone. As it turns out, it was a nice, kid-friendly fair, albeit a little generic (I guess fair food is pretty standard, although there were also interesting pop-up stores). I got to try chicken-fried bacon (because you only live once) as well as a vegan chocolate and peanut butter ice cream from Lick, both awesome. However, the crowds exceeded my expectations and made it a little unpleasant for our family of introverts. I think even event organizers were overwhelmed, because even though we got there pretty early, the official parking lot was full, as were all the other lots in the general area (we managed to find parking several streets away). Local residents probably have only one of two choices: embrace the chaos, or flee the city for the weekend. The owner of the house below had chosen the former approach, and we overheard her telling a passerby that they had gutted and renovated the entire house upon buying it.


We had planned to go to the aquarium in May, but we never found the time, so that’ll have to be postponed until late summer at the earliest.

Chocolate Curry Cupcakes

I realize I may have already lost some of you with that title, but if you’re still with me, you’re in for a treat. The inspiration for these cupcakes is Itsi Bitsi in Montreal, where Dear Sister bought assorted flavors for my bachelorette party (8 years ago already). The only flavor I remember was chocolate curry! It was unusual enough at the time that I’d never considered curry in desserts, though I’ve now seen more recipes along those lines, and I’ve also enjoyed “savory” spices mixed with chocolate in other dishes. So over the years, I tried to recreate these cupcakes, or at least come up with something that I’d make again, and I think I’ve got it! To be clear, this isn’t Itsi Bitsi’s recipe, and I don’t think the cupcakes even look similar (maybe theirs had a curry-yellow buttercream frosting, though I can’t remember clearly now). It took some tweaking: I started with 1 teaspoon of curry in the cupcakes, but it wasn’t noticeable at all then. This recipe calls for 2 tablespoons, which makes them almost savory. I only use mild curry, but even then, be warned that the flavor deepens over time, so the cupcakes will have a more pronounced curry taste if you eat them 2 days later (when freshly baked, it was certainly not overpowering, but after 2 days, it got almost spicy). For the base of the chocolate cake, I adapted my friend Jen’s excellent recipe for chocolate cream cupcakes (which is actually from America’s Test Kitchen). The recipe for the base of the frosting is from my favorite chocolate cake, from Minimalist Baker. These were such a hit that to wash them down, the Engineer used up in 2 days the amount of milk that normally lasts him 7 days… Be warned!

For the cupcakes
1 cup all-purpose flour
½ tsp. baking soda
¼ tsp. salt
½ cup boiling water
1/3 cup cocoa powder
1/3 cup semisweet chocolate chips
1 tsp. instant espresso
¾ cup sugar
½ cup lactose-free sour cream or plain Greek yogurt
½ cup vegetable oil
2 large eggs
1 tsp. vanilla extract

Adjust oven rack to middle position and preheat oven to 325 °F. Grease and flour a 12-cup muffin tin.

Combine flour, baking soda, and salt in bowl.

Whisk water, cocoa, chocolate chips, and espresso in large bowl until smooth. Add sugar, sour cream, oil, eggs, and vanilla and mix until combined. Whisk in flour mixture until incorporated. Divide batter evenly among muffin cups.

Bake until a toothpick inserted into a cupcake comes out with few dry crumbs attached, 18 to 22 minutes. Cool cupcakes in tin 10 minutes, then turn out onto wire rack and cool completely.


For the frosting
1 cup (16 Tbsp.) vegan margarine, softened
2 - 3 cups powdered sugar (I used 2 cups), sifted
1 tsp. curry
2/3 cup unsweetened cocoa powder
1 oz. (about ¼ cup) semisweet chocolate (dairy-free if desired), melted and slightly cooled
2 tsp. pure vanilla extract
~ ¼ cup lactose-free milk of choice (such as cow’s milk or almond milk)

Once the cupcakes have cooled, prepare frosting by beating together all ingredients until light and fluffy, adding the powdered sugar in small amounts until you reach your desired consistency and sweetness. If it becomes too thick, add more milk. If it's too thin, add more cocoa powder or powdered sugar. With the amounts indicated above, it was great! Not too sweet, and with only a subtle curry taste.

Batch of links - Abortion

Let me start by getting this off my chest: even if you believe that abortions done for reasons of “unplanned pregnancy” should only be done in the first trimester, you can’t flat-out ban abortions in later pregnancy, because those are usually done for very important medical reasons, like saving the life of the mother or not birthing a baby who wouldn’t survive outside the womb. This happened to a close friend of mine at almost 24 weeks of pregnancy, in Quebec, and despite the tragic outcome, I’m very happy that she had access to medical care that had her best interests (both physical and psychological) in mind. Plus, of course, to get back to unplanned pregnancies, you have to take into consideration the fact that when women have adequate access to health care, including contraception and prenatal care, the number of abortions drops anyway.

Now, if you have a moment, I highly recommend you watch John Oliver’s piece on abortion, because he always manages to be both funny and very informative. The piece summarizes the current controversies very well. You can also read an article on The Daily Beast published a little over a year ago, about the “craziest” (most restrictive) abortions bills passed since 2010.

Last year, a federal appellate court upheld House Bill 2, which states that Texas can require abortion clinics to meet the same building, equipment, and staff standards as hospitals. This sounds good in theory, until you realize that the law is actually unnecessary (the procedures done in abortion clinics are not the same as those done in most hospitals) and that this severely restricts the number of clinics in what is the second most populous state. The Supreme Court is currently divided on the issue, but a ruling isn’t due until late June. Roughly half of the abortion clinics in the state have closed already, and the majority of the rest depend on a favorable ruling to stay open. (On a related note: here’s a Rolling Stone article titled Lone-Star Crazy: How Right-Wing Extremists Took Over Texas.) (And also, this could lead to a situation like this one predicted by The Onion.)

Texas also wanted to cut Medicaid funding from Planned Parenthood (who is suing) because 3% of the organization’s expenses go towards abortion, which Republican lawmakers oppose. Of course, this directly penalized the poorest patients, who are most in need of medical services offered by Planned Parenthood (including the 97% of the funding that goes to medical exams, birth control, mammograms, etc.).

Missouri also has some pretty strict laws, including a 72-hour waiting period (the longest in the country). A bill was proposed a year ago to require the biological father’s permission before performing an abortion, effectively condemning rape victims to get consent from their abuser, but looking at Missouri abortion laws today, I don’t think that bill passed.

Indiana, though, passed a law banning abortions performed because of fetal genetic abnormalities. And yet, something tells me they won’t be subsidizing the health care of fetuses and babies born with severe defects, or psychological support for the parents…

Alabama just passed a bill that treats abortion clinics like sex offenders, meaning that they can’t be within 2,000 feet of an elementary or middle school. This would shut down two of the state’s five clinics (but those two alone provide 72% of abortions). Obviously, no other medical facilities are subject to the same rules!

Oklahoma state legislature just passed a bill that would make providing abortions a felony, which goes directly against Roe v. Wade. This won’t become the law unless the governor signs it into law, but she is expected to do so, given her record.

And it looks like a long stretch of cities in the South won’t have access to abortions after the first trimester, due to recent bills.

This may be because I’m from Quebec, but I really can’t understand why people would want their rights and medical care to regress to pre-1970s standards…

I feel like the only positive development lately is that the FDA expanded access to abortion by modifying its requirements regarding the abortion pill.

If you feel moved to help, there are several petition online for the various bills I mentioned, and you can always make a donation to the National Organization for Women.

[Update, June 27th, 2016: I am unbelievably happy to announce that the Supreme Court has struck down the Texas abortion clinic restrictions!]

Wednesday, June 01, 2016

Vegan Chocolate Chip Cookies

I recently tried two recipes for vegan chocolate chip cookies; unlike last summer’s cookies, these don’t call for egg replacers, they were just conceived without eggs in the first place. What they had in common was mixing oil with sugar until you get a caramel-like consistency, which was important for the structure of the cookie (and that’s the reason why I don’t recommend substituting applesauce here). The first recipe was from Post-Punk Kitchen; the cookies were good, though I prefer the ones I normally make, so I’m not posting the recipe here.


The second recipe, though, from Sift & Whisk, called for a small amount of oats as well as chopped chocolate instead of chips; the result was a darker, tastier cookie. The dough was a bit dry and crumbly as I was working with it, and I still thought these were not my best cookies, but the Engineer loved them. That being said, I didn’t want to buy nut oils just for this, so I used canola oil instead of peanut oil, and olive oil instead of macadamia oil. Obviously this affected the taste, but these were good, and nut-free. They actually reminded me a bit of my Neiman-Marcus cookies, which I haven’t made since the 36-hour cookies came into my life 5 years ago – I’ll have to remedy that this summer.

And as I was typing up this post, I realized that I had another recipe for olive oil chocolate chip cookies, so I tried that one too, but even though they tasted fine, they spread out way too much. I also think there was too much sugar compared with the flour. So all this to say, this vegan Sift& Whisk recipe was the best of the bunch, and here it is below.

½ cup (50 g.) rolled oats
1½ cups (180 g.) all-purpose flour
1 tsp. baking powder
¾ tsp. baking soda
½ tsp. kosher salt
1 cup (170 g./6 oz.) roughly chopped vegan chocolate (I use semisweet or bittersweet)
½ cup (100 g.) granulated sugar
½ cup (110 g.) packed dark muscovado (or dark brown sugar)
5 Tbsp. peanut oil (or other neutral oil, like grapeseed or canola)
4 Tbsp. macadamia nut oil (or other flavorful oil, even olive oil)
¼ cup plus 1 Tbsp. water
Maldon sea salt, or other flaky sea salt, for sprinkling

Spread the oats on a baking sheet and toast in a 350 °F oven for 10-15 minutes, until fragrant. Allow to cool, then grind the oats into a fine powder in a spice grinder or blender. (Since this is such a small amount of oats, I used my spice grinder instead of the food processor, and I was amazed at how fast and efficient it was at pulverizing the oats!)

In a large bowl, whisk together oat flour, all-purpose flour, baking powder, baking soda, and salt. Add the chopped chocolate to the flour mixture and toss to coat.

In the bowl of a stand mixer, combine the sugars. Break up any lumps in the muscovado (or brown) sugar by running the mixer on low for a few seconds. Use your fingers or spoon to break up any lumps the mixer missed. Add both oils and the water. Mix on medium-high speed until smooth and fully combined, about 2 minutes.

Turn the mixer speed to low, add the chocolate and flour mixture, and mix until just combined. Remove the bowl from the stand mixer and scrape down the bowl just to make sure everything is combined evenly, but don’t overmix the dough. Cover the bowl with plastic wrap and refrigerate the dough for at least 12 hours (you can keep it refrigerated for a week, easily).

Preheat the oven to 350 °F. Line two half-sheet baking pans with silicone baking mats or parchment paper (I actually like baking them one sheet at a time, as needed). Remove the dough from the refrigerator and scoop the dough into 2-inch mounds, eight on each baking sheet (stagger the dough mounds so they don't spread into each other; my cookies were slightly smaller and I fit 12 per pan, for 2 pans total). Freeze the cookie dough mounds for 10 minutes. (If your freezer isn't very large, you can put all the dough mounds on one pan, freeze them, and then redistribute the frozen dough mounds between the two baking sheets before baking.)

Remove the cookie dough from the freezer and sprinkle the tops of the dough with sea salt. Bake for 13-15 minutes (12 minutes for me), rotating the pans from front to back and top to bottom halfway through baking. The cookies are done when the edges are set and the tops are still a tiny bit shiny. Cool the cookies on the pan for 3 minutes, then transfer the cookies directly to a wire rack to cool completely.