Wednesday, September 30, 2015

Veganized egg and tuna salads

Now that the Little Prince eats lunch like a real person (as opposed to even a year ago), I’ve been making something or other each week when we run out of leftovers. I tried sesame spring rolls with tahini coconut dip, which called for baking tofu rolled in sesame seeds. I liked the spring rolls, but the Little Prince did not. He did, however, LOVE the leftover strips of tofu and would have happily eaten the whole batch if I hadn’t made the rolls! (We both loved the dipping sauce, too, and that’s one I’d trot out for other recipes or perhaps with appetizers.) I still had some of my block of tofu left in the fridge, though, and I was looking for a way to use it up, so I made Lemony Eggless Salad from The Kitchn (I halved the recipe). I chopped the tofu instead of crumbling it, though I realize it would have looked more like egg salad if I had followed directions. Then again, I wasn’t trying to fool anyone; I told my son it was tofu on toast, and that’s what he ate with gusto! (Obviously I started ahead of the game because my kid actually likes tofu.) This would work well in a sandwich, too, perhaps with some lettuce. The lemon really brightened it up, but I think I would dial it down next time. It’s served here with a side of Delancey’s tomato and fresh corn salad with shallot vinaigrette.

For the dressing
4 Tbsp. vegan mayonnaise
2 Tbsp. mustard
2 Tbsp. red wine vinegar
1 Tbsp. olive oil
½ tsp. turmeric
½ tsp. lemon zest

For the salad
1 20-oz. block extra-firm tofu
¼ cup slivered almonds (optional)
4 tsp. capers (I omitted them)
¼ cup chopped chives
fresh thyme, to taste (I used lemon thyme, which may have been too lemony)
salt and pepper to taste

In a large bowl, whisk together all the dressing ingredients. Using your hands, crumble the tofu into roughly ½-inch pieces. Stir together with dressing and add almonds, capers, chives, and thyme. Lastly, salt and pepper to taste. Serve on sandwich bread or rolls or with salad greens. (Leftover salad will keep refrigerated for several days.)


After that, I tried a veganized version of tuna salad. I had two recipes bookmarked, one from The Kind Life and one from The Kitchn. After comparing ingredients and deciding that I wasn’t too keen on pickles or nori, while celery, scallions and mustard were more my thing, I went with The Kitchn and their recipe called Chickpea of the Sea Salad. You can’t beat that name, and honestly, you can’t beat that salad! It’s like it was pushing all the buttons that tuna salad normally pushes for me, but it doesn’t have tuna. And you know, lots of people want to avoid tuna – maybe they have allergies, they’re vegan, they’re concerned about sustainability or mercury exposure. This salad is your answer, people. I loved it, the Little Prince loved it (actually, he called it tofu, which we’ve established is a compliment coming from him), and when the Engineer had a bite later that evening, he was flabbergasted that it tasted like it did but without containing any tuna or chicken or any animal flesh at all. I’ll be making this one again.

1 (15.5-oz.) can chickpeas, drained and rinsed
¼ cup vegan mayonnaise
1 Tbsp. whole grain mustard
1 ½ Tbsp. umeboshi vinegar
2 tsp. celery seeds
¼ cup chopped celery, from about one rib
2 Tbsp. sliced scallions, from about two scallions
freshly ground black pepper

Place chickpeas in the bowl of a food processor and pulse two or three times to roughly chop. Add remaining ingredients and pulse two or three times more to incorporate. Serve on bread, with or without lettuce.

Tuesday, September 29, 2015

Stir-Fried Beef and Broccoli

First, sorry I don’t have a better picture – I wasn’t originally planning on blogging this. This stir-fry is actually a meal that the Engineer made (from The America’s Test Kitchen Healthy Family Cookbook, his new project). We both thought that the Little Prince would like the beef, and probably the sauce, and that would be that. But no: he was all about the broccoli, which was a big surprise. He had exactly one bite of each of the main components, and then kept asking, over and over, for “broccoli with sauce”. I had to give him some of my broccoli when he finished his, making sure he saw me dipping it into the sauce each time. He wanted more the next day. And later that week, after dinner, when he normally asks for cake or chocolate or something along those lines, he looked at me hopefully and said, “Broccoli with sauce?” So I figure I owe parents out there this recipe. Us adults very much enjoyed it, and I can’t guarantee that your kids will be as crazy about it as mine was, but it’s worth a shot. Enjoy! (Note that to make this gluten-free, you will need to double-check the label of ingredients like broth, soy sauce and hoisin sauce and make appropriate substitutions when necessary.)

For the sauce
½ low-sodium chicken broth
¼ cup Chinese rice cooking wine or dry sherry
3 Tbsp. hoisin sauce
1 Tbsp. low-sodium soy sauce
2 tsp. cornstarch
1 tsp. toasted sesame oil

For the stir-fry
12 oz. flank steak (trimmed of all visible fat and sliced across the grain)
2 tsp. low-sodium soy sauce
2 tsp. Chinese rice cooking wine or dry sherry
3 scallions, minced
6 garlic cloves, minced
1 Tbsp. grated fresh ginger
4 tsp. vegetable oil
1 lb. broccoli florets
¼ cup water
2 red bell peppers, stemmed, seeded and cut into matchsticks

For the sauce
Whisk all ingredients together in a bowl. Set aside.

For the stir-fry
Combine soy sauce and rice wine in a bowl, stir in the beef, and marinate for at least 10 minutes or up to 1 hour. (You can do this while you chop the vegetables.)

Combine the scallions, garlic, ginger and 1 teaspoon of the vegetable oil in a bowl.

Heat 2 teaspoons more vegetable oil in a 12-inch nonstick skillet or wok over high heat until just smoking. Add the beef, break up any clumps, and cook until lightly browned on all sides but not fully cooked, about 2 minutes. Transfer to a bowl, cover, and set aside.

Add the remaining teaspoon vegetable oil to the skillet and return to high heat until shimmering. Stir in the broccoli, add the water, cover, and steam until broccoli is bright green and begins to soften, about 2 minutes.

Uncover and allow the water to evaporate, 30 to 60 seconds. Stir in the bell peppers and cook until the vegetables are crisp-tender, 3 to 4 minutes.

Clear the center of the skillet, add the garlic mixture, and cook, mashing the mixture into the pan, until fragrant, 15 to 30 seconds. Stir it into the vegetables.

Return the beef, with any accumulated juice, to the skillet. Whisk the reserved sauce to recombine, then add to the skillet. Simmer, tossing constantly, until the beef is cooked through and the sauce has thickened, 30 seconds to 2 minutes. Serve with rice.

Magic Chocolate Custard Cake


If you’ve been reading this blog a long time, you may remember what I call “impossible tart”, after a favorite recipe of my mother’s. I tried a pumpkin version, though my favorite was always the coconut one. The basic principle is that you mix all the ingredients and end up with a very liquid batter which, in the oven, stratifies to makes something reminiscent of clafoutis, with a bottom “crust” made up of flour and an unctuous filling in the middle, sometimes with a crisp topping. It’s a great dessert, satisfying and usually not too sweet. So, enter the White on Rice Couple with their magic chocolate custard cake, a much thicker version in which the middle layer is like custard while the top layer is cakier than in the iterations with which I’m familiar. This was absolutely fantastic and won rave reviews from the Engineer and the Little Prince! I’ll have to try the “plain” version of this cake at some point, too, but for today, chocolate it is. If you’ve never tried this type of dessert, this recipe is a great place to start!

½ cup (1 stick) margarine
2 ½ cups lactose-free milk
1 cup (115 g.) flour
½ cup (43 g.) cocoa powder
4 eggs, separated
4 drops white vinegar
1 ¾ cups (210 g.) confectioners’ sugar, sifted
2 Tbsp. espresso or strong coffee, lukewarm
1 tsp. vanilla
extra confectioners’ sugar, for dusting (optional)

Preheat the oven to 325 °F. Lightly grease an 8"-square baking dish.

Melt the margarine and set aside to slightly cool. Warm the milk to lukewarm and set aside. (It is important to have both at close to room temperature when they are mixed with the other ingredients.)

In a medium bowl, whisk together the flour and cocoa powder. Set aside.

Whip the egg whites with vinegar to stiff peaks. Set aside.

Beat the egg yolks and sugar until light. Beat in the melted margarine, espresso, and vanilla until evenly incorporated. Mix the dry ingredients into the batter until evenly incorporated. Gently whisk in the milk until everything is well mixed.

Gently fold in 1/3 of the egg whites; repeat with the rest of the egg whites until they are all folded in. (For the record: at this point, my “batter” was remarkably soupy, and I was convinced this would be a monumental failure. This seems to actually be entirely normal, though, so don’t panic.)

Pour the batter into the prepared pan and bake for 50-60 minutes or until when you gently shake the cake, it is slightly jiggly but is no longer runny-jiggly.

Allow cake to completely cool before cutting and then dust with confectioners’ sugar (if using).


Saturday, September 26, 2015

Pasta with Tahini-Yogurt Sauce

I found this recipe on The Kitchn somewhat by accident. I had seen the post the day that it went up, but it’s only upon reading someone talk about the recipe later that week that I decided it looked good enough to make. I’m not sure why I had dismissed it the first time, but I’m very happy that I took a second look – it was SO GOOD! The sauce was rich, but the tahini prevented it from being too decadent while also adding some unexpected brightness with the lemon. I didn’t have nigella seeds (still, I know; I’ll just buy them next time I see them so that I can make stuff like this on a whim). I used black sesame seeds instead, for a little visual interest. I had a bit too much of the seed mixture, so I might make slightly less next time. I increased the amount of pasta to 16 ounces, and I used a red bell pepper instead of chile peppers (which is what I’m writing below).

16 oz. whole grain fusilli, rotelle, or other pasta shells (gluten-free if desired)
2 Tbsp. sesame seeds
1 tsp. whole cumin seeds
1 tsp. nigella seeds (optional; I just used half black sesame seeds and half white)
½ a red bell pepper, divided in two
3-4 cloves garlic, peeled
1 cup lactose-free plain Greek yogurt (do not use nonfat)
1 cup lactose-free sour cream
¼ cup plus 2 Tbsp. tahini
¼ cup freshly squeezed lemon juice (1 to 2 lemons)
½ tsp. fine sea salt
¼ cup chopped fresh flat-leaf parsley, for garnish

Bring a large pot of water to a rolling boil. Add salt as you see fit and then the pasta, stirring a few times. Return to a boil and cook at a gentle boil until the pasta is al dente, according to the package directions. When it is almost ready, dip a heatproof measuring cup into the pasta pot to reserve ¾ cup cooking liquid.

While the water is coming to a boil, add the sesame, cumin, and nigella seeds to a medium skillet over medium heat. Toast, stirring frequently, until the seeds turn fragrant and the sesame turns golden, 3 to 5 minutes. Immediately scrape the seeds onto a plate and set aside.

Finely chop a quarter of the bell pepper (i.e., half of what the recipe calls for) and set aside. Add the remaining bell pepper and the garlic to the bowl of a food processor, fitted with the metal blade. Process until minced, scraping down the sides as needed. Add the yogurt and sour cream and blend until creamy. Add the tahini, lemon juice, and salt and process until smooth. (At this point, the recipe called for warming the sauce in a skillet for a few minutes, but I was afraid of curdling the dairy, so I skipped this step. I found that the sauce got plenty warm enough simply from the residual heat of the pasta in the last step.)

Drain the pasta (making sure you have reserved ¾ cup of the cooking liquid); quickly return the pasta to the pot and add the sauce along with about half of the reserved cooking liquid, mixing well to coat the pasta. Add more of the reserved pasta cooking liquid as needed, until you have a creamy sauce.

Set in plates, sprinkle with the reserved seed mixture, the finely chopped bell pepper and the parsley. Serve at once.

Raspberry Chocolate Chip Muffins

This recipe is adapted from Alice Medrich’s Pure Dessert. It’s originally a raspberry chocolate chunk muffin recipe, and while I concede that chocolate chunks would elevate the dish, I took the easiest route and used chocolate chips. I also used white whole wheat flour instead of the mixture of flours and really liked the results. Note that it’s important for the raspberries to be frozen when you add them to the batter, to prevent them from overcooking. If you have fresh raspberries, you can freeze them on a baking sheet before using them in the recipe. Take them out of the freezer only right before using them. These muffins are really wonderful, and they freeze well. Because of the fruit in them, I actually recommend freezing them if you’re not going to eat all of them within two days or so (to rewarm, 30 seconds in the microwave does the trick).

1 ½ cups (6.75 oz.) all-purpose flour
½ cup (2.25 oz.) whole wheat flour
1 Tbsp. baking powder
½ tsp. salt
¼ tsp. freshly grated nutmeg
2 large eggs
scant 2/3 cup sugar
1 cup lactose-free milk
5 Tbsp. unsalted butter or margarine, melted and still warm
5 to 6 oz. frozen raspberries
4 oz. semisweet or bittersweet chocolate, chopped into little chunks, or 2/3 cup chocolate chips

Position a rack in the lower third of the oven and preheat the oven to 400 °F. Line a muffin tin with paper liners.

In a large bowl, whisk the flours, baking powder, salt and nutmeg. Set aside.

In another bowl, whisk the eggs and sugar together. Whisk in the milk and butter. Pour the wet mixture over the flour mixture and fold gently until all of the dry ingredients are moistened but the batter is still very lumpy and uneven. Dump the frozen berries and the chocolate into the bowl and fold just until they are distributed throughout the batter. (Do not try to create a smooth, homogenous batter, or your muffins will be tough.)

Divide the batter among the muffin cups (I like using an ice cream scoop for this). Bake until a toothpick inserted into the cakey part of a muffin emerges free of batter (other than a little melted chocolate or raspberries), 15 to 18 minutes. Cool on a rack.

Serve the muffins warm or at room temperature.

Friday, September 25, 2015

Batch of links

- Did you know there’s an app to help you manage your food allergies? Download Content Checked on your smartphone, then use it to scan a product’s barcode and be notified of any allergens. It contains more than the top eight allergens, for which there should be a warning on the package; you can also tailor it to warn you about other allergens, gluten, lactose or foods you might be temporarily avoiding because of a health condition, for example.

- Have you heard of the Cotton Candy grape? It’s a new variety that the Engineer brought home last month. It’s been created to taste like cotton candy. The Engineer swears that it does (and the Little Prince loves these grapes, more so than other varieties he’s tried), but I don’t taste that at all. To me, they just taste a little sweeter than regular grapes.

- Six ways to tone down a meal that’s too spicy.

- 37 food tweets guaranteed to make you laugh. Some of these are really good!

- René Redzepi plans to close Noma and reopen it as an urban farm. Well, as long as it reopens, I guess…

- Here’s a great profile of Julia Child, written in 1974.

- I linked to this video debunking the paleo diet before, which is why I was so amused to read that it turns out people from the Paleolithic Era ate porridge. I mean, you can choose to avoid grains if you want, just don’t say it’s because they weren’t part of our diet 30,000 years ago, you know?

- Mission Chinese reinvented the tiki cocktail – and it changes colors naturally!

- In the category of food hacks, it turns out that scoring a cheap cut of meat actually does make it more tender!

- Also, here’s why you need a meat thermometer.

- And finally, here’s an article I’m hoping my mother in particular will read: No, you do not need to drink 8 glasses of water a day. There’s simply no science to back this up.

Tuesday, September 22, 2015

Lactose-Free, Dairy-Full Cheesecake


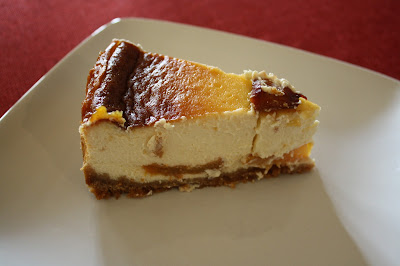
So, remember the lactose-free cream cheese I found out existed last winter? I finally got around to making cheesecake again. I actually tried a sour cream cheesecake recipe last spring (from Bon Appétit, actually, though I can’t find it online), but I was not pleased at all with the results. I had to bake the cake a full hour longer (!) than the recipe called for, because it was way too jiggly in the middle. Granted, I’m rusty because it had been a very long time (maybe ten years) since I had baked a cheesecake, but I trusted the description in the instructions and I know “too jiggly” when I see it. As a result, the cake was overbaked and dry and tasted of bitter disappointment – it was possibly the worse I’d made. But just recently, I tried a recipe by Green Valley Organics (who actually make the lactose-free cream cheese and sour cream necessary for all this) for a roasted peach cheesecake. This time, it was perfect. The instructions and baking time yielded the perfect doneness, I got an amazing consistency with the filling, and ohmigod it was so good! I mean, it’s actual cheesecake, with all the tang and richness of dairy, except it won’t make me sick. It was light and not too sweet, which I liked (I think the Engineer would have preferred more sugar or more flavor; the Little Prince, however, liked it enough to add “cheesecake” to his vocabulary). I was actually disappointed only by the roasted peaches which, even though I roasted them for a shorter time than called for, came out almost burnt and falling apart. Honestly, I would leave them out altogether and just use this recipe as a base, so that’s what I’m writing down below. You could add some lemon or orange zest to the filling if you wish, or use vanilla bean paste instead of the vanilla extract. This would be great with a cherry or strawberry sauce, but my next one will probably be chocolate. Note that it’s very rich, so it probably serves about 12 people, but it freezes very well in individual slices (just let them thaw in the fridge for a day before eating).

[Again, for the record, I’m not at all affiliated with Green Valley Organics. I happen to like their ethics, and I LOVE their lactose-free dairy products.]

For the crust
2 ¼ cups finely ground graham cracker crumbs (about 12 sheets or 9.5 oz. crackers; use GF if necessary)
½ cup vegetable oil (I used coconut oil)

For the filling
4 8-oz. tubs lactose-free cream cheese (Green Valley Organics is the only brand of which I know)
5 eggs
¾ cup sugar
1 cup lactose-free sour cream (Green Valley Organics is the only brand of which I know)
2 Tbsp. freshly squeezed lemon juice
1 tsp. vanilla extract
1 Tbsp. powdered sugar (optional, for garnish)

For the crust
Preheat oven to 350 °F.

Line the bottom of a 10” springform pan with parchment paper. Wrap the outside in thick tin foil; place on a baking sheet and set aside.

In a food processor, blend graham cracker crumbs and oil until just combined. Pour the mixture into the prepared pan and press the crumbs firmly into the pan (I pressed to create a bottom and some very low sides, but the bottom is really the important part here). Bake until crust is fragrant and begins to browns, about 7-8 minutes.

For the filling
In a large bowl, gently combine cream cheese and sugar with a hand mixer on lowest setting. (As you can see in the picture below, I used my stand mixer.) Add eggs, one at a time, and mix until just combined. Add sour cream, lemon juice and vanilla; mix until just combined. Pour the filling into the prepared crust.

Bake for 1 hour, until the edges are golden brown and the middle is just set. Turn oven off and leave cheesecake in there, with the door closed, for another 45 minutes. Remove from oven (at this point, I ran a knife along the outer edge to loosen the sides and prevent cracking), let cool to room temperature and refrigerate for at least 4 hours.

Before serving, remove cake from pan and carefully transfer to platter. Decorate the top with a sprinkle of powdered sugar, if desired.

Monday, September 21, 2015

Tomatoes and corn in late summer

This might win a prize for most unoriginal post ever. I mean, what else are you supposed to do in summer? Sure, there are grilling recipes (like a potato, white bean and red onion salad that was just alright), and some awesome-sounding yet profoundly disappointing recipes (I’m looking at you, chicken guacamole burgers). Yet most recipes relying on fresh, seasonal produce won’t steer you wrong, and you barely need to do anything to it. I ate A LOT of corn and heirloom tomatoes lately, and I’ve been making lunches out of them to prevent the Engineer from getting tired of them. It turns out that the Little Prince loves fresh corn, which is somewhat unexpected given how much he despised canned or frozen corn whenever it was presented to him.

There was a chickpea salad with tomatoes and roasted corn, served with honey lime cilantro vinaigrette. And my oh my, was it ever fantastic! I used a touch less garlic in the dressing (since it’s raw), and I roasted the corn in the oven at 450 °F for 20 minutes. I was going to share it here, but then I didn’t because I thought, Am I really going to talk about another chickpea salad? But if you’re into that, please click on the link and get that recipe; you can thank me later.


I also tried a (corn-less) cold soup by the name of tomato-mango coconut cooler, which I found in a magazine. It was refreshing and original, but the Little Prince didn’t like it (even though he liked the mango by itself), and the Engineer never even tasted it, so perhaps it’s a bit out there as a recipe.


Earlier this year, when I was reading Delancey (Molly Wizenberg’s second memoir), I bookmarked a salad that I’m glad I remembered now that the ingredients are in season: her tomato and fresh corn salad with shallot vinaigrette, that she and her husband served when their restaurant first opened in late August several years ago. It was really, really good, and I loved the sharpness of the vinaigrette here to offset the corn. I’ll be keeping that recipe in my back pocket.


The recipe I’ll share today, though, is Bon Appétit’s tomato-peach salad with tofu cream. I’m actually changing the recipe below slightly and omitting the soy sauce in the tofu cream (which I felt was too much), but the rest was delectable. I served it with toasted bread. The Little Price mostly liked the corn and peaches that didn’t have soy sauce on them; we liked all of it. (The green plate was the Little Prince’s plate, though obviously I then cut his food into bite-sized pieces for him.)

8 oz. silken tofu
4 Tbsp. sherry vinegar, divided (I used white wine vinegar)
4 Tbsp. olive oil, divided
1 Tbsp. soy sauce
kosher salt and freshly ground black pepper
3 medium heirloom tomatoes, cut into 1-inch wedges
1 pint cherry tomatoes, halved
2 medium peaches, cut into ½-inch wedges
½ small red onion, thinly sliced (I used my vegetable peeler for this)
½ cup fresh corn kernels (from 1 medium ear)
2 Tbsp. chopped fresh tarragon
2 Tbsp. chopped fresh chervil, plus sprigs for serving (I omitted it because I couldn’t find any)

Blend tofu, 2 Tbsp. vinegar, and 1 Tbsp. oil in a blender until light and smooth; season tofu cream with salt.

Whisk remaining 2 Tbsp. vinegar, 3 Tbsp. oil, and soy sauce in a large bowl (or shake it together in a jar); season with salt and pepper. Add tomatoes, peaches, onion, corn, tarragon, and chopped chervil and toss to combine. Adjust seasoning if needed.

Swipe tofu cream on a platter and arrange tomato salad over; top with chervil sprigs. Serve with bread.

Saturday, September 19, 2015

Killer Peanut Butter Cake

When it’s the Engineer’s birthday, he gets to choose what cake I make. (And stop me if I told you this story before.) At first, he wasn’t sure what to ask for, perhaps because he wasn’t exactly used to having someone make him a cake on his birthday. But now, he’s getting very precise with his wishes! I thought he would say things like, “I want a chocolate cake” or “I want something with vanilla frosting,” but he’s upped the ante. And even though I always have a little moment of panic when I hear his request (“Do I even have a recipe for a pineapple cake that isn’t the upside-down kind?”), I find something to make and it all works out. This year he wanted a peanut butter cake, ideally (but not necessarily) with chocolate frosting. I had no such recipe up my sleeve, but after some googling, I found one on The Daring Gourmet, where the blogger calls it the Killer Peanut Butter Cake not just for its taste, but also for its artery-blocking properties. Perfect for a birthday! :)

I modified the frosting a bit by replacing the cream with coconut milk, but I would just use lactose-free milk next time, because my frosting has an unpleasant texture. Then again, the peanut butter in the frosting makes it unusual to begin with. The cake, however, was delicious, and just what the Engineer wanted. I’ll definitely keep that recipe, but for the frosting, either I’ll try with milk or I’ll use another recipe. I only modified the cake itself to make it in two regular 9-inch pans instead of one tall 9-inch pan, because I am often unable to cut a cake in two layers as well as I would like, especially with recipes I’ve never tried before. So I reduced my baking time, and that’s what I wrote below. (Note that the original recipe says that you could bake this cake in a 9”x13” pan and halve the amount of frosting, and/or add Nutella to the frosting.) I also reordered some of the ingredients to make the recipe easier to work with. I very much recommend this if you’re looking for a peanut butter cake! It was a big hit with us.

For the cake
1½ cups all-purpose flour
2 tsp. baking powder
½ tsp. baking soda
½ tsp. salt
1 cup brown sugar
⅓ cup coconut or vegetable oil (I use coconut oil)
⅓ cup natural, unsweetened peanut butter
2 large eggs
1 tsp. vanilla extract
1 cup buttermilk substitute (i.e. a splash of lemon juice and lactose-free milk)

For the frosting
1 cup natural, unsweetened peanut butter
½ cup unsalted butter, softened
2 Tbsp. cocoa powder, sifted
3 cups powdered sugar, sifted
up to ½ cup lactose-free milk, at room temperature (see note above)

Preheat the oven to 350 °F. Grease two 9-inch round baking pans.

In a medium bowl, sift the flour, baking powder, baking soda and salt. Set aside.

In a large mixing bowl, add the brown sugar, oil and peanut butter. Beat until combined and creamy. Add the eggs and vanilla extract and beat just until combined.

Alternately add the flour and buttermilk to the wet mixture, beating just until combined. Be careful not to over-beat or the cake will be dense and dry. A few small lumps of flour are fine.

Pour batter into the prepared pan. Bake for about 15-20 minutes or until a toothpick inserted into the middle of the cake comes out moist (not wet with batter but moist – if the toothpick is dry, the cake is over-baked and will be dry).

Let the cake sit in the pan for at least 5 minutes, then invert the cake onto a wire rack to cool completely.

In the meantime, to make the frosting, place the peanut butter and butter in a large mixing bowl. Beat until smooth and creamy. Add the cocoa, then the powdered sugar one cup at a time, continuing to beat. Add the milk until you reach a spreadable consistency. (Note that this is a fairly stiff frosting.)

Frost the bottom half of the cake. Place the top layer of the cake, upside down if desired (I never bother), on top of the bottom layer. Frost the top layer and down the sides.


[Update, 2016/05/13: I just now made this cake again, at the Engineer’s request. For the frosting, I used 2 cups of powdered sugar and 3 tablespoons of lactose-free milk, and it was great! Delicious, great texture. I highly recommend it!]

Sunday, September 13, 2015

Mild Jambalaya


I had a recipe in my folder from the March 2011 issue of Bon Appétit; it had been in my folder for over 4 years. I would eye it every once in a while and I would always chicken out, either because it seemed like too big a project or because it fed an army (10 to 12 people) and I was intimidated. It turns out that breaking up the cooking in a prep phase (I spent all of the Little Prince’s nap time chopping and doing mise en place so that things would go smoothly when I was ready to cook.) and an active cook phase, plus a hands-off bake phase to end, made it easier for me. Plus, I decided to freeze leftovers, so both problems were solved. I’m really glad I took the plunge, too, because this was the most requested dish for a while (the Little Prince asked for “jambaya” for many days afterwards), and the Engineer keeps asking me when I’m pulling the leftovers out of the freezer!

The version below is mine, and the main change is that I made it mild (I served it with Cholula on the side for the Engineer, but the Little Prince and I loved ours just as is). I couldn’t find andouille sausage, so I just increased the amount of smoked sausage instead (mine was a local beef sausage that was fantastic on its own and really enhanced the overall flavors of the jambalaya). At one point, it seemed like every animal in creation was in that Dutch oven! It just looked like a bit pot of meat. Then I dumped the rice in there, mixed it in and put the whole thing in the oven for the last 45 minutes. When I took it out, bam! It was a pot of rice with meat in it. And again, it was delicious and a big hit with all members of the household.

12 oz. applewood-smoked bacon, diced
1 ½ lbs. smoked fully cooked sausage (such as linguiça), halved lengthwise, cut crosswise into ½-inch-thick semi-circles
1 lb. andouille sausages, quartered lengthwise, cut crosswise into ½-inch cubes
½ lb. tasso or smoked ham (such as Black Forest), cut into ½-inch cubes
1 ½ lbs. onions, chopped (4 to 5 cups)
2 large celery stalks, chopped
1 red bell pepper, coarsely chopped
1 green bell pepper, coarsely chopped
6 large skinless boneless chicken thighs, cut into 1- to 1 ½-inch pieces
2 Tbsp. paprika
1 Tbsp. chopped fresh thyme
1 tsp. Korean pepper (or ground pepper of your choice; increase to taste)
28-oz. can diced tomatoes
2 ½ cups beef broth (I used chicken broth)
3 cups (19 to 20 oz.) long-grain white rice
8 green onions, chopped (about 2 cups)
chopped fresh Italian parsley

Position rack in bottom third of oven and preheat to 350 °F.

Cook bacon in very large pot over medium-high heat until brown but not yet crisp, stirring often, 8 to 10 minutes. Add smoked sausage, andouille, and tasso. Sauté until meats start to brown in spots, about 10 minutes. Add onions, celery, and bell peppers. Cook until vegetables begin to soften, stirring occasionally, 10 to 12 minutes. Mix in chicken. Cook until outside of chicken turns white, stirring often, 5 to 6 minutes. Mix in paprika, thyme, and Korean pepper. Cook 1 minute. Add diced tomatoes and broth; stir to blend well. Mix in rice.

Bring jambalaya to boil. Cover pot. Place in oven and bake until rice is tender and liquids are absorbed, 45 to 48 minutes. Uncover pot. Mix chopped green onions into jambalaya; sprinkle jambalaya with chopped parsley and serve.

Saturday, September 12, 2015

Nutella Bread Pudding


I know I already made Nutella bread pudding this summer, but that was with croissants (!), and I had Nutella left from making that second batch of Nutella puddings. I was looking at Alice Medrich’s Pure Dessert, thumbing through the pages on which I had stuck little post-it notes (that book is like a bouquet of post-its, really). And there it was: Nutella bread pudding (which she also shared on Chowhound, hence the link and reproduction of the recipe here). And this was really perfect timing, because Ms. Medrich recommends bread such as Oroweat*, and I actually had half a loaf of it going stale in the fridge. (This is what I rationalized to the Engineer: I had to use up the loaf, and the recipe called for it, so more Nutella bread pudding it was!)

I adapted the recipe to make it lactose-free. The Engineer said, “This is delicious. I heartily endorse this.” I loved it as well! And the Little Prince is A-OK with anything that is dessert and/or chocolate, so this hit all the right buttons for him as well. It did not turn out nearly as photogenic as the author’s, but that’s fine, as bread pudding has always been a bit homely to begin with. Note that you can use any brand of chocolate spread, and feel free to branch out with something like salted caramel hazelnut spread (which I used on 2 of the 6 slices of bread).

[*So I’m looking at the recipe again, and for the life of me, I can’t find where she mentions Oroweat. I googled her name and that brand name, and what comes up is her salted caramel banana bread pudding, in which she says what I could swear I read in the Nutella recipe: “thin slices slightly stale or very lightly toasted firm white sandwich bread (such as Pepperidge Farm or Oroweat/Arnold’s Country Buttermilk or Country Potato Bread)”. I have no explanation for the mix-up, but Oroweat is what I used.]

enough ¼-inch slices of home-style or bakery white bread or baguette, with or without the crusts, to cover the bottom of an 8-inch square baking dish, not too tightly, with 2 layers of bread
¼ to 1/3 cup Nutella
5 large eggs
½ cup sugar
1 pinch salt
1 ¼ cups lactose-free milk (I would use just 1 cup next time)
1 ¼ cups coconut milk

Position a rack in the lower third of the oven. Preheat the oven to 325 °F. Put the bread in the bottom of the baking dish to make sure you have sliced enough to make two layers.

Remove the bread from the dish. If the bread is fresh, lay slices on a baking sheet and bake for 5 minutes on each side, or until very lightly toasted. Let the slices cool.

Spread one side of each slice of bread with Nutella. Cut or break large whole slices (not baguette slices) into 4 pieces each. Arrange the bread, Nutella side facing up, in the baking dish in one layer of overlapping pieces, with rounded crusts or trimmed angles showing attractively.

In a medium bowl, whisk the eggs, sugar, and salt together. Gradually whisk in the milk and coconut milk. Pour the egg mixture through a strainer into the baking dish. Cover the pudding with plastic wrap and press any floating bread pieces back into the egg mixture. Let stand for at least 15 minutes to allow the bread to absorb the liquid.

Put a kettle of water on to boil.

Uncover the pudding and place it in a baking pan large enough to hold it with a little space on all sides, and then into the oven. Pull the oven rack out and carefully pour enough boiling water into the large pan to come halfway up the sides of the baking dish. Bake until a knife inserted into the pudding comes out free of custard (or with a little Nutella clinging to it), 50 to 55 minutes. Cool for at least 1 hour.

Serve the pudding warm or at room temperature. Cold leftover pudding is divine, but you could also reheat it in the microwave on medium power for a few seconds.

Friday, September 11, 2015

Soft Zucchini Cookies


There are more vegetables in these cookies than there is sugar (!), which is why the Little Prince was allowed to have a second one when he asked for it. I’m sure I must have made something similar in the past, but this particular recipe is from here. They worked great with zucchini and had a nice, pleasant texture, but I think they would also work with grated apple or even pear, if you wanted to try it. This recipe makes something like 3 dozen, so I put some in the freezer for a quick dessert when the need strikes. If you wanted, you could use raisins or nuts instead of (or with) the chocolate chips, but I prefer chocolate! Note that for the second batch, I made my cookies slightly bigger than the ones pictured, and we preferred them to the first batch. Perhaps aim for spoonfuls of dough slightly bigger than golf balls…

½ cup shortening (I used ¼ cup non-hydrogenated shortening and ¼ cup margarine)
½ cup granulated sugar
1 cup brown sugar
2 eggs, beaten
3 cups grated zucchini (I eyeballed it and used 2 zucchinis)
2 ½ cups flour
2 cups quick oats (I used rolled oats)
1 tsp. baking powder
½ tsp. baking soda
1 tsp. cinnamon
½ tsp. salt
1 cup chocolate chips

Preheat oven to 375 °F. Line a baking sheet with parchment paper or a silpat (I made three batches in all).

Cream shortening, sugars and eggs until fluffy; stir in zucchini.

Sift (or whisk together) flour, baking powder, baking soda, cinnamon and salt; add to zucchini mixture.

Stir in oatmeal until well blended. Add chocolate chips (and nuts or raisins, if using).

Drop by spoonfuls onto prepared cookie sheets. Bake for 12-15 minutes or until barely golden around the edges.

Wednesday, September 09, 2015

Quinoa Pizza with Roasted Corn, Tomatoes and Pesto


This pizza is unlike any I’ve had before. It’s gluten-free and vegan, but instead of calling for gluten-free flour to make dough, it’s actually quinoa that’s been soaked in water and processed (and it should go without saying, but obviously, don’t skip the step of soaking the quinoa, or else this definitely will not work). The result is not like regular pizza crust, obviously, but it holds its own – it’s solid enough that you can pick up a piece and eat it straight up, it’s slightly chewy, and it’s filling. It’s also very easy to make! Since corn and tomatoes were both in season (and still are, in many places), it was the perfect season for this. The Little Prince and I had this for lunch, and we actually ended up making two lunches out of this; we both enjoyed it very much. I rewrote some of the instructions to be clearer to follow, but let me know if anything isn’t clear.

1 Tbsp. olive oil or coconut oil
¾ cup quinoa, soaked for at least 8 hours, rinsed and drained
¼ to ½ water
½ tsp. sea salt
1 clove garlic, peeled and sliced (optional, but I used it)
2 tsp. dried seasonings (I used dried thyme and oregano; garlic or onion powder would be good, too)
1 ear fresh corn
1 handful grape or cherry tomatoes, sliced in half (I used a chopped heirloom tomato)
pepper, to taste
1 ½ to 2 cups packed fresh basil leaves
½ cup shelled walnuts or pine nuts (optional)
1 clove garlic, sliced
¼ tsp. sea salt
1 to 2 tsp. nutritional yeast
juice from ½ a lemon
3 Tbsp. extra virgin olive oil
1 to 2 Tbsp. diced red onion or shallot
a few fresh basil leaves, thinly sliced

Preheat the oven to 450 °F. Spread the olive oil or coconut oil in a 9-inch round cake pan and place the pan in the oven while it is heating up.

In a high-speed blender or food processor, blend together the rinsed quinoa, ¼ cup water, sea salt, garlic and seasonings until smooth. The “dough” should be thick but pourable, somewhat like pancake batter; add water if needed (perhaps my dough would have been smoother if I had used the Vitamix instead of the food processor, but it came out alright anyway).

Remove the heated cake pan from the oven and pour the “dough” into the pan, using a spatula to spread it evenly out to the sides. Place the pan in the oven, along with the ear of corn, and bake for 20 minutes. (I put my ear of corn in the oven as is, husk and all, directly on the rack, but if yours is shucked, you can wrap it in foil.)

Meanwhile, line a baking sheet with parchment paper. Place the tomatoes on it, sprinkle with salt and pepper to taste, and set aside.

In the food processor (rinsed or wiped clean), blend together the basil, walnuts, garlic, salt, nutritional yeast and lemon juice until it forms a coarse meal, scraping down the sides as necessary. While the motor is running, add the olive oil in a slow stream. Taste and adjust seasonings to your liking.

After 20 minutes, remove the dough and corn from the oven. Flip the dough over in the pan (this was surprisingly easy, though I did use a spatula to tease the edges away from the pan slowly). Put the dough back in the oven for 10 minutes along with the tomatoes, until the dough’s edges are brown and crisp and the dough has baked all the way through.

Once everything has been removed from the oven, the corn should be cool enough to handle, so you can shuck it and strip the kernels off the cob (I like doing this by propping the corn up in the center of a bundt pan and using a serrated knife to cut off the kernels – they will fall in the pan instead of flying off every which way on your countertops).

Now that the dough has cooled a bit, you can take it out of the pan and put it onto a plate or serving board. Spread the pesto on top of the dough and top with corn, tomatoes, red onion, basil, and salt and pepper to taste. Enjoy!


Monday, September 07, 2015

Crème de cajou glacée à l'érable

Crème de cajou glacée, ce n’est pas un terme répandu. Mais si j’avais appelé ce dessert « crème glacée à l’érable », je pense que ça aurait été un peu décevant une fois que vous auriez vu les ingrédients… Il n’y en a que très peu, d’ailleurs, des ingrédients (cinq, en comptant l’eau). Il s’agit d’un dessert glacé végétalien (donc un sorbet, j’imagine) trouvé sur One Green Planet. J’ai changé deux choses à la recette d’origine. La première, c’est que j’ai fait tremper mes noix de cajou dans l’eau pendant 8 heures avant de cuisiner, et j’ajoute cette étape dans la recette ci-dessous. En effet, il s’agit d’une étape importante pour obtenir une consistance crémeuse avec les noix, et vu les commentaires du billet d’origine, je ne suis pas la seule de cet avis. La deuxième chose, c’est que je n’ai pas ajouté d’eau directement dans la jarre du mélangeur, parce que je me disais que ça ferait un sorbet trop dur. En fin de compte, voici ce que je vous recommande : si vous allez manger ce sorbet le jour-même, ajoutez l’eau (ou ½ tasse, au moins), sinon, le sorbet sera un peu trop mou (les photos ici ont été prises le jour-même, pour vous donner une idée). Par contre, si vous prévoyez le laisser au congélateur plus de 24 heures, vous pourriez vous en passer, car le sorbet va durcir un peu. Cependant, les quantités ci-dessous ne font que très peu de sorbet (environ 2 tasses), alors je n’hésiterais pas à les doubler, et à ce moment-là c’est sûr que je ne mettrais pas trop d’eau.

L’Ingénieur a aimé le goût de cette crème de cajou glacée, mais pas la texture – peut-être que j’aurais dû actionner le mélangeur un peu plus longtemps, ou peut-être qu’il n’aime vraiment que les crèmes glacées laitières. Honnêtement, il faudrait que je compare à de la crème de cajou glacée du commerce, mais je n’en ai pas encore vu dans les épiceries de mon coin (ça existe!). Moi, j’ai trouvé ce dessert absolument délicieux, et avec une texture riche et crémeuse en plus. Je dois avouer qu’il me rappelait, presque exactement, un dessert que ma mère faisait quand j’étais petite : sa mousse à l’érable des grandes occasions. Ça goûte un peu la tarte au sucre, mais en bien meilleur. C’était un dessert à base de crème et de sirop d’érable – je n’ai pas sa recette, et ça doit faire 20 ans que je n’en ai pas mangé, mais puisque ma mère est elle aussi intolérante au lactose, j’imagine que cette crème de cajou glacée va l’intéresser!

1 tasse de sirop d’érable
1 tasse de noix de cajou, que vous ferez tremper 8 h au préalable
1 tasse d’eau (voir la note ci-haut)
1 ½ c. à thé de vanille
1 c. à thé de sel de mer (ou ¾ c. à thé de fleur de sel)

Mettre tous les ingrédients dans un mélangeur puissant (comme un Vitamix) et actionner jusqu’à ce que le mélange soit homogène. Mettre au réfrigérateur quelques heures.

Faire congeler en suivant les directives de sa sorbetière.

Boulettes de brocoli


Il y a quelques mois, j’avais essayé des galettes de brocoli que j’avais trouvé très décevantes : le mélange ne tenait pas ensemble, c’était trop salé, ça donnait un très petit rendement… J’avais fini avec des galettes tellement minces que c’en était presque des pancakes, et tout s’effritait. Bref, pas satisfaisant du tout. Mais ensuite, j’ai vu une recette dans le numéro de mai 2015 de Coup de Pouce (recette que je ne retrouve pas en ligne) et j’ai décidé d’essayer leur version, des boulettes végés. Et c’était nettement mieux! Facile à faire, et bon en plus.

Bon, on va se dire les vraies affaires : ça reste du brocoli. Vous ne convaincrez personne que c’est de la viande, parce que c’est clairement végétal. Mais pour un légume vert, c’est très bon! Alors tant que c’est servi correctement, ça se mange très bien. Moi, je les ai servies avec de l’orzo et de la sauce tomate. Le Petit Prince a d’abord pris la sauce tomate pour du ketchup, et je ne l’ai pas contredit trop fort (parce qu’il adore le ketchup), mais je lui ai dit que, tout comme le ketchup, c’était une sauce tomate. Puis bon, il adore la sauce aussi, alors il a accepté le plat. Peut-être que j’appellerai ça des boulettes vertes, la prochaine fois. J’ai doublé la recette ci-dessous, pour un total de 47 boulettes. Si vous faites pareil, je vous recommande de mettre le brocoli dans le robot en deux fois, ça va être plus facile à hacher (mais une fois tout le brocoli en minuscules morceaux, vous pouvez procéder en une seule fois avec le reste des ingrédients). Le beurre d’amande apporte ici un peu de protéines, en plus de lier le mélange. On pourrait le remplacer par un autre beurre de noix naturel, ou encore par du beurre de tournesol ou du tahini.

3 tasses de brocoli coupé en bouquets (environ un pied de brocoli)
¼ tasse de beurre d’amandes
½ tasse de parmesan râpé
2 gousses d’ail, hachées finement
1 œuf, légèrement battu
sel et poivre noir du moulin

Préchauffer le four à 350 °F. Tapisser une plaque de cuisson de papier parchemin ou de papier aluminium et l’enduire l’huile végétale (en aérosol ou avec un pinceau; je recommande ça parce que mes boulettes ont collé un peu).

Au robot culinaire, hacher le brocoli jusqu’à ce que le mélange soit grumeleux. Ajouter le reste des ingrédients et mélanger en actionnant et en arrêtant successivement l’appareil, en raclant les bords au besoin.

Façonner la préparation en 12 boulettes environ (j’en ai eu davantage), en pressant bien pour qu’elles gardent leur forme. Les déposer sur la plaque de cuisson et cuire pendant 20 minutes ou jusqu’à ce qu’elles soient dorées. Laisser reposer les boulettes pendant 5 minutes avant de servir.

Dark Chocolate Blueberry Muffins


I’ve been on a bit of a muffin kick lately, because they freeze very well, and that way I can easily have a nice breakfast whenever I feel like it. These dark chocolate blueberry muffins were exactly what I wanted! Dark chocolate goes very well with blueberries, in my opinion, more so than milk chocolate. I imagine these would be good with raspberries, too, though perhaps they would need a bit more sugar in that case. In any event, I’m glad I still have some of these stashed away!

2 cups white whole wheat flour (or all-purpose flour)
1 ½ tsp. baking soda
½ tsp. salt
2 Tbsp. cocoa powder
2/3 cup brown sugar
½ tsp. cinnamon
1 egg
1 tsp. vanilla
¼ cup butter or margarine, melted
1 cup lactose-free milk
1 cup fresh or frozen blueberries
¼ cup chopped dark chocolate (if you’re feeling lazy, use chocolate chips instead of chopping chocolate)

Preheat oven to 350 °F. Line a muffin pan with paper liners.

In a large bowl, combine flour, baking soda, salt, cocoa powder, brown sugar, and cinnamon.

In a medium bowl, combine the egg, vanilla, melted butter, and milk. Pour the wet mixture into the dry ingredients and combine (with a whisk or wooden spoon).

Gently fold in the blueberries and dark chocolate.

Spoon batter into paper liners, dividing equally between 12 muffin cups (the original recipe can make up to 15, but I definitely got 12).

Bake for 14 to 18 minutes, or until muffins are cooked through (mine took 15 minutes). Let muffins cool in the pan for about 5 minutes; remove to a wire rack to cool completely.

Sunday, September 06, 2015

Lemony Pesto Pasta with Edamame and Almonds


This meatless dish was just what the doctor ordered after a week of eating on the road! It’s great for summer, and satisfying without being heavy. It has a lot of brightness, thanks to the lemon, and the edamame makes it toothsome more substantial than plain pasta. As a matter of fact, this was the dish that made the Little Prince decide that he likes edamame – he even went so far as to refuse a forkful that I offered because it did *not* have edamame on it! This dish was a hit with all three if us. The main thing I would change is that I would use short pasta instead of the spaghetti of the original recipe, because I had trouble mixing the long strands of pasta with the other ingredients, and then it was very hard to get a single bite of food that had a bit of everything in it. I doubled the amount of pasta, which is what I’m writing below, but left the amounts of other ingredients as they were, and it was just fine for our taste. (Honestly, it’s pasta, not precision surgery.)

16 oz. pasta (ideally short pasta – see note above; gluten-free if necessary)
½ cup pesto, store-bought or homemade
8 oz. baby spinach (I only had 5 oz.)
2 cups edamame (shelled and shucked; I used 16 oz. frozen edamame beans)
juice from 2 lemons (plus fresh lemon wedges for serving)
¾ cup almonds, crushed and lightly toasted (I would only use ½ cup next time)

Heat a large pot of water to boiling, and cook pasta until al dente. Strain.

In a large bowl, combine the pasta, pesto, and spinach, and stir until evenly mixed (some spinach will wilt, some will stay firm — this is a nice contrast of textures). Finally, stir in the edamame and squeeze the lemon all over the finished dish. Reserve a few lemon slices for people to add more if they like. Garnish pasta with the toasted almonds.

Nutmeg Maple Cream Pie


Alright, pardon the delay – here’s the last of the recipes I tried in Quebec, when I had lactose-free cream. It was a nutmeg maple cream pie from Smitten Kitchen that looked absolutely fantastic. My version disappointed me a little because it turned out much darker than expected, more brown than blonde, though I must say it was, in fact, delicious. I made it in a pie shell, even Deb Perelman had used a tart shell, but I still ended up with a lot of extra filling! I think only a homemade (read: deep) pie shell could contain all the filling – otherwise, bake the extra in a few ramekins. (I also had to increase the baking time a bit, since my pie was deeper than her tart, and that probably contributed to the dark top!)

¾ cup maple syrup
2 ¼ cups lactose-free cream
4 egg yolks
1 whole egg
¼ tsp. salt
1 tsp. freshly grated nutmeg
1 tsp. vanilla extract
1 9-inch pie crust or tart shell (gluten-free if necessary)

Preheat oven to 350 °F. Line pie refrigerated pie shell with foil or parchment paper and fill with pie weights or dried beans. Bake 10 to 12 minutes or until beginning to set. Remove foil with weights and bake 15 to 18 minutes longer or until golden. If shell puffs during baking, press it down with back of spoon. Cool on wire rack. Lower temperature to 300 °F.

In a medium saucepan over medium-high heat, reduce maple syrup by a quarter, 5 to 7 minutes. Stir in cream and bring to a simmer. Remove from heat.

In a medium bowl, whisk together egg yolks and egg. Whisking constantly, slowly add cream mixture to eggs. Strain mixture through a fine-mesh sieve into a cup or bowl with pouring spout. Stir in salt, nutmeg and vanilla.

Pour filling into crust and transfer to a rimmed baking sheet. Bake until pie is firm to touch but jiggles slightly when moved, about 1 hour (I’d suggest covering it with tin foil during baking if you feel it is getting too dark). Let cool to room temperature before serving.

Wednesday, September 02, 2015

Bacon Date Scones with Marmalade Glaze


I tried another pastry recipe over the summer, pear maple turnovers with goat cheese, but I was disappointed by the result – the filling was a little dry and not sweet enough. So I figured that to make up for it, before I left Quebec, I’d at least have to make something good with the President’s Choice bacon marmalade that was sitting in the fridge, barely touched. You see, when I bought it, I thought it was regular bacon jam, sort of like this one, but no! It’s actually marmalade, with oranges, even though the label doesn’t specify that. (The ingredient list does have oranges, obviously, but all I read was “Rich with caramelized flavours of bacon and sautéed onions, authentic balsamic vinegar of Modena, and a delicate hint of spices, this tantalizing savoury-sweet spread is a sensory experience to behold.” So I really thought it was bacon jam.). And despite what President’s Choice thinks, I find that the citrus taste does not marry well with this bacon, so none of its suggested uses appealed to me, and neither did those of bacon jam. So the marmalade just sat on a shelf in the fridge, but I didn’t want to waste it.

When life gives you lemons, make… marmalade. Or use the marmalade to make scones. Or something like that. See, I remembered that I had a recipe for bacon date scones with orange marmalade glaze that I never got around to making. Serendipitously, it also called for cream, and so far it’s only sold lactose-free north of the border, so it really was the perfect time to make those scones! I simply mixed all the bacon and dates into the dough (instead of saving some for the topping), and used my marmalade instead of regular orange marmalade. It turns out these scones were delicious!

For the scones
2 ¼ cups all-purpose white flour
1/3 cup sugar
4 tsp. baking powder
1 pinch of salt
6 Tbsp. butter or cold margarine, in little pieces
½ cup chopped precooked bacon
½ cup chopped pitted dates
½ cup chopped walnuts (I didn’t use them)
¾ cup lactose-free cream
1 egg

For the glaze
½ cup orange marmalade (or bacon marmalade!)

Preheat oven to 400 °F. Spray 1 large cookie sheet with cooking spray.

In large bowl, combine flour, sugar and baking powder; mix well. Using pastry blender or fork, cut in butter until mixture looks like coarse crumbs.

In small bowl, stir together bacon, dates and nuts (if using). Stir 1 cup of bacon mixture into flour mixture; set remaining bacon mixture aside (see note above – if using bacon marmalade, I recommend just mixing all the bacon into the dough).

Make a well in center of flour mixture. In small bowl, lightly beat cream and egg together with wire whisk. Pour into well of flour mixture. Stir with fork until flour mixture is moistened. Gently form into 2 balls.

Place balls about 3 ½ inches apart on cookie sheet; pat each into 8-inch round. Using knife dipped in flour, cut each round into 8 wedges; do not separate. Sprinkle top of each round with remaining bacon mixture. Press mixture into dough.

Bake 14 to 16 minutes or until edges are light golden brown.

In small microwavable bowl, microwave the glaze for 20 to 30 seconds or until melted, stirring until smooth. Spread glaze evenly over the 2 rounds. Carefully separate into 16 wedges. Serve warm.