Monday, December 05, 2011
Linguine with Lemon, Garlic and Thyme
This pasta recipe is from my friend Jen, who published it on The Littlest Crafter. It was created by Nigella Lawson, but I changed it slightly by using less oil and more parmesan; that’s the version I’m giving below. Also, since there’s nothing but the heat of the pasta to cook the mushrooms, I’ll cut them quite small the next time I make it. All in all, though, this is a really great pasta dish that’s very easy to make!
8 oz (4 cups) finely sliced/chopped mushrooms (such as chestnut or cremini)
¼ cup extra-virgin olive oil
1 Tbsp kosher salt or Maldon sea salt (or 1 ½ tsp table salt)
1 clove garlic, minced
1 lemon, zested and juiced
4 sprigs fresh thyme, stripped to give 1 tsp leaves
1 lb linguine
1 bunch fresh parsley, leaves chopped, to give ½ cup
1 generous handful of freshly grated parmesan (or to taste)
freshly ground black pepper
Put the mushrooms in a large bowl with the oil, salt, garlic, lemon zest, lemon juice and gorgeously scented thyme leaves.
Cook the pasta according to the instructions on the box and drain loosely, retaining some water (I used about ¼ cup of pasta water). Quickly put the pasta into the bowl with the mushroom mixture and toss together well. Add the parsley, cheese and pepper before tossing again. Serve immediately, with some extra grated parmesan on top.
Sunday, December 04, 2011
Emerald City Salad
I found this recipe on Tea and Cookies, a blog I really like. This salad is full of healthy stuff, but has enough variety to be interesting and hearty. While I believe in sticking to a recipe the first time I make it, I had to improvise a little here, as I couldn’t find fennel. I ended up using half a sweet onion, soaked in water, instead; it still had more bite than it should have, but all things considered, I’m glad I didn’t let the lack of fennel stop me. I also threw some spiced pumpkin seeds on top of the salad at the last minute, because I had some already made, and they worked really well with this salad. I’ll be adding this to the repertoire of kale salads I like!
4 cups mixed greens (mix of dino kale, curly kale, chard), coarsely chopped; don’t make this from one type of green, the mixture is important
3 green onions, sliced thin
¾ cup red pepper, diced
1 Tbsp parsley, chopped
1 cup fennel bulb, sliced thin (or, at worse, a sweet onion soaked in water overnight and sliced thin)
1 cup wild rice
2 Tbsp olive oil
2 Tbsp lemon juice
½ tsp salt
Cook the rice according to directions. Set aside to cool.
Prep the greens and other vegetables. Toss is a large bowl, adding the wild rice when it is cool. Drizzle with olive oil and mix. Add the lemon juice and salt and mix again. Serve chilled.
4 cups mixed greens (mix of dino kale, curly kale, chard), coarsely chopped; don’t make this from one type of green, the mixture is important
3 green onions, sliced thin
¾ cup red pepper, diced
1 Tbsp parsley, chopped
1 cup fennel bulb, sliced thin (or, at worse, a sweet onion soaked in water overnight and sliced thin)
1 cup wild rice
2 Tbsp olive oil
2 Tbsp lemon juice
½ tsp salt
Cook the rice according to directions. Set aside to cool.
Prep the greens and other vegetables. Toss is a large bowl, adding the wild rice when it is cool. Drizzle with olive oil and mix. Add the lemon juice and salt and mix again. Serve chilled.
5-Minute Chocolate Mug Cake
I got this recipe from an unlikely place: New Dress a Day (which I had mentioned before). You can make this cake in a mug by baking it for 5 minutes in the microwave, and you probably have all the ingredients in your pantry already. I like the fact that it makes just one serving (or two small servings in our case, since we split it) for those nights when you just want a little something sweet to end a meal, but you didn’t have time to plan anything. That being said, the consistency of the cake is a little spongy (in a “squeaky” sense), so it’s not the best thing ever. Which is just great, because if it were, it’s so easy to make that you’d probably be having it too often. (If you have an hour instead of a few minutes, consider chocolate mink cakes, which I suddenly remembered existed.)
4 Tbsp flour
4 Tbsp sugar
2 Tbsp cocoa
1 egg
3 Tbsp lactose-free milk
3 Tbsp canola oil
3 Tbsp chocolate chips (optional, but why would you omit them?)
a small splash of vanilla extract
1 large coffee mug (microwave-safe)
Add dry ingredients to mug, and mix well. Add the egg and mix thoroughly before pouring in the milk and oil in. Keep mixing. Add the chocolate chips next (if using) and vanilla extract, and mix again…
Put your mug in the microwave and cook for 3 minutes at 1000 watts. The cake will rise over the top of the mug, but don’t be alarmed! (This didn’t happen to me, though.) Allow it to cool a little, and tip out onto a plate. Split it if desired.
4 Tbsp flour
4 Tbsp sugar
2 Tbsp cocoa
1 egg
3 Tbsp lactose-free milk
3 Tbsp canola oil
3 Tbsp chocolate chips (optional, but why would you omit them?)
a small splash of vanilla extract
1 large coffee mug (microwave-safe)
Add dry ingredients to mug, and mix well. Add the egg and mix thoroughly before pouring in the milk and oil in. Keep mixing. Add the chocolate chips next (if using) and vanilla extract, and mix again…
Put your mug in the microwave and cook for 3 minutes at 1000 watts. The cake will rise over the top of the mug, but don’t be alarmed! (This didn’t happen to me, though.) Allow it to cool a little, and tip out onto a plate. Split it if desired.
Saturday, December 03, 2011
No-Knead Bread
I probably should have tried this bread before I got over my issues with kneading! I finally got around to making it based on the version of the recipe published on The Kitchn. Be warned that it’s not fast to make, as it requires time to rise (overnight in the original recipe, 6 to 8 hours in this version). It didn’t rise as much as I thought it would, and next time, I would use bread flour instead of white whole wheat flour. That being said, it was good bread!
I served it with a squash-corn-lemongrass soup topped with spiced pumpkin seeds, which I liked, but the Engineer said there was something about the mix of flavours that was offensive to him. He likes them all individually, though. I personally thought it was a bit bland, which I fixed with my “chickn” broth powder made from nutritional yeast (of course, I’d write “broth” instead of “water” in that recipe, myself). Given the Engineer’s reaction to the soup, I won’t be making it again, but the spiced pumpkin seeds are keepers, as is the no-knead bread, obviously!
I recommend reading 20 tips, tricks and ideas for no-knead bread, which rounds up different versions of the recipe, as well as flavour variations and recommendations for making it into a sandwich loaf or a baguette instead. Here’s the recipe!
3 cups white flour or bread flour
¾ tsp yeast (ideally instant yeast, though active would work too, apparently)
1 ¼ tsp salt
1 ½ cups slightly warm water
Put the flour in a bowl. Add the yeast and salt and stir thoroughly. Measure out 1 ½ cups of barely warm (tepid) water, pour into the bowl and stir thoroughly. The dough will look rough and shaggy.
Spray the top of the dough with cooking spray, or lightly oil the top of the dough with olive oil. Spread a thin layer over top with a paper towel, then turn the dough in the bowl so the whole ball of dough is coated with the oil. Cover the bowl with plastic wrap. Throw a towel over top of the bowl and set it in a warm corner. Leave it alone for 6 to 8 hours.
After at least 6 hours have passed, the dough will have risen and will look rather bubbly and stretched out. Lightly oil the countertop and turn the dough out onto it, folding it over on itself at least once. Cover the dough with plastic wrap and let it sit for another hour.
About 20 minutes before the hour is up, turn on the oven to 450 °F. Place an oven-safe Dutch oven or pot in the oven. When the rise time is up, the dough will have risen and nearly doubled in size. Quickly shape the dough into a round ball and drop it into the pot. Even if you can't get it into a good ball, that's OK. Just try to roughly shape it. I recommend using parchment paper in the bottom of the Dutch oven to facilitate cleaning up; it’s even easier to transfer the dough into the hot pot directly on the paper. (If you’re afraid of burning yourself, try placing the dough to rise in a cold oven which you later turn on for the baking, as suggested in this version.) Slash or cut the top of the dough with kitchen shears or a sharp knife. Place the lid on the pot and put it in the oven. Bake for 30 minutes.
Remove the lid from the pot and bake for an additional 15 to 20 minutes. You can be extra-sure that the bread is done when an instant-read thermometer inserted in the top or side reads 210 °F. Remove the bread from the oven. If you wish to keep it warm for serving, you can wrap it in a clean kitchen towel. Slice and serve!
I served it with a squash-corn-lemongrass soup topped with spiced pumpkin seeds, which I liked, but the Engineer said there was something about the mix of flavours that was offensive to him. He likes them all individually, though. I personally thought it was a bit bland, which I fixed with my “chickn” broth powder made from nutritional yeast (of course, I’d write “broth” instead of “water” in that recipe, myself). Given the Engineer’s reaction to the soup, I won’t be making it again, but the spiced pumpkin seeds are keepers, as is the no-knead bread, obviously!
I recommend reading 20 tips, tricks and ideas for no-knead bread, which rounds up different versions of the recipe, as well as flavour variations and recommendations for making it into a sandwich loaf or a baguette instead. Here’s the recipe!
3 cups white flour or bread flour
¾ tsp yeast (ideally instant yeast, though active would work too, apparently)
1 ¼ tsp salt
1 ½ cups slightly warm water
Put the flour in a bowl. Add the yeast and salt and stir thoroughly. Measure out 1 ½ cups of barely warm (tepid) water, pour into the bowl and stir thoroughly. The dough will look rough and shaggy.
Spray the top of the dough with cooking spray, or lightly oil the top of the dough with olive oil. Spread a thin layer over top with a paper towel, then turn the dough in the bowl so the whole ball of dough is coated with the oil. Cover the bowl with plastic wrap. Throw a towel over top of the bowl and set it in a warm corner. Leave it alone for 6 to 8 hours.
After at least 6 hours have passed, the dough will have risen and will look rather bubbly and stretched out. Lightly oil the countertop and turn the dough out onto it, folding it over on itself at least once. Cover the dough with plastic wrap and let it sit for another hour.
About 20 minutes before the hour is up, turn on the oven to 450 °F. Place an oven-safe Dutch oven or pot in the oven. When the rise time is up, the dough will have risen and nearly doubled in size. Quickly shape the dough into a round ball and drop it into the pot. Even if you can't get it into a good ball, that's OK. Just try to roughly shape it. I recommend using parchment paper in the bottom of the Dutch oven to facilitate cleaning up; it’s even easier to transfer the dough into the hot pot directly on the paper. (If you’re afraid of burning yourself, try placing the dough to rise in a cold oven which you later turn on for the baking, as suggested in this version.) Slash or cut the top of the dough with kitchen shears or a sharp knife. Place the lid on the pot and put it in the oven. Bake for 30 minutes.
Remove the lid from the pot and bake for an additional 15 to 20 minutes. You can be extra-sure that the bread is done when an instant-read thermometer inserted in the top or side reads 210 °F. Remove the bread from the oven. If you wish to keep it warm for serving, you can wrap it in a clean kitchen towel. Slice and serve!
Chicken with White Beans and Tomatoes
This recipe, from Real Simple, was particularly great because it is a super easy one-pot meal. I love one-pot meals because it frees me from having to not only come up with, but also make, a nutritious side dish. In this case, the Engineer and I have both become quite fond of cannellini beans; they happen to go quite well with tomatoes and garlic, so this was a hit. I used herbs from my garden, too, so it was particularly satisfying!
2 15.5-oz cans cannellini beans, rinsed
1 pint grape tomatoes
4 sprigs fresh thyme
4 sprigs fresh oregano, plus leaves for garnish
2 garlic cloves, smashed
¼ tsp crushed red pepper (I used Korean pepper)
2 Tbsp olive oil
½ cup dry white wine (entirely optional, I didn’t use it)
kosher salt and black pepper
8 bone-in, skin-on chicken thighs (about 3 lbs total)
Heat oven to 425 °F. In a 9-by-13-inch (or some other large) baking dish, toss the beans and tomatoes with the thyme and oregano sprigs, garlic, red pepper, 1 Tbsp of the oil, white wine (if using), ½ tsp salt, and ¼ tsp black pepper.
Pat the chicken dry and place on top of the bean mixture, skin-side up. Rub with the remaining 1 Tbsp of oil; season with ½ tsp salt and ¼ sp black pepper.
Roast until the chicken is golden and cooked through, 35 to 45 minutes. Sprinkle with the oregano leaves.
2 15.5-oz cans cannellini beans, rinsed
1 pint grape tomatoes
4 sprigs fresh thyme
4 sprigs fresh oregano, plus leaves for garnish
2 garlic cloves, smashed
¼ tsp crushed red pepper (I used Korean pepper)
2 Tbsp olive oil
½ cup dry white wine (entirely optional, I didn’t use it)
kosher salt and black pepper
8 bone-in, skin-on chicken thighs (about 3 lbs total)
Heat oven to 425 °F. In a 9-by-13-inch (or some other large) baking dish, toss the beans and tomatoes with the thyme and oregano sprigs, garlic, red pepper, 1 Tbsp of the oil, white wine (if using), ½ tsp salt, and ¼ tsp black pepper.
Pat the chicken dry and place on top of the bean mixture, skin-side up. Rub with the remaining 1 Tbsp of oil; season with ½ tsp salt and ¼ sp black pepper.
Roast until the chicken is golden and cooked through, 35 to 45 minutes. Sprinkle with the oregano leaves.
Sunday, November 27, 2011
Lactose-free macaroni and cheese, finally
As some of you might know, I had been looking for a good Kraft-style mac&cheese recipe that I could eat. I found a pretty good store-bought substitute, but I wanted to make one. And it was trial and error all the way.
I started with this recipe from Taste of Home. While it wasn’t bad by any means, I felt that it wasn’t anything close to the taste that I was looking for. The texture was also quite oily, and I found the sauce more grainy than creamy.
Then I tried a lactose-free but dairy recipe from The Kitchn. I ended up making it on the stovetop, since cooking pasta in the microwave as the recipe suggested quickly turned to disaster. I used less salt, and I used orange Tillamook extra sharp cheddar, which I can digest without a problem. I ended up using more cheese than the recipe called for, though, because the sauce wasn’t creamy enough and I felt that it needed some sort of binder. Unfortunately, I didn’t quite achieve the consistency I was looking for, and the taste of the sharp cheddar overpowered the dish. That being said, it was good, and I felt I was getting closer to the right dish with that recipe.
It was on The Kind Life that I finally found THE recipe. The color is relatively close to the orange I wanted, thanks to some tomato paste, and the sauce is quite creamy, even though it’s vegan. It doesn’t taste exactly like cheese, but it’s really good! The secret ingredient, I think, is nutritional yeast, which can taste a bit like cheese with the right seasonings. The recipe below makes 4-6 servings and freezes well.
1 lb elbow macaroni
¼ cup vegan margarine
1/3 cup all-purpose flour
3 cups soy, almond, or rice milk
½ cup nutritional yeast
2 Tbsp tomato paste
2 tsp salt
1 tsp garlic powder
1 Tbsp lemon juice
1 Tbsp agave syrup
Bring a large pot of heavily salted water to a boil. Add macaroni and cook according to package directions. Drain and return to pot.
Meanwhile, in a medium saucepan, make a roux by whisking the margarine and flour over medium heat for 3 to 5 minutes. Add non-dairy milk, yeast, tomato paste, salt, and garlic powder to the saucepan and bring to a boil, whisking frequently. Reduce heat to low and let simmer until the sauce thickens. Adjust seasoning to taste and stir in lemon juice and agave.
Toss the cooked noodles with the sauce and serve immediately.
I started with this recipe from Taste of Home. While it wasn’t bad by any means, I felt that it wasn’t anything close to the taste that I was looking for. The texture was also quite oily, and I found the sauce more grainy than creamy.
Then I tried a lactose-free but dairy recipe from The Kitchn. I ended up making it on the stovetop, since cooking pasta in the microwave as the recipe suggested quickly turned to disaster. I used less salt, and I used orange Tillamook extra sharp cheddar, which I can digest without a problem. I ended up using more cheese than the recipe called for, though, because the sauce wasn’t creamy enough and I felt that it needed some sort of binder. Unfortunately, I didn’t quite achieve the consistency I was looking for, and the taste of the sharp cheddar overpowered the dish. That being said, it was good, and I felt I was getting closer to the right dish with that recipe.
It was on The Kind Life that I finally found THE recipe. The color is relatively close to the orange I wanted, thanks to some tomato paste, and the sauce is quite creamy, even though it’s vegan. It doesn’t taste exactly like cheese, but it’s really good! The secret ingredient, I think, is nutritional yeast, which can taste a bit like cheese with the right seasonings. The recipe below makes 4-6 servings and freezes well.
1 lb elbow macaroni
¼ cup vegan margarine
1/3 cup all-purpose flour
3 cups soy, almond, or rice milk
½ cup nutritional yeast
2 Tbsp tomato paste
2 tsp salt
1 tsp garlic powder
1 Tbsp lemon juice
1 Tbsp agave syrup
Bring a large pot of heavily salted water to a boil. Add macaroni and cook according to package directions. Drain and return to pot.
Meanwhile, in a medium saucepan, make a roux by whisking the margarine and flour over medium heat for 3 to 5 minutes. Add non-dairy milk, yeast, tomato paste, salt, and garlic powder to the saucepan and bring to a boil, whisking frequently. Reduce heat to low and let simmer until the sauce thickens. Adjust seasoning to taste and stir in lemon juice and agave.
Toss the cooked noodles with the sauce and serve immediately.
Poudre pour bouillon de simili-poulet
J’ai récemment fait une poudre de bouillon végétalienne avec un produit que je voulais essayer, la levure nutritionnelle. Cette levure (nutritional yeast en anglais) est inactive et a la particularité de prendre un goût de volaille ou de fromage, selon les épices que vous choisissez d’y mélanger. C’est donc un assaisonnement pratique quand on est végétalien, entre autres! De plus, il ne contient pas de gluten, contient peu de sodium et est considéré comme un aliment santé, avec une forte teneur en fibres et en protéines. Pour en savoir plus, je vous recommande cet excellent billet d’Estomac sur deux pattes (qui est d’ailleurs le plus populaire du blogue).
J’ai acheté de la levure alimentaire de marque Red Star en gros flocons. Normalement, tout bon magasin d’aliments naturels en a en stock, et c’est vendu en pot. Par contre, nous avons acheté la nôtre en vrac, ce qui veut dire qu’il y a eu risque de contamination croisée (gluten, noix, arachides, etc.), donc nous en tiendrons compte en cuisinant pour des gens qui ont des restrictions alimentaires.
J’ai décidé d’utiliser une partie de ma levure alimentaire pour faire de la poudre pour bouillon à goût de poulet, après avoir terminé ma base de bouillon de poulet du commerce, en suivant à peu près la recette donnée par Lucie sur Estomac sur deux pattes. J’ai dû changer les fines herbes, car je n’avais ni persil séché, ni marjolaine, ni aneth (dont je ne raffole pas). J’ai quand même utilisé ¼ c. à thé d’origan, que je rajoute plus bas. J’ai aussi utilisé des flocons d’oignons déshydratés au lieu de la poudre d’oignons, ça passe au robot de toute façon. On peut toujours diminuer la quantité de sel un peu. Et j’ai trouvé cela très bon! C’est pratique d’en avoir un contenant sous la main dans le garde-manger, je trouve, et ça facilite la vie quand on veut rendre certaines recettes végétariennes.
1½ tasse de flocons de levure alimentaire Red Star
3 c. à soupe de sel
1 c. à soupe de poudre d’oignon
1 c. à soupe de paprika
2 c. à thé de poudre d’ail
1 c. à thé de flocons de persil séché
½ c. à thé de curcuma
¼ c. à thé de thym séché
¼ c. à thé de marjolaine séchée
¼ c. à thé de feuilles d’aneth séchées (ou d’origan séché)
¼ c. à thé de poivre
Combiner tous les ingrédients. Idéalement, passer au mélangeur ou au robot culinaire pour réduire en poudre fine uniforme. Se conserve assez longtemps à la température de la pièce, dans un contenant hermétique. Donne environ 2 tasses de mélange si non réduit en poudre ou environ 1¼ tasse si réduit en poudre.
Pour faire le bouillon : pour chaque tasse d’eau, ajouter 2 c. à thé de mélange non moulu (ou 1½ c. à thé si réduit en poudre), ou plus ou moins au goût. Le mélange peut aussi être utilisé comme assaisonnement en poudre.
Pour ceux et celles qui préfèrent la base de bouillon en pâte (à garder au frigo), vous pouvez en faire vous-mêmes avec des légumes. Je recommande d’essayer la recette publiée sur 101 Cookbooks, qui est également végétalienne et sans gluten. Ça se garde moins longtemps, par contre, et je trouve que la version avec la levure alimentaire est plus simple à faire!
J’ai acheté de la levure alimentaire de marque Red Star en gros flocons. Normalement, tout bon magasin d’aliments naturels en a en stock, et c’est vendu en pot. Par contre, nous avons acheté la nôtre en vrac, ce qui veut dire qu’il y a eu risque de contamination croisée (gluten, noix, arachides, etc.), donc nous en tiendrons compte en cuisinant pour des gens qui ont des restrictions alimentaires.
J’ai décidé d’utiliser une partie de ma levure alimentaire pour faire de la poudre pour bouillon à goût de poulet, après avoir terminé ma base de bouillon de poulet du commerce, en suivant à peu près la recette donnée par Lucie sur Estomac sur deux pattes. J’ai dû changer les fines herbes, car je n’avais ni persil séché, ni marjolaine, ni aneth (dont je ne raffole pas). J’ai quand même utilisé ¼ c. à thé d’origan, que je rajoute plus bas. J’ai aussi utilisé des flocons d’oignons déshydratés au lieu de la poudre d’oignons, ça passe au robot de toute façon. On peut toujours diminuer la quantité de sel un peu. Et j’ai trouvé cela très bon! C’est pratique d’en avoir un contenant sous la main dans le garde-manger, je trouve, et ça facilite la vie quand on veut rendre certaines recettes végétariennes.
1½ tasse de flocons de levure alimentaire Red Star
3 c. à soupe de sel
1 c. à soupe de poudre d’oignon
1 c. à soupe de paprika
2 c. à thé de poudre d’ail
1 c. à thé de flocons de persil séché
½ c. à thé de curcuma
¼ c. à thé de thym séché
¼ c. à thé de marjolaine séchée
¼ c. à thé de feuilles d’aneth séchées (ou d’origan séché)
¼ c. à thé de poivre
Combiner tous les ingrédients. Idéalement, passer au mélangeur ou au robot culinaire pour réduire en poudre fine uniforme. Se conserve assez longtemps à la température de la pièce, dans un contenant hermétique. Donne environ 2 tasses de mélange si non réduit en poudre ou environ 1¼ tasse si réduit en poudre.
Pour faire le bouillon : pour chaque tasse d’eau, ajouter 2 c. à thé de mélange non moulu (ou 1½ c. à thé si réduit en poudre), ou plus ou moins au goût. Le mélange peut aussi être utilisé comme assaisonnement en poudre.
Pour ceux et celles qui préfèrent la base de bouillon en pâte (à garder au frigo), vous pouvez en faire vous-mêmes avec des légumes. Je recommande d’essayer la recette publiée sur 101 Cookbooks, qui est également végétalienne et sans gluten. Ça se garde moins longtemps, par contre, et je trouve que la version avec la levure alimentaire est plus simple à faire!
Cilantro-Scallion Bread
It’s time like these I’m grateful to have a grocery store with a bulk section. This Bon Appétit recipe calls for ½ cup of white sesame seeds; if I were still stuck buying them in little glass jars, I could easily have spent $10 on them. But in the bulk section, ½ cup came out to a grand total of $0.38! If you don’t have stores that offer sesame seeds in the bulk section, you should know that Bob’s Red Mill makes them at comparable prices (I found some at about $6.50/lb online; as sesame seeds can go rancid, though, consider freezing the extra if you have a lot).
This bread was pretty easy to make, and while it was delicious warm, I found that it dried out pretty quickly. I served them with a creamy vegan onion soup.
2 tsp active dry yeast
½ cup warm water (105 °F to 115 °F)
2 tsp Kosher salt, divided
2 tsp sugar, divided
1 ¾ cups plus 3 Tbsp all-purpose flour
4 Tbsp unsalted butter or margarine, chilled, cubed
1 large egg plus 1 yolk
1 ¼ cups coarsely chopped scallions
½ cup coarsely chopped fresh cilantro
½ cup white sesame seeds
1 Tbsp black sesame seeds
3 Tbsp olive oil, plus more for bowl and brushing
Line a baking sheet with parchment paper. Pour water into a small bowl. Sprinkle yeast, 1 tsp salt and 1 tsp sugar over; let stand until mixture bubbles, about 10 minutes.
Place flour, butter, remaining 1 tsp salt and remaining 1 tsp sugar in bowl of a stand mixer with dough hook attached. Rub in butter with fingertips until mixture resembles coarse meal. Beat in egg, yolk, and yeast mixture, scraping down sides.
Knead on medium speed until dough is soft and smooth, about 5 minutes. Form dough into a ball; transfer to a large, lightly oiled bowl. Cover and let rise until doubled in size, about 1 hour.
Meanwhile, combine scallions and cilantro in a food processor and pulse to finely chop. Transfer mixture to a medium bowl; stir in all sesame seeds and 3 Tbsp olive oil and set aside.
Preheat oven to 350 °F. Roll dough into a 18”x9" rectangle. Spoon scallion mixture evenly onto center and spread mixture to corners of dough. Working from one short edge, roll dough rectangle into a cylinder. Cut cylinder into ¾” dough swirls. Transfer dough swirls to prepared baking sheet; brush with oil. Bake until golden brown, about 30 minutes.
This bread was pretty easy to make, and while it was delicious warm, I found that it dried out pretty quickly. I served them with a creamy vegan onion soup.
2 tsp active dry yeast
½ cup warm water (105 °F to 115 °F)
2 tsp Kosher salt, divided
2 tsp sugar, divided
1 ¾ cups plus 3 Tbsp all-purpose flour
4 Tbsp unsalted butter or margarine, chilled, cubed
1 large egg plus 1 yolk
1 ¼ cups coarsely chopped scallions
½ cup coarsely chopped fresh cilantro
½ cup white sesame seeds
1 Tbsp black sesame seeds
3 Tbsp olive oil, plus more for bowl and brushing
Line a baking sheet with parchment paper. Pour water into a small bowl. Sprinkle yeast, 1 tsp salt and 1 tsp sugar over; let stand until mixture bubbles, about 10 minutes.
Place flour, butter, remaining 1 tsp salt and remaining 1 tsp sugar in bowl of a stand mixer with dough hook attached. Rub in butter with fingertips until mixture resembles coarse meal. Beat in egg, yolk, and yeast mixture, scraping down sides.
Knead on medium speed until dough is soft and smooth, about 5 minutes. Form dough into a ball; transfer to a large, lightly oiled bowl. Cover and let rise until doubled in size, about 1 hour.
Meanwhile, combine scallions and cilantro in a food processor and pulse to finely chop. Transfer mixture to a medium bowl; stir in all sesame seeds and 3 Tbsp olive oil and set aside.
Preheat oven to 350 °F. Roll dough into a 18”x9" rectangle. Spoon scallion mixture evenly onto center and spread mixture to corners of dough. Working from one short edge, roll dough rectangle into a cylinder. Cut cylinder into ¾” dough swirls. Transfer dough swirls to prepared baking sheet; brush with oil. Bake until golden brown, about 30 minutes.
Vegan-ish Chocolate Pie
I finally caved and bought light agave nectar. I have a few bookmarked recipes that call for it, and I am unsure of how to substitute (various sources give me various equivalences for the same ingredients, so that if I decided to use maple syrup instead, for example, the correct ratio is anywhere between 1:1 and 2:1, depending on who you ask). It tastes a bit like a light version of molasses. For this pie in particular, I think you could use maple syrup instead and taste as you go; fine sugar or honey would work, too. I used 5 Tbsp of the agave nectar here.
I couldn’t find the right kind of tofu (I had the Chinese stuff sold in the produce section, not the room-temperature aseptic Japanese tofu), and this affected the final texture. For one thing, using cold tofu made the melted chocolate seize up a bit, and the texture was on the granular end of the smooth spectrum. The Engineer said he could taste the deception. (Actually, he asked me what the trick was, which made me sad because I thought he assumed that my pies are tricked somehow. He said that was not the case, but he could taste there was something healthy about it! It was good, but he’s right, not quite creamy enough. I’ll look for the right kind of tofu before I try this again, or at the very least let it come to room temperature.)
This pie, found on Flickr, is vegan-ish in the sense that it’s incredibly easy to make it vegan – or gluten-free, for that matter. I used a store-bought granola crust which was not vegan, but feel free to buy or make something to suit both your taste and dietary restrictions. You also need to keep an eye on the ingredients in the chocolate you use, of course. I recommend quality chocolate bars (I used some 60% cocoa Ghiradelli) instead of chips, since the latter are made to resist melting. You can of course adjust the ingredients to taste, but this pie is so easy a monkey could do it.
1 pie crust (ideally a cookie crumb crust rather than a pastry crust)
12 oz of quality semi-sweet chocolate (don’t skimp on this, it’s the main taste of the pie; after all, you don’t want to taste the tofu)
3 to 5 Tbsp of agave nectar, maple syrup or honey (to taste)
20 to 24 oz (just under 2 packages; I used 21 oz) of "silken", firm tofu (that is, you want the Japanese stuff typically sold at room temperature in aseptic packages, not the Chinese stuff you find chilled in the produce section)
Melt the chocolate in a double boiler. Once melted, blend the chocolate, agave nectar, and tofu in a food processor. Do this quickly before the chocolate begins to resolidify, which will make blending difficult. Pour into the crust and chill for 2 to 3 hours. Top with a dollop of lactose-free whipped cream when serving, if you wish; you can also add a sprinkle of cinnamon if you are so inclined. Or, you know what I suddenly think would be great? Marshmallow fluff!
I couldn’t find the right kind of tofu (I had the Chinese stuff sold in the produce section, not the room-temperature aseptic Japanese tofu), and this affected the final texture. For one thing, using cold tofu made the melted chocolate seize up a bit, and the texture was on the granular end of the smooth spectrum. The Engineer said he could taste the deception. (Actually, he asked me what the trick was, which made me sad because I thought he assumed that my pies are tricked somehow. He said that was not the case, but he could taste there was something healthy about it! It was good, but he’s right, not quite creamy enough. I’ll look for the right kind of tofu before I try this again, or at the very least let it come to room temperature.)
This pie, found on Flickr, is vegan-ish in the sense that it’s incredibly easy to make it vegan – or gluten-free, for that matter. I used a store-bought granola crust which was not vegan, but feel free to buy or make something to suit both your taste and dietary restrictions. You also need to keep an eye on the ingredients in the chocolate you use, of course. I recommend quality chocolate bars (I used some 60% cocoa Ghiradelli) instead of chips, since the latter are made to resist melting. You can of course adjust the ingredients to taste, but this pie is so easy a monkey could do it.
1 pie crust (ideally a cookie crumb crust rather than a pastry crust)
12 oz of quality semi-sweet chocolate (don’t skimp on this, it’s the main taste of the pie; after all, you don’t want to taste the tofu)
3 to 5 Tbsp of agave nectar, maple syrup or honey (to taste)
20 to 24 oz (just under 2 packages; I used 21 oz) of "silken", firm tofu (that is, you want the Japanese stuff typically sold at room temperature in aseptic packages, not the Chinese stuff you find chilled in the produce section)
Melt the chocolate in a double boiler. Once melted, blend the chocolate, agave nectar, and tofu in a food processor. Do this quickly before the chocolate begins to resolidify, which will make blending difficult. Pour into the crust and chill for 2 to 3 hours. Top with a dollop of lactose-free whipped cream when serving, if you wish; you can also add a sprinkle of cinnamon if you are so inclined. Or, you know what I suddenly think would be great? Marshmallow fluff!
Centerpieces (of the Beast)
This is post # 666 – the number of the Beast. Had I thought of this in advance, I would have prepared a recipe like devil’s food cake or deviled eggs. But the Engineer doesn’t get to his devil’s food cake for another few weeks, and while I have two recipes bookmarked for deviled eggs, I haven’t gotten around to making either one of them (they always seem like so much effort for so little reward). So instead, I’ll make this post short and use the lentils of the Beast as a theme. You see, even though I can’t prove that they made me sick, I was afraid of using the rest of them in any recipe. I also had some yellow split peas that had been sitting in the pantry for... much longer than I care to admit. It turns out that dried lentils, beans and peas do go bad eventually, even though you can’t tell by looking at them, so I decided that both stashes were unsuitable for consumption. I therefore used them in these nifty centerpieces! For all I know, I might even have 666 lentils in there, too. I just used some wide vases, poured my lentils and peas into them, and added a tealight. Depending on the size of your vases, you can add more tealights, and you can use different materials as filling (even sand or pebbles). I like that these are also fall-coloured, so it was nice to have them on the table this past month!
Saturday, November 26, 2011
Couscous au dindon et au cari
Toujours dans la catégorie « recettes que Coup de Pouce n’a pas mises en ligne » adaptées, voici un couscous au dindon et au cari. Je n’avais pas de chutney à la mangue, alors j’ai improvisé en ajoutant un peu de vinaigre de cidre è de la confiture de mangue. Il s’agit d’une recette toute simple et très rapide, parfaite pour utiliser un restant de dinde (ou, tsé, utilisez du poulet). Ça fait aussi un très bon lunch pour le lendemain!
1 c. à soupe d’huile d’olive
½ oignon haché
2 c. à thé de cari
1 ½ tasse de bouillon de dindon ou de poulet réduit en sel
1 ½ tasse de couscous
2 tasses de dindon cuit, coupé en dés (ou de poulet)
2/3 tasses de petits pois surgelés
1 poivron rouge haché
¼ tasse mayonnaise légère
¼ tasse de chutney à la mangue (ou équivalent; voir plus haut)
Dans une grande casserole, chauffer l’huile à feu moyen. Ajouter l’oignon et cuire, en brassant, pendant environ 2 minutes ou jusqu’à ce qu’il ait légèrement ramolli. Ajouter le cari et poursuivre la cuisson pendant une minute. Ajouter le bouillon et le couscous et porter à ébullition. Ajouter le dindon, les petits pois, le poivron, la mayonnaise et le chutney et mélanger délicatement. Couvrir et laisser reposer pendant 5 minutes ou jusqu’à ce que le liquide ait été absorbé. Au moment de servir, défaire les grains de couscous à la fourchette.
1 c. à soupe d’huile d’olive
½ oignon haché
2 c. à thé de cari
1 ½ tasse de bouillon de dindon ou de poulet réduit en sel
1 ½ tasse de couscous
2 tasses de dindon cuit, coupé en dés (ou de poulet)
2/3 tasses de petits pois surgelés
1 poivron rouge haché
¼ tasse mayonnaise légère
¼ tasse de chutney à la mangue (ou équivalent; voir plus haut)
Dans une grande casserole, chauffer l’huile à feu moyen. Ajouter l’oignon et cuire, en brassant, pendant environ 2 minutes ou jusqu’à ce qu’il ait légèrement ramolli. Ajouter le cari et poursuivre la cuisson pendant une minute. Ajouter le bouillon et le couscous et porter à ébullition. Ajouter le dindon, les petits pois, le poivron, la mayonnaise et le chutney et mélanger délicatement. Couvrir et laisser reposer pendant 5 minutes ou jusqu’à ce que le liquide ait été absorbé. Au moment de servir, défaire les grains de couscous à la fourchette.
Lasagne à la courge musquée
Cette délicieuse recette de lasagne végétarienne est vraiment parfaite pour ce temps-ci de l’année. Je l’ai trouvée dans le Coup de Pouce de novembre 2010, mais elle n’est pas sur leur site. C’était la première fois que je faisais une lasagne, et j’ai trouvé que c’était long à faire, mais le rendement est bon (car ça donne quand même 6 à 8 portions). Pour la faire sans lactose, j’ai utilisé de la crème de soya au lieu de la crème normale et du fromage suisse au lieu du mozzarella, avec du lait sans lactose, bien sûr. Et c’est tellement bon, de la courge musquée! La prochaine fois, je vais peut-être finir en passant la lasagne sous le gril, question que le dessus soit un peu doré.
1 courge musquée (3 lb) pelée, épépinée et coupée en tranches de ¼ à ½ pouce d’épaisseur
3 c. à soupe d’huile d’olive
1 c. à thé de sel
¼ tasse de beurre ou de margarine
6 gousses d’ail hachées finement
¼ tasse de farine
4 tasses de lait sans lactose
1 c. à soupe de romarin frais (ou 1 c. à thé de romarin séché)
9 lasagnes cuites
1 1/3 tasse de parmesan râpé finement
1 tasse de crème de soya
1 tasse de fromage suisse sans lactose
Préchauffer le four à 425 °F. Dans un grand plat allant au four et légèrement huilé, mettre les tranches de courge. Ajouter l’huile et la moitié du sel et mélanger pour bien enrober. Étendre uniformément les tranches de courge dans le plat. Cuire à découvert de 25 à 30 minutes ou jusqu’à ce que la courge soit tendre (remuer une fois). Réserver et baisser le four à 375 °F.
Dans une grande casserole, faire fondre le beurre à feu moyen. Ajouter l’ail et cuire, en brassant, pendant 1 minute. Ajouter la farine et le reste du sel et mélanger. Incorporer petit à petit le lait en brassant. Cuire, en brassant, jusqu’à ce que la sauce soit bouillonnante et ait épaissi. Ajouter le romarin et mélanger.
Dans un plat rectangulaire allant au four, d’une capacité de 3 litres / 12 tasses (le mien faisait 8"x13" et c’était juste, mais ça allait), étendre environ 1 tasse de la sauce. Couvrir du tiers des tranches de courge réservées, de 3 lasagnes, du tiers du reste de la sauce et de 1/3 tasse de parmesan. Faire deux autres étages de la même manière. Verser uniformément la crème de soya sur la lasagne. Parsemer du fromage suisse et du reste du parmesan.
Couvrir la lasagne de papier d’aluminium et cuire au four pendant 40 minutes. Retirer le papier d’aluminium et poursuivre la cuisson pendant 10 minutes ou jusqu’à ce que le pourtour soit bouillonnant et que le dessus soit légèrement doré. Laisser reposer pendant 10 minutes avant de servir.
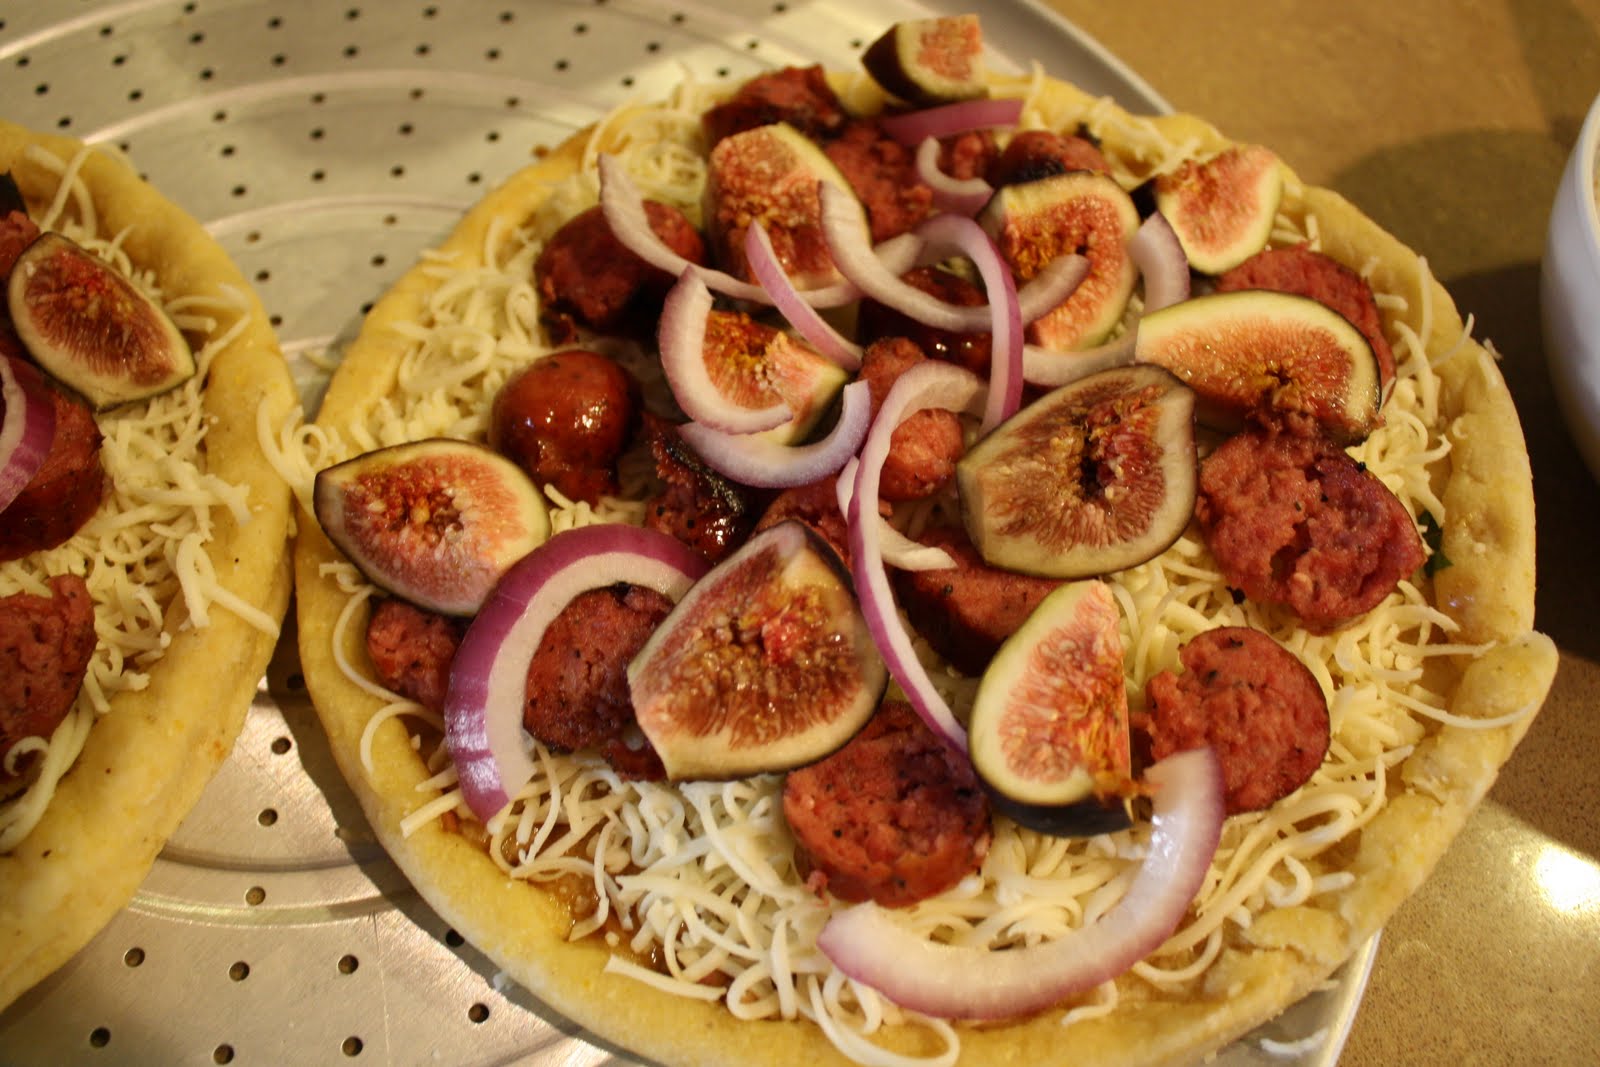
Grilled Sausage and Fig Pizza with Goat Cheese
I made some sausage and fig pizzas with goat cheese that were closely based on these from Bon Appétit. We used store-bought pizza dough, because I was too tired to make some, and we baked it in the oven instead of using the grill, but feel free to go either way. We had smoked beef sausages, but Italian would be a good choice here as well. The mixture of all the different tastes was divine, and the Engineer ended up praising it (after initially poo-pooing the recipe for being too fancy). I used the leftover dressing with a simple arugula salad the next day.
For the pomegranate-cumin dressing (which you can scale down to make a total of 5 Tbsp)
7 ½ Tbsp extra-virgin olive oil
4 ½ Tbsp white balsamic vinegar (I used regular)
3 Tbsp sliced fresh mint leaves
1 ½ Tbsp pomegranate molasses
1 Tbsp ground cumin
6 Tbsp minced shallots
(If you can't find pomegranate molasses at the supermarket or a Middle Eastern store, make your own by boiling 1 cup pomegranate juice until reduced to 3 tablespoons syrup, about 15 minutes.)
Whisk first 5 ingredients in bowl. Mix in shallots; season with salt and pepper.
For the pizza
1 lb purchased fresh pizza dough
5 Tbsp pomegranate-cumin dressing, divided
1 cup coarsely grated Fontina cheese
2 grilled sausages, sliced about 1/3 inch thick
6 fresh figs, quartered
2 thin red onion slices, rings separated
1 package crumbled soft fresh goat cheese
fresh arugula
Prepare barbecue (medium-high heat). Halve dough; roll to 10-inch rounds. Brush tops with some of dressing. Grill pizzas, seasoned side down, until golden on bottom, about 4 minutes. Turn pizzas over. Top with Fontina, sausages, figs, and onions. Drizzle with more dressing. Cover; grill until Fontina melts and pizza is cooked through, about 4 minutes. Top with goat cheese. Grill until goat cheese softens, about 1 minute. Top with arugula and serve.
For the pomegranate-cumin dressing (which you can scale down to make a total of 5 Tbsp)
7 ½ Tbsp extra-virgin olive oil
4 ½ Tbsp white balsamic vinegar (I used regular)
3 Tbsp sliced fresh mint leaves
1 ½ Tbsp pomegranate molasses
1 Tbsp ground cumin
6 Tbsp minced shallots
(If you can't find pomegranate molasses at the supermarket or a Middle Eastern store, make your own by boiling 1 cup pomegranate juice until reduced to 3 tablespoons syrup, about 15 minutes.)
Whisk first 5 ingredients in bowl. Mix in shallots; season with salt and pepper.
For the pizza
1 lb purchased fresh pizza dough
5 Tbsp pomegranate-cumin dressing, divided
1 cup coarsely grated Fontina cheese
2 grilled sausages, sliced about 1/3 inch thick
6 fresh figs, quartered
2 thin red onion slices, rings separated
1 package crumbled soft fresh goat cheese
fresh arugula
Prepare barbecue (medium-high heat). Halve dough; roll to 10-inch rounds. Brush tops with some of dressing. Grill pizzas, seasoned side down, until golden on bottom, about 4 minutes. Turn pizzas over. Top with Fontina, sausages, figs, and onions. Drizzle with more dressing. Cover; grill until Fontina melts and pizza is cooked through, about 4 minutes. Top with goat cheese. Grill until goat cheese softens, about 1 minute. Top with arugula and serve.
Heavenly Hots
I’ve just realized that I’m about a month late in posting recipes here. I wish I had a really good excuse, but I don’t, so I’ll just try to do some catching up. I’m sure you’ll forgive me, though, once you taste these heavenly hots, the lightest, littlest and most delicious pancake to grace my plate in quite a while. They were the best thing ever, really, and didn’t even need syrup. They are made with very little flour, with a very high ratio of eggs-to-batter, and what makes them special is the sour cream they contain. I didn’t actually get the chance to try the recipe with tofu sour cream or strained lactose-free yogurt, because I ended up making them when the Engineer had left about 1 cup of regular sour cream in the fridge after making his weekly recipe (it’s cakes, now). I took some Lactaid for this, but I think they would work with tofu sour cream and a splash of lemon juice to compensate for the acidity. I made a half batch, so about 16 pancakes, and that served both of us for breakfast without any leftovers. However, be warned that these are so good, and so light, that had I made the full recipe, it still would have served both of us without any leftovers!
¼ cup all-purpose flour
3 Tbsp sugar
1 tsp cornstarch
1 tsp baking powder
½ tsp salt
¼ tsp baking soda
2 cups sour cream (or equivalent)
3 large eggs, lightly beaten
½ tsp vanilla
3 Tbsp unsalted butter, margarine or oil
Combine flour, sugar, cornstarch, baking powder, salt and baking soda in a medium bowl.
Whisk sour cream, eggs and vanilla in a large bowl until smooth. Gently fold flour mixture into sour cream mixture until incorporated.
Heat 2 tsp butter in a large non-stick skillet over medium-low heat until butter begins to sizzle. Place five 1Tbsp-scoops of batter in pan, cover, and cook until tops appear dry and bottoms are golden brown, 1 ½ to 2 minutes. Gently flip pancakes and cook, uncovered, until golden brown, about 30 seconds. Keep warm in a 200 °F oven while repeating with remaining batter, using butter as needed. Serve plain, or with your choice of fruit, confectioners’ sugar or syrup.
Friday, November 18, 2011
Honey Pie
I found this recipe in the Spring 2011 issue of Where Women Cook. I ended up combining it with a gluten-free pie crust recipe from Gluten-Free Girl and the Chef, just so I could try my hand at it; of course, you could use your favourite pie crust recipe here. If you try it, though, I strongly recommend weighing the ingredients. I had to make a few changes (vegetable shortening instead of leaf lard; and extra potato starch to compensate for the 1.15 oz of rice flour I was missing), but I think it came out quite well. The pie itself came out much darker than on the picture in the magazine, so I question the temperature and baking time required (and I also had a lot of foam at the surface of the egg mixture after all the whisking, before I baked it). I’m printing it here as in the recipe, but be warned that you might need to adjust it. Despite that, the pie was very good, light, and not too sweet. The Engineer even had seconds!
Gluten-free pie crust
1 ¼ cup (5 oz) almond flour
2/3 cup (2 oz) gluten-free oat flour
2/3 cup (2 oz) tapioca flour
½ cup (2 oz) teff flour
½ cup (3 oz) potato starch
¼ cup (2 oz) sweet rice flour
2 tsp xanthan gum
¼ tsp guar gum
½ tsp kosher salt
5 Tbsp butter, cold (or non-dairy butter sticks, as I did, ideally from the freezer)
4 Tbsp leaf lard, cold (see note below)
1 large egg
6 to 8 Tbsp ice-cold water
In a large bowl, using a whisk, mix the almond flour, oat flour, tapioca flour, teff flour, and potato starch. Add the xanthan and guar gums and the salt. Mix well.
Add small pieces of the ice-cold butter to the flour mixture, not much bigger than a pea. (Or, if you’d like, freeze your butter beforehand, then grate the frozen butter into the flours. Move quickly.) Afterward, add the leaf lard in small portions, of equal size.
Use your hands to scoop up the flours and mix in the fats. Go slowly. Rub your hands together. Feel the fats work into the flours with your fingers. The flours will look sandy when you are done.
Combine the egg with 3 tablespoons of the water and whisk them together.
I used the food processor for this next step, but you could do it by hand, too. Put the dough in the food processor and turn it on. As the dough is running around and around, drizzle in the eggy water. Stop to feel the dough. When the dough feels coherent, you are done. If it still feels dry and not quite there, then drizzle in a bit more water. If you go too far, and the dough begins to feel sticky or wet, sprinkle in a bit of potato starch to dry it out.
Wrap the pie dough in plastic wrap (or in a bowl) and let it rest in the refrigerator for 15 minutes or so. Take it out and roll out the dough between two pieces of parchment paper. Roll it out as thin as you can. Carefully, lift the top piece of parchment paper and turn the dough upside down on the top of a pie plate. Rearrange until it is flat. (This is where the parchment paper is extremely handy: since there is no gluten in this dough, it will NOT hold together in one piece if you try to pick it up from the counter and transfer it to your plate. You need the help of the parchment paper to move the whole thing. If it breaks apart, don’t worry; just piece it back together in the plate by pressing it with your fingertips. Again, there’s no gluten, so you can’t overwork it.) Crimp the edges.
For the honey pie
1 cup lactose-free whole milk
4 large eggs, at room temperature
½ honey
2 tsp vanilla extract
1 pinch of salt
a 9-inch pie crust (recipe of your choice, or store-bought)
fresh nutmeg
Preheat the oven to 400 °F (see note above).
Warm the milk in a small pan over medium heat. Watch carefully, and remove from the heat just before bubbles begin forming on the surface of the milk. Set aside.
In a medium-sized mixing bowl, whisk the eggs, honey, vanilla, and salt. Slowly add in warmed milk, whisking it in a bit at a time before adding more. Once all the milk is added to the egg mixture, whisk thoroughly to ensure all ingredients are fully incorporated.
Pour mixture into piecrust. Grate nutmeg liberally over the surface of the egg mixture. Place the pie on a rimmed baking sheet. Bake for 30 minutes.
Remove from the oven. Allow to cool at least 1 hour before serving.
White Bean Salad
I found the recipe for this white bean salad in the October issue of Real Simple. I thought it was wonderful, though I’ll add directions to soak the red onion next time, as I found it a bit strong. It can be used as a side or, with the optional addition of a hard-boiled egg, as a light meal. In the latter case, it makes about 4 servings.
2 Tbsp red wine vinegar
2 Tbsp olive oil
2 tsp Dijon mustard
kosher salt and black pepper
3 15.5-oz cans cannellini beans, rinsed
1 bell pepper, chopped
½ small red onion, thinly sliced and soaked in water overnight, then drained
2 tsp fresh thyme leaves
In a large bowl, whisk together the vinegar, oil, mustard, ¾ teaspoon salt, and ½ teaspoon black pepper. Stir in the beans, bell pepper, onion, and thyme. Serve cold or at room temperature.
Thursday, November 17, 2011
Strawberry Cardamom Cupcakes
I just love cupcakes. If a cupcake doesn’t make you smile, there might be something wrong with you. Of course, there is such a thing as too many cupcakes; this is where it comes in handy if you can bring cupcakes to work and share them! I’m still a domestic engineer at the moment, but the actual Engineer brought almost four dozen cupcakes to work over three days, so I was happy to try out a recipe to contribute. I made these strawberry cardamom cupcakes from Chow, which were a big hit. I found them awesome myself. The recipe below is for 2 dozen (though I ended up with 22, not 24), and you might have a bit of strawberry sauce left over. Instead of a cream cheese frosting, I tried a vegan alternative found on Must Follow Recipes, and this is actually going to be my go-to “cream cheese” frosting from now on. I threw in a little strawberry sauce for this recipe to make it pretty, but it was darn near perfect as it was!
For the strawberry sauce
¾ lb strawberries, washed, hulled and cut into large dice
½ cup granulated sugar
1 tsp finely grated lemon zest
2 tsp freshly squeezed lemon juice
Place strawberries and sugar in a medium, nonreactive saucepan and stir until strawberries are coated in sugar. Mash with a potato masher until about half of the strawberries are completely smashed but some medium-sized chunks remain.
Place the pan over high heat and cook, stirring occasionally, until bubbles form along the pan’s edge, about 5 minutes. Skim any foam from the surface of the sauce with a spoon and discard. Add lemon zest and juice, stir to combine, and bring to a full boil, cooking until foam coats the surface, about 2 minutes.
Remove from heat and skim and discard the foam. Let the sauce cool to room temperature. Use ¾ cup for the cupcakes, and perhaps up to a few tablespoons for the frosting; if any remains, transfer to a container with a tight-fitting lid and refrigerate for up to 3 weeks. It’s very good with pound cake, waffles or vanilla Tofutti (or vegan peanut butter ice cream).
For the cupcakes (about 2 dozen)
2 cups cake flour
2 tsp baking powder
½ tsp ground cardamom
½ tsp fine salt
12 Tbsp (1 ½ sticks) margarine, or unsalted butter at room temperature
1 ½ cups granulated sugar
2 large egg whites, at room temperature
2 large eggs, at room temperature
¾ cup lactose-free whole milk, at room temperature
2 tsp vanilla extract
¾ cup strawberry sauce (see above)
Heat the oven to 350 °F and arrange a rack in the middle. Line 2 (12-well) muffin pans with paper cupcake liners; set aside.
Place the flour, baking powder, cardamom, and salt in a medium bowl and whisk to aerate and break up any lumps; set aside.
Place the butter in the bowl of a stand mixer fitted with a paddle attachment and beat on medium-high speed until light in color, about 3 minutes. Add the sugar and continue beating until the mixture is light in color and airy, about 3 minutes.
Stop the mixer and scrape down the paddle and the sides of the bowl. On medium speed, add the egg whites 1 at a time, beating well after each addition. Next add the eggs 1 at a time, beating well after each addition. Scrape down the sides of the bowl.
On low speed, slowly add the milk and vanilla and mix until combined (the mixture will look curdled). Add the reserved flour mixture and mix until just combined, about 15 seconds.
Fill each muffin well about three-quarters full. Using a spoon, create a small indentation in the batter by slightly spreading it from the middle out toward the edges. Measure 1 heaping teaspoon of the strawberry sauce and place the back of the teaspoon inside the indentation. Rotate the spoon, letting the sauce slide into the indentation. Repeat in each well.
Bake the cupcakes until a toothpick inserted in the center comes out clean, about 18 to 20 minutes. Set the pans on wire racks and let cool for 5 minutes. Remove the cupcakes from the pans and let cool completely on the wire racks before frosting.
For the frosting
½ cup Tofutti Better Than Cream Cheese, softened
½ cup dairy-free margarine, softened
2 tsp vanilla extract
3 ½ to 4 cups confectioners’ sugar (the 1 lb package, basically)
a few tablespoons of strawberry sauce (optional; see above) OR a splash of lemon juice
Cream margarine, cream cheese, and vanilla extract together in a large bowl. Slowly mix the confectioners’ sugar into the creamed mixture until the desired consistency/taste and until smooth. Add a few tablespoons of strawberry sauce for color, if desired. You could go with a splash of lemon juice instead, which should help inch you closer to the tart flavor of real cream cheese. Enjoy!
Juicing
I had mentioned already that I was going to get a juicer, and now it’s done. Before giving you a recipe, let me walk you through my decision process regarding the model I chose, and I’ll tell you what I think now that I have it.
I weighed the pros and cons of centrifugal juicers vs. masticating juicers. Centrifugal juicers first grate the fruit (or vegetable) into a pulp, then use centrifugal force to extract the juice from the pulp. It tends to be faster than a masticating juicer, but doesn’t extract as much juice – and doesn’t do well at all with leafy or grassy vegetables. The juice is also more aerated, which means that it has to be consumed immediately, otherwise it oxidizes and loses its nutritional benefits (plus, the heat destroys some beneficial enzymes in the juice). But centrifugal juicers are also more affordable than masticating ones, which was really the central issue for me.
On The Kitchn, I had read two reviews, for the Breville Juice Fountain Compact, a centrifugal juicer, and the Hurom Slow Juicer, a masticating juicer, along with comments from users (with these brands or others) regarding what they like and dislike about their juicers. I knew that my juicer should have a small footprint, it shouldn’t leave too much moisture in the pulp, and it had to be relatively easy to clean.
While the Hurom Slow Juicer looked like it had it all, it was a big initial investment (about $360). The Hamilton Beach Big Mouth Pro Juice Extractor, though, gives you more bang for your buck ($80), and seems like a good choice for beginners. It was recommended by Bon Appétit and was a Consumer Reports Best Buy. Reviewers call it a workhorse. Since this is my first juicer and I’m not quite sure how much of a commitment I’ll make to it in the long run, and I won’t use it every day even in the short run, I decided to go with the inexpensive version. If I decide that I really like juicing and that I want to keep doing it, I might upgrade to the Hurom eventually, but I feel like the Hamilton Beach Big Mouth Pro Juice Extractor is a good fit for me at this point.
I’ve had it for several months already, and I use it a few times a month. I find that it’s great to make fresh juice you couldn’t get in a grocery store, and also to use up extra fruit you have on hand (apples, plums and cherries? don’t mind if I do!). The model I have doesn’t separate the foam from the juice, and I do have to stir the juice if I leave it unattended too long to get it homogenized again, but those are minor annoyances. It really isn’t hard to clean (though I use a different brush than the one it comes with, mainly because it was white and stained easily). It’s sometimes a little hard to dose quantities if I want to end up with a single serving, but I’m getting the hang of it.
The juice I get with the juicer seems to me more filling than store-bought juice, though not as filling as a smoothie (since I’m not using the pulp with the juicer). I like making some for breakfast and drinking it alongside a bowl of granola or a slice of banana bread. I don’t end up with too much pulp, though if I did, there are always ways to use it in the kitchen! I won’t give too many juice recipes here, because I’m well aware that most people don’t have juicers. There is one that I wanted to share, though, as it’s the first one I made and it was surprisingly good. I found it on The Kind Life. I was afraid it wouldn’t be sweet enough at first, because it only calls for an apple to sweeten it (and I’m not a fan of savoury juices). It was perfect, however, and I’ve made it several times since. All ingredients keep well in the fridge, too, so it’s easy to stock up so you can make this blend whenever you feel like it. The recipe below makes about one serving, though obviously you can alter it to suit your taste.
Carrot-Apple-Lemon-Ginger Cocktail
4 or 5 large carrots
1 large apple (such as Fuji)
½ lemon (peelded, for my juicer)
a 1-inch piece of ginger
Go ahead and juice. Enjoy!
I weighed the pros and cons of centrifugal juicers vs. masticating juicers. Centrifugal juicers first grate the fruit (or vegetable) into a pulp, then use centrifugal force to extract the juice from the pulp. It tends to be faster than a masticating juicer, but doesn’t extract as much juice – and doesn’t do well at all with leafy or grassy vegetables. The juice is also more aerated, which means that it has to be consumed immediately, otherwise it oxidizes and loses its nutritional benefits (plus, the heat destroys some beneficial enzymes in the juice). But centrifugal juicers are also more affordable than masticating ones, which was really the central issue for me.
On The Kitchn, I had read two reviews, for the Breville Juice Fountain Compact, a centrifugal juicer, and the Hurom Slow Juicer, a masticating juicer, along with comments from users (with these brands or others) regarding what they like and dislike about their juicers. I knew that my juicer should have a small footprint, it shouldn’t leave too much moisture in the pulp, and it had to be relatively easy to clean.
While the Hurom Slow Juicer looked like it had it all, it was a big initial investment (about $360). The Hamilton Beach Big Mouth Pro Juice Extractor, though, gives you more bang for your buck ($80), and seems like a good choice for beginners. It was recommended by Bon Appétit and was a Consumer Reports Best Buy. Reviewers call it a workhorse. Since this is my first juicer and I’m not quite sure how much of a commitment I’ll make to it in the long run, and I won’t use it every day even in the short run, I decided to go with the inexpensive version. If I decide that I really like juicing and that I want to keep doing it, I might upgrade to the Hurom eventually, but I feel like the Hamilton Beach Big Mouth Pro Juice Extractor is a good fit for me at this point.
I’ve had it for several months already, and I use it a few times a month. I find that it’s great to make fresh juice you couldn’t get in a grocery store, and also to use up extra fruit you have on hand (apples, plums and cherries? don’t mind if I do!). The model I have doesn’t separate the foam from the juice, and I do have to stir the juice if I leave it unattended too long to get it homogenized again, but those are minor annoyances. It really isn’t hard to clean (though I use a different brush than the one it comes with, mainly because it was white and stained easily). It’s sometimes a little hard to dose quantities if I want to end up with a single serving, but I’m getting the hang of it.
The juice I get with the juicer seems to me more filling than store-bought juice, though not as filling as a smoothie (since I’m not using the pulp with the juicer). I like making some for breakfast and drinking it alongside a bowl of granola or a slice of banana bread. I don’t end up with too much pulp, though if I did, there are always ways to use it in the kitchen! I won’t give too many juice recipes here, because I’m well aware that most people don’t have juicers. There is one that I wanted to share, though, as it’s the first one I made and it was surprisingly good. I found it on The Kind Life. I was afraid it wouldn’t be sweet enough at first, because it only calls for an apple to sweeten it (and I’m not a fan of savoury juices). It was perfect, however, and I’ve made it several times since. All ingredients keep well in the fridge, too, so it’s easy to stock up so you can make this blend whenever you feel like it. The recipe below makes about one serving, though obviously you can alter it to suit your taste.
Carrot-Apple-Lemon-Ginger Cocktail
4 or 5 large carrots
1 large apple (such as Fuji)
½ lemon (peelded, for my juicer)
a 1-inch piece of ginger
Go ahead and juice. Enjoy!
Vegan Peanut Butter Ice Cream
This recipe is from The Vegan Scoop, which is full of awesome recipes for frozen desserts (I’ve barely scratched the surface). I really liked this ice cream, though after a few bites, I found it a bit one-dimensional. Maybe I’ll try mixing it with another flavour (the book suggests jelly, banana, brownies, flaxseed and even cucumber as possibilities!). I actually did serve it with a homemade strawberry sauce once, but the little angel on my right shoulder made me resist topping it with melted Nutella.
2 cups soymilk
¾ cup peanut butter
½ cup brown sugar
1 Tbsp vanilla extract
In a medium-size saucepan, combine soymilk, peanut butter, and brown sugar. Bring to a boil, then remove from heat. Add vanilla extract.
Refrigerate until mixture is chilled, approximately 2 to 3 hours. Freeze according to your ice cream maker’s instructions.
Subscribe to:
Posts (Atom)